Ativa DMC-5000C User manual

080806-6OD

Table of Contents
Thank you for your purchase. The Auto Feeder Paper Shredder series is a powerful confetti-cut
shredder designed to shred high quantities of paper sheets automatically. With its contemporary
design, this shredder also suits any office decor. Equipped with a powerful thermally protected
motor, these models shred up to 550 pages of 8.5” x 11” standard paper or 250 pages of 8.5”
x14” legal size paper, sheet by sheet, into 2 mm x 15 mm confetti particles. Durable, hardened-
steel cutters accept staples and small paper clips.
The Auto Feeder Paper Shredder also features an electronic auto start/stop function for quick,
easy shredder operation and is designed to shut off automatically and alert operator with
troubleshooting LCD when a jam occurs, wastebasket is full, open door, overheated motor or
any maintenance information.
Cabinet door offers convenient holder for oil and manual while the 80 Liter waste basket
pulls out for easy waste disposal.
1.0 Safety Instructions
2.0 Parts Identification
3.0 Technical Specifications
4.0 Installation
5.0 Caution
6.0 Operation
6.1 Install waste box for shredded material
6.2 Switching equipment “ON”
6.3 Forward / Reverse operation to clear paper jam
6.4 Door Locking
6.4.1 Locking
6.4.2 Unlocking
6.4.3 Cancel Password
6.4.4 Switching equipment “OFF”
7.0 LCD Operation
8.0 Warranty and Product Registration
2

1.0 Safety Instructions
1. Read all instructions before use.
2. Save these instructions for later use.
3.Follow all warnings and instructions marked on the product.
4. Unplug this product from wall outlet before cleaning. Clean with a damp cloth using a mild
soap and water solution. Do not use abrasives or petroleum-based cleaners.
5. Place this product as close as possible to power source for quick and easy unplugging.
6. The device is equipped with a power switch. Always turn off the power switch before
removing it from the cabinet. For higher safety unplug the power cord. Always disconnect
the power cord before opening the case.
7. Do not use this product near water.
8. This product should never be placed near a radiator or heat source.
9. Operate from the type of power source indicated on the marking label. If you are not sure
of the type of power available, consult your dealer or local electricity board.
10. Do not allow anything to rest on the power cord. Do not place this product where people
may walk on the cord.
11. If an extension cord is used with this product, make sure that the total of the ampere
ratings on the products plugged into the extension cord do not exceed the extension cord
ampererating.
12. Do not attempt to service this product yourself as opening or removing covers may
expose you to dangerous live parts or other risks.
13. Unplug this product and refer servicing to qualified technician:
•When the power cord or plug is damaged or frayed.
•If liquid has been spilled on the product.
•If the product has been exposed to rain.
•If the product does not operate normally when the operating instructions are followed.
•If the product has been dropped or casing has been damaged.
14. Keep out of the reach of children.
15. This shredder should be operated only with an operator in attendance.
16. Do not use flammable synthetic oil, petroleum-based products or aerosol of any kind on
or near shredder at any time.
17. Keep the receptacle empty so that the shredder output is not impeded.
18. The machine should only be fed with paper. Shredding other types of materials can cause
injuries or may damage the shredder.
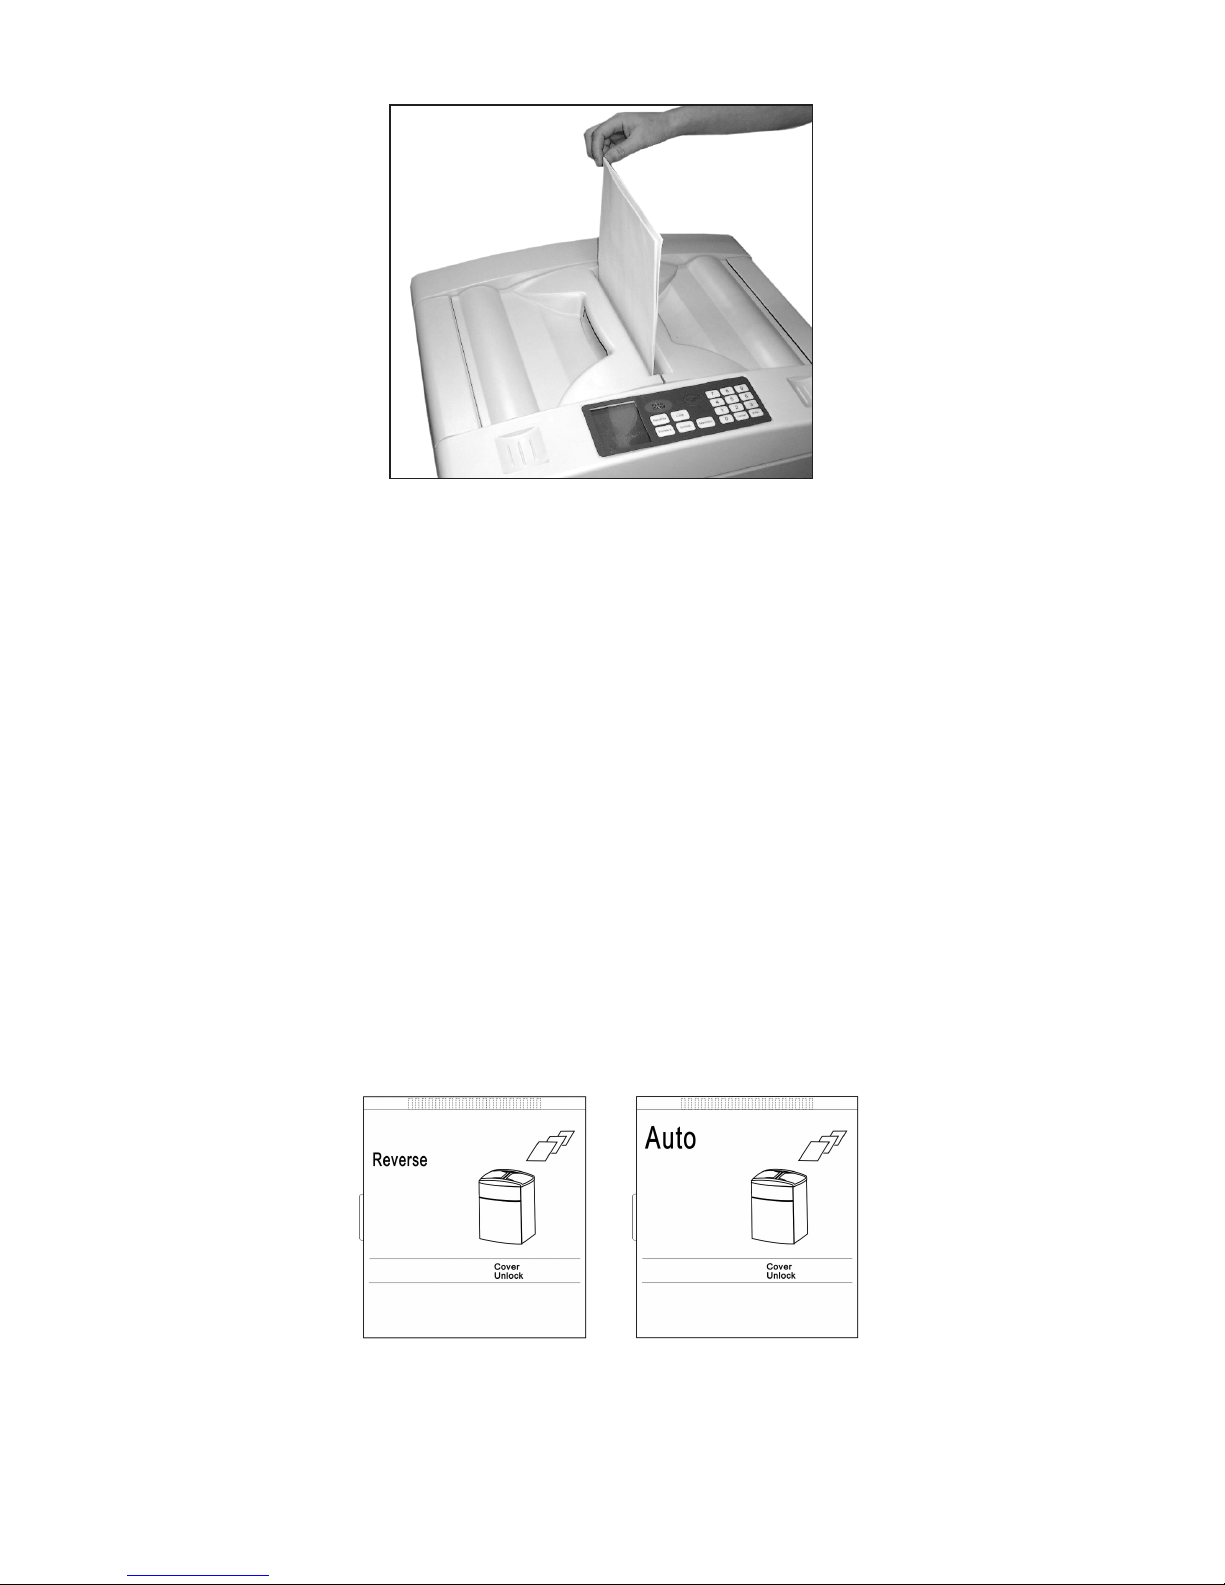
19. Do not place fingers too close to the feed slot as serious injury may occur.
20. Keep all loose articles of clothing, ties, jewelry, long hair or other loose objects away from
opening, injury may result.
Warning: Danger due to moving parts! Keep away fingers and other body parts from openings.
For moreinformation about ID theft protection and to
register your product, please go to www.ShredCare.com.
3

4
2.0 Parts Identification
1-LCD Panel (Figure 1)
2-Soft push button control panel
•Start
•Stop
•Reverse
•Forward
•Maintain
•Lock
•Unlock
•Security key no. with Enter and Cancel
3-Doors for paper tray
4-Rating plate
5-Power ON/OFF switch
6-Power socket
7-Cabinet
8-Cabinet access door
9-Paper feeding opening
10-Waste basket
Figure 2
Figure 1
LCD Panel
3
1
2
4
5, 6
7
8
10
9
Soft push button
control panel

5
3.0 Technical Specifications
4.0 Installation
•Refer to set-up instructions printed on carton box for proper assembly.
•Operate this product only from the type of power source indicated on the marking label.
•Install the paper shredder so that the plug is easily accessible.
•Shredder must be operated only in upright position.
• Set up paper shredder so that the ventilation slots areunobstructed. Toensure
sufficient ventilation of the shredder a minimum distance of 5cm to the wall or to
furniture must be maintained.
5.0 Caution
Never inserthand, fingers or any foreign objects into the feed opening. Serious injury
may result.
Keep all loose articles of clothing, ties, jewelry, long hair or other loose objects away
from feed opening. Injury may result.
Always turnoff and unplug the machine before moving, servicing, cleaning or any
other conduct other than normal operation. Serious injury may result.
Model DMC- 5000C
Cutting style Confetti Particle Cut
Shred Size 2 mm x 15mm
Sheet capacity 500-sheet autofeed
6-sheet manual feed
Speed 64 mm/s
Intake throat width 240 mm
Motor power 0.4 hp
Voltage 120V / 60Hz
Dimension (L x W x H) 545 x 430 x 910 mm
Weight 52 kg
Receptacle volume 83 liters
Noise level In idle < 60dB(A)

6
6.0 Operation
Read operating instructions before putting shredder into operation
Connect power cord to the power socket at the backside of the machine.
Connect the power cord to any standard 120V AC, 60Hz outlet.
6.1 Install wastebasket for shredded material
•Open cabinet door and pull the wastebasket completely out of the cabinet.
•Put plastic waste bag in basket (3 sample bags provided). Allow bag edges to overhang.
•Slide the wastebasket into the cabinet and shut the cabinet door
•Store this operation manual in slot inside cabinet door
6.2 Switching equipment “ON”
•Turn on the power switch at right side of the machine. The unit is powered.
•The LCD panel indicates machine is ready for shredding operation. (Figure 3)
Note: The display indication is always
shown for unlocked paper tray doors.
Open doors
Place maximum of 500 sheets of
paper into the paper tray.
Close doors
Press “START” button. The machine
starts shredding sheet by sheet.
Figure 3
When the shredding of all paper sheets inside the tray has been completed,
the machine automatically stops.
Depending on the quantity of paper the shredding operation can be performed
either by auto or manual feeding:
1. Auto feed at high quantity of paper (max 500 sheets)

7
2. Manual feed at low quantity of paper (max 6 sheets)
The shredding process is started by photocells in the paper feed opening. Insert a
maximum of 6 sheets of paper into the paper feed opening; shredding begins
automatically.When shredding is complete, the cutting system automatically stops
after approximately 3 seconds.
6.3 Forward/Reverse operation to clear paper jam
If paper jam occurs press and hold the “Reverse” button to back paper out of the
paper entry. Try pulling gently on the paper to remove it from the shredder. Alternate
between forward and reverse, as needed, until the jam clears.
Caution: The shredder may be damaged if you alternate too rapidly between
forward and reverse.
Unplug shredder, open cabinet door and remove wastebasket. Carefully clear any paper
shreds that have collected on underside of paper entry. Use care when removing paper
shreds.
Caution: The machine has exposed blades on underside of paper entry.
Use care when removing shredded paper.
LCD at reverse operation LCD at forward operation

8
6.4 Door Locking
The doors can be locked to avoid confidential papers from being taken out of the
paper tray by other people.
6.4.1. Locking
When “Lock” button is pressed, the following appears on LCD:
6.4.2. Unlocking
When “Unlock” button is pressed, the following appears on LCD:
6.4.3. Cancel Password
If the locking or unlocking process needs to be interrupted, press the “Cancel”
button. The locking or unlocking process will be cancelled.
6.4.4. Switching equipment “OFF”
Press “STOP” button. The machine stops shredding, however, it is still
powered. Turn off the power switch at right side of the equipment.
The machine is powered off.
On display, “Enter Password” is flashing. Enter 4-digit password.
Be sure to remember the password. The code is displayed. Press
“Enter” button.
On display the indication “Cover Unlock” changes to “Cover Lock”.
During the locking process “Cover Lock” in the display is flashing.
Both doors will be locked mechanically. The locking process takes
approximately 3 seconds. After the locking process is completed,
the flashing of “Cover Lock” on display changes into steady.
If the locking process cannot be completed within 7 seconds
the entire locking process is cancelled.
On display, “Enter Password” is flashing. Enter the 4-digit
password. The code is displayed. Press “Enter” button.
On display the indication “Cover Lock” changes to
“Cover Unlock”.
During the unlocking process “Cover Unlock” flashes in the
display. Both doors will be unlocked mechanically. The
unlocking process takes approximately 3 seconds. After the
unlocking process is completed, the flashing of “Cover
Unlock” on display changes into steady.
If the input of any
password digits is wrong
during the Locking or
Unlocking process, press
“Lock” or “Unlock”
button. The passwordis
reset again.

9
7.0 LCD Operation
Powering ON
The master power switch is located on the right side of
the cabinet. When the switch is turned on, the LCD
shows AUTO and the machine enters into AUTO mode.
In the Auto mode, the shredder stands ready to shred
paper either by auto or manual feed.
START Mode
When pressing the Start button, the machine starts and
paper is fed automatically sheet by sheet into the
shredder. The LCD shows AUTO with paper feeding.
STOP Mode
When pressing the Stop button, the machine stops.
The LCD displays flashing STOP character.
REVERSE Mode (In Auto Mode)
When pressing the Reverse button during Auto Mode
operation, the LCD shows Reverse and the motor enters
the Reverse mode. Press and hold the Reverse button in
order to keep the motor running in reverse. When the
Reverse button is released, the machine returns to Auto
mode and the display will show Auto.
REVERSE Mode (In Stop Mode)
When pressing the Reverse button during Stop Mode,
the LCD shows Reverse and the motor enters the
Reverse mode. Press and hold the Reverse button in
order to keep the motor running in reverse. When the
Reverse button is released, the machine returns to Stop
Mode and the LCD displays flashing Stop character.

10
FORWARD Mode
When pressing the Forward button during Stop mode,
the LCD displays Auto and the motor enters the
Forward mode. Press and hold the Forward button in
order to keep the motor running in forward. When the
Forward button is released, the machine returns to Stop
mode and the LCD displays flashing Stop character.
OVERLOAD Mode
When the shredder overloads during shredding, the
motor will stop running and sound alert. The LCD will
show Overload and will flash the Overload icon.
Pressing the Reverse button will start the motor
reversing and the LCD will show Reverse. When the
overloaded paper is removed from the throat, the
motor will start running for three seconds to clear any
remaining paper particles. After the motor stops, the
LCD will show Auto.
If user cannot remove the paper from the throat by
pressing the Reverse button, tear offthe remaining
paper and press Forward button to start shredding
again and clean out the paper. Repeat the above
process until the paper is completely removed and the
LCD displays Auto.
DOOR OPEN Mode
When the cabinet access door (#8 in Figure2) is opened
while shredding, the motor will stop immediately.The
LCD shows Door Open and will flash cabinet access
door open symbol and sound alert. To resume normal
function, the door must be closed. The LCD will show
Auto again. The machine must restartagain.
PAPER TRAY DOOR OPEN Mode
When the paper tray doors (#3 in Figure 2) are opened
while shredding, the motor will stop immediately. The
LCD shows Door Open and will flash paper tray door
open symbol and sound alert. To resume normal
function, the doors must be closed. The LCD will show
AUTO again.

11
OVERHEAT Mode
If the shredder overheats, the LCD shows Overheat and
will flash Overheat symbol. All functions will stop. When
the shredder overheats, user may press Stop button to
place the shredder in Stand by mode. The shredder will
not resume normal functioning until the temperature of
the motor cools down to a safe temperature and LCD
shows Auto.
MAINTAINENCE
After approximately shredding of 500 sheets of paper,
the LCD will show the character Maintain and flash
maintain symbol. This indicates that the shredding
blades need to be lubricated using an approved
shredder lubricant. Only shredder lubricant sheets or
bottled lubricant designed specifically for shredders
should be used. Follow the instructions provided with
the shredder lubricant. NEVER USE AN AEROSOL
LUBRICANT,or any lubricant that is flammable. Refer to
the warnings provided in your shredder manual.
The shredder will continue to operate in a normal
manner while the Maintain icon is flashing. After
applying lubricant to the cutting blades, the Maintain
icon can be deactivated by pressing and holding the
maintain button for approximately 7 seconds. The LCD
will clear the word Maintain, and the internal counter
on the shredder will be reset to zero.
BIN FULL Mode
If the bin is full, the motor will stop and sound alert.
LCD shows the character Bin Full and flash bin full
symbol. All shredder functions will stop. If the cabinet
door is open, the LCD will show the character Door
Open and flash door open symbol. After the bin is
emptied, placed back into cabinet and the door is
closed, the LCD will show AUTO and resume normal
functioning. The machine must restartagain.

12
8.0 Warranty and Product Registration
The manufacturer warrants the machine for a limited time to be free from
defects in material and workmanship. If any part is found to be defective
during the warrant period, your sole and exclusive remedy will be repair or
replacement, at the manufacturer’s option and expense, of the defective part
except for the postage that is the responsibility of the consumer to return the
machine to the manufacturer.
This warranty is valid for the original consumer only with original proof of
purchase and is not transferable. This warranty does not apply in cases of
abuse, mishandling or unauthorized repair. ANY IMPLIED WARRANTY,
INCLUDING THAT OF MERCHANTABILITY OR FITNESS FOR A PARTICULAR
PURPOSE, IS HEREBY LIMITED IN DURATION TO THE APPROPRIATE WARRANTY
PERIOD SET FORTH ABOVE. In no event shall the manufacturer be liable for
any consequential or incidental damages attributable to this product.
This warranty gives you specific legal rights. You may have other legal rights
that vary.
Repairs must be performed by the manufacturer’s authorized technician.
For more details or to obtain service under this warranty, please contact us
at 866-707-9502.
Please retain original proof of purchase and to ensure that your product is
recorded and warranty information received, register your product at
www.ShredCare.com today.
ReturnInstructions
1. Call 866-707-9502 for a Return Authorization Number (RA#).
2. Pack the product in its original carton, or equivalent, and clearly mark
the box with the RA#.
3. Enclose a copy of the proof of purchase showing original purchase date.
4. Enclose a note describing the difficulty you have had with product.
Be sure to include your complete name, address and phone number.
5. Mail the above prepaid to the address provided by the manufacturer
with the RA #.
Call first for approval.
Note: Consumers must call 866-707-9502 to obtain a RA# in order to return
adefective product.

13

14
Table des matières
Nous vous remercions pour votre achat. Cette robuste déchiqueteuse à coupe confetti de la
gamme alimentation automatique est conçue pour déchiqueter automatiquement de grandes
quantités de feuilles de papier. Dotée de lignes contemporaines, elle s’agence à tout décor de
bureau. Équipés d’un puissant moteur protégé thermiquement, ces modèles déchiquettent
jusqu’à 550 feuilles de taille standard de 8 _ x 11 po ou 250 feuilles grand format de 8 _ x
14 po, feuille par feuille, en particules de 2 mm x 15 mm. Ses couteaux durables en acier
trempé peuvent déchiqueter agrafes et petits trombones.
La déchiqueteuse de documents à alimentation automatique comprend également une
fonction de marche/arrêt automatique électronique pour un fonctionnement facile et rapide;
elle est conçue pour s’arrêter automatiquement et aviser l’utilisateur, par son afficheur ACL,
s’il se produit un entassement du papier, si la corbeille est pleine, la porte est ouverte, le
moteur surchauffe et lui communiquer tout autre renseignement au sujet de l’entretien.
La porte du boîtier comprend un rangement pratique pour le lubrifiant et le manuel tandis
que la corbeille de 80 litres se retire pour être vidée facilement.
1.0 Consignes de sécurité
2.0 Identification des pièces
3.0 Spécifications techniques
4.0 Installation
5.0 Avertissement
6.0 Fonctionnement
6.1 Installation de la corbeille pour le papier déchiqueté
6.2 Mise en marche de l’appareil
6.3 Fonction de marche avant/arrière pour dégager le papier coincé
6.4 Verrouillage de la porte
6.4.1 Verrouillage
6.4.2 Déverrouillage
6.4.3 Annulation du mot de passe
6.4.4 Mise hors tension de l’appareil
7.0 Fonctionnement de l’afficheur ACL
8.0 Garantie et enregistrement du produit

15
1.0 Consignes de sécurité
1. Lisez toutes les instructions avant l’utilisation.
2. Conservez ces instructions pour référence future.
3. Respectez tous les avertissements et toutes les instructions inscrits sur cet appareil.
4.Débranchez cet appareil de la prise murale avant de le nettoyer. Nettoyez avec un chiffon
et une solution d’eau et de savon doux. N’utilisez pas de nettoyants abrasifs ou à base
de pétrole.
5. Placez cet appareil aussi près que possible de la source d’alimentation pour pouvoir
le débrancher rapidement et facilement.
6. Cet appareil est muni d’un interrupteur d’alimentation. Mettez toujours l’appareil hors
tension avant de la retirer du boîtier. Pour encore plus de sécurité, débranchez le cordon
d’alimentation. Débranchez toujours le cordon d’alimentation avant d’ouvrir le boîtier.
7. N’utilisez pas cet appareil à proximité de l'eau.
8. Cet appareil ne devrait jamais être placé à proximité d’un radiateur ou d’une source
de chaleur.
9. Faites-le fonctionner selon le type de source d’alimentation indiquée sur l’étiquette. Si vous
n’êtes pas certain du type d’alimentation disponible, consultez votre distributeur ou
la régie de l’électricité de votre localité.
10. Ne laissez aucun objet appuyer sur le cordon d’alimentation. Ne placez pas cet appareil
dans un endroit où les gens pourraient marcher sur le cordon.
11. Si une rallonge électrique est utilisée avec cet appareil, assurez-vous que l’intensité
nominale totale des appareils branchés dans la rallonge n’excède pas l’intensité nominale
de la rallonge électrique.
12. Ne tentez pas de réparer vous-même cet appareil, car si vous ouvrez ou retirez
les couvercles, vous pourriez être exposé à des parties sous tension ou à d’autres risques.
13. Débranchez cet appareil et confiez les réparations à un technicien qualifié :
•Lorsque le cordon d’alimentation ou la fiche sont endommagés ou effilochés.
•Si un liquide a été renversé sur l’appareil.
• Si l’appareil a été exposé à la pluie.
• Si l’appareil ne fonctionne pas normalement en suivant le mode d’emploi.
• Si l’appareil a été échappé ou si le boîtier est endommagé.
14. Tenez hors de la portée des enfants.
15. Cette déchiqueteuse devrait être utilisée seulement sous la supervision de l’utilisateur.
16. N’utilisez pas, en aucun temps, d’huile synthétique inflammable, de produits à base de
pétrole ou n’importe quels types d’aérosols sur ou à proximité de la déchiqueteuse.
17. Videz la corbeille pour ne pas nuireàla sortie du papier déchiqueté.
18. Cet appareil ne devrait être alimenté qu’avec du papier. Le déchiquetage d’autres types
de matériaux pourrait entraîner des blessures ou endommager la déchiqueteuse.
19. Ne placez pas les doigts trop près de la fente d’alimentation, car ceci pourrait causer des
blessures graves.
20. Tenez éloigné de l’ouverture tous vêtements amples, cravates, bijoux, cheveux longs ou
autres objets non attachés, car ceci pourrait causer des blessures.
Avertissement: Danger causé par des pièces mobiles! Tenez les doigts et les autres parties
du corps éloignés des ouvertures.
Pour obtenir de plus amples renseignements concernant
la protection contre l’usurpation d’identité et pour
enregistrer votre appareil, veuillez vous rendre sur le
site www.ShredCare.com.

16
2.0 Identification des pièces
1- Panneau à afficheur ACL (le schéma 1)
2- Panneau de contrôle avec boutons
de commande souples
•Marche (Start)
•Arrêt (Stop)
•Marche arrière (Reverse)
•Marche avant (Forward)
•Entretien (Maintain)
•Verrouillage (Lock)
•Déverrouillage (Unlock)
•Code de sécurité avec Entrée (Enter) et Annulation (Cancel)
3- Portes pour plateau d’alimentation
4- Plaque signalétique
5-.interrupteur de marche/arrêt (On/Off)
6- Connecteur du cordon
7- Boîtier
8- Porte d’accès du boîtier
9- Ouverture pour l’alimentation
du papier
10- Corbeille
Le schéma 2
Le schéma 1
Panneau à afficheur ACL
3
1
2
4
5, 6
7
8
10
9
Panneau de contrôle
avec boutons de
commande souples

17
3.0 Spécifications Techniques
4.0 Installation
•Référez-vous aux instructions d'installation imprimées sur la boîte de carton pour
l'assemblée appropriée.
•Faites fonctionner cet appareil seulement selon le type de source d’alimentation indiqué
sur l’étiquette.
•Installez la déchiqueteuse de façon à ce que la fiche soit facilement accessible.
•La déchiqueteuse doit être utilisée en position verticale.
•Installez la déchiqueteuse de façon à ce que les fentes d’aération ne soient pas
obstruées. Pour assurer une aération adéquate de la déchiqueteuse, une distance
minimale de 5 cm entrele mur ou les meubles et celle-ci doit être conservée.
5.0 Avertissement
N’insérez jamais la main, les doigts ou tout autre corps étranger dans l’ouverture
d’alimentation. Vous pourriez subir des blessures graves.
Tenez éloignés de l’ouverture d’alimentation tous les vêtements amples, les cravates,
les bijoux, les cheveux longs ou autres objets non attachés. Vous pourriez subir des
blessures.
Mettez toujours l’appareil hors tension et débranchez-le avant de le déplacer,
d’effectuer l’entretien, de le nettoyer ou d’effectuer toute autre action que le
fonctionnement normal. Vous pourriez subir des blessures graves.
Modèle DMC- 5000C
Type de coupe Coupe en particules confetti
Dimension du papier déchiqueté 2 mm x 15 mm
Capacité de feuilles de papier Alimentation automatique de 500 feuilles
Alimentation manuelle de 6 feuilles
Vitesse 64 mm/s
Largeur de l’ouverture d’alimentation 240 mm
Puissance du moteur 0,4 ch
Tension 120 V / 60 Hz
Dimension (longueur x largeur x hauteur) 545 x 430 x 910 mm
Poids 52 kg
Volume du contenant 83 litres
Niveau sonore en mode inactif < 60 dB(A)

18
6.0 Fonctionnement
Lisez le mode d’emploi avant de faire fonctionner la déchiqueteuse.
Branchez le cordon d’alimentation dans le connecteur situé à l’arrière de l’appareil.
Branchez le cordon d’alimentation dans n’importe quelle prise de courant alternatif
standard de 120 volts, 60 Hz.
6.1 Installation de la corbeille pour le papier déchiqueté
•Ouvrez la porte du boîtier et retirez complètement la corbeille du boîtier.
•Placez un sac en plastique dans la corbeille (3 échantillons de sac compris).
Laissez les bords du sac dépasser de la corbeille.
•Glissez la corbeille dans le boîtier et fermez la porte du boîtier.
•Rangez ce mode d’emploi à l’intérieur de la porte du boîtier.
6.2 Mise en marche de l’appareil
•Placez l'interrupteur, situé sur le côté droit de l’appareil, en position marche (On).
L’appareil est sous tension.
•Lepanneau à afficheur ACL indique que l’appareil est prêt à déchiqueter. (Le schéma 3)
Remarque: L’affichage indique toujours lorsque
les portes du plateau d’alimentation déverrouillées.
Ouvrez les portes.
Placez un maximum de 500 feuilles de
papier dans le plateau d’alimentation.
Fermez les portes.
Appuyez sur le bouton Démarrer (Start).
L’appareil commence à déchiqueter les
feuilles, une à la fois.
Le schéma 3
Lorsque le déchiquetage de tout le papier contenu dans le plateau est terminé, l’appareil
s’arrête automatiquement.
Selon la quantité de papier à déchiqueter,le déchiquetage peut être effectué en mode
d’alimentation manuelle ou automatique.
1. Utilisez le mode d’alimentation automatique pour une grande quantité de papier.

19
2. Utilisez le mode d’alimentation manuel pour une petite quantité
de papier (maximum de 6 feuilles).
Le processus de déchiquetage est démarré par les cellules photoélectriques dans
l’ouverture de l’alimentation. Insérez un maximum de 6 feuilles de papier dans
l’ouverture d’alimentation et le déchiquetage commence automatiquement.
Lorsque le déchiquetage est terminé, le système de coupe s’arrête
automatiquement après 3 secondes.
6.3 Fonction de marche avant/arrière
(Forward/Reverse) pour dégager le papier coincé
S’il se produit un blocage du papier, appuyez sans relâcher sur le bouton de marche
arrière (Reverse) pour retirer le papier de la fente d’alimentation. Essayez de tirer
doucement sur le papier pour le retirer de la déchiqueteuse. Alternez entre la marche
avant et arrière, au besoin, jusqu’à ce que le papier soit dégagé.
Attention : La déchiqueteuse peut être endommagée si vous alternez trop
rapidement entre la marche avant et arrière.
Débranchez la déchiqueteuse, ouvrez la porte du boîtier et retirez la corbeille. Nettoyez
prudemment tout morceau de papier qui pourrait être resté sous l’ouverture
d’alimentation. Faites preuve de prudence lorsque vous retirez les morceaux de papier.
Attention : L’appareil a des lames exposées sous l’ouverture d’alimentation.
Faites preuve de prudence lorsque vous retirez le papier déchiqueté.
Afficheur ACL en mode de
marche arrière (Reverse)
Afficheur ACL en mode de
marche avant (Forward)

20
6.4 Verrouillage de la porte
Les portes peuvent être verrouillées pour éviter que des personnes prennent les
documents confidentiels dans le plateau d’alimentation.
6.4.1. Verrouillage
Lorsque vous appuyez sur le bouton de verrouillage (Lock), voici ce qui
apparaît sur l’afficheur ACL :
6.4.2. Déverrouillage
Lorsque vous appuyez sur le bouton de déverrouillage (Unlock), voici ce qui
apparaît sur l’afficheur ACL :
6.4.3. Annulation du mot de passe
S’il est nécessaire d’interrompre le processus de verrouillage ou de
déverrouillage, appuyez sur le bouton Annuler (Cancel). Le processus de
verrouillage ou de déverrouillage sera lors annulé.
6.4.4. Mise hors tension de l’appareil (OFF)
Appuyez sur le bouton Arrêt (Stop). L’appareil arrête le déchiquetage, mais il
est toutefois toujours sous tension. Placez l'interrupteur, situé sur le côté droit
de l’appareil, en position Arrêt (Off).
L’appareil est hors tension.
Sur l’afficheur, Entrez votre mot de passe (Enter password) clignotent.
Entrez votre mot de passe de 4 chiffres. Assurez-vous de ne pas
oublier votre mot de passe. Le code est affiché. Appuyez sur le bouton
Entrée (Enter).
Sur l’afficheur, l’indication Couvercle déverrouillé (Cover Unlock)
change pour afficher Couvercle verrouillé (Cover Lock)
Au cours du processus de verrouillage, Couvercle verrouillé (Cover
Lock) clignote sur l’afficheur. Les deux portes seront mécaniquement
verrouillées. Le processus de verrouillage prend environ 3 secondes.
Lorsque le processus de verrouillage est terminé, l’indication Couvercle
verrouillé (Cover Lock) clignotante est affichée en continu.
Si le processus de verrouillage ne peut être complété à l’intérieur d’un
délai de 7 secondes, le processus de verrouillage est annulé en entier.
Sur l’afficheur, Entrez votre mot de passe (Enter password) clignotent.
Entrez le mot de passe de 4 chiffres. Le code est affiché. Appuyez sur
le bouton Entrée (Enter).
Sur l’afficheur, l’indication Couvercle verrouillé (Cover Lock) change
pour afficher Couvercle déverrouillé (Cover Unlock).
Au cours du processus de déverrouillage, Couvercle déverrouillé
(Cover Unlock) clignote sur l’afficheur. Les deux portes seront
mécaniquement déverrouillées. Le processus de déverrouillage prend
environ 3 secondes. Lorsque le processus de déverrouillage est
terminé, l’indication Couvercle déverrouillé (Cover Unlock) clignotante
est affichée en continu.
Si l'entrée de n'importe quels
chiffres de mot de passe est
erronée pendant le
processus de fermeture ou
ouvrant, la pression
«serrure »ou « ouvrent »
le bouton. Le mot de passe
est remis à zéroencore.
Table of contents
Languages:
Other Ativa Paper Shredder manuals

Ativa
Ativa MD 500 User manual

Ativa
Ativa A20CC17 User manual

Ativa
Ativa HIGH SECURITY User manual

Ativa
Ativa 505SB User manual

Ativa
Ativa DX180D User manual

Ativa
Ativa DQ120D User manual

Ativa
Ativa DQ61M User manual

Ativa
Ativa 272-210 User manual

Ativa
Ativa DMD120D User manual

Ativa
Ativa VORTEX HS2000 User manual