ATS Water boy User manual

11/10
/
NO
T
Thre
Plea
cust
o
the
e
WA
R
Exh
a
inje
c
/
2008
T
E:
A
mong
ad) tap an
d
se read all
o
mer, pass
e
nd.
R
NING: T
h
a
ust Gas T
e
c
tion (mixtu
r
Please re
a
Fig
u
other stan
d
a 21/64"
d
instruction
s
this manu
a
h
e ATS Wa
t
e
mperatur
e
r
es of wate
Installati
o
Water
All mak
a
d all inst
r
u
re 1 – W
a
dard tools,
d
rill bit to p
e
s
before st
a
a
l along to
t
t
er Boy is
d
e
(EGT). It
r with wind
s
o
n Manua
l
Boy - Sta
g
es and m
o
r
uctions b
e
a
ter Boy Ki
you will n
e
e
rform this
a
rting. If in
t
hem. The
d
esigned fo
is not to b
e
s
hield was
h
l
v1.3:
g
e 3
o
dels
e
fore insta
t Content
s
e
ed a 1/8"-
2
installation
stalling thi
s
re is a trou
b
r water inj
e
e
used for
w
h
er fluid).
U
1000
-
llation.
s
2
7 NPT (N
a
.
s
system fo
b
leshootin
g
e
ction to co
w
ater/meth
a
U
sing
-
102-930 - IN
S
a
tional Pipe
r a
g
section a
t
ntrol
a
nol
S
T
1
t

11/10/2008 1000-102-930 - INST
2
water/methanol, or any other mixture of water with combustible fluids, can
harm your vehicle's motor and the Water Boy components.Testing done by
ATS Diesel showed that injecting water/methanol causes a dangerous spike in
cylinder pressures. You can make more (and safer) power by adding fuel
through more aggressive E-Power Tuning and/or ATS Injectors/Fuel Systems
than you can by using water/methanol injection. The Water Boy can control the
increased EGT that would result from adding fuel.
DO NOT USE WATER/METHANOL WITH THE ATS WATER BOY
How the Water Boy Works
This kit is designed to progressively inject three stages of water. When the
system is armed with the power switch, the LED will be green. The first stage
activates when the EGT probe senses a temperature above the setting chosen
on the electronics box. A smaller "A" nozzle should be used for stage one if you
are using more than one size nozzle. When stage one is active, the LED will be
yellow. The second stage will activate when the EGT probe senses a
temperature above the setting for level two, AND approximately 10 psi of boost
or more (or 25 psi if the pink wire is not connected-See section below on Boost
Level Setting). The LED will change to Orange when Stage 2 is active (during
stage 2, the stage 1 nozzle will also be active). The third stage will activate when
the EGT probe senses a temperature above the box setting AND the boost
sensor measures approximately 15 psi (or 30-see Boost Level Setting section) of
boost or more. During stage 3, all three nozzles will be active and the LED will
be Red. When the tank is close to empty, the float switch will cut off supply power
to the pump. This will be indicated by a typical flickering of the LED. This will stop
pump “air-locking” which will help prevent the premature pump failure.
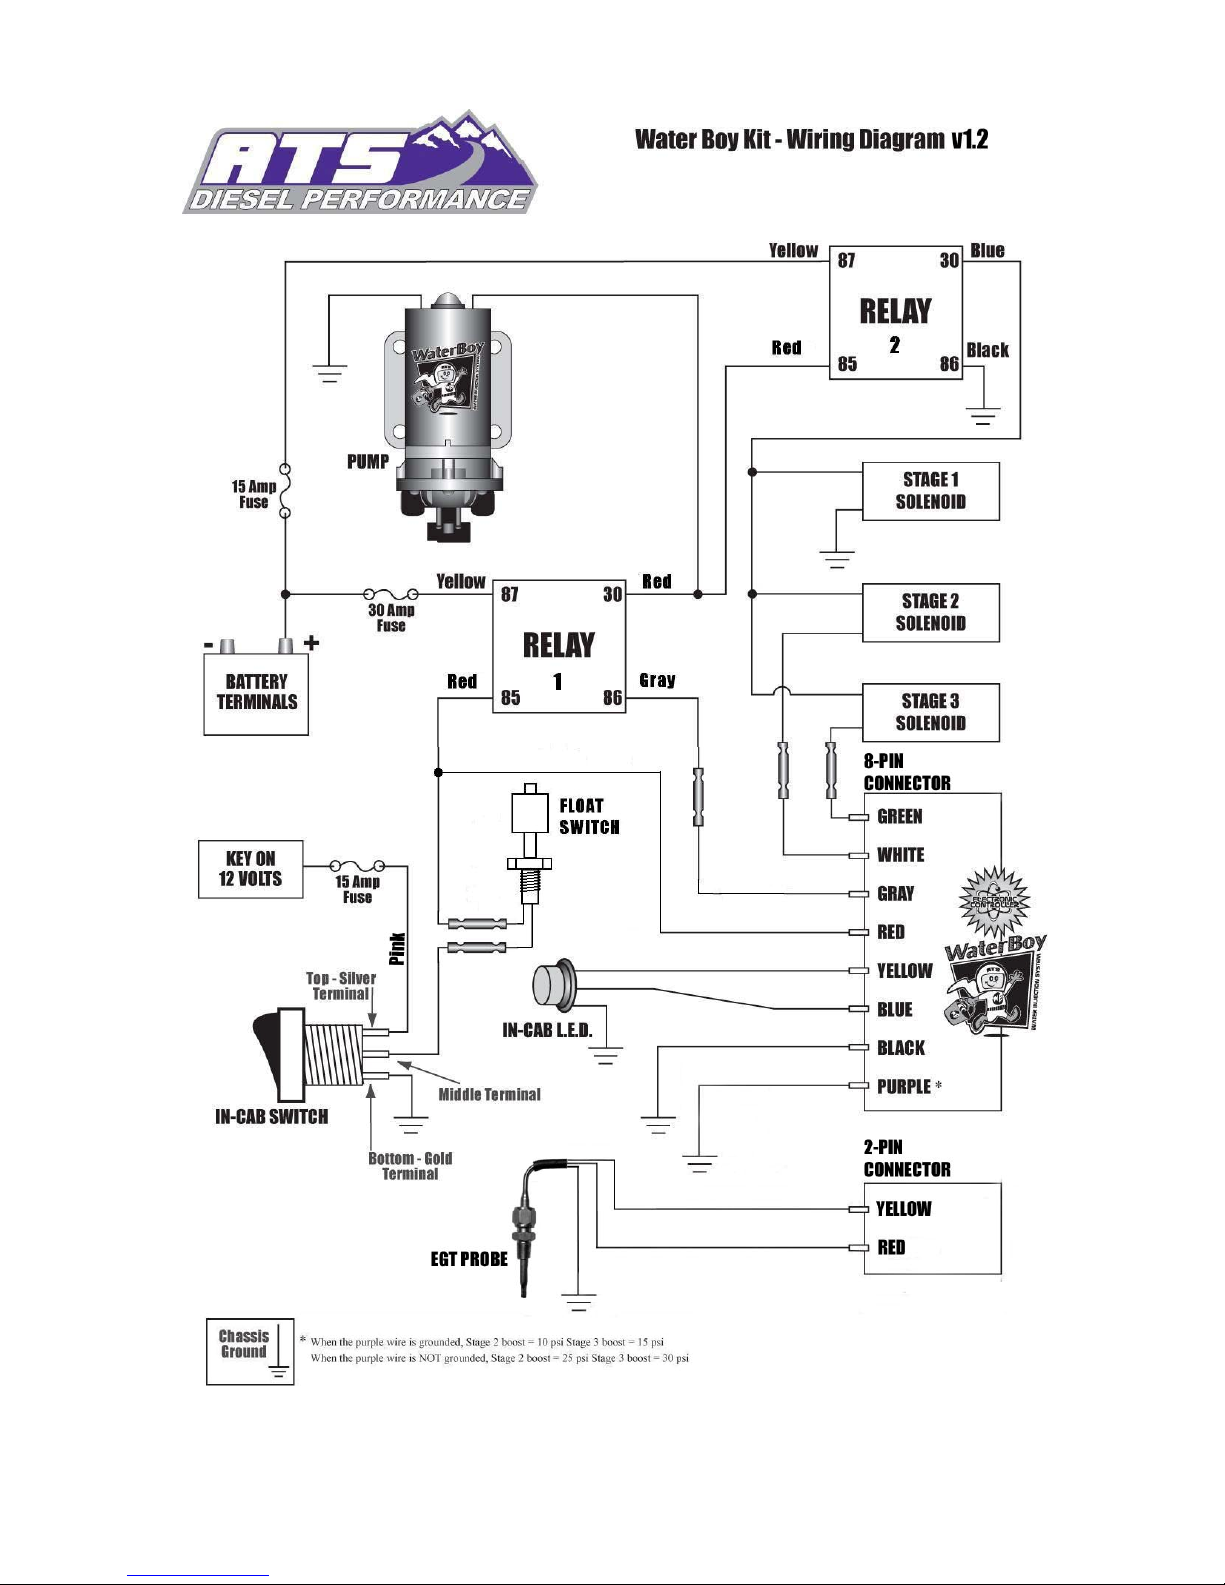
Boost Level Setting
In the Water Boy wiring harness, you will notice a purple wire. If you connect this
wire to a good ground the boost settings will be approximately 10 psi for stage 2
and 15 psi for stage 3. If this wire is not connected the boost setting will be
approximately 25 psi for stage 2 and 30 psi for stage 3. The harness is
assembled at ATS with the purple wire connected to ground. If the higher boost
levels are desired, then cut the purple wire. Choose the boost settings to suit
your vehicle’s performance. If the vehicle produces less than 35 psi of boost,
then use the lower settings.
Adjusting the Water Boy
The EGT settings at which each stage will activate can be adjusted to dial in the
Water Boy response to fit your needs and driving style. There are three small
Phillips head screws on the electronics board. Turning the screw counter-
clockwise will increase the temperature. Adjust the screws so that they will
activate progressively (stage one will be the lowest of the three temperatures).

11/10/2008 1000-102-930 - INST
3
Four nozzles are included with the kit, 1 "A" nozzle (smaller) and 3 "B" nozzles
(larger). ATS recommends installing an "A" nozzle for Stage 1 and "B" nozzles
for Stages 2 and 3. If more cooling is required from Stage 1, replace the "A"
nozzle with a "B" nozzle. If more cooling is required after adding the “B” nozzle
and adjusting the 3 stages with the EGT settings, you can get "C" and "D"
nozzles from ATS, however these are used on highly modified vehicles and
require precise EGT settings. Using 3 "B" nozzles with proper EGT settings will
effectively cool most applications.
NOTE: Solder and shrink-wrap all electrical connections (especially for all
connections made outside of the cab) for the most reliable results.
NOTE: When making the push-in connections with the 3/8" and 1/4" plastic line,
push the line in firmly and make sure the plastic line is pushed in all of the way (it
will go in approximately 1/2" to 3/4" into the fitting).
NOTE: Before drilling or installing self tapping screws, check both sides of the
work piece to check that no other vehicle systems are damaged during
installation.
Installation:
1. Please make sure no parts are missing from ATS Stage 3 WaterBoy Kit. A
complete corresponding list of parts can be found on page 11. Each bag in
Figure 1 represents a different subassembly.
2. Disconnect the (-) negative terminal from the battery(s).
3. Mount the Water Boy electronics box in a convenient location in the
engine compartment using the supplied hardware. Try mounting it such
that the adjustment screws can be accessed with a screwdriver.
4. Drill a 21/64" hole in the exhaust manifold and tap it to 1/8" x 27 NPT
(National Pipe Thread). ATS recommends removing the exhaust manifold
to do this. Drilling and threading can cause small metal chips to fall into
the manifold. If left inside, the chips can cause serious damage to your
turbocharger and exhaust. Make sure manifold is free of chips prior to
reinstallation.
5. Install the 1/8" NPT fitting supplied with the pyrometer probe.
6. Install the pyrometer probe into the NPT fitting.
7. Connect the Pyrometer 2-pin male socket to the corresponding electronics
box socket and connect the White wire ring terminal to a suitable ground.
8. Plug the 8-pin socket of the supplied wiring harness into the electronics
box.

11/10/2008 1000-102-930 - INST
4
9. Find a suitable/visible location to mount the L.E.D. such as the dash or a
gauge pillar.
10.Drill a hole just large enough to fit the plastic sleeve through and push the
LED through to secure it. A 1/4" drill bit will work best.
11.Find a suitable location for the supplied power switch and install it. The
switch requires a 13/16” hole to mount properly.
12.Feed the four-wire group (Red, Black, Yellow, Blue) extending from the
Water Boy harness through a rubber grommet in the firewall into the cab.
13.Connect the Red wire of the four-wire group to the center terminal of the
switch with a spade connector. The wire should be labeled; “To Middle
Terminal Switch”.
14.Connect the remaining three wires of the four-wire group to the L.E.D.
color for color.
15.Connect the supplied Black wire to the brass-colored terminal of the
switch with the spade connector. Connect the other end of the black wire
to a good ground under the dash.
16.Connect the supplied Pink wire to the remaining switch terminal and
attach it to a 12V source under the dash that is only energized when the
key is turned on. Use a voltmeter to find a suitable wire.
17.At a convenient location under the dash, cut the Pink wire connected to
the switch and splice in the supplied in-line fuse holder. Use the supplied
15A fuse.
18.Find suitable locations for both the pump and tank. Depending on the size
of the tank and the vehicle make, a spot under the hood might be hard to
find. If the tank cannot be mounted in the engine compartment, mount the
tank in the bed and the pump on the frame rail. Mount the tank above the
pump so that gravity will feed the pump (this will help eliminate "air-
locking" of the pump). If the tank will be mounted in the bed, mount it on
the same side as the intake manifold (Cummins- Driver’s side, Duramax-
Passenger’s side). This will make it easier to route the 3/8” plastic line.

11/10
/
Fig
u
1
2
2
2
2
2
N
n
3
2
2
/
2008
u
re 2 - Tan
k
mou
9.
A
ttach t
h
0.Extendi
n
RED 12
V
on the p
u
1.Mount t
h
manifold
2.Connect
to the p
o
the sup
p
and a 1
5
3.Connect
to the p
o
the sup
p
and the
3
4.Connect
ring ter
m
N
ote: If yo
u
ozzles and
0 regardin
g
5.Remove
intercool
intake s
y
engine.
6.Drill thre
e
spaced.
from the
"mock-
u
k
mounted
nted belo
w
h
e Black w
i
n
g from the
V
” extends
u
mp.
h
e solenoid
using sup
p
the Yello
w
o
sitive term
i
p
lied fuse h
o
5
Afuse.
the Yello
w
o
sitive term
i
p
lied fuse h
o
3
0A fuse.
the group
o
m
inal.
u
have a D
o
boost line
g
the boost
the Intake
e
r
pipe an
d
y
stem is ap
a
e
(3) 21/64
Keep in m
manifold a
u
p" the no
z
in front-p
a
w
on a su
p
i
re from th
e
Water Bo
y
from Rela
y
and relay
a
p
lied hard
w
w
wire from
i
nal on the
o
lder in a c
o
w
wire from
i
nal on the
o
lder in a c
o
o
f Black w
o
dge with
a
fitting. Ski
line.
manifold f
r
d
engine to
a
rt. Debris,
" holes in t
h
ind that th
e
good dist
a
z
zles. Mak
e
a
ssenger
s
p
port (Dur
a
e
pump to
a
y
harness,
a
y
1. Conne
a
ssembly
a
w
are.
Relay 2 la
battery. C
u
o
nvenient l
Relay 1 la
battery. C
u
o
nvenient l
ires to a g
o
a
n ATS Arc
-
p steps 25,
r
om the ve
h
prevent d
e
small or l
a
h
e manifol
d
e
nozzles a
n
a
nce. Plac
e
e
sure yo
u
s
ide corn
e
a
max)
a
chassis g
r
a
red wire l
a
ct this Red
a
s near as
p
beled “TO
u
t the Yell
o
ocation. U
beled “TO
3
u
t the Yell
o
ocation. U
o
od ground
-
Flow, it is
p
26, 27 bu
t
h
icle. Make
e
bris from
e
a
rge, can s
e
d
in positio
n
n
d the sup
p
e
the mani
u
have cle
a
1000
-
e
r o
f
bed a
n
r
ound
a
beled, “T
O
wire to th
e
p
ractical to
15A FUSE
o
wwire an
d
se the hol
d
3
0A FUSE
o
wwire an
d
se the hol
d
using the
a
p
re-tapped
t
you must
f
sure to bl
o
e
ntering wh
i
e
verely da
m
n
s that are
p
ly lines wi
l
fold on th
e
a
rance bef
o
-
102-930 - IN
S
n
d pump
O
PUMP-
e
Red wire
the intake
BATTER
Y
d
splice in
d
er provide
d
BATTER
Y
d
splice in
d
er provide
d
a
ttached
for the
f
ollow step
o
ck or cove
r
i
le the
m
age the
properly
l
l extend o
u
e
engine t
o
o
re drillin
g
S
T
5
Y
”
d
Y
”
d
r
u
t
o
g
.

11/10
/
2
2
2
3
/
2008
Figure 3 -
7. Tap the
8.Install th
e
thread s
e
9.Install th
e
equivale
n
0.The Wat
has a b
o
supplied
supplied
electroni
If your tr
u
the mani
clearanc
the fittin
g
tapped f
o
fitting an
A drilled
a
F
holes to 1
/
e
1/8" NPT
e
aling tape
e
nozzles,
n
t on the n
o
er Boy ele
c
o
ost line th
a
1/8" barbe
tubing fro
m
cs.
u
ck does n
o
fold using
t
e for the fit
t
g
to the ele
c
o
r the boo
s
d skip step
a
nd tappe
d
F
igure 4 -
F
/
8" x 27 NP
push in fit
t
, or equiva
l
noting the
s
o
zzle threa
c
tronics re
q
a
t uses a s
o
d connect
o
m
the “T” to
o
t have a
s
t
he 21/64”
d
t
ing before
c
tronics bo
a
s
t line fittin
g
31.
d
intake m
a
F
ord 6.0L
m
T
t
ings on th
e
l
ent.
s
ize and p
o
ds.
q
uire a boo
s
o
ft 1/8" line
o
rs, then s
p
the boost
p
s
oft 1/8” bo
o
d
rill bit and
drilling. C
o
a
rd. The
Ar
g
. Simply re
a
nifold for
m
anifold
e
end of th
e
o
sition. Us
e
s
t signal. I
f
that is co
m
p
lice the exi
p
ort on the
o
st line the
n
1/8” NPT t
o
nnect the
r
c-Flow int
a
move the
p
1000
-
an LLY D
u
e
water no
z
e
thread se
a
f
your truc
k
m
patible wit
h
sting line.
C
Water Bo
y
n
remove,
d
ap. Make
s
supplied t
u
a
ke manifol
p
lug and in
s
-
102-930 - IN
S
u
ramax
z
zles. Use
a
ling tape
o
k
already
h
the
C
onnect th
e
y
d
rill and ta
p
s
ure there i
s
u
bing from
d is pre-
s
tall the
S
T
6
o
r
e
p
s

11/10/2008 1000-102-930 - INST
7
31.Clean out all shavings and debris from the intake manifold. Reinstall the
manifold on to the engine (do not forget to remove the items, rags or tape,
that were used to block off the intercooler pipe and engine to keep debris
out).
32.Using the supplied 1/4" plastic line, connect the solenoids to the nozzles
(make sure the stage one solenoid connects to a smaller nozzle if you are
using multiple sizes). The solenoids are labeled “1”, “2” and “3”.
NOTE: Do not route water lines near exhaust components or other
sources of extreme heat under the vehicle. Intense heat can reduce the
burst pressure of the lines which can lead to system failure.
33.Run 3/8" line from the solenoid block to the pump.
34.Run a short piece of 3/8" line from the pump to the water filter supplied
with the kit. Make sure the flow arrow on filter points towards pump. Mount
the filter in a visible area so it is easy to check and clean in the future.
35.Run 3/8” line from the filter to the tank.
36.With the tank in place and 3/8” lines installed, route the Red harness wires
labeled “To Tank” along the 3/8” lines. Do this until they reach the leads
extending from the bottom of the switch in the bottom of the tank.
Note: If updating kit that is previously installed it will be necessary to
slightly modify the old wiring harness. Do the following ONLY if
updating a kit. Harness colors may vary depending which version of the
WaterBoy kit is installed. Make sure WaterBoy system switch is OFF
before modifying harness. It will be necessary to cut the wire leading
from the middle terminal on the power switch to the relay. This is typically
a RED wire. It is best to cut this wire near the relay inside the loom that
houses the L.E.D. wiring (see Figure 5). Extend both ends of the cut
power wire to the tank using the supplied connectors and heat shrink.
Connect the extended wires to the float switch leads using the supplied
connectors and heat shrink. Refer to the wiring diagram for further help.

11/10/2008 1000-102-930 - INST
8
Figure 5 - Cutoff Switch Wire Splice
37.Trim excess wire and enough loom to cover the switch wires.
38.Use supplied butt connectors, solder and heat shrink to wire in switch.
39.Fill the tank, check for leaks.
40.Reconnect the battery(s).
41.Test-drive the vehicle with the system armed. The LED will be green
when armed, yellow during stage 1, orange during stage 2, and red during
stage 3.
42.In a safe place, drive the vehicle such that EGT’s are produced to activate
all three Water Boy stages. Check for leaks, and adjust the EGT settings
on the electronics box to tune performance.
Cut and splice
this red wire

11/10/2008 1000-102-930 - INST
9

11/10/2008 1000-102-930 - INST
10
Figure 5 – Water Boy Harness Socket Layout
Troubleshooting the Water Boy
The LED will not change from green and no stages are activating despite
the EGT reaching the setting for stage 1
The electronics box is not receiving the EGT signal. Make sure the pyrometer
wires are securely attached to the electronics board and that they are in the
proper ports. If the problem persists, double-check the wire connections that go
to the electronics board.
The LED goes through all stages, but it is not injecting water
Make sure the tank is mounted above the pump to help eliminate air-locking of
the system. Check to make sure the pump is properly grounded and that the
wiring is correct. Check the fuse that is inline with the relay's yellow wire. Check
the filter housing to see if it is clogged. If so, remove element, rinse until clean
and replace.
The system goes to stage 1, but will not go to stage 2 or 3
Stages 2 and 3 are boost dependent. The electronics box must see
approximately 10 psi and the set EGT level to activate stage 2, and
approximately 15 psi and the set EGT level to activate stage 3. If your vehicle is
meeting both boost and EGT requirements and still not activating, check to make
sure both ends of the boost line are securely attached and that the line is not
kinked.
The LED won't come on when the power is turned on
Check the black wire coming from the LED, is it properly grounded? Check the
fuse that is in line with the electronic box's red wire. Check the fluid level in the
tank as this can be an indication it is empty.

11/10/2008 1000-102-930 - INST
11
The LED and pump turn on and off
Check the fluid level in the tank. This can be an indication the tank is out of fluid.
Check all electrical connections to ensure good contacts.
The LED never changes from green, otherwise the system performs as
expected.
Check the LED connections. A replacement LED may be required.
Have Any Questions?
Thank you for purchasing the Water Boy Stage 3 System. Please check our website at
http://www.atsdiesel.com for technical support and other performance products such as
the 5-Star™ torque converter, ATS High Performance Valve Body and ATS High
Performance Transmission along with our full line of power enhancers. Please call or e-
mail our Technical Service Department, 8:00am to 5:30pm Mountain Standard Time,
Monday through Friday.
Contact Information
Toll Free: 800-949-6002
Local: 303-431-7973
Fax: 303-431-01135
Website: www.ATSDiesel.com
We strive to make our instructions as clear and complete as possible. To achieve this,
our instructions are under constant construction. We encourage you to visit our
Technical Support Website (http://www.atsdiesel.com/ATSWebsite/Technical.asp) to
check for the most up-to-date manuals and diagrams as well as other information. If you
have any suggestions as to how we can improve this installation manual, let us know at
mailto:Suggestions@ATSDiesel.com.

11/10/2008 1000-102-930 - INST
12
Bill of Materials
1. Wiring Harness
- (1) Solenoid Stack 3923-04-B232
- (1) Mounting Bracket
- (6) Solenoid Mounting Screws 90380A191
- (3) 1/4” Push-in - 1/8” NPT Fitting PC1/4-N1UT
- (1) 3/8” Push-in - 1/8” NPT Fitting PC3/8-N1U
- (1) 1/8” NPT Plug 50785K918
- (2) 8-3/8 Mount Screws 90061
- (2) 8-3/8 Nylock Nuts 321
- (4) Self Tap Screw 84931D
- (1) Self Tap Screw 84930D
- (1) L.E.D. Bezel 67-1332-ND
- (1) Wiring Kit 1000-102-011
2. Pump Assembly
- (1) Pump (pre-adjusted) 8030-813-239
- (2) 3/8” Push-In to 3/8” NPT Fitting A6MC6-MG
- (4) Self Tap Screw 85241D
- (1) Self Tap Screw 84930D
- (1) 16-14 Ring Connector 35776
3. Reservoir Tank Assembly
- (1) Tank/Cap 070316AE
- (1) 3/8” Push-In to 3/8” NPT Fitting A6MC6-MG
- (6) Washer 88445
- (6) Self Tap Screw 2539D
- (1) Float Switch 50195K73
4. (5’) 1/4" O.D. Boost Line 1J-203-10
5. (20’) 3/8” Polyurethane Tube PW0756100
6. (10’) 1/4" Polyurethane Tube PW0754100
7. (1) 3/8” Push-In to 3/8” Push-In Filter 8698T12
8. Pyrometer Probe 015-193-072
9. Electronic Control Box
- (5) Self Tap Screw 84927D
- (1) Electronic Control Box
10.Boost Line Fittings
- (3) Green Hose Clamp HC-4ST G
- (2) Black Hose Clamp CSC316
- (2) 1/8” NPT to 3/16” Barbed Fitting 96855
- (3) 1/8” NPT to 1/8” Barbed Fitting 50523
- (1) 1/8” Brass “Tee” 5325

11/10/2008 1000-102-930 - INST
13
11.Dual Fuse Bundle
- (2) 16-14 Non-Insulated Butt Connector
- (1) 30A ATM Fuse ATM30
- (1) 15A ATM Fuse ATM15
- (2 pieces) 3/16” Heat Shrink Tubing HSR316
- (1) 12-10 Ring Connector
- (2) ATM Fuse Holder
12.Switch Bundle
- (3) 16-14 Non-Insulated Butt Connector
- (1) Self Tap Screw 84930D
- (3 pieces) 3/16” Heat Shrink Tubing HSR316
- (1) ATM Fuse Holder ATMFH12
- (1) 15A ATM Fuse ATM15
- (1) Switch
- (3) Female Blade Connectors 86061
- (4’) 18 AWG Wire Black GPT-18-00
- (4’) 18 AWG Wire Pink GPT-18-11
- (1) 16-14 Ring Terminal 25262
13.Nozzle Bundle
- (3) Nozzle “B”
- (1) Nozzle “A”
- (3) 1/4" PushLok® to 1/8” NPTF Fitting PCF1/4-N1U
14.Wire Extension Kit
- (12’) 14 AWG Wire Red GPT-14-02
- (5) 16-14 Non-Insulated Butt Connector
- (5 pieces) 3/16” Heat Shrink Tubing HSR316
- (1 piece) Rosin Core Solder 96332
Not Pictured:
15.Instruction Folder
- (1) Purple ATS Folder
- (1) Instruction Manual
- (2) ATS Stickers
Table of contents
Other ATS Automobile Accessories manuals