Atten ST 60 User manual

ST
60/ST
80/ST
100
SHENZHEN ATTEN TECHNOLOGY CO., LTD.
©2014 ATTEN Corpora
SOLDERING STATION
USER’S MANUAL

1
Content
Content ..................................................................................................................................1
Copyright ...............................................................................................................................2
Symbols and Conven�ons ..................................................................................................2
Assump�on For User...........................................................................................................2
Safety .....................................................................................................................................2
Disclaimer..............................................................................................................................2
Item Check List .....................................................................................................................3
Product Overview ................................................................................................................3
Features.................................................................................................................................3
Specifica�ons........................................................................................................................3
First Glance ...........................................................................................................................4
LCD Display Panel................................................................................................................. 4
Opera�onal Guide ...............................................................................................................5
Maintenance.........................................................................................................................9
Troubleshoo�ng ...................................................................................................................9
Service Contact................................................................................................................... 10
Appendix ............................................................................................................................. 10

2
Copyright
The design of this product (includingsoware) and its accessories is under tutelage of laws. Any
to violate relevant right of our product will be penalized through law. Please consciously
observe relevant local laws in the use of this product.
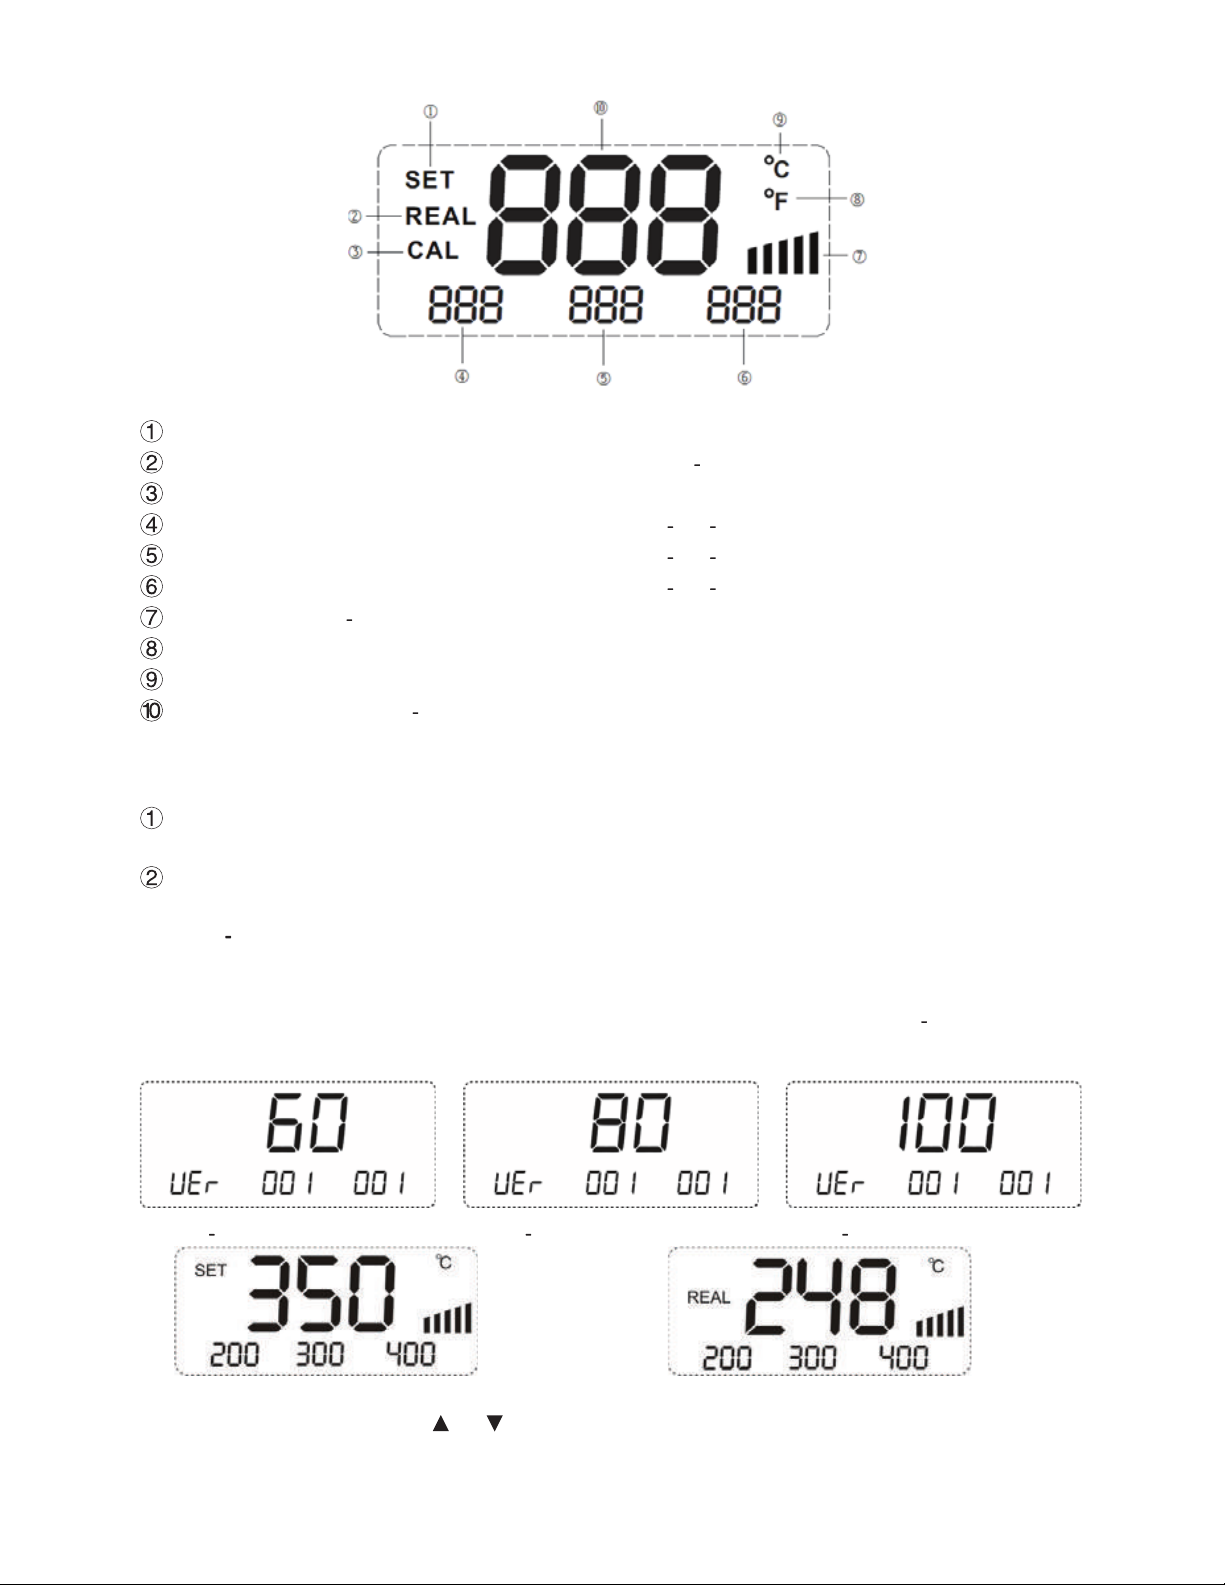
Symbolsand conven�ons
Thank you for purchasing this soldering staon product. Please read this manual carefully and pay
aenon to warnings and prec mened herein before using this product.
Warning you against therisk of electric shock.
Warning you against therisk of physical injury.
Assump�on for user
We assume that user have common sense and basic relevant electrical opera knowledge before
using this product. This device is not intended for use by persons (including children) with limited
physical, sensory or mental ape, or by persons who lack knowledge or experience in handling
the device. This appliance can be used by children aged from 8 years and above and persons with
reduced physical, sensory or mental ca or lack of experience and knowledge if they
have been given supervision or instr concerning use of the appliance in a safe way and
understand the hazards involved. Children shall not play with the appliance. Cleaning and user
maintenance shall not be made by children without supervision.
Safety
Disclaimer
For physical injuries and possessions loss caused by those reasons which are not related to
product quality such as opera without following manual guide, natural disasters or force
majeure, we take no responsibility for that.
Under the supervision of Shenzhen Aen Technology Co., Ltd, this manual has been compiled
and published which covered the latest product and ca The content of
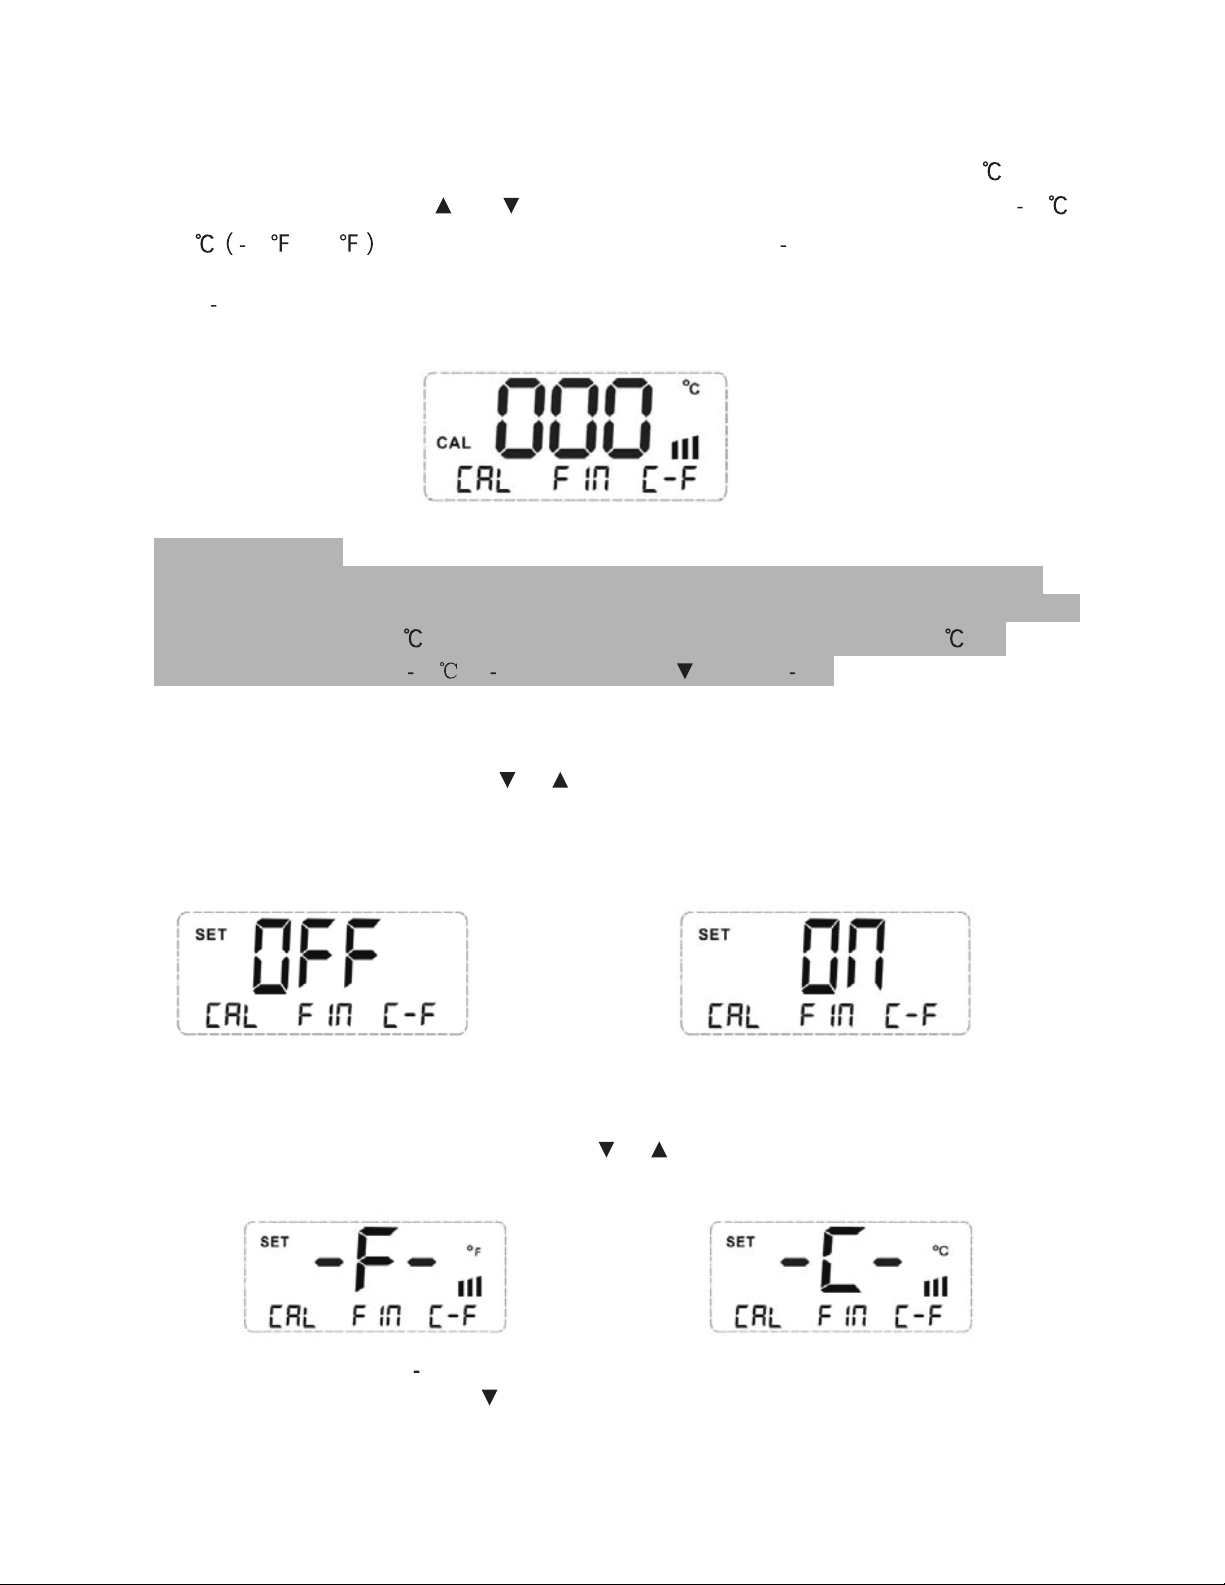
WARNING: The soldering temperature can reach 150 ~480 as this product in working
status. User shouldobey following rules rigorously in view of improper opera will causeres or
burns.
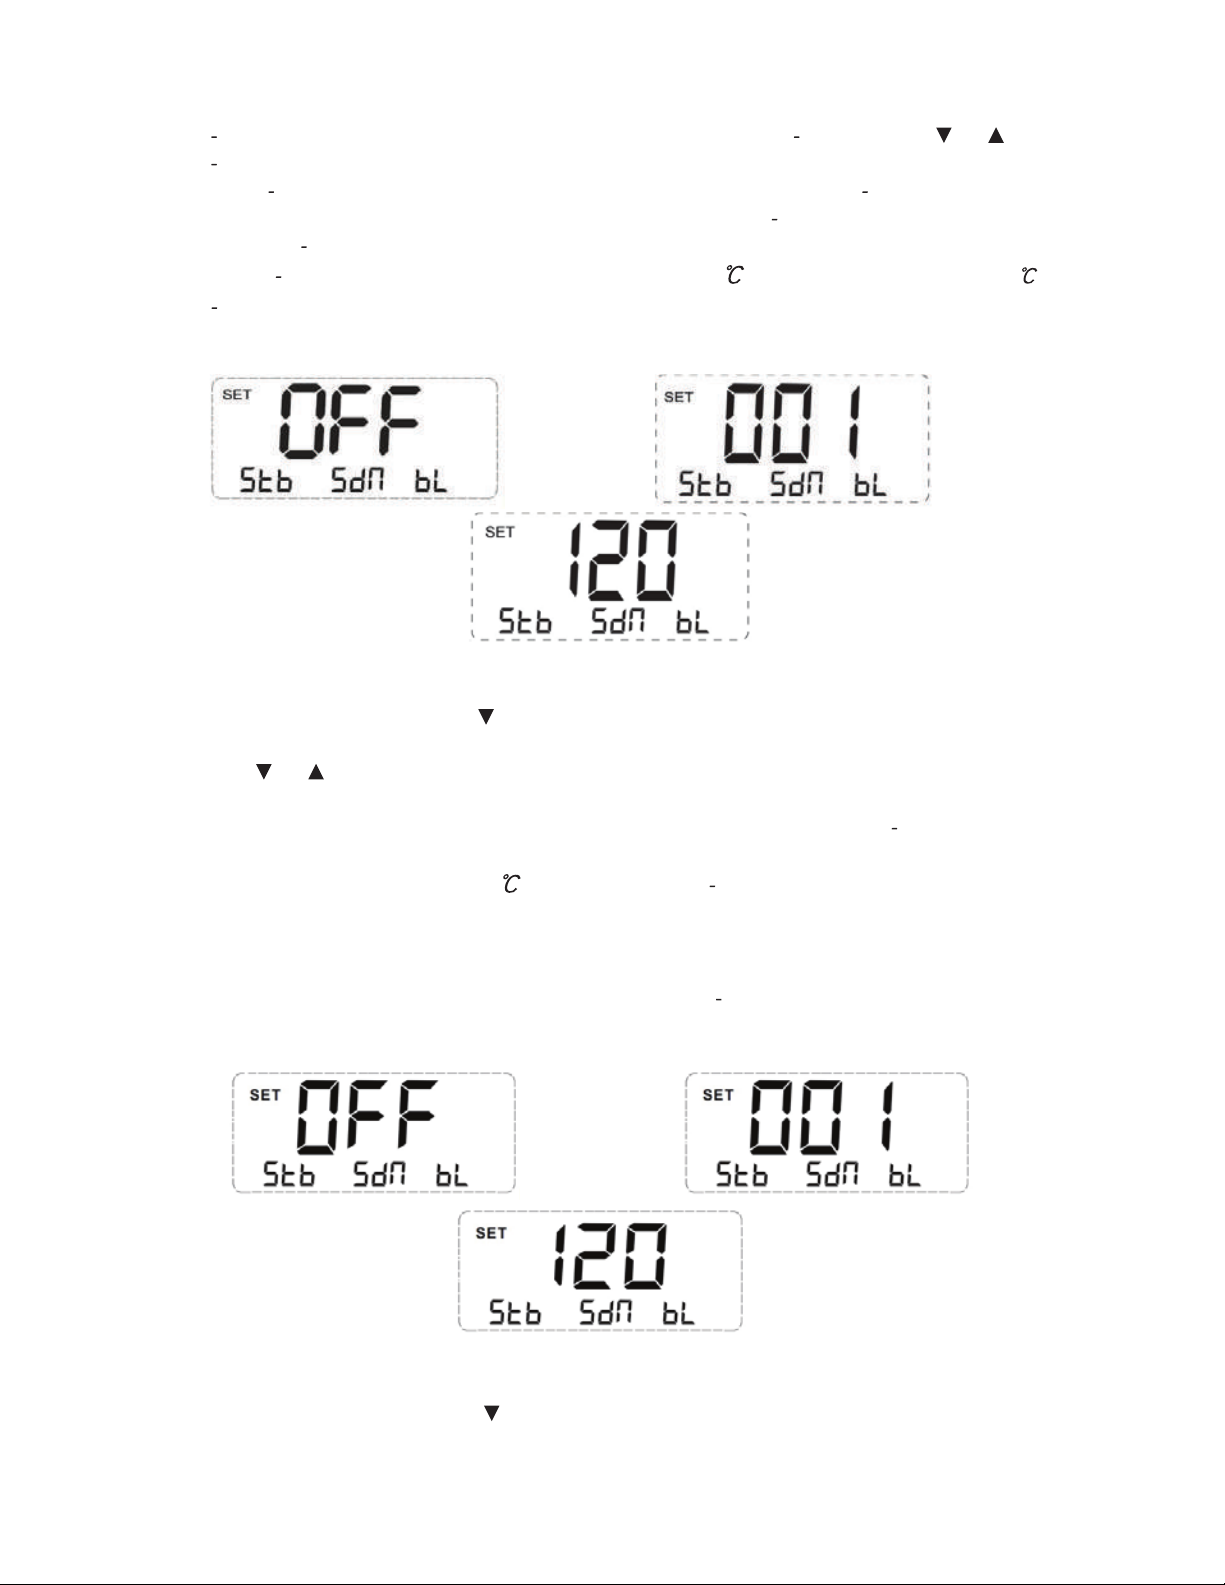
Never touch soldering and surrounding metal part of soldering before soldering
cool down completely.
Never usethis product around objects.
Always turn switch oaer operan and always turn switch ofor temporary
notopera
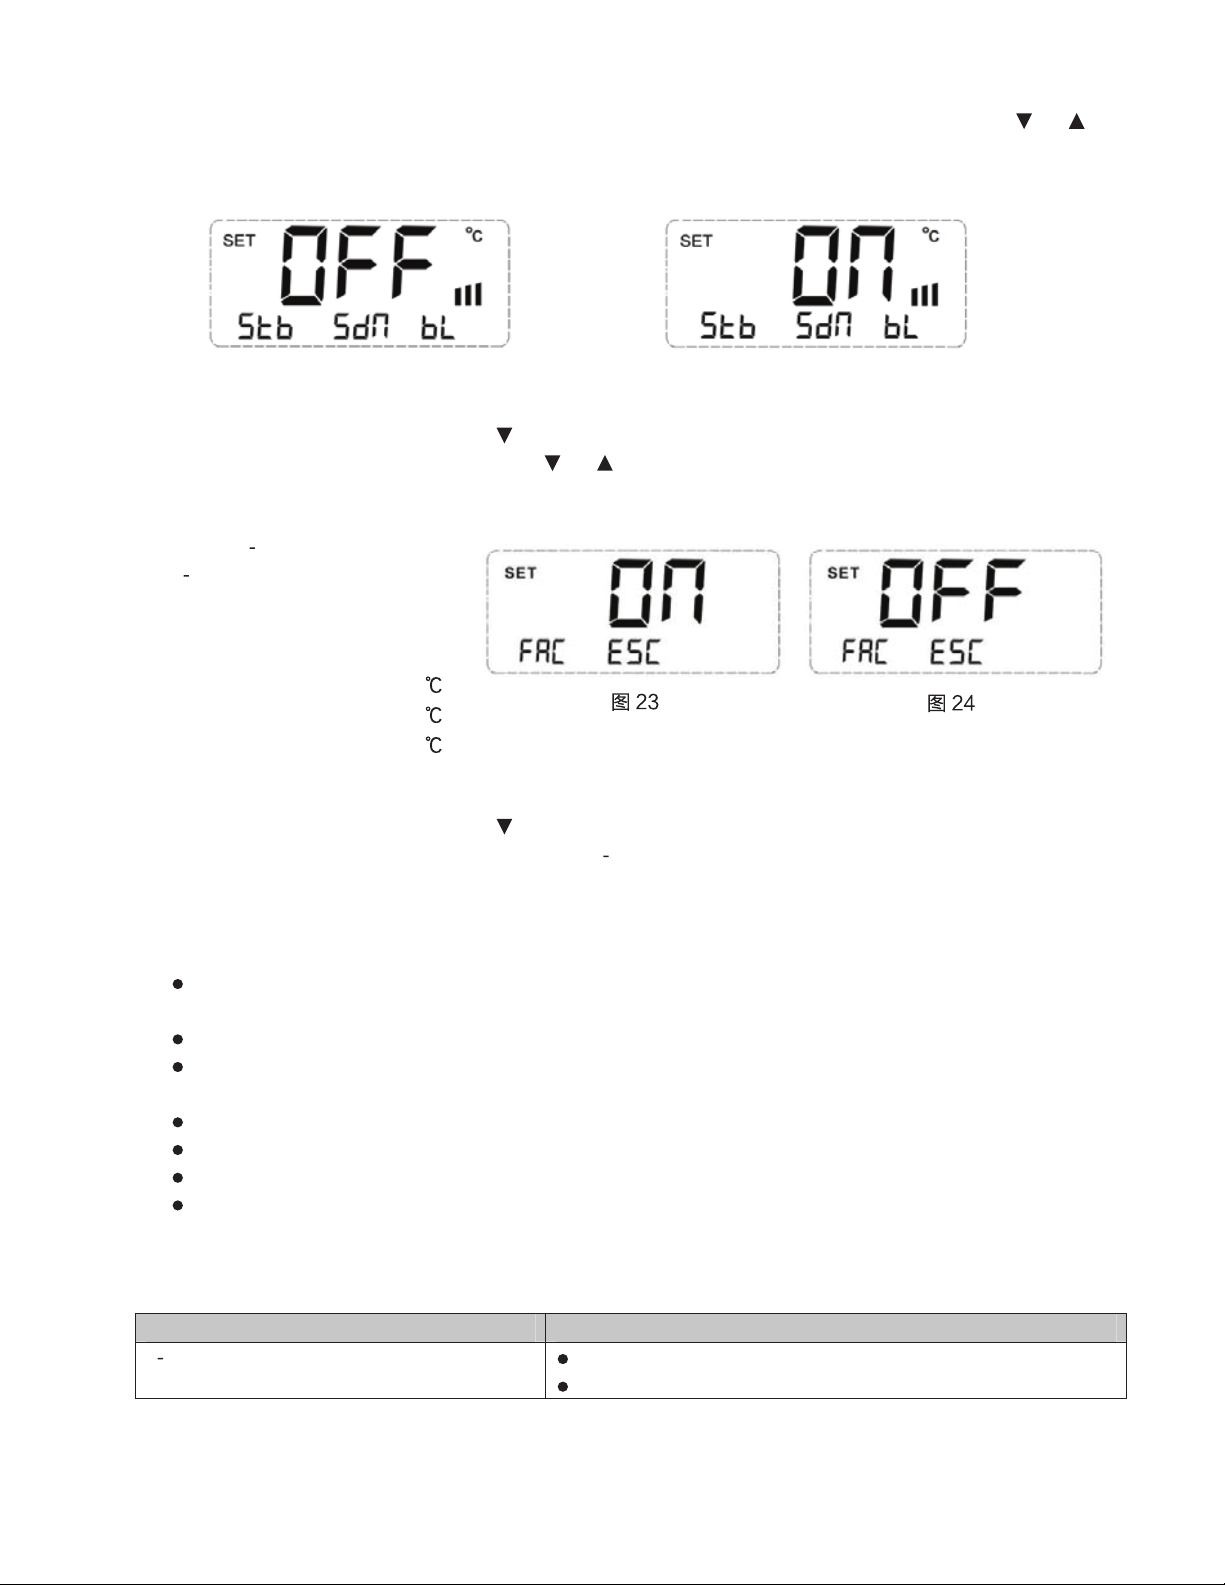
User must w soldering iron cool down completely aer turning switch ofor the
replacement of soldering and internal parts.
Never operate on product for those who have no experience or have no basic knowledge for
the circumstance of no guidance.
Keep this product out of reach of children.
Never place product and part of it in water or operate as your hands are wet.
Please keep workplace well venated for fumes produced in soldering work.
Never play with others while using this product.

3
this manual is subject to change without
ATTENTION: To avoid damaging to unit and keep opera safe, please read the inst manual
ahead and keep it accessible for any operator
Item check list
Name Quan
Soldering staon 1 Unit
Soldering iron 1 PCS
Iron stand 1 Unit
Power cord 1 PCS
Manual 1 Copy
Sponge 1 Unit
Product overview
ST 60/ST80/ST100 is a new designed digital soldering staon which got beer performance and is
more convenient and safer to useAnd it has been widely used in colleges & univers instutes,
industrial producn line and so on
Features
Brand new design and LCD display which can display various seg v
New designed menu enable system seg easier
Visual control over opera process which Analogue hea up status bar to indicate hea
up status and visual se
3 keys to store and retrieve frequently used temperature values quickly
Provide temperature locking funcon to make producn line management convenien
Smart standby, shutdown adjustable standby and adjustable shutdown
enable more energy saved and environment friendly
Touchtone could be turned oand
Temperature calibran was designed to be more precise and more convenient to keep this
product in good performance for a longme
This product was designed with low voltage hea heater which is completely separated from
power supply to keep soldering work safer
This product was designed to be compa with general 900Mseries (only for ST 60/ST80)
soldering which was assembled separately with hea heater to cut user costs down
Separated iron stand to save room and to make soldering stan layout easier
Specifica�ons
ST 60 ST 80 ST 100
Input Voltage AC (100V/110V/120V||220V/230V/240V) 50/60Hz(op
Power 60W80W100W
Hea element voltage 26VAC 28VAC 28VAC
Temperature Range 150450/302842150480/302896150480/302896
Temperature calibran range 50 / 90 50 / 90 50 /±90
Temperature precision 15 10 10

4
ST 60 ST 80 ST 100
Temperature Stability 2in s�ll air, without load
Automa�cally stand by �me 1 120 minutes
Standby temperature 150
Automa�cally shut down �me 1 120 minutes
Temperature regula�on 5 digits(default)/1digit (fine tuning)
Hea�ng element High performance
dual wire heater
High end quad wire
heater Silver alloy heater
Temperature lock Yes
Beeping Yes
Tipto ground impedance < 2
Tip to ground voltage < 2 mV
Volume 175(L)*115(W)*95(H)mm
Net Weight 1.85KG 2.36KG 2.4KG
Soldering �ps 900M
series(Appendix)
900M
series(Appendix)
AT800
series(Appendix)
The above specifica�ons are subject to further change withoutno�ce and refer to actual
products.
It is not recommend to set working temperature above 450 for a long �me to keep this
product lifespan longer.
First glance
LCD displaypanel
Iron handpiece
Iron stand
Preset key 1
Preset key 2
LCD screen
Preset key 3
Up key
Down key
Power switch
Handpiece receptacle

5
LCD display Descripn:
SET (Set Mode): indicate soldering staon enter seg mode;
REAL (Real Mode): indicate soldering staon enter real display mode;
CAL (Calibra indicate soldering staon enter temperature calibraon mode;
Show the temperature value stored in express store and retrieval channel 1
Show the temperature value stored in express store and retrieval channel 2
Show the temperature value stored in express store and retrieval channel 3
Analogue heag up status bar to show current hea strength.
Indicate current temperature scale is Fahrenheit.
Indicate current temperature scale is Celsius.
Display soldering real me temperature values.
guide
1. Cecn
Plug soldering iron power end into receptacle on soldering staon front panel and place
soldering iron handle in soldering iron stand.
Plug power cord female plug into receptacle on soldering staon rear panel.(Please assure
power supplied is for this product) .
2. Pwer n
Turn switch on aer power cord co LCD display panel will display system version number
for 1 seconds, then LCD display panel will show last set temperature value and show "SET"
simultaneously(Figure 1).3seconds later, display panel will show soldering iron real me
temperature value and "REAL" at the same re 2).
ST 60 Version Display ST 80 Version Display ST 100 Version Display
Figure 1 Figure 2
3. Se temperature
In normal working state, press or to adjust temperature and enter temperature seg mode

6
(Figure 4),"SET" will show on LCD display panel simultaneously. Pressing and holdingor can
adjust temperature quickly. Stop pressing will cause soldering staon store seg value
automacally and exit from temperature seg mode.
Figure 3 Figure 4
4. Storing and retrieving temperature values quickly
Retrieve temperature values: in normal working state, press 1, 2, 3(Figure 5) to retrieve
temperature values stored in memory and set retrieved value as current working temperature.
Store temperature: in normal working state, press and hold (over 3 seconds) 1, 2, 3 to store
current set temperature values into memory.
Figure 5
5. Lockingoperan keys
In normal working state, pressing andholding 1, 2, 3 simultaneously over 3 seconds can lock
current set temperature value. Now any opera on control panel will make no sense which
indicate operan keys is locked.
In key locking mode, pressing and holding 1, 2, 3 simultaneously over 3 seconds can remove
locking state as you want to.
Figure 6
6. System seg
6.1 As user need to set system parameters, user should enter system seg mode rst. Press and
holdand simultaneously over 3 seconds to enter system seg mode. User can turn seg
pages by pressing and in system seg mode (Figure 7, 8, 9).
Figure 7 Figure 8
Figure 6

7
7. Manually temperature calibra
7.1 In rst system seg page ,press 1 to enter temperature calibran mode, and "CAL" will show
on display panel on which also shows last calibran value(Figure 10,calibran value is 0 ).
7.2 In calibran mode, press and to set calibran temperature values whose range is 50
~ 50 90 ~+90 .Calibra value will be negave as actual measured temperature value is
smaller than the value showed on display panel. Calibra value will be posive as
actual measured temperature value is bigger than the value showed on display panel.
7.3 Press #1 to store calibran temperature values aer input calibran values.
Figure 10
Calibran
Please prepare temperature probe, measure soldering temperature and record it(Please add
some solder on soldering to let soldering and probe contact closely). Denote actual measured
temperature as T1(like 320) and denote displayed temperature value as T2(like 350).So
calibran value should be 30 (T1 T2) and then press to input " 30".
8 Trimming is turn 8.Enable tuning.
8.1 In system seg mode, press #2 to enter tuning seg mode and display panel will show
current tuning status now. Press or to enable or disable tuning and then
press #2 to save it.
Note: As seg content is "ON”, the tuning is turned on which make temperature
adjusted at 1 digit for each pressing. Otherwise, temperature will be adjusted at 5 digits for each
pressing. This is quite for dierent opera requirements.
Figure 11 Figure 12
9. Switching temperature scales
9.1 In system seg mode, Press #3 to enter temperature scales seg mode and display panel
will show current temperature scale now. Press or to switch temperature scales between
Fahrenheit and Celsius, then press #3 to save it(Figure 13,Figure 14).
Figure 13 Figure 14
10. Se autmacsta by e
10.1 In system seg mode, press to go to second seg page(Figure 8). Then press #1 to enter

8
stand by me seg mode and display panel will show current stand by me. Press or to set
stand by me and press #1 to save it.
Note: Stand by me can be set between 1 minute and 120minutes andstand by funcon will be
disabled as seng content is "OFF"(Figure 15).Aer enabling stand by funcon, soldering staon
will enterstand by state if no soldering work orany othercontrol panel operaons taken throughout
during stand by me,and the temperature will decline to 150and be stabilized around 150.In
stand by state, picking solder ironhandle orany operaon on control panel can wake up soldering
staon and soldering staon will connue to work in preset temperature value.
Figure 15 Figure 16
Figure 17
11. Se automac shut me
a) In system seg mode, press to go to second seg page(Figure 8). Then press #2 to enter
shutdown me seg mode and display panel will show current shutdown me set value.
Press or to set shutdown me as 1 minute ~ 120 minutes or OFF and press #2 to save it. It
will disable automa shutdown as seg content is "OFF".
Note: Automac shutdown funcon only can be enabled as automac stand by funcon set on.
Soldering staon will enter shutdown state,stop heang and don't turn off display panel unl
temperature has declined to 100as the me in stand by state exceeds preset shutdown me.
Aerentering shutdown mode,any operaon on control panel will make no sense aer
enteringshutdown mode. The solderingstaon only can exit thismode aer userswitch power
off and restartit.
b) In shutdown mode, soldering staon is not in real power ostate which s consumes li
energy as soldering staon is well connected with power supply. To ensure safety, please turn
opower switch or pull power plug out.
Figure 18 Figure 19
Figure 20
12. Touchto
12.1 In system seg mode, press to go to second seg page (Figure 8). Then press #3 to enter

9
touchtone se mode and display panel will show current touchtone sestatus. Press or
to set touchtone stateand press #3 to save it.
Note: Beeping funcon is enable as seng content is "ON”, and now there will arise short beep for
each operaon on control panel to call your aenon.
re 21 re 22
13. Restore factory segs
12.1 In system semode, press to o to third sepaere 8). Then press #1 to enter
factory ses restoraon mode. Press or to choose rese pae or not. Aer rese,
staon system se will be reset as follows:
CAL (User temperature calibran value): Cleared.
FIN OFF
CF (Temperature scales): Celsius
STB (Automa Standby): OFF
SDN (Automa shutdown): OFF
BL (Beepin): ON
Express temperature 1: 200
Express temperature 2: 300
Express temperature 3: 400
14. Exg system seg quickly
14.1 In system semode, press to o to third sepaere 8) as user want to exit
system semode quickly(Default automa ex me is 10 seconds),then press #2 to exit
system semode.
Mece
To ensure this product lifespan will not be shortened, user must pay aenon to follow
maers in usinthis product.
Do notuse this equipment for other purposes except solderi work.
Do not rack irons handle to remove residue solder on which will damae
this unit.
Do not tamper with this product and its internal components.
Do not modify this product and its internal parts.
Please choose accessories produced by manufacturer for replac parts.
Please rasp rather than cables for out.
Troublesg
Fault Code Or MalfcDescripCauses For
E0:Abnormal hea alarm of heater. Transformer damaed
Power MOSFET damaed

10
Fault Code Or Malfunc�on Descrip�on Causes For Malfunc�on
Short circuit for heater or soldering iron wires
E 1: Abnormal hea up alarming Open circuit for hea element.
error for heag element.
E 2: Open circuit alarming for sensors Heater damaged.
Wiring error of hea element.
Not well connected Check power cord plug and fuse (Please replace it with
same specica.
Temperature displayed is not correct Please check whether the soldering iron is damaged and
calibrate it again.
Unreadable code Switch power oand restart soldering sta.
Aer malfuncn occurred, maintenance workshould be done through assigned technician by
original manufacturer or technician.
Service contact
Service Department Tel :(+86) 0755 61618282
Appendix
Machine exploded view:

11
PartsList
Number Material name Number Material name
Power cord Key group 1
Fuse(T1.0A|220V/230V240V),(T2.0
A|100V/110V/120V) Key group 2
Male socket Power switch
Soldering iron stand Output receptacle
Cleaning sponge Soldering iron handle cables
Housing Soldering iron handle end sleeve
PCBA screws Soldering iron handle end
PCBA board Soldering iron handle sleeve
Transformers screws Soldering iron handle
Transformers Hea element unit
Boom housing base
screws for boom housingSoldering
Machine base swivel nut
Front panel Soldering tube
Transparent mask

12
Interchangeable soldering p ca (900M series)
3
900M-T-1.6D
5
900M-T-2.4D
6.5
900M-T-3.2D
900M-T-B
900M-T-0.8D
900M-T-1.2D
900M-T-1.2LD
900M-T-SB
900M-T-LB
900M-T-1C
900M-T-1CF*
60°
900M-T-2C
900M-T-2CF* 45°
900M-T-3C
900M-T-3CF*
45°
900M-T-4C
900M-T-4CF*
45°
900M-T-0.5C
45°
900M-T-0.8C
45°
900M-T-1.5CF*
60°
900M-T-K
45°
2
900M-T-RT
2
900M-T-R
900M-T-I
900M-T-H
25°
900M-T-1.8H
25°
900M-T-S4
900M-T-SI
17(0.66)
(0.031)
Φ0.8
0.6(0.024)
17(0.66)
(0.047)
Φ1.2
0.7(0.028)
17(0.66)
(0.1)
(0.06)
Φ1.6
0.5(0.02)
17(0.66)
(0.2)
(0.09)
Φ2.4
0.5(0.02)
17(0.66)
(0.25)
(0.12)
Φ3.2
0.5(0.02)
25(0.98)
(0.047)
Φ1.2
0.7(0.028)
14(0.55)
R0.2(0.008)
(0.08)
Φ2
17(0.66)
R0.5(0.02)
25(0.98)
R0.2(0.008)
15(0.6)
17(0.66)
(0.031)
Φ0.8
15(0.6)
15(0.6)
(0.06)
Φ1.5
17(0.66)
(0.08)
Φ2
17(0.66)
(0.1)
Φ3
(0.1)
Φ3
17(0.66)
(0.16)
Φ4
(0.16)
Φ4
15(0.6)
(0.2)
Φ5
2(0.08)
17(0.66)
(0.08)
(0.2)
Φ5.1
(0.1)
3.2
17(0.66)
(0.08)
(0.17)
Φ4.2
(0.08)
2
13(0.51)
R0.2(0.008)
17(0.66)
R0.2(0.008)
19(0.74)
(0.29)
7.5
1.2(0.04)
3.5(0.13)
14(0.5)
(0.29)
7.5
1(0.04)
1.8(0.07)
15(0.6)
R0.25(0.01)
(0.08)
Φ2
)40.0(1 )2
0
.0(5.
0
900M-T-S10*
17
(0.66)
55°
900M-T-S11*
17
(0.66)
55°

13
Interchangeable soldering p ca (AT800 series)

Model ______________Product NO. ___________
QC _________________Produc date ________
Sales clerk ___________Sale date _____________
Warranty
This product warraty period cover 12 moths from the day this
product purchased. We willmake free tee for ayquality
problem itself if this card a receipt provided. We will repair a
retu your device withi2 workdays aer receivg repairi req
device.
Note: please aach this warraty card if you wat your
device to be repaired without charge.
Cer�ficate of Product

SHENZHEN ATTEN TECHNOLOGY CO., LTD.
Soldering Iron Soldering Sta n Hot Air Rework Sta n
func n Rework System BGA Rework System
Regulated DC Power Supply Switching DC Power Supply
Programmable Power Supply
RF Microwave Instruments RF Microwave Components
Aenuator Amplifier Coaxial Load
THE
INSTRUMENTS BRAND IN CHINA
©2014 ATTEN CORPORATION
MADE IN CHINA
S/N
SHENZHEN ATTEN TECHNOLOGY CO., LTD.
CBN027457 (A)
This manual suits for next models
2
Table of contents
Other Atten Soldering Gun manuals