Audi VAS 6160-VPC Operating and installation instructions

Service Information
Page 1 of 22 ver1.3
© 2013 Audi of America, Inc.
All rights reserved. Information contained in this document is based on the latest information available at the time of printing and is subject to the copyright and other intellectual
property rights of Audi of America, Inc., its affiliated companies and its licensors. All rights are reserved to make changes at any time without notice. No part of this document may
be reproduced, stored in a retrieval system, or transmitted in any form or by any means, electronic, mechanical, photocopying, recording, or otherwise, nor may these materials be
modified or reposted to other sites, without the prior expressed written permission of the publisher.
VAS Tester Number: AVT-13-02
Subject: VAS 6160-VPC Diagnostic Tablet - Unpacking and Setup
Instructions Date: Jan. 25, 2013
Please print this document and retain for future reference
1.0 – Safety Instructions
1.1 – Explanation of Symbols
Symbols with the following meanings are used in the safety instructions of the Operating Manuals, the
startup/unpacking instructions and other documentation provided, in screen displays on the tester during
operation and on the products themselves:
Warning! Text with this symbol contains information regarding your safety and how you
can reduce the risk of serious or fatal injuries. The Warning symbol deserves
special attention with respect to your safety.
Caution! Text with this symbol contains information on how you can prevent damage to
the vehicle and to the device. The Caution symbol informs you that failure to
comply with such information can result in damage to the vehicle and/or tester,
e.g.: ensure touch screen is not touched with sharp objects.
Note Text with this symbol contains additional, useful information. The Note symbol
indicates important information on the product, its use and other items.
1.2 – Reference to Additional Safety Instructions
The following contains the general safety instructions that apply to all VAS diagnostic console, tablet and
laptop devices. Additional safety instructions can be found in the applicable device Operating Manuals. It is
thus important to read the device Operating Manual prior to use. Safety instructions may also appear on
the screen of the tester and displayed by the diagnostic software. Heed all instructions displayed.
Notes
These unpacking & setup instruction apply ONLY to the VAS 6160-VPC Diagnostic
Tablets included with the VAS-VPC/TSP Testing System Package (along with VAS 6356
Test Instrument Box, VAS 6556A Mobile Trolley & VAS 5051/51D Printer).
The tablet’s “-VPC” designation indicates it is licensed for, and preloaded with VAS-PC Base
software.
The following instructions contain cross-references to instructions located in related documents
posted on ServiceNet. Use a dealership PC or laptop connected to a printer to access these
documents as instructed.

Service Information
Page 2 of 22
© 2013 Audi of America, Inc.
All rights reserved. Information contained in this document is based on the latest information available at the time of printing and is subject to the copyright and other intellectual
property rights of Audi of America, Inc., its affiliated companies and its licensors. All rights are reserved to make changes at any time without notice. No part of this document may
be reproduced, stored in a retrieval system, or transmitted in any form or by any means, electronic, mechanical, photocopying, recording, or otherwise, nor may these materials be
modified or reposted to other sites, without the prior expressed written permission of the publisher.
1.3 – Important Safety Instructions
Warning!
1. Read all instructions.
2. If the power cable or unit is damaged, the equipment may be not used until inspected by a
qualified technician.
3. Do not allow any cables or leads to drape over the edges of tables, benches or stands. Prevent
hot parts or rotating fans from coming into contact with cables or leads.
4. Use of an extension cable is prohibited. When performing tests, only the specified cables and
leads may be used.
5. Always unplug the equipment when it is not in use. Never unplug the power cable from the outlet
by pulling on the cable. Grasp the connector to disconnect the equipment from the power outlet.
6. The tester may not be used in the vicinity of open fuel containers, as there is otherwise the risk of
fire or explosion.
7. When you are working on internal combustion engines, ensure adequate ventilation. Otherwise,
there is a risk of poisoning.
8. Use the equipment only in the manner described. Use only the accessories listed by the
manufacturer.
9. Risk of explosion. The equipment has spark-generating components inside and for this reason
must not be used in areas with flammable vapors. The equipment should be operated at a height
of at least 460 mm (18 inches) above the floor, since gasoline and other possible vapors collect
at floor level.
10. The equipment complies with Safety Class 1 when under power and is equipped with a safety
tested power cable. Connect the equipment only to electrical service or power outlets with a
grounded protective conductor (TN network).
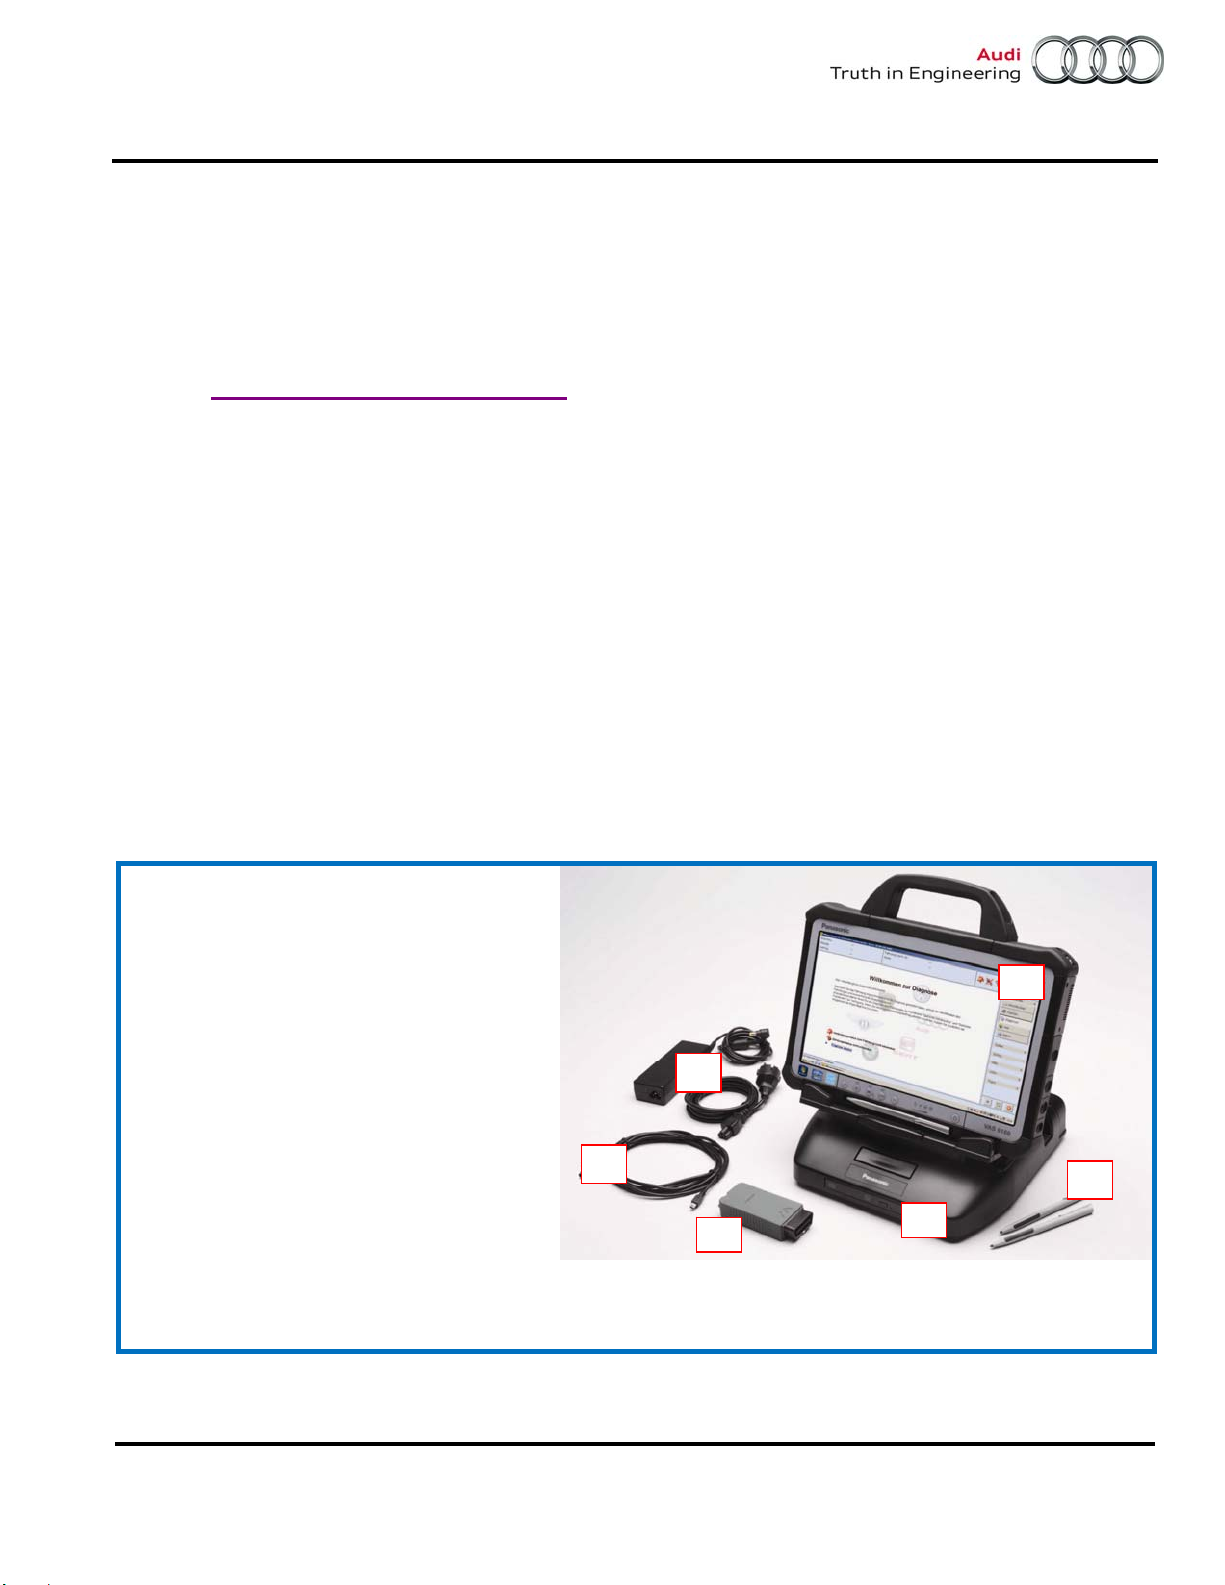
11. Fasten the diagnostic tablet securely to the rear seat of the vehicle during test drives. A second
person on the rear seat must operate the diagnostic tablet. For safety reasons, operation on the
front seat and without being fastened securely is prohibited (e.g. risk of triggering the airbag).
12. Electric ignition systems have voltages of up to approx. 30 kV. General Safety guidelines for
workshops are to be observed at all times.
13. Opening of the tester, including its accessories, by unauthorized personnel can result in serious
risk to the individual and the equipment.
14. If the power cable, a diagnostic or measuring cable, the tester or any other accessory under
power is damaged, their use is prohibited until a qualified technician has given approval to do so.
15. If you will not be using the equipment for a longer period of time, please switch it off at the on/off
switch and disconnect it from the power if the rechargeable battery is charged. Switching off at
the on/off switch alone does not ensure that the power supply, charging circuit or any connected
accessory has been disconnected from power.
16. Data transmission lines should not be connected or disconnected during a thunderstorm nor
should the equipment itself be operated.

Service Information
Page 3 of 22
© 2013 Audi of America, Inc.
All rights reserved. Information contained in this document is based on the latest information available at the time of printing and is subject to the copyright and other intellectual
property rights of Audi of America, Inc., its affiliated companies and its licensors. All rights are reserved to make changes at any time without notice. No part of this document may
be reproduced, stored in a retrieval system, or transmitted in any form or by any means, electronic, mechanical, photocopying, recording, or otherwise, nor may these materials be
modified or reposted to other sites, without the prior expressed written permission of the publisher.
1.4 – Safety Instructions for Wireless Units
Warning!
1. No antenna modifications, e.g. relocation or use of other antennas or transmitters, are permitted
on units approved for wireless operation.
2. Do not use a portable transmitter (e.g. wireless network (WLAN) or Bluetooth device) in the
vicinity of unshielded detonator caps or in an explosive atmosphere, unless the device has been
modified in a way that permits such use.
3. Information regarding Bluetooth and W-LAN approval in various countries may be found in the
device Operating Manual and the VAS 5054A / VAS5055 information located in the
Administration function of the VAS-PC diagnostic software.
Caution!
1. Line voltage fluctuations and deviations exceeding the permissible tolerance can result in
malfunction and damage to the diagnostic device.
2. When operating the VAS 6160-VPC in a workshop cart, ensure that the power adapter has
adequate ventilation. Remember that the charging circuit is operating even when the tester is
switched off. This is also true in the power saving mode.
3. When connecting other make vehicles:
The VAS 6160-VPC diagnostic tablet was developed and specified for vehicles manufactured
by the Volkswagen Group. Connecting the tester or remote diagnosis head interface directly
to a vehicle from another manufacturer, may cause damage to the vehicle’s electrical system.
If attempting to use the generally applicable OBD functions for self-diagnosis of other make
vehicles, the OBD adapter cable VAS 5052/16 should be connected between the diagnostic
head and diagnosis connection in the vehicle.
4. When handling the rechargeable battery:
The rechargeable battery should be replaced only by properly trained personnel.
Never short-circuit the rechargeable battery.
Never throw the rechargeable battery into a fire.
Dispose of/recycle the rechargeable battery only when discharged and in accordance with
local regulations.
Continued …4/

Service Information
Page 4 of 22
© 2013 Audi of America, Inc.
All rights reserved. Information contained in this document is based on the latest information available at the time of printing and is subject to the copyright and other intellectual
property rights of Audi of America, Inc., its affiliated companies and its licensors. All rights are reserved to make changes at any time without notice. No part of this document may
be reproduced, stored in a retrieval system, or transmitted in any form or by any means, electronic, mechanical, photocopying, recording, or otherwise, nor may these materials be
modified or reposted to other sites, without the prior expressed written permission of the publisher.
2.0 – Important Information
2.1 – Windows XP®Operating System Recovery
2.2 – Shipping Damage / Incomplete Shipment
Please check the following items when unpacking/starting your VAS 6160-VPC:
1. Packaging damaged:
Have the damage confirmed in writing on the shipping documents by the delivery service and
report it immediately.
2. Packaging in good condition, but contents damaged:
Report damage in writing immediately.
3. Incomplete shipment:
Please check the contents list as per instructions in Section 4.0 to determine whether your
shipment is complete. Please report an incomplete shipment in writing immediately.
2.3 – Temperature Equalization
Caution!
If the VAS 6160-VPC is delivered during winter months, efforts must be made to prevent the
formation of condensation within the device. For this reason we recommend the device be left
unattended at room temperature for approximately 3 hours prior to connecting/switching on for
temperature compensation purposes.
2.4 – Safety and Startup Instructions
Please read the safety and startup instructions carefully prior to startup.
Note
DO NOT use the Panasonic – Windows®system CDs included with this shipment to
perform system recovery!
The Windows XP®operating system on VAS 6160-VPC is recovered from a partition on the
hard drive. If system recovery becomes necessary, refer to Service Information document
title: VAS 6160/-VPC Diagnostic Tablet - System Recovery Instructions located in the
Workshop Equipment – VAS Tester section of ServiceNet.
Using the Panasonic system CDs erases the VAS 6160-VPC partitions and recovery data, and
installs a standard Windows 7®operating system. This prevents reinstallation of the VAS-PC
diagnostic software.
Please mark the Panasonic system CDs with an appropriate note (example: DO NOT USE!)
and set aside where they cannot be accessed by dealership service or IT personnel.

Service Information
Page 5 of 22
© 2013 Audi of America, Inc.
All rights reserved. Information contained in this document is based on the latest information available at the time of printing and is subject to the copyright and other intellectual
property rights of Audi of America, Inc., its affiliated companies and its licensors. All rights are reserved to make changes at any time without notice. No part of this document may
be reproduced, stored in a retrieval system, or transmitted in any form or by any means, electronic, mechanical, photocopying, recording, or otherwise, nor may these materials be
modified or reposted to other sites, without the prior expressed written permission of the publisher.
2.5 – Purchase Documentation
Please retain your shipping documents as proof of purchase and delivery.
2.6 – Warranty Registration
Please register your new tablet for warranty coverage as soon as possible. Warrantable repairs will only be
performed on registered units. To register your unit:
Go to http://vw.spx-registrations.com
Select VAS6160 and VASPC(Siemens) from the drop-down menus.
Answer the remaining prompts as applicable.
3.0 – Unpacking Instructions
The VAS 6160-VPC is delivered with the tablet unit and docking station (port replicator) packed separately
in the main shipping box.
1. Unpack all parts; then remove the protective film from the tablet and the docking station (port
replicator).
2. Dispose of the packaging material in accordance with local regulations.
3. Check the contents for completeness as instructed in Section 4.0 - Contents of Carton.
4. In case of shipping damage or an incomplete shipment, proceed as described in Section 13.0 -
Malfunctions and Support.
4.0 – Contents of Carton
Confirm your VAS 6160-VPC shipment contains the following items (check the boxes provided):
1. VAS 6160-VPC
(Panasonic CF-D1AV1)
2. Docking Station with CD/DVD drive
3. A/C Power Adapter/cables
4. VAS 5054A Transmitter Head
5. VAS 5054A USB Cable (“Rugged
USB 2.0”)
6. Stylus
Rechargeable Battery*
Operating Manuals for Panasonic CF-
D1 series tablet and docking station*
Service Manager cover letter and
GeKo Certificate Request form*
1
2
4
5
3
6

Service Information
Page 6 of 22
© 2013 Audi of America, Inc.
All rights reserved. Information contained in this document is based on the latest information available at the time of printing and is subject to the copyright and other intellectual
property rights of Audi of America, Inc., its affiliated companies and its licensors. All rights are reserved to make changes at any time without notice. No part of this document may
be reproduced, stored in a retrieval system, or transmitted in any form or by any means, electronic, mechanical, photocopying, recording, or otherwise, nor may these materials be
modified or reposted to other sites, without the prior expressed written permission of the publisher.
5.0 – Install Rechargeable Battery Pack
The rechargeable battery pack may or may not be pre-installed. If not installed, remove battery from its
packaging and install as follows:
1. On the left-hand underside of the tablet, slide the battery compartment lock to the right and downward
as illustrated -arrows-, then open the battery compartment cover:
2. Slide the rechargeable battery pack into the compartment until it connects firmly with the contacts.
3. Close battery compartment cover and re-secure the lock.
Continued …7/
Caution!
When handling the rechargeable battery:
The battery should be replaced only by properly trained personnel.
Never short-circuit the battery.
Never throw the battery into a fire.
Dispose of/recycle the battery only when discharged and in accordance with local regulations.
Caution!
Ensure battery compartment cover is locked at all times. Otherwise, the battery pack may fall out
during use or transport.

Service Information
Page 7 of 22
© 2013 Audi of America, Inc.
All rights reserved. Information contained in this document is based on the latest information available at the time of printing and is subject to the copyright and other intellectual
property rights of Audi of America, Inc., its affiliated companies and its licensors. All rights are reserved to make changes at any time without notice. No part of this document may
be reproduced, stored in a retrieval system, or transmitted in any form or by any means, electronic, mechanical, photocopying, recording, or otherwise, nor may these materials be
modified or reposted to other sites, without the prior expressed written permission of the publisher.
6.0 – Connecting to Power
The tablet is connected to power either via the docking station (port replicator) connection to the A/C
power adapter, directly via the A/C power adapter or run from the internal rechargeable battery pack.
7.0 – Initial Start and Setup
7.1 - Preparation
The initial startup must be performed with the tablet removed from the docking station (port replicator)
and the wireless switch in the OFF position.
Additional information can be found in the Panasonic CF-D1 series Operating Manual.
1. On the upper left-hand side of the tablet, open the access cover marked “SC / EX”. If necessary, slide
the wireless operation switch to the OFF position -arrow-:
Note
For optimum battery performance and service life, please heed the battery charging and recalibration
instruction documents included with the Panasonic program suite. After 6160V set up, locate the
documents as follows:
2. From the Windows desktop, go to Start > All Programs > Panasonic > Battery
3. Select Battery Recalibration or Important Tips
Caution!
The A/C power adapter includes a country-specific power cable (UL-approved or CSA-approved,
oil-resistant power cord).
Operation on ungrounded or impedance-grounded electrical networks (IT electrical networks) is
prohibited.
Use only the original Panasonic CF-D1 power adapter. For additional information (part number
etc.), refer to the CF-D1 Operating Manual.

Service Information
Page 8 of 22
© 2013 Audi of America, Inc.
All rights reserved. Information contained in this document is based on the latest information available at the time of printing and is subject to the copyright and other intellectual
property rights of Audi of America, Inc., its affiliated companies and its licensors. All rights are reserved to make changes at any time without notice. No part of this document may
be reproduced, stored in a retrieval system, or transmitted in any form or by any means, electronic, mechanical, photocopying, recording, or otherwise, nor may these materials be
modified or reposted to other sites, without the prior expressed written permission of the publisher.
2. On the lower right-hand side of the tablet, open the cover for the DC IN 15.6V (adapter) port. Connect
the A/C power adapter cable to the DC adapter port -arrow- and a 115V A/C outlet:
7.2 – Interface Connections
For additional information on interface connections, refer to the Panasonic CF-D1 series and docking
station (port replicator) Operating Manuals.
7.3 – Switching the Unit On and Off
Switch on the tablet by pressing the on/off button on the front of the tablet for approximately 1 second. The
tablet boots up and the Windows user interface appears.
7.4 – Windows XP - Initial Setup
When the tablet starts for the first time, the initial Windows XP setup screens are displayed. All user
settings performed here can also be changed at any time through Windows Control Panel.
After the Windows XP Welcome and setup screen is displayed…
1. Review the Regional and Language options to ensure all settings are indicated as English (United
States / EN) etc. Change and save if necessary. Click Next.
2. Set the Date, Time, Time Zone and Daylight Savings settings as applicable to your location and click
Next. The system saves various settings and then automatically reboots to the Windows desktop.
Caution!
When switching the tablet off after normal use, DO NOT press and hold the on/off button for
longer than 5 seconds! This executes a forced shutdown which may result in hard drive faults.
To switch off the tablet after normal use, always click “Start” from the Windows desktop and then
select “Turn Off Computer…” and then “Turn Off”.

Service Information
Page 9 of 22
© 2013 Audi of America, Inc.
All rights reserved. Information contained in this document is based on the latest information available at the time of printing and is subject to the copyright and other intellectual
property rights of Audi of America, Inc., its affiliated companies and its licensors. All rights are reserved to make changes at any time without notice. No part of this document may
be reproduced, stored in a retrieval system, or transmitted in any form or by any means, electronic, mechanical, photocopying, recording, or otherwise, nor may these materials be
modified or reposted to other sites, without the prior expressed written permission of the publisher.
8.0 – Network Configuration & Netviewer
8.1 – Preparation
1. Temporarily connect a USB mouse and keyboard to tablet (to aid with selections and input).
2. Connect network (Ethernet) cable to tablet.
8.2 – Set Computer Name
We recommend the computer name be set before proceeding with the remaining setup.
For a suggested method to build, set and validate computer names, refer to Service Information
document title: VAS Diagnostic Device Computer Name Builder in the Workshop Equipment – VAS
Tester section of ServiceNet.
8.3 – Configure Static IP Addresses
This section applies ONLY to VAS 6160-VPC used in dealership networks using static IP addresses (the
tablet is set to DHCP by default). If your dealership network is configured using DHCP, proceed to
Section 8.3 – Download and Install Netviewer Software.
We recommend that you ask your dealership systems administrator or IT professional for assistance with
this step if you are unfamiliar with the process, or call the IT Service Desk at: 866-892-3375.
3. Open the Windows Start menu by clicking Start, and then select Settings, then Control Panel.
4. Scroll down (if necessary) and select Network Connections.
5. From the Network Connections dialog, right click (select) Local Area Connection and open its
Properties dialog box.
6. Click on Internet Protocol (TCP/IP).
7. In the General tab, check “Use the following IP addresses” to open the IP data window.
8. Fill in all IP and DNS address fields as appropriate to your dealership. Ask your dealership systems
administrator or IT professional for assistance with this step if you do not know the necessary entries.
9. Select OK and close all dialog boxes, and Restart the tablet (Start > Shut down > Restart).
10. Connect a dealership network Ethernet cable to the tablet and confirm internet connectivity, i.e.: launch
Internet Explorer.
Notes
Should more than one VAS diagnostic device be connected to the dealership LAN, each device
must use a different computer name. The VAS-PC application refers to device computer name
identification as the VAS Station Name.
While various computer naming methods may be used, each must ensure that the computer
names for all individual devices on a network are different.
The computer name must be determined (“built”) and set prior to use of diagnostic application
functions requiring the use of a dealership LAN connection to the Internet.

Service Information
Page 10 of 22
© 2013 Audi of America, Inc.
All rights reserved. Information contained in this document is based on the latest information available at the time of printing and is subject to the copyright and other intellectual
property rights of Audi of America, Inc., its affiliated companies and its licensors. All rights are reserved to make changes at any time without notice. No part of this document may
be reproduced, stored in a retrieval system, or transmitted in any form or by any means, electronic, mechanical, photocopying, recording, or otherwise, nor may these materials be
modified or reposted to other sites, without the prior expressed written permission of the publisher.
8.4 – Download and Install Netviewer Software
An active internet connection must be available before continuing, i.e.: static IP configuration performed as
instructed in Section 8.2 or DHCP connection confirmed.
1. Shut down VAS-PC if running.
2. From the Windows desktop, launch Internet Explorer.
3. Logon to ServiceNet.
4. From the Workshop Equipment section, select VAS Tester > Software.
5. Right click the link to the Netviewer one2one – Telediagnosis Software.
6. Select Save Target As… from the menu and save file to the Windows desktop.
7. When the save is complete select “Close” from the dialog box and close all remaining windows.
9.0 – VAS 5054A Transmitter Head - Overview
9.1 – VAS 5054A Bluetooth (wireless) Operation
The VAS 6160-VPC is equipped with a Bluetooth interface for operation of the supplied VAS 5054A
Transmitter Head.
Bluetooth (wireless) operation is possible only with the tablet wireless operation switch in the ON
position. Visible confirmation of wireless operation is via the wireless operation indicator (green LED)
on the front panel below the touch screen -arrow-:
The VAS 5054A Transmitter Head is powered by the vehicle Data Link Connector (DLC) when
connected, and communicates with the tablet and the diagnostic software via Bluetooth (wireless) or
the via the supplied USB cable.
The VAS 5054A Bluetooth configuration must be confirmed prior to placing the tablet into service. This
takes place in Section 12.0.
Continued …11/
Note
Netviewer telediagnosis software enables VWGoA support personnel to access your device
remotely during support call consultation. When necessary, consultants will instruct you to start
the Netviewer application, and they will provide a session number to start a remote diagnosis
session.

Service Information
Page 11 of 22
© 2013 Audi of America, Inc.
All rights reserved. Information contained in this document is based on the latest information available at the time of printing and is subject to the copyright and other intellectual
property rights of Audi of America, Inc., its affiliated companies and its licensors. All rights are reserved to make changes at any time without notice. No part of this document may
be reproduced, stored in a retrieval system, or transmitted in any form or by any means, electronic, mechanical, photocopying, recording, or otherwise, nor may these materials be
modified or reposted to other sites, without the prior expressed written permission of the publisher.
9.2 – VAS 5054A USB (cabled) Operation
If the tablet is used to perform Software Version Management (SVM) flash procedures or ant-theft
immobilizer adaptations, a USB (cabled) connection must be used between the VAS 5054A
transmitter head and the tablet. This ensures an uninterrupted data stream.
Prior to first use with a USB cable, the tablet and transmitter head must be configured for USB
(cabled) operation. For instructions refer to Service Information document title: VAS 5054A
Transmitter Head - USB Configuration & Function in the Workshop Equipment – VAS Tester
section of ServiceNet.
9.3 – VAS 5055 Diagnosis Interface (optional)
The optional VAS 5055 diagnosis interface connects between the vehicle and the VAS 6160-VPC via
an integrated USB cable. The VAS 5055 attaches to the vehicle DLC and receives power from it.
9.4 – Additional Information
Before proceeding to use the VAS 6160-VPC, please read the "Panasonic CF-D1 Series Operating
Manual", containing additional important information regarding the unit, its accessories and its care.
Notes
For USB (cabled) connection of VAS 6160-VPC to VAS 5054A, the supplied USB cable is of
the Rugged USB 2.0 type. A circular, secure (locked) connection is used.
On the lower right-hand side of the tablet, open the cover for the Rugged USB 2.0 port and
connect by lining up the two dots and inserting the connection straight into the port -arrow 1-:
To disconnect, release the connector lock -A- by sliding the locking collar away from the tablet
-arrow 2-:
1
2
A

Service Information
Page 12 of 22
© 2013 Audi of America, Inc.
All rights reserved. Information contained in this document is based on the latest information available at the time of printing and is subject to the copyright and other intellectual
property rights of Audi of America, Inc., its affiliated companies and its licensors. All rights are reserved to make changes at any time without notice. No part of this document may
be reproduced, stored in a retrieval system, or transmitted in any form or by any means, electronic, mechanical, photocopying, recording, or otherwise, nor may these materials be
modified or reposted to other sites, without the prior expressed written permission of the publisher.
10.0 – Confirm, Install & Configure Diagnostic Software
10.1 – VAS-PC - General Information
Current and future VAS-PC Base and Brand software for existing VAS diagnostic console, tablet and
laptop devices also apply to VAS 6160-VPC diagnostic tablets.
The VAS-PC Base software version that was current at the time of supplier preparation is preinstalled.
However, updated Base software versions may have been issued in the meantime. As a result, the current
Base software version must first be determined and if necessary, installed prior to using the tablet for
vehicle diagnostics covered under warranty.
In all cases, the installed VAS-PC Base software must be configured and the current Audi Brand
software version determined and installed prior to placing the tablet into service.
10.2 – Confirm Latest VAS-PC Software Versions
1. Using a dealership PC or laptop connected to a printer, logon to ServiceNet.
2. From the Workshop Equipment section, select VAS Tester > Software.
3. Refer to document title: Current VAS-PC Software Versions.
4. Record the current VAS-PC Base CD Version & Ordering Number:
5. Record the current Audi Brand DVD Version & Ordering Number:
6. Retrieve the current Audi Brand DVD version from your VAS software disc storage. Note that this disc
was used to update your existing VAS diagnostic devices in service with the latest version!
7. Disconnect the power adapter DC plug from the tablet and connect to the DC port on the base station
(port replicator).
8. Mount the VAS 6160-VPC to the base station (port replicator).
9. From the 6160-VPC Windows desktop, click the VAS-PC icon.
10.If a Note appears that the Transmitter Head is not configured properly, click OK, The transmitter head
is configured in Section 12.0.
11.If a Note appears with a software version expiry message: “Please install current base-CD” skip to
Step 13.
12.If the software version expiry Note above does not appear: Note the version number of the pre-
installed Base software from the VAS-PC Main / Start screen title header. Example: Version -
USA/CDN- / V19.01.XX:
If the pre-installed VAS-PC Base version is earlier than recorded in Step 4, install the current
version starting from Step 13 below.
If the pre-installed VAS-PC Base version is the same as recorded in Step 4, skip to Section 10.3
on Page 13.
13.Retrieve the current version VAS-PC Base CD from your VAS software disc storage. Note that this
disc was used to update your existing VAS diagnostic devices in service with the latest version!
14.From ServiceNet, go to the Workshop Equipment > VAS Tester > Service Information section.
Locate and print the Service Information document covering installation of the current VAS-PC Base
version. Example: VAS-PC Base V19.01.XX Installation Instructions.

Service Information
Page 13 of 22
© 2013 Audi of America, Inc.
All rights reserved. Information contained in this document is based on the latest information available at the time of printing and is subject to the copyright and other intellectual
property rights of Audi of America, Inc., its affiliated companies and its licensors. All rights are reserved to make changes at any time without notice. No part of this document may
be reproduced, stored in a retrieval system, or transmitted in any form or by any means, electronic, mechanical, photocopying, recording, or otherwise, nor may these materials be
modified or reposted to other sites, without the prior expressed written permission of the publisher.
15.Go to the Base installation document section “3.0 - Perform Base Software Installation”.
16.Follow the instructions (in order) in subsections “3.1 - Uninstall Previous Base Software” and “3.2 -
Install Base Software V19.01.XX”.
17.When the current Base software version installation is complete, proceed to Section 10.3 - Configure
VAS-PC Base Software below.
10.3 – Configure VAS-PC Base Software
Note
The Importer number and the Dealership number entry can only be performed once. Ensure
they are entered correctly as instructed with the next steps.
1. From the VAS-PC Main / Start screen, select Administration and then Enter workshop code.
2. Enter the Importer number using the virtual keypad: For the US market, the Importer Number is 444.
For the CDN market, the Importer Number is 999. Press Q.
3. Enter the last five digits of your Dealership number, and then press Q. Use substitution of alpha
characters as follows: A=1, B=2, C=3, D=4, E=5, F=6, G=7, J=8, S=9 & W=0.
4. After confirming the input, select OK to proceed. Selecting Cancel will allow re-entry of the Importer
number and Dealership number.

Service Information
Page 14 of 22
© 2013 Audi of America, Inc.
All rights reserved. Information contained in this document is based on the latest information available at the time of printing and is subject to the copyright and other intellectual
property rights of Audi of America, Inc., its affiliated companies and its licensors. All rights are reserved to make changes at any time without notice. No part of this document may
be reproduced, stored in a retrieval system, or transmitted in any form or by any means, electronic, mechanical, photocopying, recording, or otherwise, nor may these materials be
modified or reposted to other sites, without the prior expressed written permission of the publisher.
5. Enter the Dealership Identifier (typically, the Dealership name). Press Q twice to complete this step.
The dealership identifier entry can be changed at any time from the Administration menu.
6. Press the green “return” arrow () from the screen footer to return to the Administration menu.
10.4 – Install Current Audi Brand DVD
Notes
Only Brand DVDs in the same language and compatible with the Base CD version can be
loaded.
Installing a Brand DVD overwrites existing Brand data and erases any stored jobs.
To use Guided Fault Finding and Guided Functions, a Brand DVD must be installed.
The installation takes up to one hour per Brand DVD, depending on device type/condition.
1. Obtain the latest Audi Brand DVD as determined and recorded in Section 10.2, Step 5.
2. From the Windows desktop, start the VAS-PC application.
3. Insert the Brand DVD into the CD/DVD drive on the base station (port replicator).
4. From the VAS-PC Main / Start screen, select Administration.
5. Select Install update / Install Update CD.
An update confirmation is displayed. Select OK to continue.
6. Wait while the contents of the Brand DVD are installed.
When finished, the software closes the Administration screen and displays the Main / Start screen. A
brand symbol in the upper right of the screen shows which Brand DVDs are installed.
7. Remove the Brand CD from the CD/DVD drive and Close the VAS-PC application.
8. Return the VAS-PC Base and Brand discs to your disc storage.

Service Information
Page 15 of 22
© 2013 Audi of America, Inc.
All rights reserved. Information contained in this document is based on the latest information available at the time of printing and is subject to the copyright and other intellectual
property rights of Audi of America, Inc., its affiliated companies and its licensors. All rights are reserved to make changes at any time without notice. No part of this document may
be reproduced, stored in a retrieval system, or transmitted in any form or by any means, electronic, mechanical, photocopying, recording, or otherwise, nor may these materials be
modified or reposted to other sites, without the prior expressed written permission of the publisher.
10.5 – Offboard Diagnostic Information System Service (ODIS Service)
VAS 6160-VPC diagnostic tablets are eligible and recommended for the initial installation of ODIS Service
diagnostic software and subsequent update installations.
To install ODIS Service, prepare the tablet, request the license, install and configure the software etc. in
order, exactly as specified in the following Service Information document titles:
ODIS Service Installation Phase 1 - Preparation and License Request Instructions (eShop)
ODIS Service Installation Phase 2 - Software Installation & Configuration Instructions
ODIS Service Installation Phase 3 - Security Certificate Request & Installation Instructions
All ODIS Service installation documents are located in the Workshop Equipment – ODIS Service > ODIS
Service > Service Information section in ServiceNet.
When installing ODIS Service, always use the latest installation and update DVD versions!
11.0 – Import GeKo Certificate for VAS-PC Operation
As indicated on the “STOP! - Attention Service Manager” shipment cover letter, the supplied GeKo
Certificate Maintenance request form must first be completed and submitted to VWGoA Network Security.
The GeKo security certificate must be imported prior to using VAS-PC for immobilizer adaptation, SVM etc.
Notes
Prior to filling in the GeKo Certificate Maintenance request form, start the VAS-PC application
and select the Administration function. Note the Equipment Number displayed in the upper
right information header, and enter this number into the appropriate field in the certificate
request form.
Proceed with the instructions in this section only after receiving confirmation that the
certificate is staged and ready to import.
Use your existing VAS Commander CD V03.00.00.Remember that this CD would have been
used to import the GeKo Certificates to your existing VAS diagnostic devices currently in
service!
If you require assistance with this information in this section, contact your dealership system
administrator or the IT Service Desk at: 866-892-3375
Prerequisites:
Device mounted in base station (port replicator).
Active internet connection available and Ethernet (network) cable connected.
VAS Commander CD V03.00.00 on hand
Procedure:
1. Insert Commander CD V03.00.00 into the CD-DVD drive in the base station (port replicator). The CD
should start automatically (could take up to three minutes to start).

Service Information
Page 16 of 22
© 2013 Audi of America, Inc.
All rights reserved. Information contained in this document is based on the latest information available at the time of printing and is subject to the copyright and other intellectual
property rights of Audi of America, Inc., its affiliated companies and its licensors. All rights are reserved to make changes at any time without notice. No part of this document may
be reproduced, stored in a retrieval system, or transmitted in any form or by any means, electronic, mechanical, photocopying, recording, or otherwise, nor may these materials be
modified or reposted to other sites, without the prior expressed written permission of the publisher.
2. If the application does not start within three minutes, double click the My Computer icon on the
Windows desktop, then double click ANW_VK35 (E:).
3. When the VAS Commander application starts, select Certificate.
4. Use the keyboard to enter your entire Dealership number, and then select ImportCert.
5. If the application detects that a certificate has already been imported, a message is displayed. Select
Yes to overwrite the certificate.

Service Information
Page 17 of 22
© 2013 Audi of America, Inc.
All rights reserved. Information contained in this document is based on the latest information available at the time of printing and is subject to the copyright and other intellectual
property rights of Audi of America, Inc., its affiliated companies and its licensors. All rights are reserved to make changes at any time without notice. No part of this document may
be reproduced, stored in a retrieval system, or transmitted in any form or by any means, electronic, mechanical, photocopying, recording, or otherwise, nor may these materials be
modified or reposted to other sites, without the prior expressed written permission of the publisher.
6. When the first private exchange key import screen is displayed, select OK.
7. Select Yes to confirm the installation of the first certificate.
8. If the application detects that a certificate already exist on the tester, a message is displayed. Select
Yes to overwrite the existing certificate.

Service Information
Page 18 of 22
© 2013 Audi of America, Inc.
All rights reserved. Information contained in this document is based on the latest information available at the time of printing and is subject to the copyright and other intellectual
property rights of Audi of America, Inc., its affiliated companies and its licensors. All rights are reserved to make changes at any time without notice. No part of this document may
be reproduced, stored in a retrieval system, or transmitted in any form or by any means, electronic, mechanical, photocopying, recording, or otherwise, nor may these materials be
modified or reposted to other sites, without the prior expressed written permission of the publisher.
9. The tester will attempt to download the certificate. If an active internet connection is not available, or if
a certificate is not available, an error message is displayed.
If you require assistance with this step, contact your dealership system administrator or the IT Service
Desk at: 866-892-3375.
10. A confirmation message is displayed after the certificate is downloaded. Select OK to continue.
11. When the second private exchange key import screen is displayed, select OK.
12. Select Yes to confirm the installation of the second certificate.

Service Information
Page 19 of 22
© 2013 Audi of America, Inc.
All rights reserved. Information contained in this document is based on the latest information available at the time of printing and is subject to the copyright and other intellectual
property rights of Audi of America, Inc., its affiliated companies and its licensors. All rights are reserved to make changes at any time without notice. No part of this document may
be reproduced, stored in a retrieval system, or transmitted in any form or by any means, electronic, mechanical, photocopying, recording, or otherwise, nor may these materials be
modified or reposted to other sites, without the prior expressed written permission of the publisher.
13. If the application detects that a certificate already exist on the tester, a message is displayed. Select
Yes to overwrite the existing certificate.
14. The VAS certificate will be installed onto the device. When the installation is complete, select OK to
close the dialog.
15. Select Exit to close the VAS Commander application.
16. Remove the VAS Commander CD from the CD/DVD drive.
17. Restart the tablet (Start > Turn Off-Computer > Restart).
12.0 – Confirm and Enable Bluetooth for VAS 5054A Transmitter Head
Notes
As of the publication date of this document, the supplied VAS 5054A Transmitter Head may or
may not be pre-configured to the VAS 6160-VPC Windows Bluetooth and EDIC applications
prior to shipment.
If the supplied VAS 5054A IS NOT pre-configured for Bluetooth operation, it must first be
manually configured.
If the supplied VAS 5054A IS pre-configured for Bluetooth operation, it needs only to be
enabled, a power management setting confirmed and its operation confirmed.
We recommend the supplied 5054A remain permanently paired to the tablet at all times, and
that it not be temporarily paired to another VAS diagnostic tester console, tablet or laptop
device.
12.1 – Preparation
1. Locate and unpack the VAS 5054A Transmitter Head supplied with the shipment.
2. Record the complete VAS 5054A Serial Number (S#) from its label:
3. Ensure that the VAS-PC application is not running.

Service Information
Page 20 of 22
© 2013 Audi of America, Inc.
All rights reserved. Information contained in this document is based on the latest information available at the time of printing and is subject to the copyright and other intellectual
property rights of Audi of America, Inc., its affiliated companies and its licensors. All rights are reserved to make changes at any time without notice. No part of this document may
be reproduced, stored in a retrieval system, or transmitted in any form or by any means, electronic, mechanical, photocopying, recording, or otherwise, nor may these materials be
modified or reposted to other sites, without the prior expressed written permission of the publisher.
4. Slide the wireless operation switch on the tablet to the ON position -arrow-:
5. Connect a battery maintainer/charger to a vehicle as per the manufacturer’s directions.
6. Connect the VAS 5054A to the vehicle Data Link Connector (DLC) and switch the ignition on. The blue
LED on the transmitter head must flash.
12.2 – Confirm Bluetooth Configuration
1. From the VAS 6160-VPC Windows desktop go to Start > Settings > Control Panel.
2. Select Bluetooth Devices.
3. In the Devices tab, check if the supplied VAS 5054A and its serial number are listed.
If the supplied VAS 5054A and serial number (S#) IS NOT listed in the Devices window, it is not
preconfigured. The Bluetooth & VCI Manager configurations must be performed manually: Follow
the manual configuration instructions in Service Information document title: VAS 5054A
Transmitter Head – Bluetooth & EDIC Configuration located in the Workshop Equipment - VAS
Tester section in ServiceNet.
If the supplied VAS 5054A and serial number (S#) IS listed in the Devices window, it is
preconfigured. Proceed with Steps 4 through 15 below:
4. Select the Hardware tab.
5. From the Hardware tab display, select / highlight the device name ALPS Integrated Bluetooth
Device and click on Properties.
6. Select the Power Management tab.
7. Ensure that Allow the computer to turn off this device to save power is deselected, and click OK.
8. Close the Control Panel window.
9. From the 6160-VPC Windows desktop, start the VCI-Manager application.
Continued …21/
Table of contents