Audibel Virtue User manual

79458-010 4/07 © All rights reserved BKLT9458-02-EE-AB
www.audibel.com
0086
Behind-The-Ear
Operations Manual

About Your Hearing Instruments ..............2
Features and Controls ......................4
Open Fittings ............................5
Identification .............................6
Batteries ................................7
Earmold Insertion and Removal ..............12
Open Earmold Insertion and Removal .........13
On, Off and Volume Control .................15
Multimemory Settings ......................18
Directional Microphones ....................21
Using the Telephone .......................23
Direct Audio Input.........................27
Feedback................................29
Handling and Care ........................30
Troubleshooting Guide .....................37
Communication Strategies ..................38
Notes...................................42
FDA Information ..........................44
CONTENTS
Congratulations!
You’ve just taken the first step
on your journey toward better
hearing. Use this manual as a
guide to the use and care of your
new hearing instruments. If you
have questions, your hearing
professional is trained and willing
to help.
Your new hearing instruments
are customized to your hearing
loss and lifestyle. Your hearing
professional can make changes
to the instruments to match your
needs. He or she will make note
of these changes in boxes like the
one shown below.
1

2
3
You have Behind-The-Ear (BTE) hearing
instruments. Your hearing instruments were chosen
for you, to treat your hearing loss. Your hearing
professional will select the features specific to your
hearing instruments.
Your BTE has two controls that operate
the instrument: a volume control and a
multimemory button.
It is important that you are familiar with the control
locations and functions on your instrument.
Your hearing instrument style is:
BTE with custom earmold (page 12)
BTE with open fit earbud (page 13)
BTE with open custom earmold (page 13)
Your hearing instrument features include:
Multimemory settings
Automatic telephone response
Automatic telecoil
Telecoil
Directional microphones
ABOUT YOUR HEARING INSTRUMENTS ABOUT YOUR HEARING INSTRUMENTS
BTE WITH CUSTOM EARMOLD

4
5
Your BTE may be configured for an open fitting.
This method of fitting uses one of two different
ear configurations, a soft earbud or an open
custom earmold.
Your hearing instrument is configured for an
open fitting.
FEATURES AND CONTROLS OPEN FITTINGS
EARHOOK
DIRECTIONAL
MICROPHONE
SOUND INLET
VOLUME CONTROL
MULTIMEMORY BUTTON
BATTERY COMPARTMENT
WITH ON/OFF CONTROL
BTE OPEN FITTING
WITH EARBUD
BTE OPEN FITTING WITH
OPEN CUSTOM EARMOLD

6
7
Serial Number and Identification
Each instrument can be identified by its serial
number, located on the inside of the battery
compartment.
Left and right hearing instruments are identified by
the color of an indicator on the battery compartment.
Battery Size
Your hearing instruments use a size 13 battery. Your
batteries have an orange mark on the package.
It is very important to use the correct size and type
battery for your hearing instrument.
Because of their size,
it’s a good idea to change
and replace batteries at
a table or desk to reduce
the risk of dropping the
instrument or battery.
To insert or replace the
battery, open the battery
compartment by placing
your fingernail under the
edge of the swing-out door
and gently pull away from
the instrument. Do not open
the battery door too far or
damage is likely to occur.
IDENTIFICATION BATTERIES
RED is for
RIGHT ear,
BLUE is for
LEFT ear.
00-000000
SERIAL
NUMBER
MANUFACTURER’S NAME
MODEL NAME
LEFT/RIGHT
INDICATOR
BATTERY
COMPARTMENT
DIRECT
AUDIO
INPUT
CONTACT

8
9
Changing Batteries
Remove the old battery by
pushing it out the top of the
fully opened door.
DO NOT pull it out the side
of the door.
Place the new battery in the
compartment with the plus
(+) sign facing up.
Close the battery
compartment by swinging
the door until it snaps shut.
NEVER FORCE THE DOOR
SHUT. This could result in
serious damage. If the door
will not close easily, check that the battery is placed
properly in the compartment and is not upside down.
Low Battery Indicator
Your hearing professional will check the box below
if the low battery indicator for your instruments is
turned on.
When the low battery indicator is turned on, your
hearing instruments will beep four times going from
a high-to-low pitch when the battery’s voltage is low.
Replace the battery when you hear these tones.
When the battery is too weak to power the hearing
instrument, you will hear a tone for two seconds and
the instrument will shut down. Replace the battery
when this happens.
The low battery indicator is turned on.
BATTERIES BATTERIES

10
11
Locking the Battery Compartment
Your BTE has a tamper-
resistant, locking
battery compartment.
The lock switch is
located on the bottom
of the battery door.
Locking the battery
compartment is not
necessary for
normal operation.
To lock the door, use
an appropriate tool
to slide the recessed
switch to the left until
it “clicks” and the
colored mark is visible.
Battery Caution
Because batteries can vary in performance, your
hearing professional is your best source for lifespan
estimates and verification that you are using the
proper size and type.
To help prevent the accidental ingestion of batteries,
keep them out of the reach of children and pets.
Always check your medication before ingesting –
batteries have been mistaken for pills.
Never put batteries in your mouth for any reason, as
they can easily be unintentionally swallowed.
Dispose of used batteries immediately, using
the proper waste or recycling receptacle.
m WARNING:
HEARING INSTRUMENT BATTERIES ARE
DANGEROUS IF SWALLOWED.
National Button Battery
Ingestion Hotline (202) 625-3333
BATTERIES BATTERIES
12
13
Before placing the BTE with an earmold into your ear,
be sure the battery is inserted and the battery door is
closed securely.
To insert the earmold,
hold it with your thumb
and forefinger on the outer
side near the tubing. Gently
insert the canal tip into your
ear canal.
Then gently press the
earmold into place with
your finger.
Carefully place the
instrument over the top of
the ear until it rests securely
in place.
To remove, take the instrument from behind your
ear and gently pull the earmold outward. Pulling
down on the earlobe may help loosen the earmold
as it is removed.
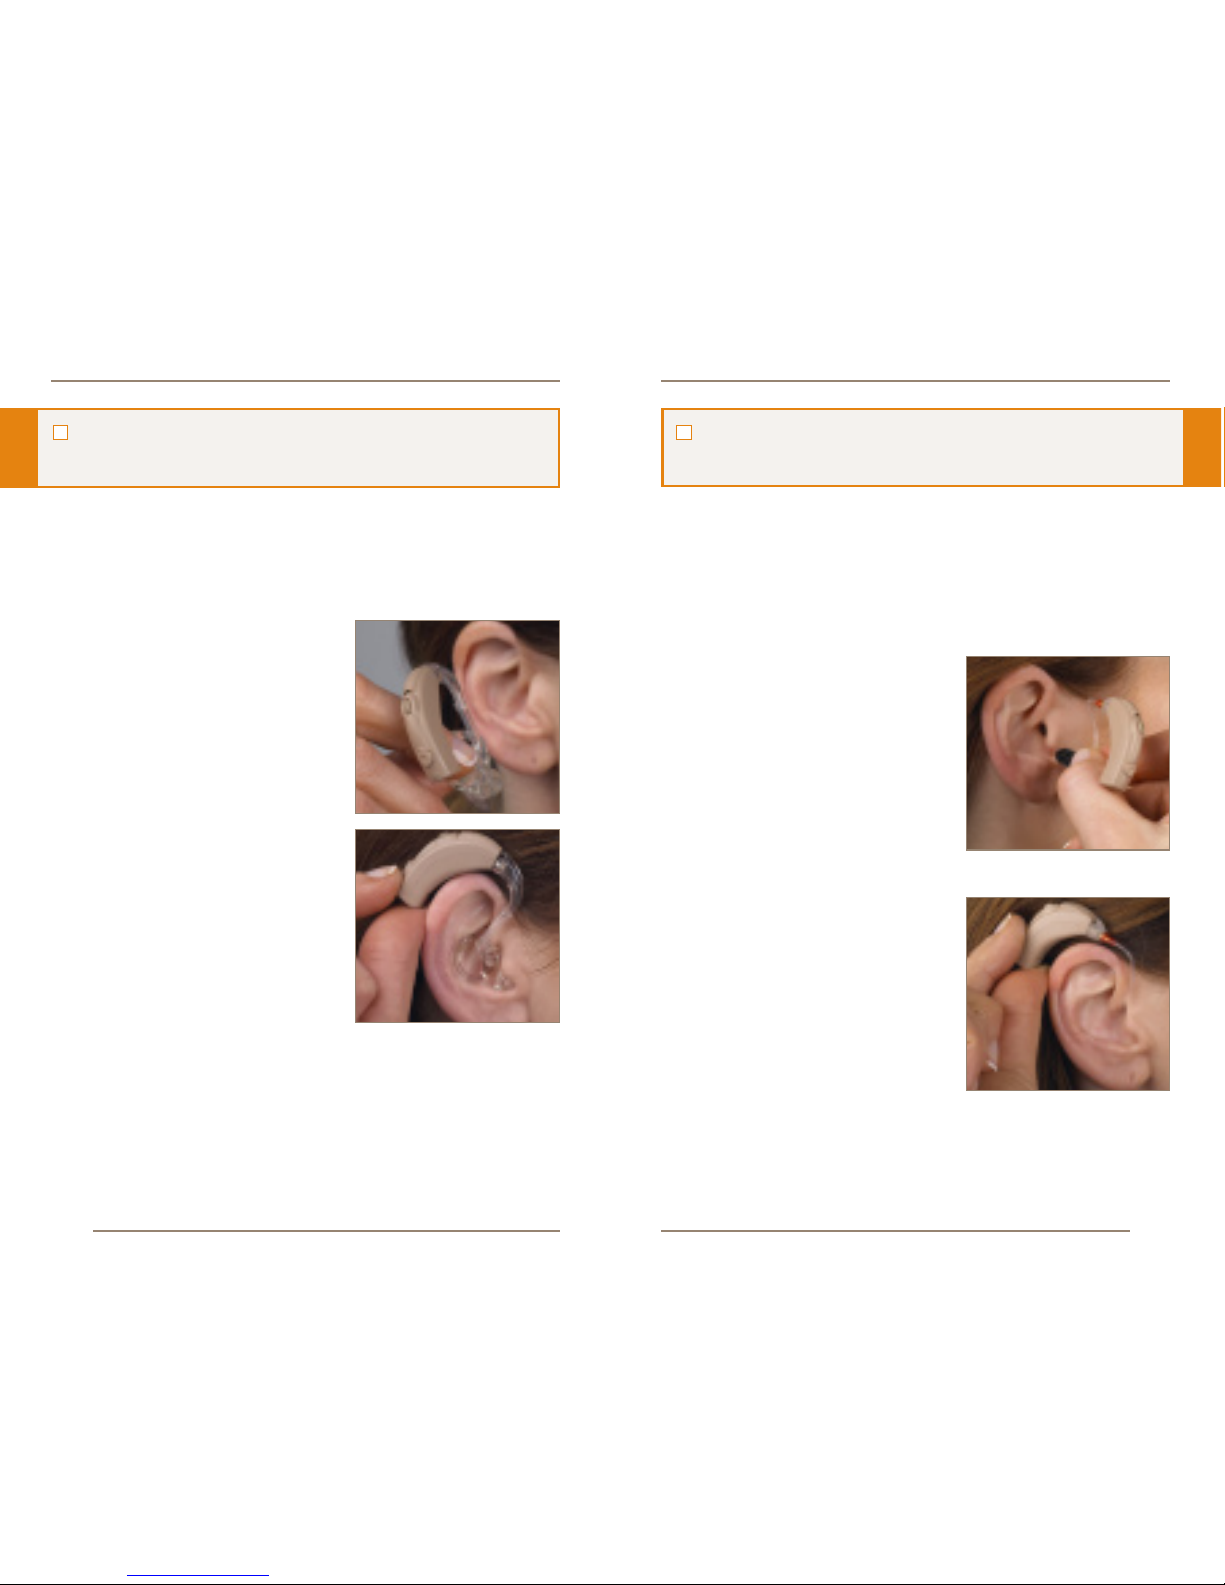
To insert the open earbud or open custom earmold,
be sure the battery is inserted and the battery door is
closed securely.
Hold the thick grab handle
outside of the earbud or
open custom earmold,
where the retention lock
meets the tubing.
Gently insert the tip into
your canal.
Carefully place the
instrument over the top of
your ear until it rests securely
in place.
Your hearing instrument is connected to a
custom earmold.
EARMOLD INSERTION AND REMOVAL OPEN EARMOLD INSERTION AND REMOVAL
Your hearing instrument is connected to an open
earbud or open custom earmold.

14
15
With your fingertips, move
the flexible retention lock
into place by first curling and
lifting the lock tip into the
bowl of your ear.
Use your fingertip to push
the lock into a secure
position in the bowl of
your ear.
To remove the earbud or
open custom earmold,
perform the insertion steps
in reverse order.
Be sure you are holding the
thick grab handle where it
connects to the retention
lock as you gently pull the
earmold outward.
Your hearing instrument is “on” any time a
functioning battery is properly placed in the
compartment and the battery door is closed.
Some hearing instruments are programmed to have a
power on delay. The power on delay means that your
instruments will take several seconds to power up
once they have been turned on. This feature allows
you to get the hearing instruments in your ear before
they start to amplify sound.
To turn the instrument “off,”
partially open the battery
compartment door until you feel
it “click.”
In this position, the battery is
not in contact with the inside of
the compartment.
OPEN EARMOLD INSERTION AND REMOVAL ON, OFF AND VOLUME CONTROL
Your hearing instruments have a power
on delay.

16
17
If you open the door further, be careful that the
battery does not accidentally fall out. To preserve
battery life, it is recommended that you turn your
instrument “off” any time it is not in use.
The volume control enables you to adjust the amount
of amplification provided by the instrument.
You may wish to change volume levels as you
encounter different listening situations. To change
the volume, use your fingertip to rotate the vertical
volume control. Your hearing instruments may be
programmed to “beep” when you reach the
correct setting.
The numbers on the control provide
an orientation for the proper volume
setting. When the control is set at
“4,“ the volume is at the maximum
level. To make sounds louder, rotate
the control upward.
To make sounds softer, rotate the
control downward. The softest level
is set at “1.”
A non-removable protective
cover may be placed over
the volume control to prevent
inadvertent adjustment.
Your hearing professional can
provide further instruction regarding volume
adjustment with the cover.
Your normal volume control setting is _____.
ON, OFF AND VOLUME CONTROL ON, OFF AND VOLUME CONTROL

18
19
While your hearing instruments
have many adjustments that
are made automatically, the
multimemory push button
gives you control by letting
you select a different setting
for your current listening
environment; for example,
when you are using the telephone or sitting in a
noisy restaurant.
When first turned on, your instruments are most likely
programmed for normal listening environments.
The additional settings are accessed by pressing the
button on the hearing instrument.
Your hearing professional will check the box below
if your hearing instruments have a multimemory
push button.
When changing between memory settings, there
may be an audible beep or indicator to let you know
where each memory is located. For example, the
hearing instrument will beep twice for memory 2.
Your hearing professional will work with you to set
the memories to your preference. With your hearing
professional, use the table below to write in the
memory settings for your instruments.
MEMORY
NO.
ENVIRONMENT/
LISTENING SITUATION
BEEP/
INDICATOR
1
2
3
4
Your hearing instruments have a multimemory
push button.
MULTIMEMORY SETTINGS MULTIMEMORY SETTINGS

20
21
Special Instructions: Your hearing instruments may be equipped
with directional microphones to help improve
understanding in noisy situations like restaurants,
parties, and other crowded environments. Your
hearing professional will check the appropriate
box below:
When the directional
microphones are automatically
activated, or activated by
pushing the multimemory push
button, sounds that are in front
of you will become more audible, while sounds from
the sides and behind you will be reduced.
MULTIMEMORY SETTINGS DIRECTIONAL MICROPHONES
Your hearing aid has a directional microphone.
Your directional microphones are
activated automatically.
Your directional microphones are activated by
pushing the multimemory push button. The
memory position is _________ .
Your hearing aid does not have a
directional microphone.

22
23
When your instruments are in the directional mode, it
is especially important that you face people you are
listening to and keep them in your direct line of sight.
Special Instructions:
Your hearing instruments are equipped with
tools to help you effectively communicate on
the telephone. Your hearing professional will check
the box/boxes below that represent the telephone
settings in your instruments.
Automatic Telephone Response and
Automatic Telecoil
These options activate the telephone response
automatically when used with a hearing aid
compatible telephone. To use, place the telephone
DIRECTIONAL MICROPHONES USING THE TELEPHONE
Your hearing instruments have the following
telephone setting(s):
Automatic telephone response
Automatic telecoil
Telecoil. The telecoil is located in memory
position _____________.
A beep or indicator tone is enabled on your
instruments to signal you when the device
switches to the telephone setting

24
25
receiver on your ear as you normally would and the
hearing instrument will select the telephone setting.
Then, move the receiver back slightly to activate the
phone response. Once the telephone is removed
from the ear, the hearing instrument will switch back
to the previous listening mode.
Note: If you have a hearing aid compatible phone,
but your automatic telephone response or automatic
telecoil does not switch to the telephone setting
automatically, your hearing professional can provide
you with a small magnet to place on your telephone
receiver. This magnet will help activate your
automatic telephone option.
Telecoil and Manual Switching
Hearing instruments with a manual telecoil allow
you to switch the devices to telephone mode
when needed.
Manually switched telecoils
are activated by pressing the
multimemory button.
Special Instructions:
USING THE TELEPHONE USING THE TELEPHONE

26
27
Your hearing professional
can provide you with
additional information
regarding devices and
techniques for connecting
with a variety of cordless
and mobile telephones.
Your BTE can connect
directly to Bluetooth®
compatible mobile
phones and devices
through the ELI™ Bluetooth module.
Connected to your instrument through the direct
audio input (DAI) boot (see page 27), ELI provides
hands-free communication with Bluetooth devices up
to 30 feet away.
Its single button lets you answer and disconnect calls
without touching your mobile phone.
Ask your hearing professional about ELI and other
telephone solutions.
Your BTE is compatible
with direct audio input
(DAI). This allows you to
connect your instrument to
another electronic sound
source, such as a wireless
FM system or audio and
video equipment.
To use DAI, slide the DAI
module onto the bottom
of the BTE, until it “clicks”
into place.
The DAI’s gain control
should be turned fully
counterclockwise.
USING THE TELEPHONE DIRECT AUDIO INPUT

28
29
When the DAI module is attached, the instrument’s
telephone coil memory is available via the
multimemory control.
To remove the module, hold the BTE and DAI
module, push from the underside of the boot and
gently snap the two apart.
Feedback is caused by amplified sounds escaping
from the ear canal that make their way back to the
instrument’s microphone. Your new instruments use
the most advanced digital technology available with
a unique feedback suppression program. If feedback
occurs after the instrument has been inserted
correctly and the volume set to a comfortable level,
contact your hearing professional.
DIRECT AUDIO INPUT FEEDBACK

30
31
Your hearing instruments represent the ultimate
in miniature technology, especially when you
consider the environment in which they function.
Heat, moisture and foreign substances can result in
degraded performance.
Proper care and maintenance go a long way toward
ensuring trouble-free performance. Do your best
to keep the hearing instruments clean at all times.
Handling the hearing instruments with clean hands is
a good starting point.
Follow the instructions for cleaning your type
of earmold.
Custom Earmold Cleaning and Care
• Separate the hearing
instrument from the
earmold for cleaning
• Clean the earmolds
daily using a soft,
damp cloth
• You may use warm soapy water to clean the
earmold; be certain that the instrument is
detached and far away from any moisture before
washing the earmold
Open Earbud or Open Custom Earmold
Cleaning and Care
An extensive cleaning for an open fit consists of
removing the tubing and/or earbud.
Note: Replace the earbuds and tubing every 6-8
weeks or as advised by your hearing professional.
HANDLING AND CARE HANDLING AND CARE
Your hearing instrument style is:
BTE with custom earmold
BTE with open fit earbud
BTE with open custom earmold

32
33
• Remove the tubing
from the BTE by using
your fingernail to
pull the colored nose
cone AWAY from the
instrument; DO NOT
PULL ON THE TUBING
• Holding the tubing by
the thicker area where
the retention lock joins
the tubing, gently pull
the earbud or open
custom earmold off
the tube
• Use the wax reamer to
remove wax and debris
from the inside of
the tubing; once the tubing is disconnected from
the BTE, insert the wax line end into the nose
cone. Push the line through the entire tubing
length; remove
General Cleaning Information
• It is a good idea to
perform all cleaning and
battery changes above
a soft cloth on a desk
or table; this will keep
the instrument from a
damaging fall to a hard
surface if dropped
• Never use water, solvents, cleaning fluids or oil to
clean your instruments
• Be careful not to insert the cleaning tools into
the inside of the hearing aid and never take your
hearing instruments apart
HANDLING AND CARE HANDLING AND CARE

34
35
General Care Information
• Store your hearing instruments in a dry, safe
place away from direct sunlight or heat to avoid
extreme temperature
• When not wearing your hearing instruments, turn
them off and open the battery compartment door
• Do not wear your hearing
instruments while using
hair spray, spray paint,
or any other sticky
sprays that can clog
the microphone
• Store your instruments
where you can easily find
them, but safely out of
reach of pets and children;
hearing instruments
can attract curious pets
resulting in possible
damage or being chewed
beyond repair
Keep Your Hearing Instruments Away From Moisture
• Your instruments may be
so comfortable that you
forget you are wearing
them; develop the habit of
checking your ears before
going swimming or taking
a shower; do the same
with clothing pockets
before they are washed
• Should your hearing
instruments get wet,
dispose of the battery
and set the instrument
on a towel in a safe
place, leaving the battery
compartment door open to promote air
drying overnight
• Never try to dry out hearing instruments by
putting them in a microwave or oven, or using a
blow dryer
HANDLING AND CARE HANDLING AND CARE
W
WW
W

36
37
When to Call Your Hearing Professional
• Severe reactions, discharge from the ear,
excessive wax, or other unusual conditions warrant
immediate medical attention
• Pain or soreness in or around the ear is normally
caused by pressure from the earmold on a
particularly sensitive area, and may easily be
corrected through trimming and polishing by your
hearing professional
• If for any reason an instrument fails, do not
attempt to fix it yourself; this will likely violate any
applicable warranties. Should your instruments
fail or perform unsatisfactorily, first check the
troubleshooting guide on page 37; if problems
persist, contact your hearing professional
SYMPTOM POSSIBLE
CAUSES
SOLUTIONS
Not Working
Low battery Replace battery
Blocked earmold
tubing or canal
opening
Clean the
devices
(see page 30)
Not Loud
Enough
Blocked earmold
tubing or canal
opening
Clean the
devices
(see page 30)
When was your
hearing last
checked?
Contact
your hearing
professional
Intermittent
Moisture Follow
instructions on
page 33
Defective
device
Contact
your hearing
professional
Automatic
Telephone
Response or
Automatic
Telecoil Not
Switching
Telephone
does not
have a strong
enough signal
to activate the
switching
See your
hearing
professional
for magnet
HANDLING AND CARE TROUBLESHOOTING GUIDE
Other manuals for Virtue
1
Table of contents
Other Audibel Hearing Aid manuals

Audibel
Audibel SurfLink Mini Mobil User manual

Audibel
Audibel range ITE User manual

Audibel
Audibel Arc AI User manual

Audibel
Audibel Virtue User manual

Audibel
Audibel Anthem User manual

Audibel
Audibel Anthem User manual

Audibel
Audibel Anthem User manual

Audibel
Audibel Via Rechargeable User manual

Audibel
Audibel LX User manual

Audibel
Audibel A4 iQ R User manual


