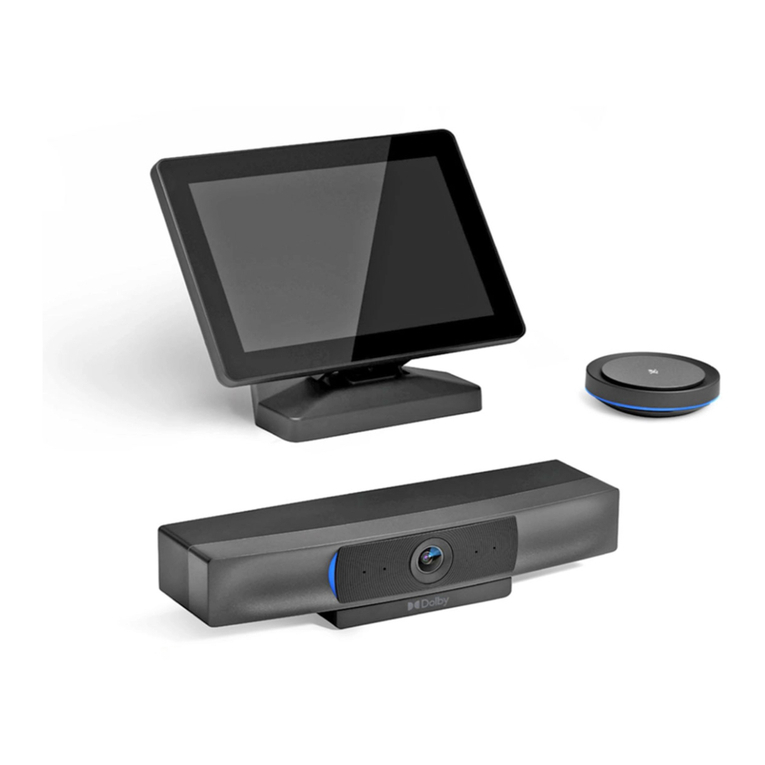
Dolby Laboratories VOICE ROOM User manual

GUIDE DE MISE EN ROUTE
GUIDA RAPIDA
KURZANLEITUNG
GUÍA DE INICIO RÁPIDO
クイックスタートガイド
簡明指南
快速入门指南
빠른 시작 가이드
DOLBY VOICE
®ROOM
PANDUAN CEPAT
HƯỚNG DẪN KHỞI ĐỘNG NHANH
HIZLI BAŞLANGIÇ KILAVUZU
GUIA DE INÍCIO RÁPIDO
QUICK START GUIDE

2
PHONECAMERA HUB
USB - 1’
HUB TO CAMERA
(TV SETUP)
HUB TO CAMERA
(SEPARATED/TABLETOP)
HUB TO NETWORKHUB TO WALLHUB TO DISPLAY HUB TO PHONE
USB - 6’ DISPLAY CABLE ETHERNET - 25’ETHERNET - 9’POWER
In the Box

3
Overview
BACK OF CAMERA
BACK OF PHONE
BACK OF HUB
To Display
Satellite
Microphone
Satellite
Microphone
PowerTo Network
To Phone
Kensington®
Lock
Peripheral
Mode
Reset /
Turn Off
From PC To Camera
QUICK START
PERIPHERALS / OPTIONAL MODES

4
Get Started. Choose a Setup.
Choose this setup to keep the hub out of view with
the cleanest mounting and cable management.
TV

5
The camera and hub can also be mounted
together on a table.
The flexible system allows the hub to be mounted
separate from the camera: on the back of the TV,
on the wall, or on the table.
TABLETOPSEPARATED

6
TV

7
Snap camera mount into hub with
mount clip pointing towards back of
hub.
Rotate camera mount open.
Slide hub towards back of TV to tighten
fit.
Ensure mount clip is snug with front of
TV and mount is level.
Follow setup steps on phone screen.
Set camera on top of TV with hub and
cables behind TV.
Plug cables into the phone, camera,
and hub. The system will turn on
automatically once power is plugged
into the wall.
1
4
2
5
3
6

8
Separated

9
Set camera on top of the TV. Slide mount clip towards back of TV to
tight fit.
Rotate camera mount open.
Rest hub on surface near TV, or fasten
to wall with screws using the keyholes
on bottom of the hub.
or
Plug cables into the phone, camera,
and hub. The system will turn on
automatically once power is plugged
into the wall.
Follow setup steps on phone screen.
1
4
2
5 6
3

10
Tabletop

11
Snap camera mount into hub with
mount clip pointing towards front of
hub.
Plug cables into the phone, camera,
and hub. The system will turn on
automatically once power is plugged
into the wall.
Rotate camera mount open.
Position hub and camera on table near
the TV.
1
4
2 3
Follow setup steps on phone screen.
5

12 EUROPE / EUROPA
In the Box
CAMÉRA
VIDEOCAMERA
KAMERA
CÁMARA
HUB
HUB
HUB
HUB
TÉLÉPHONE
TELEFONO
TELEFON
TELÉFONO
Contenu du coffret
Contenuto della confezione
Verpackungsinhalt
Contenido de la caja

EUROPE / EUROPA 13
USB - 30cm
HUB VERS CAMÉRA
(INSTALLATION SUR
TÉLÉVISEUR)
USB, 30 cm
HUB VERSO LA
VIDEOCAMERA
(MONTAGGIO SU TV)
USB - 30 cm
HUB AN KAMERA
(TV-EINRICHTUNG)
USB - 30 cm
HUB A CÁMARA
(AJUSTES TV)
USB - 180cm
HUB VERS CAMÉRA
(SUR SUPPORT DÉDIÉ/SUR
TABLE OU BUREAU)
USB, 180 cm
HUB VERSO LA
VIDEOCAMERA
(MONTAGGIO SEPARATO O
SU TAVOLO)
USB 180 cm
HUB AN KAMERA
(GETRENNT / TISCH)
USB - 180 cm
HUB A CÁMARA
(INDEPENDIENTE/EN MESA)
CÂBLE ÉCRAN
HUB VERS
ÉCRAN
CAVO VIDEO
HUB VERSO
LA TV
BILDSCHIRMKABEL
HUB AN BILDSCHIRM
CABLE DE PANTALLA
HUB A PANTALLA
ALIMENTATION ÉLECTRIQUE
HUB VERS PRISE MURALE
CAVO DI ALIMENTAZIONE
HUB VERSO PRESA
A PARETE
NETZANSCHLUSS
HUB AN WAND
ALIMENTACIÓN
HUB A PARED
ETHERNET - 275cm
HUB VERS RÉSEAU
ETHERNET, 275 cm
HUB VERSO LA RETE
ETHERNET - 275 cm
HUB AN NETZWERK
ETHERNET - 275 cm
HUB A RED
ETHERNET - 760cm
HUB VERS
TÉLÉPHONE
ETHERNET, 760 cm
HUB VERSO IL
TELEFONO
ETHERNET - 760 cm
HUB AN TELEFON
ETHERNET - 760 cm
HUB A TELÉFONO

Setup 01
14 EUROPE / EUROPA
Antivol Kensington®
Foro per lucchetto Kensington®
Kensington®-Schloss
Candado Kensington®
De PC
Dal PC
An PC
APC
Vers TÉLÉVISEUR
Verso la TV
An Bildschirm
ATV
Vers caméra
Verso la videocamera
An Kamera
A cámara
Overview
Aperçu / MISE EN ROUTE PÉRIPHÉRIQUES/MODES EN OPTION
Panoramica / GUIDA RAPIDA MODALITÀ OPZIONALI/PERIFERICHE
Übersicht / KURZANLEITUNG PERIPHERIE / OPTIONALE MODI
Introducción / INICIO RÁPIDO PERIFÉRICOS/MODOS OPCIONALES
FACE ARRIÈRE DE LA CAMÉRA | RETRO DELLA VIDEOCAMERA
RÜCKSEITE KAMERA | PARTE TRASERA DE LA CÁMARA
FACE ARRIÈRE DU HUB
RÜCKSEITE HUB
14 EUROPE/EUROPA

EUROPE / EUROPA 15
FACE ARRIÈRE DU TÉLÉPHONE | RETRO DEL TELEFONO
RÜCKSEITE TELEFON | PARTE TRASERA DEL TELÉFONO
Vers téléphone
Verso il telefono
An Telefon
A teléfono
Vers réseau
Verso la rete
An Netzwerk
A red
Alimentation électrique
Alimentazione
Netzkabel
Alimentación
Microphone satellite
Microfono satellite
Satellitenmikrofon
Micrófono satelital
Mode périphérique
Modalità periferica
Peripheriemodus
Modo para periféricos
Réinitialiser/Éteindre
Ripristino/spegnimento
Zurücksetzen / Ausschalten
Restablecer/Apagar
EUROPE/EUROPA 15
RETRO DELL’HUB
PARTE TRASERA DEL HUB

16 EUROPE / EUROPA
Get Started. Choose a Setup.
TÉLÉVISEUR | TV
TV | MONTAJE SOBRE TV
Mise en route. Sélectionnez un type d’installation
Opzioni di installazione
Erste Schritte. Einrichtungsmöglichkeiten
Primer paso. Elige el tipo de montaje
Sélectionnez cette installation pour dissimuler
le hub et disposer des meilleures conditions de
montage et de gestion des câbles.
Con questa installazione, l’hub, i componenti di
montaggio e i relativi cavi saranno meno evidenti,
per una gestione più ordinata.
Wählen Sie diese Einrichtung, um den Hub
weitgehend aus dem Sichtbereich zu halten und
eine optimale Montage und Kabelführung zu
erreichen.
Elige esta opción para ocultar el hub y disfrutar
de las mejores condiciones de montaje y
administración de cables.
Le système flexible permet de monter le hub
séparément de la caméra à l’arrière du téléviseur,
sur le mur ou sur la table.
La flessibilità del sistema consente di installare
l’hub separatamente dalla videocamera, sul retro
della TV, montato a parete o appoggiato su un
tavolo.
SUR SUPPORT DÉDIÉ | MONTAGGIO SEPARATO
GETRENNT | MONTAJE INDEPENDIENTE

EUROPE / EUROPA 17
SUR SUPPORT DÉDIÉ | MONTAGGIO SEPARATO
GETRENNT | MONTAJE INDEPENDIENTE
SUR TABLE OU BUREAU | COLLOCAZIONE SU TAVOLO
TISCHMONTAGE | MONTAJE SOBRE UNA MESA
Das flexible System ermöglicht die Montage des
Hubs getrennt von der Kamera; auf der Rückseite
des TV-Geräts, an der Wand oder auf dem Tisch.
El sistema flexible permite que el hub y la cámara
puedan montarse por separado, en la parte
posterior del televisor, en la pared o en la mesa.
La caméra et le hub peuvent également être montés
ensemble sur une table.
La videocamera e l’hub possono anche essere
installati assieme su un tavolo.
Die Kamera und der Hub können auch zusammen
auf einem Tisch montiert werden.
La cámara y el hub también se pueden montar
juntos en una mesa.

18 EUROPE / EUROPA
TV
Faites pivoter le support de la caméra.
Fai ruotare la staffa di montaggio della
videocamera per aprirla.
Öffnen Sie die Kamerahalterung durch Drehen.
Gira el soporte de la cámara para abrir la pinza
de sujección.
Enfichez la caméra dans le hub (le clip de
montagedoit pointer vers la face arrière du
hub).
Fai scattare la staffa di montaggio della
videocamera nell’hub, con l’apposita clip rivolta
verso il retro dell’hub.
Lassen Sie die Kamerahalterung im Hub
einrasten. Der Halterungs-Clip muss dabei zur
Rückseite des Hubs zeigen.
Acopla el soporte de la cámara al hub,
asegurándote de que la pinza de sujección está
orientada hacia la parte trasera del hub.
Connectez les câbles au téléphone, à la
caméra et au hub. Le système s’allumera
automatiquement lorsque l’appareil sera
branché à la prise murale.
Collega i cavi al telefono, alla videocamera e
all’hub. Il sistema si accende automaticamente
una volta collegato alla presa di alimentazione
a parete.
Stecken Sie die entsprechenden Kabel in
Telefon, Kamera und Hub. Das System schaltet
sich automatisch ein, sobald das Netzkabel an
die Stromversorgung angeschlossen ist.
Conecta los cables al teléfono, la cámara y el
hub. El sistema se encenderá automáticamente
una vez que el cable de alimentación esté
enchufado a una toma de corriente.
1 2 3
Téléviseur
TV
TV
Montaje sobre TV

EUROPE / EUROPA 19
Faites glisser le hub vers l’arrière du
téléviseurpour assurer son ajustage.
Fai scorrere l’hub sul retro della TV affinché
l’insieme dei componenti sia stabile.
Schieben Sie den Hub in Richtung der TV-
Rückseite, um einen engen Sitz zu erreichen.
Desliza el hub hacia el televisor para ajustar el
montaje.
Vérifiez que le clip de montage est correctement
ajusté sur la face avant du téléviseur et que
le support est de niveau. Suivez les étapes
d’installation affichées sur l’écran du téléphone.
Assicurati che la clip di montaggio sia ben
fissata alla parte anteriore della TV e che
tutto il montaggio sia livellato. Segui le fasi di
installazione sullo schermo del telefono.
Der Halterungs-Clip muss eng an der
Vorderseite des TV-Geräts anliegen und die
Halterung muss zur TV-Oberseite parallel sein.
Befolgen Sie die Einrichtungsschritte auf dem
Telefondisplay.
Asegúrate de que la pinza de sujección esté
nivelada con el borde del televisor. Sigue los
pasos de configuración que aparecen en la
pantalla del teléfono.
Installez la caméra sur le téléviseur et le hub et
les câbles derrière le téléviseur.
Installa la videocamera sopra la TV con l’hub e i
cavi dietro di essa.
Setzen Sie die Kamera oben auf das TV-Gerät.
Dabei befinden sich Hub und Kabel hinter dem
TV-Gerät.
Sujeta la cámara a la parte superior del televisor,
colocándo el hub y los cables detrás de la
pantalla.
4 5 6

20 EUROPE / EUROPA
Separated
Faites pivoter le support de la caméra.
Fai ruotare la staffa di montaggio della
videocamera per aprirla.
Öffnen Sie die Kamerahalterung durch Drehen.
Gira el soporte de la cámara para abrir la pinza
de sujección.
Installez la caméra sur le téléviseur.
Appoggia la videocamera sopra la TV.
Setzen Sie die Kamera oben auf das TV-Gerät.
Monta la cámara sobre la parte superior del
televisor.
Faites glisser le clip de montage vers l’arrière du
téléviseur pour assurer son ajustage.
Fai scorrere la clip di montaggio sul retro della
TV affinché l’insieme dei componenti sia stabile.
Schieben Sie den Halterungs-Clip in Richtung
der TV-Rückseite, um einen engen Sitz zu
erreichen.
Desliza la pinza de sujeción hacia el televisor
para ajustar el montaje.
1 2 3
Sur support dédié
Montaggio separato
Getrennt
Montaje independiente
This manual suits for next models
3
Other Dolby Laboratories Conference System manuals
Popular Conference System manuals by other brands

RELACART
RELACART CS-101 Operating instruction

TANDBERG
TANDBERG 1700 MXP user guide

Cooper Lighting
Cooper Lighting RFM189 instruction manual

Taiden
Taiden hcs-8300 Installation and operation manual

Lucent Technologies
Lucent Technologies DEFINITY Guide installation manual

AudioCodes
AudioCodes RXV80 installation manual