Audiofront eDrumin 4 User manual

USER MANUAL
Version 2.0

Table of Contents
Introduction.................................................................................................4
Getting Started............................................................................................7
!"
#$%&'('!!"
)
*)
'+,-
',-
,,
The Control Application...............................................................................12
!,.
$,/
#,/
0!(,
$',
,
1,
,
,"
%%,"
,"
# ,)
2 ,)
.-
3.,
'!!34.,
*35'..
4(6..
6'./
717321./
71!6./
&%28,.
eDRUMin Manual Page 2 of 49

'.
&.
71&.
! .
'#.
#.)
(.)
#9/-
$: /-
'5#9/-
'6*6'/,
;%63/.
4(6 /.
6< //
48,.#=/
/
&*(/
'5/
&521/
'!!'/
eDRUMin 10 US Host Port and MIDI Ports...................................................38
5'!!'/"
#9'!!/)
Updating Firmware.....................................................................................40
iOS Control Application...............................................................................41
,
+,
31'!!,
$<.
Appendix....................................................................................................43
717'6&2/
21'!!'
(
715
7
!7"
'!!!)
eDRUMin Manual Page 3 of 49

Introduction
Features at a Glance
eDRUMin 6 8'!!56
>($>9$(
$?0??0,-$,-+0
09((
;
%
:/8(
%25/87(
5
?'!!5
5/(@
5
($
?
:
%(
2?4(6 &259@@
&$
5&!5
(
@eDRUMin('!!<eDRUMin,-$'!!!<
@@&2(6$eDRUMin,-
eDRUMin Manual Page 4 of 49

The Hardware and Connections
Pedal Input
$15eDRUMin
A1*1 9
55$(5(
DC Power Connector
eDRUMin ((5&2$ !5((eDRUMin
&2>(&2A1
eDRUMin62<(;1>6
eDRUMin ,-->eDRUMin,-
.-->--5&22<8,.-
56
eDRUMin Manual Page 5 of 49
7 - 9V (200 mA)
4
Full Size MIDI OUT
Status Indicato
MIDI Indicato
9V DC Connecto (if not using USB)
Cont olle Input
Unive sal T igge Inputs Full Size USB B
10 Unive sal T igge Inputs
Exte nal 9V Powe
(if not using USB)
Full Size
MIDI po ts
MIDI Po t
Activity LEDs
Powe
Switch / LED
USB 2.0 Host Po t
Suppo ts up to 4
eDRUMin / USB MIDI
Dual Cont olle
Inputs Status
LED
USB
Type B
Connecto
10

Supported Pads
eDRUMin158!B5(
$(%>:>(C(B
56
Electric Drum Pads Electric Cymbals Acoustic Triggers
%D8,.1
%8"
%+8"
%+8,-
%8,
%28,
:8
:8,.-
'8,-
%:8,/%
%:8,%
%:8"
%48,-
%48,/
::,
*,"E%
%%8/-%
Note: ((5FA$1(59G
5%&' 4%&'55
5
Supported Hihat Controllers
$156$%:
(>9>>5*1
955(
Note: 7 9 > ( //4 //4
$=
((5>$$21
5>
((($(
$5eDRUMin*16(5
B5!6
Hithat Controllers Expression Pedals Sustain Pedals Footswitches
:
%8"
%48,,
%48,/
'#8/
%#48
:
'8#D8
24,--
*#D,
:/
:
:
%8,-
:
28
')--,-
eDRUMin Manual Page 6 of 49

Getting Started
Attaching the Drum Stand Clip
:(eDRUMin55
255eDRUMin >$
5eDRUMin ,-'1(6(B5
6
!
1
eDRUMin 7
6>
6
55(7
5
6( $1
6 1 4
eDRUMin Manual Page 7 of 49

2eDRUMin6>B6:
66
Installing the Control Application
6$ 5
7> <> < $
55
95
Enabling eDRUMin in your IDI Applications
7((eDRUMin 5H>(
$5I0'!!
$eDRUMin 6
eDRUMin Manual Page 8 of 49
REAPER

Connecting Drum Pads
,0E5565
'1((%
61#65(
?>(%$
($6%!5($5/8
(>;$39>
(52<70##J%/8K%B
($1J2B
! $
$<>55
65
Loading a Pad Preset
:5($(1'!
!55(6$>(B($(
(;
*155$'
eDRUMin Manual Page 9 of 49
For ED10 , the BOW / EDGE connector
should be plugged into the top input,
and the BOW / BELL on the bottom.
For ED4 , the BOW / EDGE connector
should be on left, and the BOW / BELL
should be on the right.
Select an input
Filte p esets
by b and
Filte p esets
by type
Open the
P eset Manage
1 2 3 Double-click a p eset to load it
Change to nput to Dual Mono to split the input

Drum aps and Kit Pieces
eDRUMin 51
61
6
$( 1 5
(=0
5$((
1 + > > 6
1
Changing Drums aps
eDRUMin65(:
$(1
$15((6
&
5
*1 5
5 $
'#
Custom Note Assignments
!5 ( H
5>((
3
7(J3B>(
$(>>
$ 1
$
eDRUMin Manual Page 10 of 49
Click to change drum maps.
Click to select Kit Piece

Setting up a Hihat Controller
*1>1((%$
$($55
$15
%&'(( !5(
B1(5(>((
56$
Loading a Pedal Preset
>1'
5'>1!
'5(
<555(!5(
> ( (
((($
*1 5 5 $ (
Setting up your hihat Cymbal
5 (> ( 5 *6
> (5(($
$J($B
!5 ( %&' ,-> ( J ,
($BJ.($B$
eDRUMin Manual Page 11 of 49

The Control Application
( eDRUMin $ > (B 5
6
B $ 5 6 1
665 2(5>((
16(5
'1(551$56
$?(HA$5
?(?69
(>((6$(1
(($15
The Input Selector
5eDRUMin656
(
$5$(18
>(($((5
!5(66>56$6$
>(6(5
6 5 6 $( = &2 6
&25eDRUMin,-$
eDRUMin Manual Page 12 of 49

Sidebar
$6L1555
2(5eDRUMin662(1JB
>(676B
(>116
'((L1(65>
>6>
59'!!F#,-<(G
786>(5$((
B
(>76(>1
556B5
61%81F815<G
15$
$& :BFMG
55H6$ :1
(5(*155
Trigger Editor
# 6 5 5 H ( 5 >
;$>>'!!
$
eDRUMin Manual Page 13 of 49
Pad / Input Type Settings
Sense Settings
Transient Scanning Controls
Output Settings
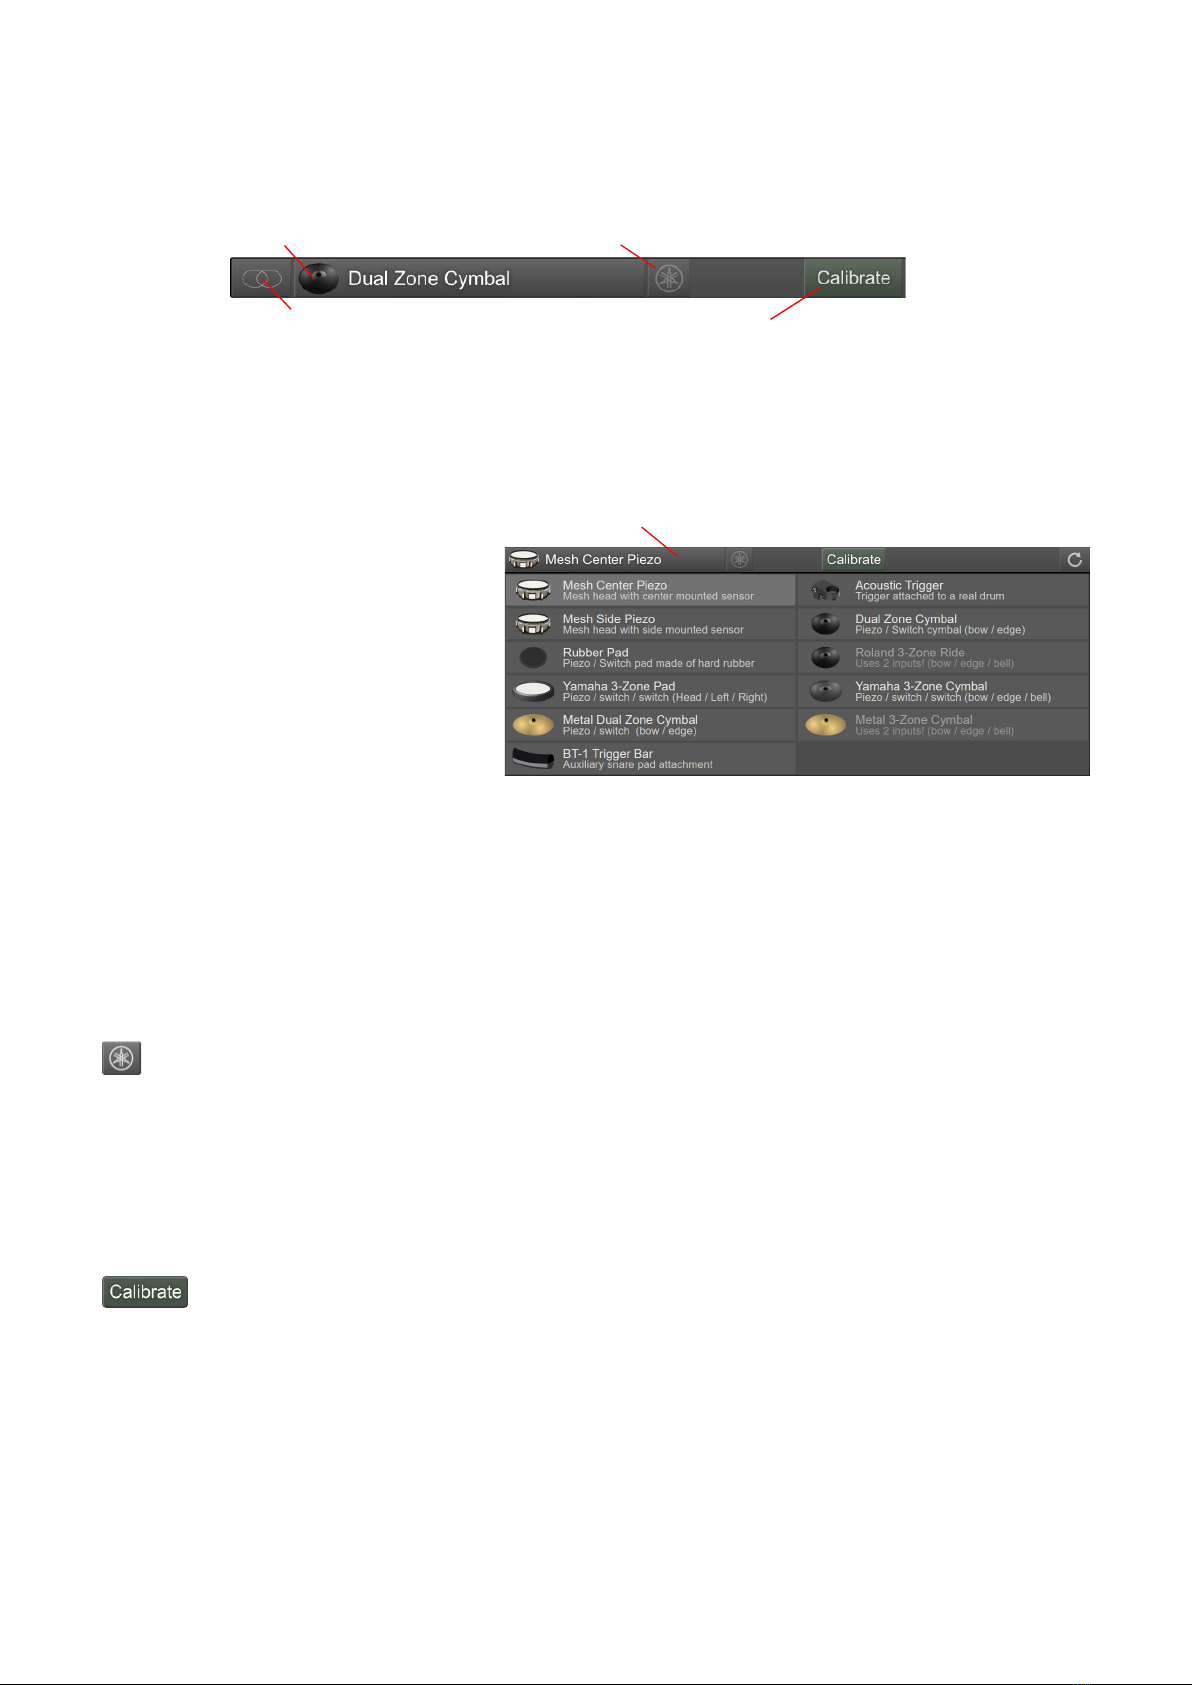
Pad / Input Type Settings
76(6>(;
H
Input ode
#5F50?G>F?
G>F?%$G
Pad Type Selector
(
$
(>
6$
7 ( (
> 5
(
($(
#6$5(>($$(;!5
?0>$(?0?>5
?(>B$%$5
eDRUMin eDRUMin 5((5
B$(
1195
Yamaha Wiring Toggle
eDRUMin 6$%:( 5
11(!5>59>
15(>$(
*1 7 955$
$
Activate Calibrate ode
$($5($((
(1*1555
eDRUMin Manual Page 14 of 49
Click to select Pad Type
Input Mode
Yamaha Wiring Toggle
Activate Calibrate Mode
Pad Type Selector

Calibrate ode
$'(L1(H
:($'>($>
=(
25 $ > 1 ( 6 (
(
7 ( H 6 $ '> !3> %#> 3> <*>
*#%$(=5(>
;(6(>
6 : 6 $ 5 (
$(6(
$(;
7((>$'=6
Calibrating a Dual Piezo Pad / Trigger
$(=8$ 6(
65>L1(
39>5$5
<*
*(>5$D81*#%
Calibrating Cymbals
2($$539$
$*#%
eDRUMin Manual Page 15 of 49

Transient Scanning Controls
eDRUMin66(55(
1;6(
9(
6$5>1
(
(>
9(6
6(
5 > 1
(
Gain
5;=
6 5 ; 6 5 6
>11
Thresh
L'1
( $ $6 N ( 5 >
(
Scan
((3
:13$>
6;1$5
6(5'!!> $
6((($
Note: 5./ 5
5(!5./>($$
Hold
<516 !$6>(B
1($)(1$6$(
<*5($ +
6B$(($??>
B($
Decay
5 #: :;
(5 (5 ( !5( 6 F(
5 ( (G>($
>5(69>6B$(15
$
eDRUMin Manual Page 16 of 49
Sc olling VU Mete Tip Piezo T ansient Ring Piezo T ansient
Input Gain

Crosstalk Cancellation
6$56
; >
6 B ( $
1%<*+
6 6$ 5
$=5>
=>4(
; 5 1
;
%<*+6$
6$
'!!65&251
!559(. eDRUMin 6>(76
56 66 6
1$6
eDRUMin ,- 6 ( 1 '!! 5 6
&2'!!!3*155$
N5'!!$6
Articulation Scalers
(F(G>
$6$
?> D81
%/?($F2G>
(#2
6 5 6 $ !3
$(6 (
($($'
eDRUMin Manual Page 17 of 49
Crosstalk cancelation
appplied
ibrations from
hitting adjacent pad

Sense Controls
6$ !' (
'5 6(1(
6($5;
Rimshot Range
% % ( H
?!5
(
>
>1(51
7(5(>65>(
>6
5 ! $6>
7;?5
Hotspot Suppression
<5(L5?6
5 ( 6 ?
6 ? > 6
5(5
$./8/51( !5(6
3$./>$$
/>JB>JB>JB
1$5JB
$(; JB JB ?
39> 5 JB (
=5(
> ( 6
JB (5
15>6
5
!5(HO$
5=>((
JB6($>$
$(6(
5 ( 6 ( JB> ; JB
55
Note:1%(!1$((?
655 !55(55
> 5 1 5 P# 6 !:
4eDRUMin$555
Note:7(1>(;%#(1>
61(%#>1%#
eDRUMin Manual Page 18 of 49
head
rimshot
sidestick
indicator
Outside is Thresh.
nside is Scaler.

Edge Sense
7 ! ' J'B J !B> #
$ 6$
5 ? 2( 6
>J3B3
517(5(
>1 Q !5>;
5$>
5
Bell Sense
25B6$($5
($(((
Supported Cymbals
(2%:8,.>:8,/%>
:8,%:8"($ '($$5 !5(
6($B(>
$$5
NOTER!5(6($5$>(/8
(5(S%/8K%E(>$(
%&'!H>J2B
$61%
Adjusting the Controls
$2>1J2B$ 7
$>J2#**B$6$
3
39>1($(
$1(($
$ H =
$ 2 2 7 (
($> <(
5$
$>(6%#
eDRUMin Manual Page 19 of 49
Cymbal Type
Enable
Thesh

Positional Sensing
eDRUMin5($J'?B
( 6 FG
>#3
3$3
1>(B;
% ! > %
$($>
Setup For Mesh Pads
'%H ?5JB57
(56(=8>
55>$(>(;
6'%$$5
5;;
'9%H?5=85
(55>?5=8
?5
!5?>6$$(1
JBJ%B J%B5>5
5?6$(5=7
5 >
$'$H5
($5$
Understanding the Positional values
7>eDRUMin65->
$ > 6 $ ,.
(
!5(35> eDRUMinJB
6):;%'9;
$JBJB
Setup For Cymbals
=5($
H % 4 ($>
*,"E%(1($
: $ $( $
515$$6
eDRUMin Manual Page 20 of 49
Switch Positional
Sensing Algorithms
Max Range
Position Indicator
Note / CC Selector
Min Range
Positional Sensing On/Off
This manual suits for next models
2
Table of contents
Other Audiofront Media Converter manuals


