Audiofront eDrumin Series User manual

USER MANUAL
Version 1.3.1

Table of Contents
Features at a Glance.....................................................................................4
The Hardware and Connections.....................................................................5
Supported Pads............................................................................................6
Supported Hihat Controllers..........................................................................6
Getting Started............................................................................................8
ein
!
" !
#!
$%&
The Control Application...............................................................................11
$ %%
%'
$ %'
($ %)
%*
$ %+
,%-
%-
%
%
. %
%
/ %
%!
# '&
0,0/, '&
#1'&
"#2'%
3 '%
''
')
0,4 ')
')
'*
eDRUMin Manual Page 2 of 45

$ '*
'*
'*
.5 '+
6 '+
25 .'+
. '-
",$'-
Triggering Mode '-
72 '
73.#'
72. '
3.8 '!
.21)&
94))
"$94))
2 94))
/, )*
pdating Firmware.....................................................................................35
)+
iOS Control Application...............................................................................36
: )-
; )-
#4, )-
48 )
eDR Min 10 SB Host Port and MIDI Ports...................................................38
$942)
Working With Multiple Devices on Separate SB Ports..................................39
,/43)!
Setting up Your Hihat on its Stand...............................................................40
Controlling Banks with MIDI Program Change Messages...............................41
Tips For Working with Audiofront Controls...................................................42
Drum Pad Wiring Diagrams.........................................................................43
Pedal Input Wiring Diagrams.......................................................................44
MIDI Implementation...................................................................................45
eDRUMin Manual Page 3 of 45

Features at a Glance
eDRUMin3<243
==954
>(>>(4%&%&;(
(4547
6)<4
/2)<0
.2
9>2
2)?
2
4
>
.6
/>13 /.25??
422
?eDRUMin*84eDRUMin%&8
??/.3eDRUMin%&
eDRUMin Manual Page 4 of 45

The Hardware and Connections
Pedal Input
$,2eDRUMin
$@,4",5
222
DC Power Connector
eDRUMin42/24eDRUMin
4/=4/ 4@,
eDRUMin3/87,=43
$eDRUMin *%&&=eDRUMin%&
'&&=-&&2/$/8 <%'&
23
eDRUMin Manual Page 5 of 45
4
Universal Trigger Inputs
Full Size MIDI OUT
Status Indicator
MIDI Indicator
9V DC Connector (if not using USB
Controller Input
Full Size USB B
10 Universal Trigger Inputs
External 9V Power
(if not using USB
Full Size
MIDI ports
MIDI Port
Activity LEDs
Power
Switch / LED
USB 2.0 Host Port
Supports up to 4
eDRUMin / USB MIDI
Dual Controller
Inputs Status
LED
USB 2.0
Type B
Connector
10
7 - 9V (200 mA

Supported Pads
eDRUMin,2<A2
=6=$4.A
23
Electric Drum Pads Electric Cymbals Acoustic Triggers
B<%'+,
<
;<
;$<%&
.<%$
/$<%
6$ <-+
6$ <%'&
$<%*&
6<%)
6<%+
6<
1.<%&.
1.<%).
6 6%++
$<)&.
Supported Hihat Controllers
$,236
=5==24",
5242
$2=/,
2=
",43
2.A23
Hithat Controllers Expression Pedals Sustain Pedals Footswitches
6..-+
9<
1.<%%
<)
1<+
69
<B<
/91%&&
"-B%
69)
69*
69+
<%&
69+
/9<
!&&%&
eDRUMin Manual Page 6 of 45
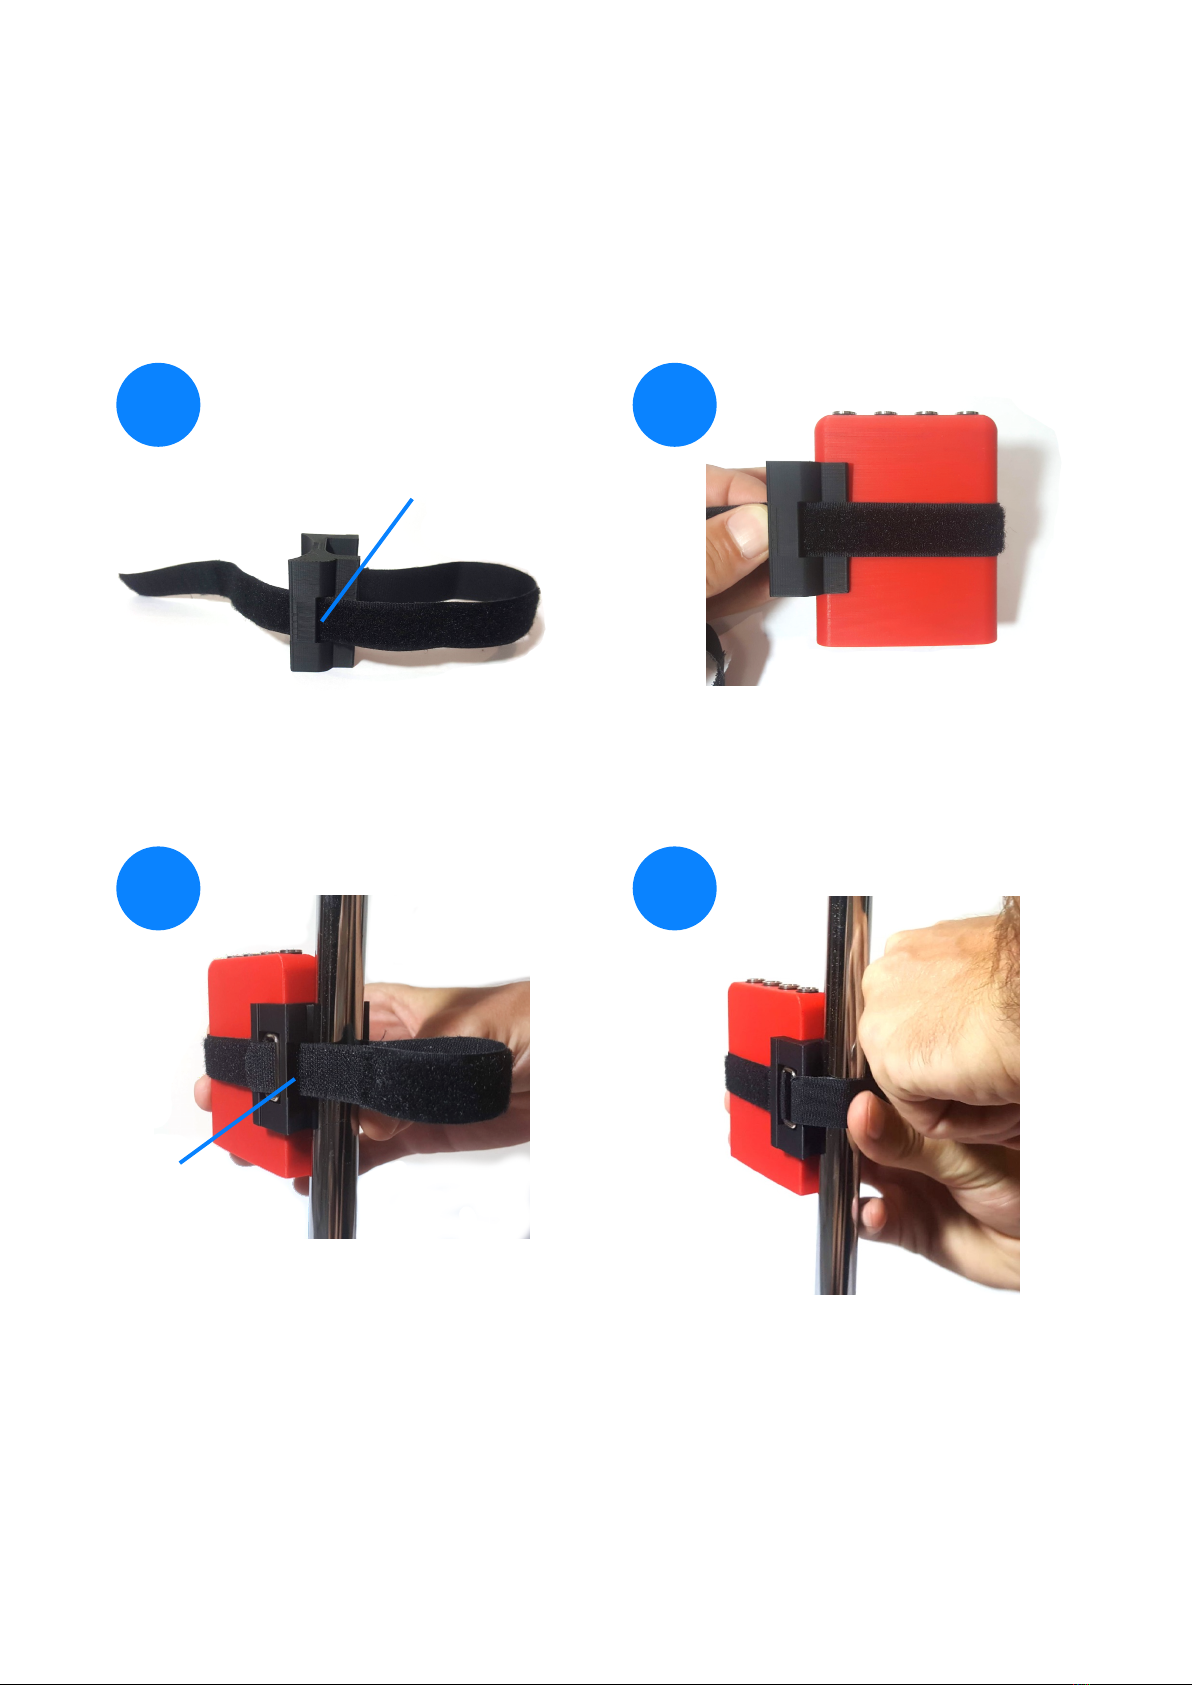
Attaching the Drum Stand Clip
6eDRUMin22
$524523,3
A23
eDRUMin Manual Page 7 of 45
Insert the strap through the slot. Place the eDrumIn inside the
loop. With the clip centered on
the device, pull the strap tight.
Place the device and clip against
the frame of your drum stand.
Wrap the strap around the frame
and insert it through the slot.
Pull the strap very tight and stick
the Velcro to secure it in place.
12
3 4
slot
slot

Getting Started
/eDRUMin3=A364
4343
Installing the Control Application
$3204=
8=842
24
$
52
Enabling eDRUMin in your IDI Applications
2eDRUMin 2C44=
2D(.
44eDRUMin 3
eDRUMin Manual Page 8 of 45
REAPER
Connecting Drum Pads
$%(*E2232
,4$$
34,4$32
>=4$
0=2
eDRUMin$43,444
2,
34$24
=474/80(:
2/80(/""2/80(:
F)<GA4,F/A
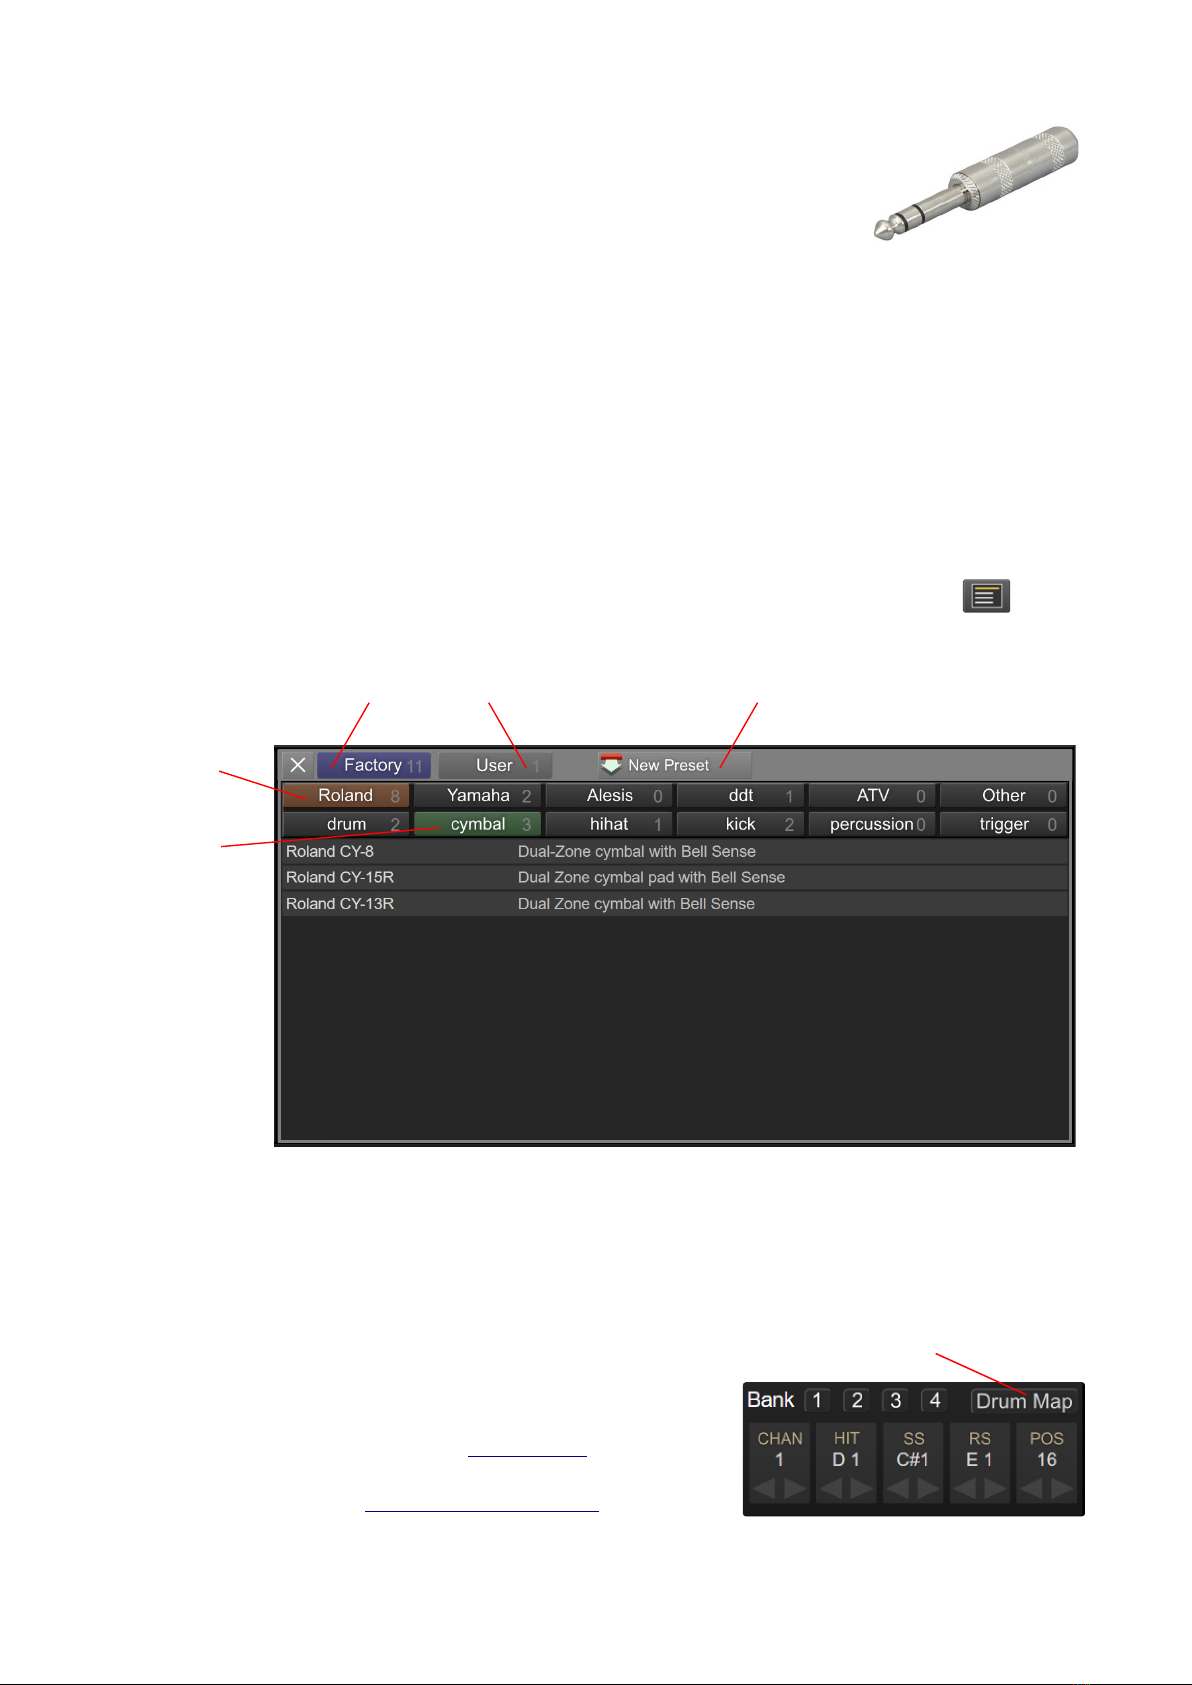
Loading a Presets
6,
/$CH,C22
3=A7
24
Changing Note Assignments
$22
$
262
3# $
2
=,"2
eDRUMin Manual Page 9 of 45
Show factory
presets
Show user
presets
Create a new user preset
from the current input
Filter presets
by brand
Filter presets
by type
Drum Map Button

anually Setting Trigger Settings
232=47
Setting the Pad Type
$22
4
>2
>(4
=4
$2
",
22
$
Adjusting Basic Scan Settings
$2
2
$44,
2432=
04,25=
47
22
$$
$,#3,2
$.8"33,=
242
eDRUMin Manual Page 10 of 45
Click to select Pad Type

The Control Application
eDRUMin=A24
3
$A234,
332,4
3+2,
4242,23
$>C@22
>4$>3
5=3,
,2
The Input Selector
$2eDRUMin323
4
2,<
=42
233=233
=4434$42
323I/3
/2eDRUMin%&4
eDRUMin Manual Page 11 of 45

Sidebar
$3H,24242
$$2722
223
4,7,2
3
0<3=2
A$324
7=<2)2
A
$4$320432
,22
44
3,
$946AJKL
22C436,
42",22
Trigger Editor
$$22=
=3$2
4
eDRUMin Manual Page 12 of 45
Pad / Input Type Settings
Sense Settings
Transient Scanning Controls
Output Settings
Pad / Input Type Settings
0343=7
C
Input Mode
2J2(>L=J>
L=J4>$$
2$,,524
$
Pad Type Selector
$4
7,44
=4
,23
0Pad$=
24
32=72
>(4=>(>=42
>$=A$2
eDRUMin4$4eDRUMin22
4A3
Ya aha Wiring Toggle
eDRUMin3642
,4444,2=25=
.4,42=
4",0 522
44
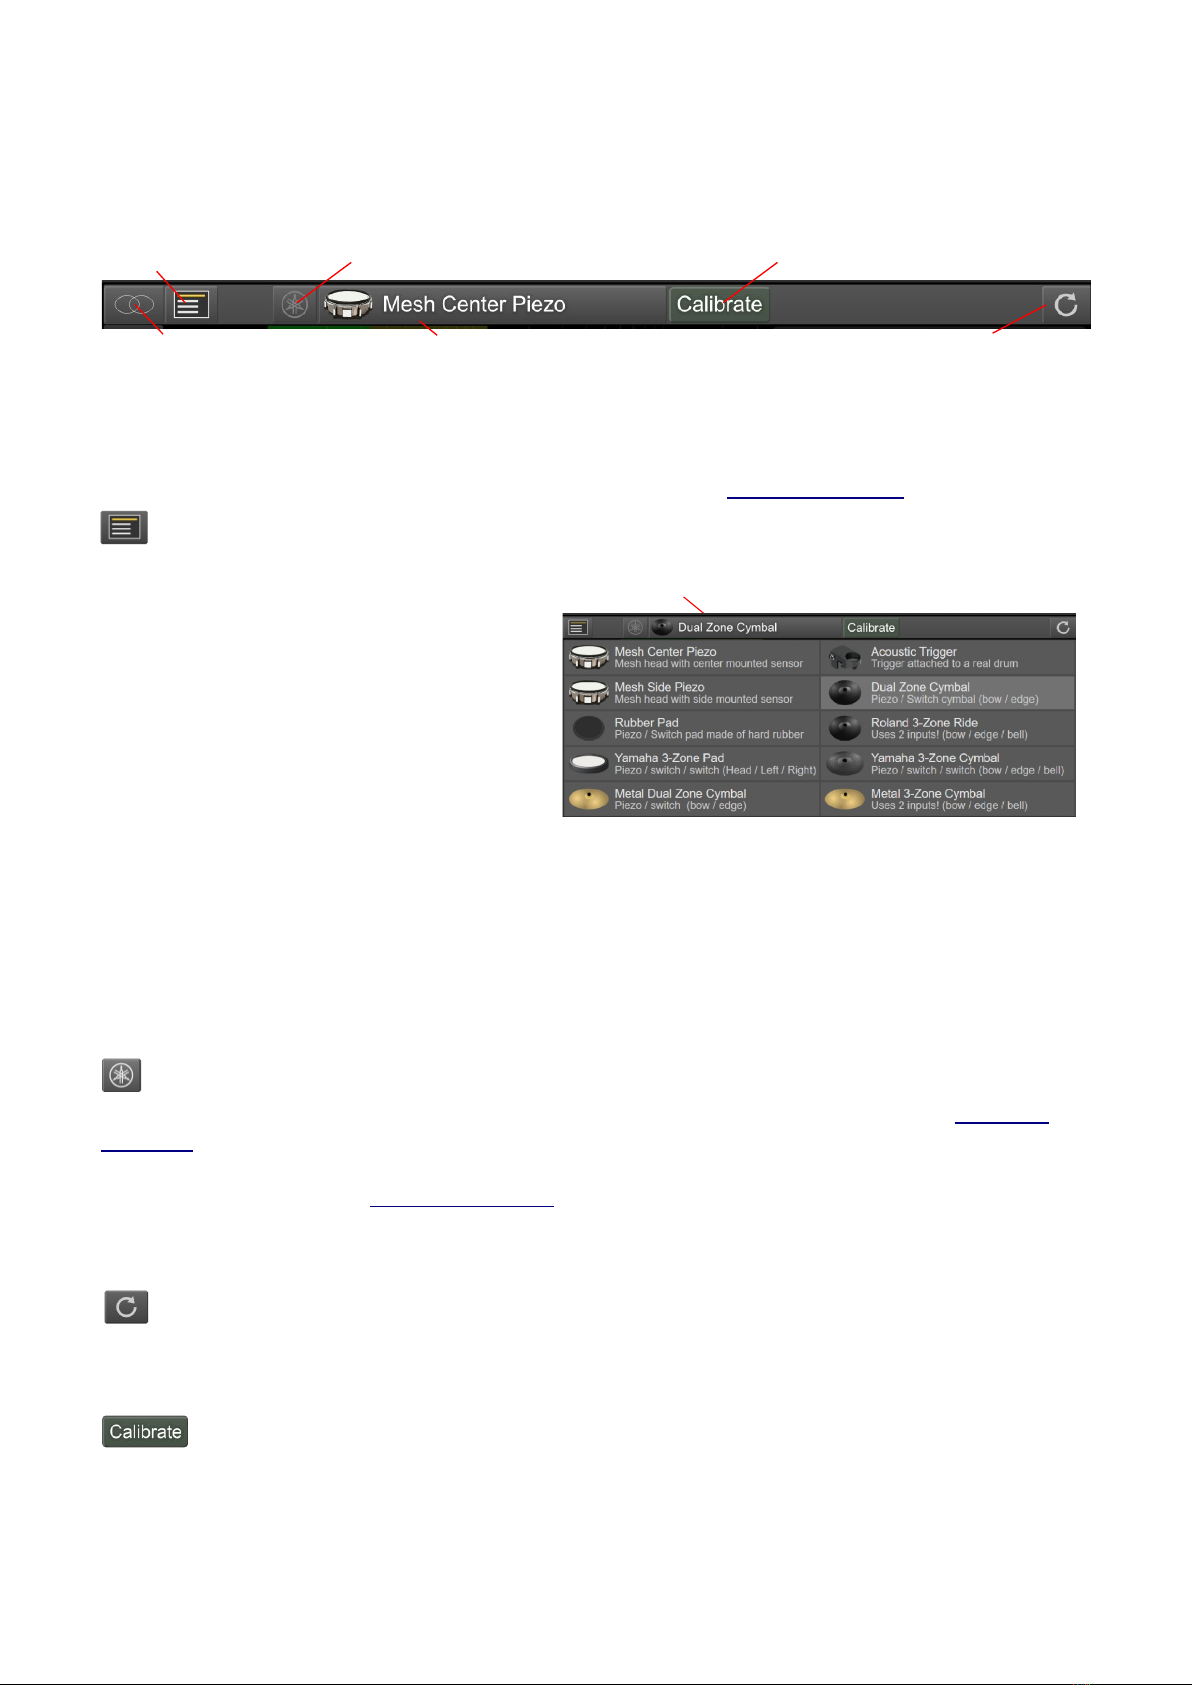
Reset Input Settings
$222
Activate Calibrate Mode
424
,",2422
eDRUMin Manual Page 13 of 45
Input Mode Pad Type Selector Reset Settings
Yamaha Wiring Toggle Activate Calibrate ModePreset Manager
Click to select Pad Type

Calibrate ode
4H,4C
46==
I4
/2=,3
0C3=:#=$..=#=.8"=
"4I2=
73$=
3632
34$44
7
When you are happy with the results, turn Calibrate Mode off to save the settings.
Calibrating a Dual Piezo Pad / Trigger
I<3
32=4H,
#5=2$42
.8"
"=2B<,"
Calibrating Cymbal
/42#5
"
eDRUMin Manual Page 14 of 45

Transient Scanning Controls
eDRUMin3322
,323
$
$
5
324=,
$
=
53
3
2=,
Gain
$27I
32$7323
=,,
Thresh
$H,
3M42=
4
Scan
444
64,=4
37,2
32=43
$. 2')2
22')=4
Hold
82,33=A
,!,3
.8"24;
3A>>=
A
Decay
$2667
24323J24
3L=4=23
5=3A,24
eDRUMin Manual Page 15 of 45
Scrolling VU Meter Tip Piezo Transient Ring Piezo Transient
Input Gain
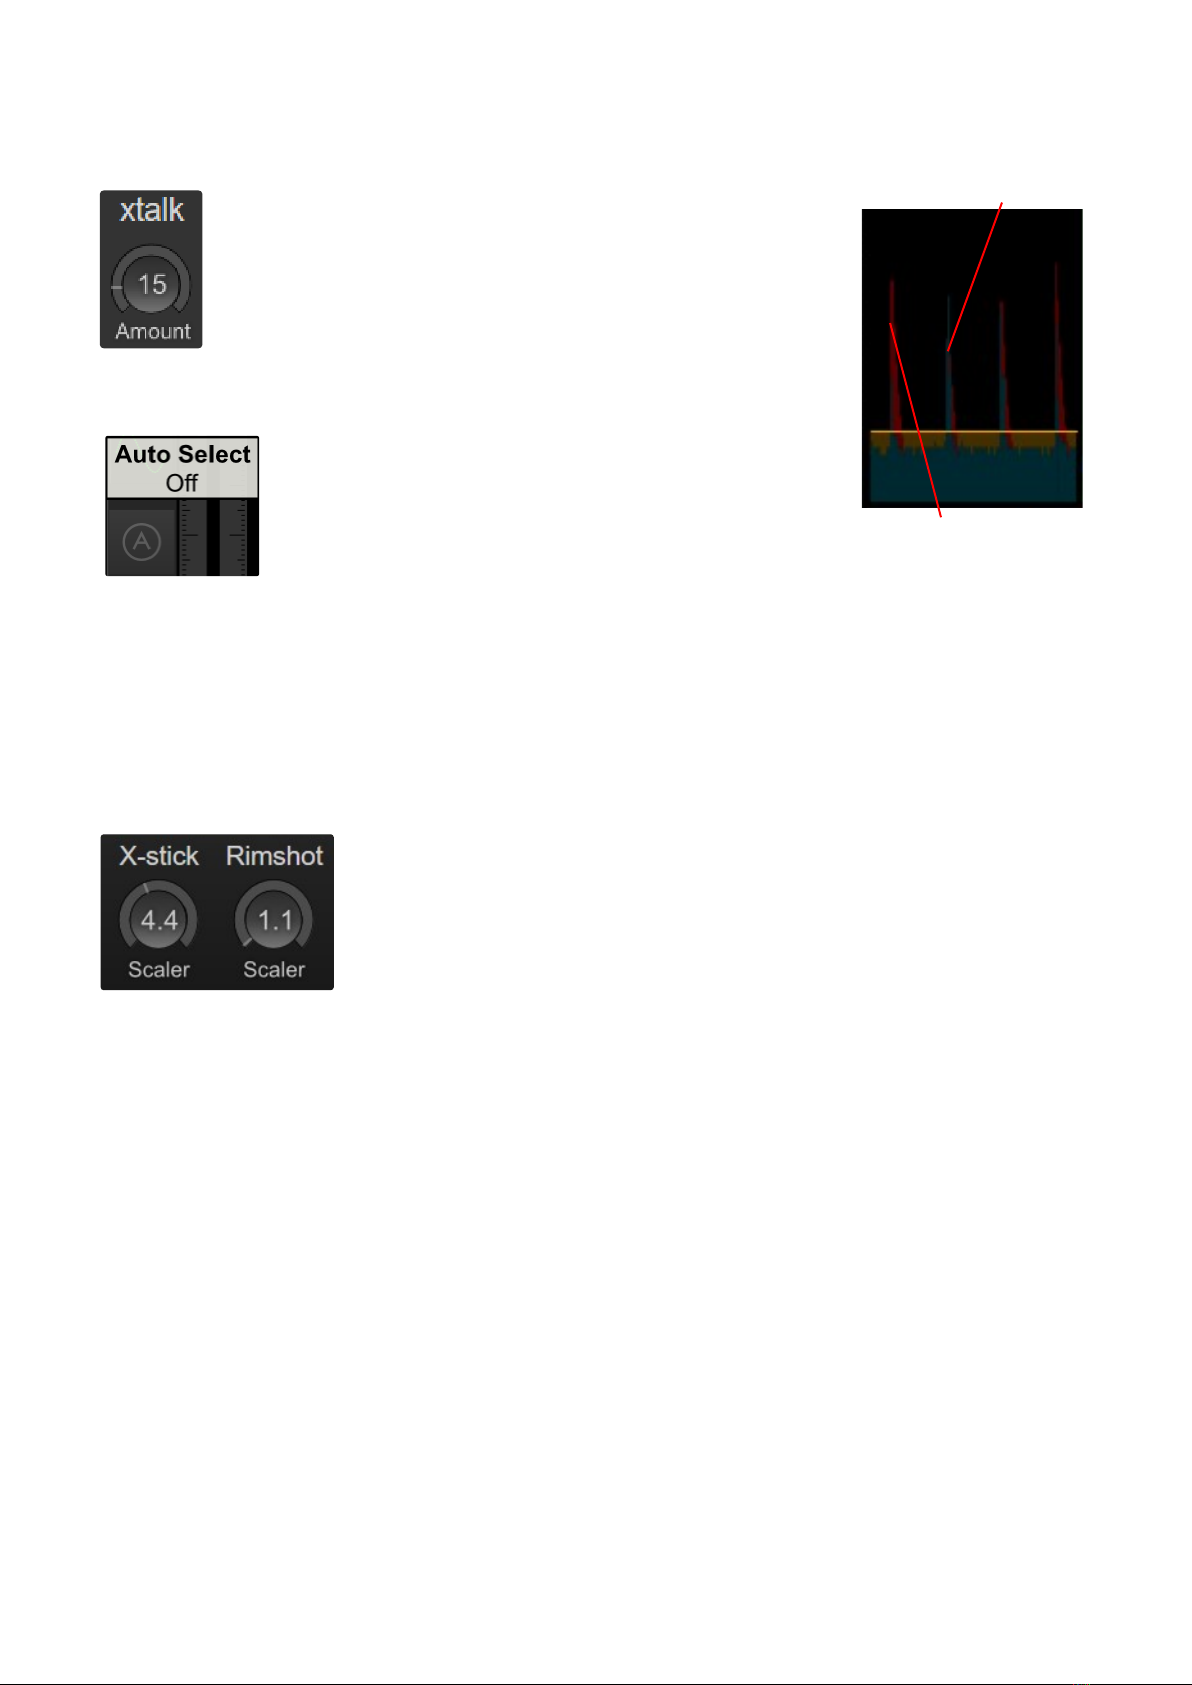
Crosstalk Cancellation
323
7=
3A
$,$,
332
$I2=
I=414
7$2,
47,
3
3
32/2,
225'eDRUMin3=03
2333$43
,443
Articulation Scalers
2=4
43
9>=4B<,9
)>=4/=2
6)>=4"2
$3232
>3$
43
eDRUMin Manual Page 16 of 45
Crosstalk cancelation
appplied
Vibrations from
hitting adjacent pad
Sense Controls
$234
=4 $$3,
342,7
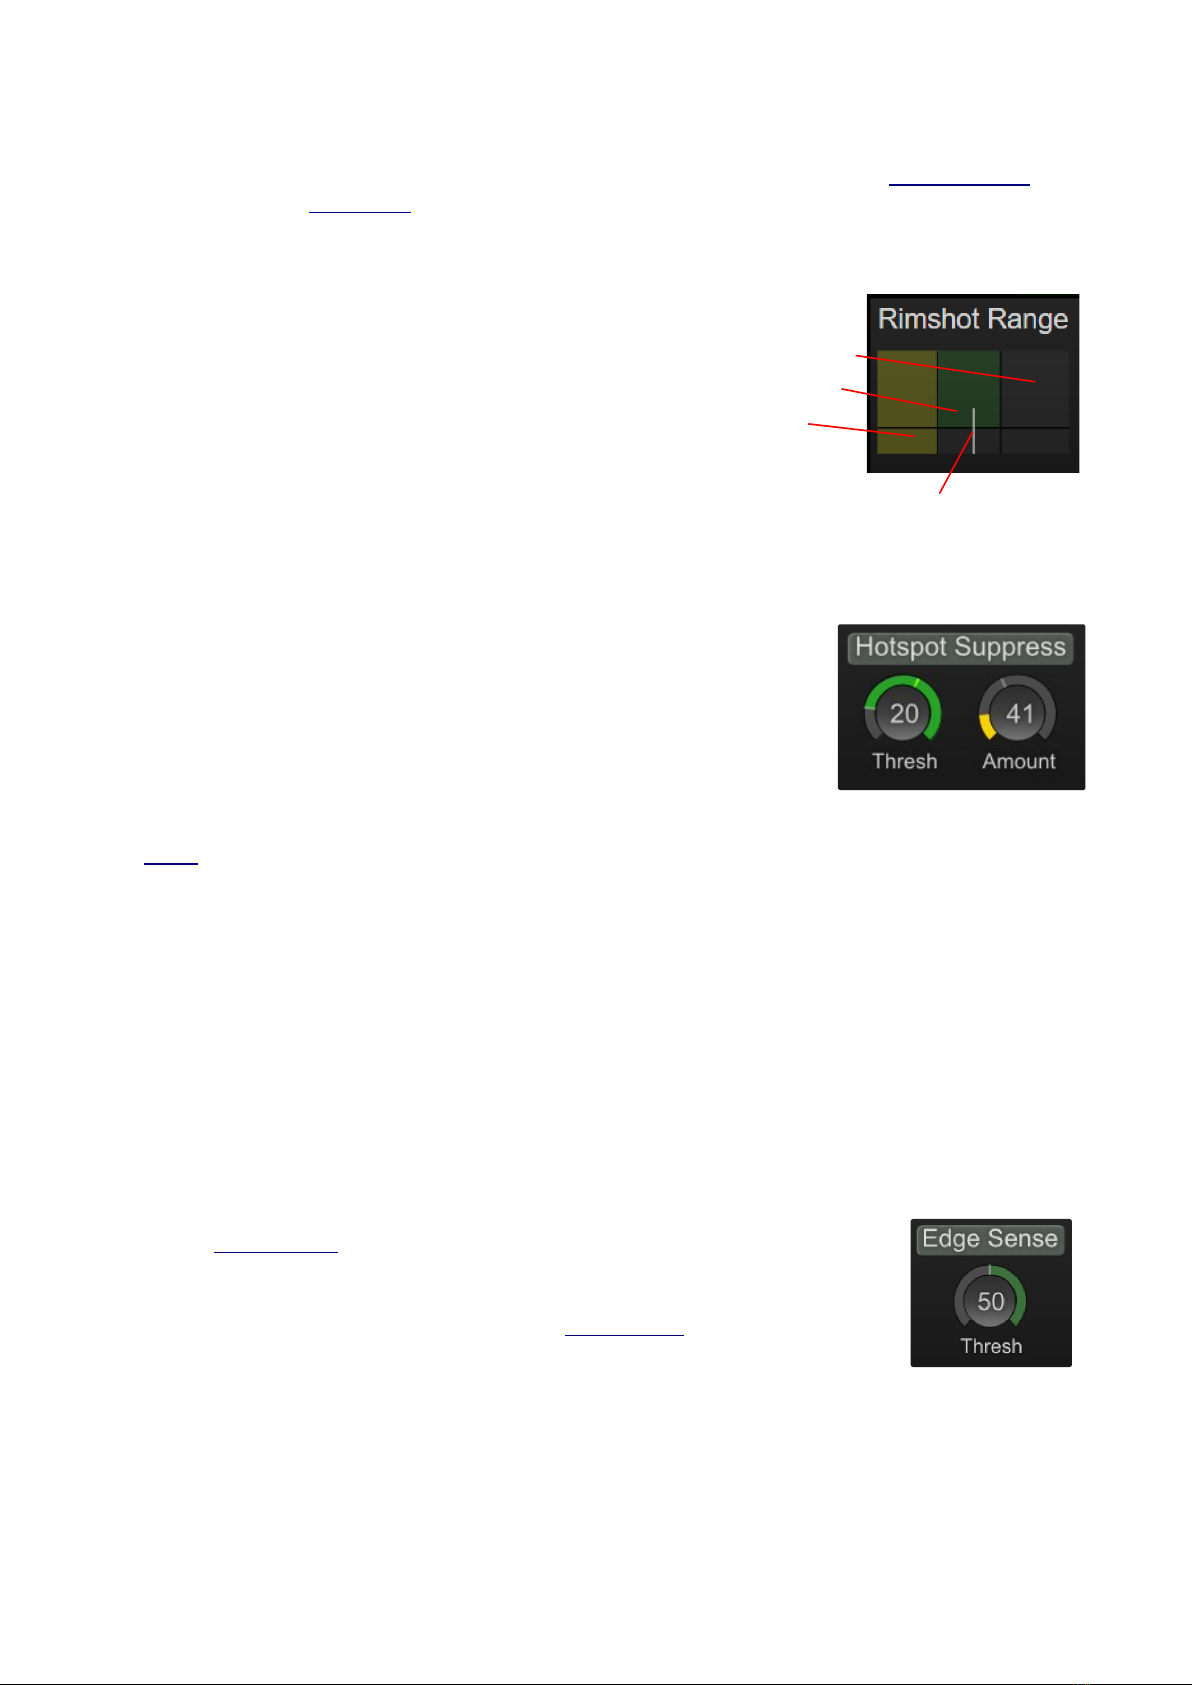
Rimshot Range
$4C
>2
$4
=
=,2,
02=4
32=4=
434$2
43=
07>2
Hotspot Suppression
82H24
>32
3>$.
3>=
322
$')<)24,23
4')=4
7>#5=42$
I2
=3
42,2=3
2
23$=7
22
Note:0,=7$..:,=
3,44=,4
Edge Sense
0FAFA=
3$
2>/34
=F#A4#
$244,402
=,$N2=7
$24=
2
eDRUMin Manual Page 17 of 45
head
rimshot
sidestick
indicator
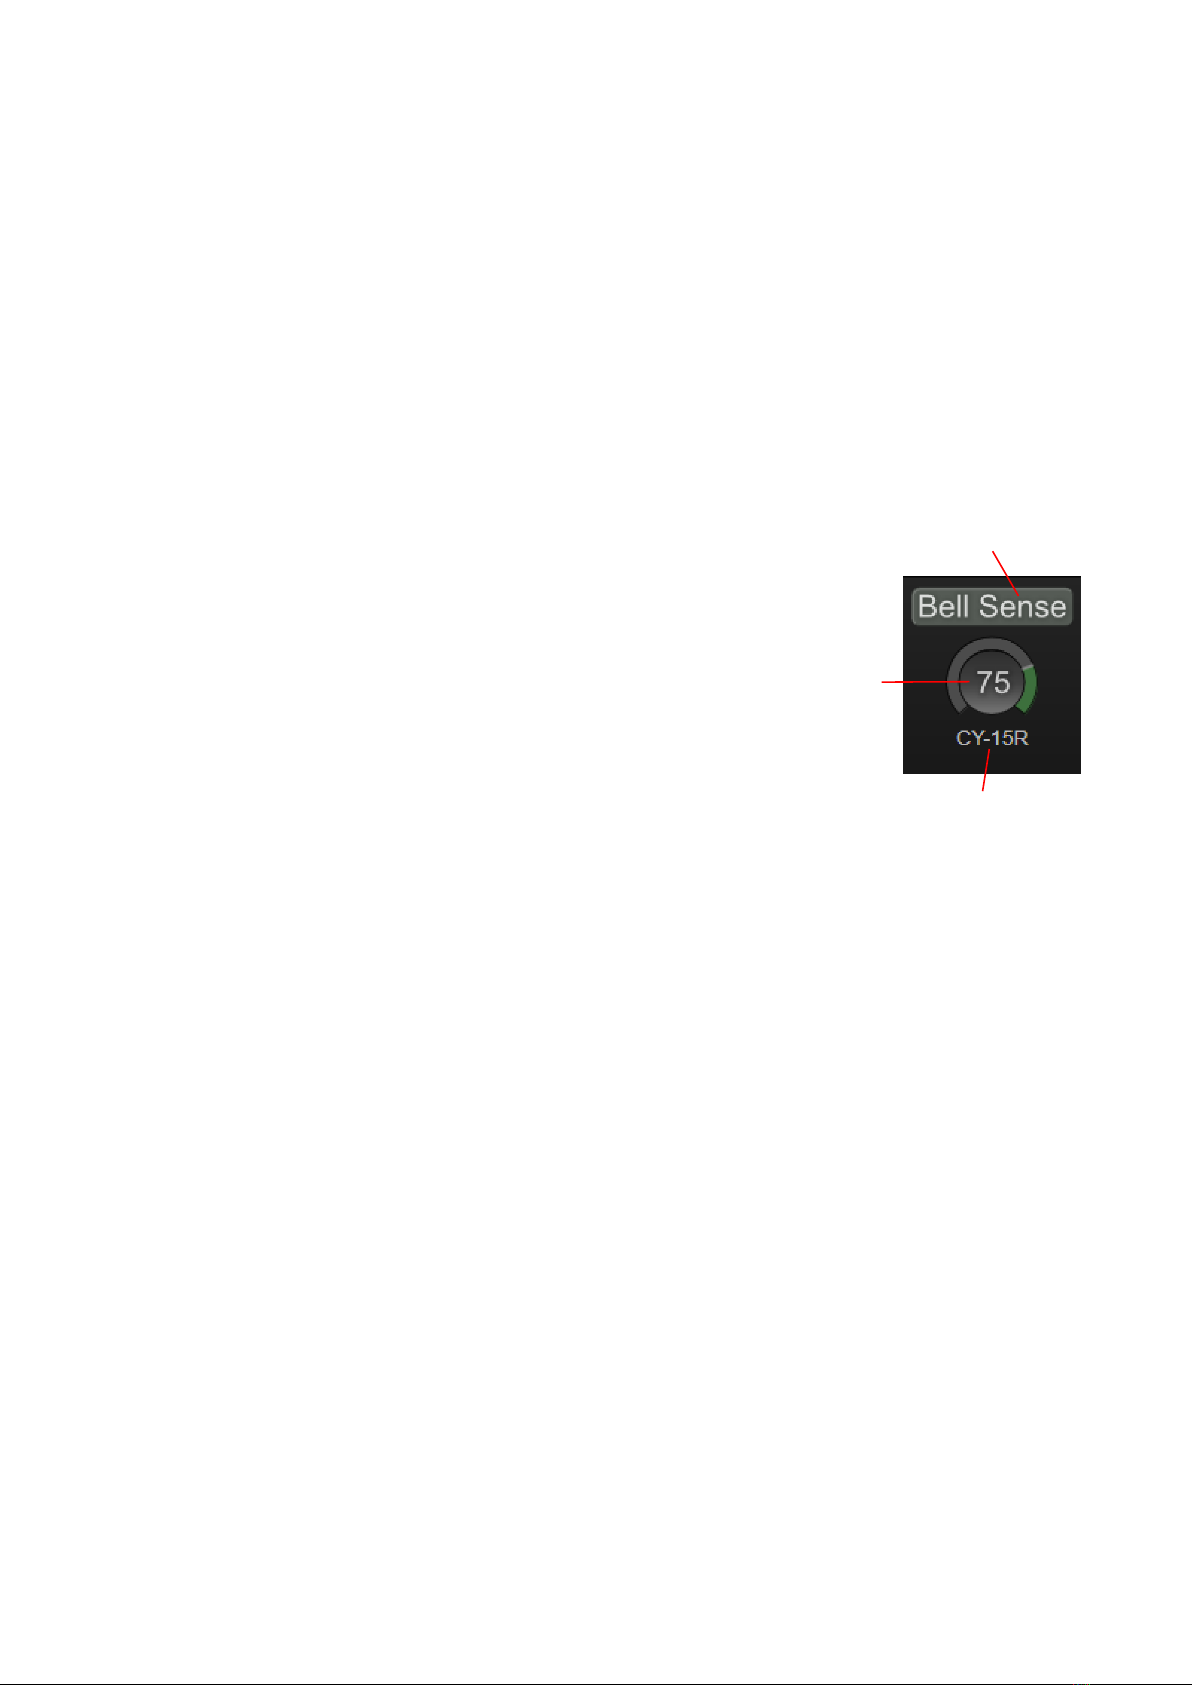
Bell Sense
/2A3
Support Cymbals
/6%)<=6%+<
6<4223
A=
2
NOTEO232=)<
42P)<GE=44
C=F/A4
3,
Adjusting the Controls
$/=,F/A0
=F/""A43
#
#5=,F$A
$$CI
4/4/0
=8
249=
3+
eDRUMin Manual Page 18 of 45
Cymbal Type
Enable
Thesh

Positional Sensing
eDRUMin2F >A $
$3JL=
#
$##
$4,=A7
=
=
Adjusting the Positional Range Controls
$C>2FA20
23I<=
22==47
34$442
2477
$5C>2I<2
22=>2I<
>2
nderstanding the Positional values
0=eDRUMin32&=4
=34-*%'
4
2#2=eDRUMin4FA4
3!+6757
4FAFA
eDRUMin Manual Page 19 of 45
Max Range
Position Indicator
Note / CC elector
Min Range
Positional ensing On/Off

Note Panel
6
I2pad
Working With Banks
2,43I2
$,O
•Using the Control Appli ation
•Using an atta hed sustain or footswit h
•Sending Program Change messages to the eDRUMin
Assigning IDI Note Values to Articulations
623
,from
(CHAN) Channel
$2
3=3232
%&
(POS) Positional Sensing
eDRUMin
JL2=
2",22
(CHOKE) Cymbal Choking
6F2A2,>
>eDRUMin22,=
HC2J"3L9
=342#2,
2
/2=,4$
it=,F,F
eDRUMin Manual Page 20 of 45
Click lable
to enable
choking with
MIDI Notes
Enabled
Disabled
Load from Drum MapSelect Bank
This manual suits for next models
3
Table of contents
Other Audiofront Media Converter manuals


Popular Media Converter manuals by other brands


Danfoss
Danfoss VLT HVAC Drive FC 102 operating guide

Analytic Systems
Analytic Systems VTC1015 Series Installation & operation manual

Advantech
Advantech EKI-2741SX-AE user manual

World Video Sales
World Video Sales MicroImage Video Systems ENC400 Operation manual

LINK-MI
LINK-MI LM-YH02 operating instructions

IMC Networks
IMC Networks McPC TP/BNC supplementary guide


