Audiotec Fischer DIRECTOR User manual

DIRECTOR
1
Herzlichen Glückwunsch!
Sehr geehrter Kunde,
Wir gratulieren Ihnen zum Kauf dieses hochwer-
tigen Produktes aus dem Hause Audiotec Fischer.
Diese Bedieneinheit wurde von uns nach neuesten
technischen Erkenntnissen entwickelt und zeichnet
sich durch hervorragende Verarbeitung und eine
überzeugende Anwendung ausgereifter Technolo-
gien aus.
Viel Freude an diesem Produkt wünscht Ihnen das
Team von
AUDIOTEC FISCHER
Allgemeine Hinweise
Um alle Möglichkeiten des Produktes optimal aus-
schöpfen zu können, lesen Sie bitte sorgfältig die
nachfolgenden Installationshinweise. Wir garantie-
ren, dass jedes Gerät vor Versand auf seinen ein-
wandfreien Zustand überprüft wurde.
Vor Beginn der Installation unterbrechen Sie
den Minusanschluss der Autobatterie.
Wir empfehlen Ihnen, die Installation von einem
Einbauspezialisten vornehmen zu lassen, da der
Nachweis eines fachgerechten Einbaus und An-
schlusses des Gerätes Voraussetzung für die Ga-
rantieleistungen sind.
Installieren Sie Ihren DIRECTOR an einer tro-
ckenen Stelle im Auto und vergewissern Sie sich,
dass die Bedieneinheit am Montageort genügend
Kühlung erhält. Montieren Sie das Gerät nicht in der
Nähe von wärmeabstrahlenden Teilen oder elektro-
nischen Steuerungen des Fahrzeuges.
Im Sinne der Unfallsicherheit muss die Bedie-
neinheit professionell befestigt werden, damit
die Bedieneinheit keine Gefahr für die Insas-
sen und/oder das Fahrzeug während einer kri-
tischen Fahrsituation, wie beispielsweise einer
Gefahrenbremsung, darstellt. Dieses geschieht
über Schrauben, die in eine Montageäche ein-
geschraubt werden, die wiederum genügend Halt
bieten muss.
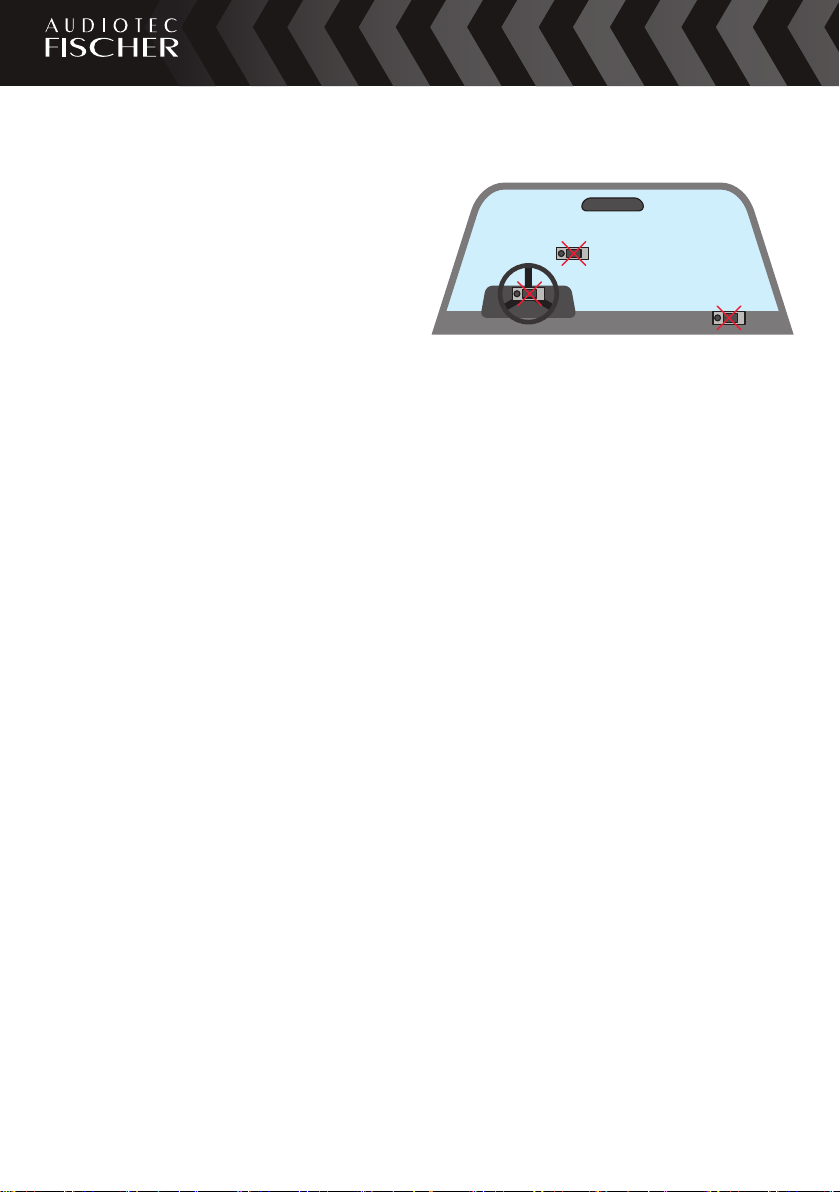
Wichtig: Achten Sie bei der Montage darauf, dass
keine Sicherheitssysteme Ihres Fahrzeugs (bspw.
Airbag) in ihrer Wirkung beeinträchtigt werden kön-
nen.
• Befestigen Sie den DIRECTOR nicht auf einer
Abdeckung eines Airbags (bspw. Lenkrad oder
Armaturenbrett Beifahrerseite)
• Befestigen Sie die Bedieneinheit nicht im Sicht-
feld des Fahrers
• Legen Sie den DIRECTOR nicht unbefestigt auf
dem Armaturenbrett ab
Bevor Sie die Schrauben im Montagefeld befesti-
gen, vergewissern Sie sich, dass keine elektrischen
Kabel und Komponenten, hydraulische Bremslei-
tungen, der Benzintank etc. dahinter verborgen
sind. Diese könnten sonst beschädigt werden. Ach-
ten Sie bitte darauf, dass sich solche Teile auch in
der doppelten Wandverkleidung verbergen können.
Die Kabelverbindungen müssen so verlegt sein,
dass keine Klemm-, Quetsch- oder Bruchgefahr
besteht. Bei scharfen Kanten (Blechdurchfüh-
rungen) müssen alle Kabel gegen Durchscheuern
gepolstert sein. Ferner darf das Versorgungskabel
niemals mit Zuleitungen zu Vorrichtungen des Kfz
(Lüftermotoren, Brandkontrollmodulen, Benzinlei-
tungen etc.) verlegt werden.
DIRECTOR
2
Installationshinweise
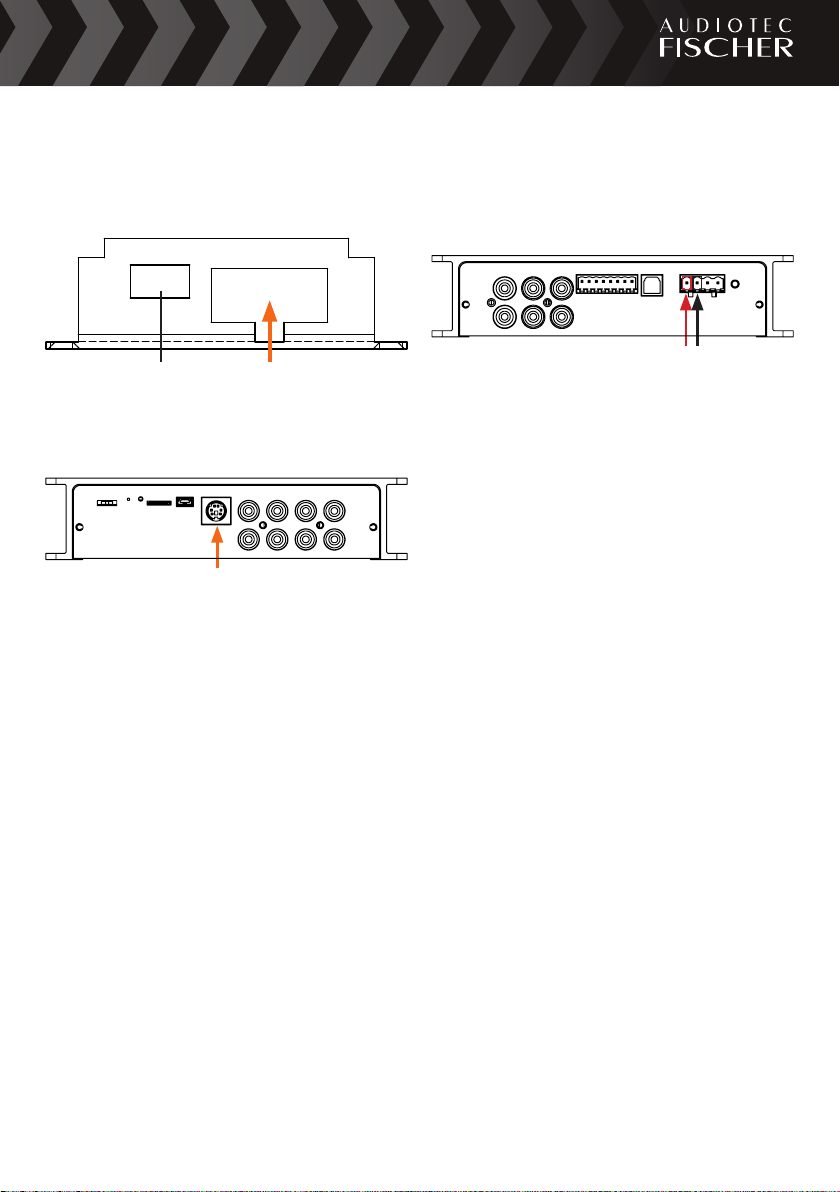
1. Verbinden Sie den 8-poligen Stecker des An-
schlusskabels, welches dem Gerät beiliegt, mit
dem DIRECTOR.
USB Eingang Kabel hier einstecken
2. Stecken Sie den Rundstecker des Anschluss-
kabels in den Multifunktionsanschluß (Control
Input) des DSPs.
3. Verbinden Sie die Masseleitung des Anschluss-
kabels (Ground / braun) mit einem Massepunkt
(bspw. von Lackresten befreiter Massepunkt
am Kfz-Chassis oder Masseanschluss eines
DSPs / Verstärkers). Danach schließen Sie die
Versorgungsleitung (+12 V / orange) an eine
+12 V Spannungsquelle (bspw. Pluspol der
Autobatterie oder +12 V Anschluss des DSPs
/ Verstärkers) an.
Achtung: Achten Sie auf eine korrekte Verka-
belung, um Beschädigungen am DIRECTOR
und/oder dem DSP / Verstärker / der Kfz-Elek-
tronik zu vermeiden.
Optional kann die Beleuchtungsleitung (Light /
blau) an eine Lichtquelle (beispielsweise Arma-
turenbrettbeleuchtung) angeschlossen werden.
Wird die Beleuchtungsleitung angeschlossen,
kann die automatische Dimmfunktion des
DIRECTORS genutzt werden.
Beispiel: Im folgenden Abschnitt wird der An-
schluss der Stromversorgung an einen HELIX
DSP erläutert.
Verbinden Sie die Masseleitung des Anschluss-
Garantiehinweis
Die Garantieleistung entspricht der gesetzlichen
Regelung. Von der Garantieleistung ausgeschlos-
sen sind Defekte und Schäden, die durch Überlas-
tung oder unsachgemäße Behandlung entstanden
sind. Eine Rücksendung kann nur nach vorheriger
Absprache in der Originalverpackung, einer de-
taillierten Fehlerbeschreibung und einem gültigen
Kaufbeleg erfolgen. Technische Änderungen und
Irrtümer vorbehalten! Für Schäden am Fahrzeug
oder Gerätedefekte, hervorgerufen durch Bedie-
nungsfehler des Gerätes, können wir keine Haftung
übernehmen. Alle HELIX Produkte sind sowohl mit
einer E-Kennzeichnung als auch einer CE-Kenn-
zeichnung versehen. Damit sind die Geräte für den
Betrieb in Fahrzeugen innerhalb der Europäischen
Union (EU) zertiziert.
kabels (Ground / braun) mit dem Massean-
schluss des DSPs (siehe folgende Abbildung,
schwarzer Pfeil). Anschließend die Versor-
gungsleitung (+ 12 V / orange) mit dem +12 V
Stromanschluss des DSPs (siehe folgende Ab-
bildung, roter Pfeil).
+12 V GROUND
4. Nun können Sie ihr Soundsystem einschalten
und Einstellungen vornehmen.
Hinweis: Mit dem Einschalten des Soundsy-
stems wird der USB Eingang des DSPs de-
aktiviert. Um den DSP mit einem PC zu ver-
binden benutzen, Sie bitte den USB Eingang
des DIRECTORS.
Hinweis: Damit der DIRECTOR dauerhaft vom
angeschlossenen DSP erkannt wird, muss die-
ser im „Device Conguration Menu“ aktiviert
werden.
DIRECTOR
3
Congratulations!
Dear Customer,
congratulations on your purchase of this high-qual-
ity product. This display remote control is produced
by using the latest technology. We wish you many
hours of enjoyment with your new Audiotec Fischer
product.
Yours,
AUDIOTEC FISCHER
General Instructions
To prevent damage to the unit and possible injury,
read this manual carefully and follow all installation
instructions. This product has been checked for
proper function prior to shipping and is guaranteed
against manufacturing defects.
Before starting your installation, disconnect the
battery’s negative terminal to prevent damage
to the unit, re and / or risk of injury. For a proper
performance and to ensure full warranty coverage,
we strongly recommend to get this product installed
by an authorized BRAX, HELIX or MATCH dealer.
Install your DIRECTOR in a dry location with suf-
cient air circulation for proper cooling of the equip-
ment.
For safety reasons the DIRECTOR must be in-
stalled professionally to prevent hazard to the
vehicle and / or risk of injury to the passengers
during a critical driving situation such as an
emergency braking. The remote control should be
secured to a solid mounting surface using proper
mounting hardware.
Attention: During assembly make sure that the
DIRECTOR cannot interfere with any safety system
of the car (e.g. airbags).
• Do not mount the remote control on faceplates
of airbags (e.g. steering wheel or car dash-
board)
• Do not mount the DIRECTOR in the view eld
of the driver
• Do not place the remote control unsecured on
top of the dashboard
Before mounting, carefully examine the area
around and behind the proposed installation loca-
tion to insure that there are no electrical cables or
components, hydraulic brake lines or any part of the
fuel tank located behind the mounting surface. Fail-
ure to do so may result in unpredictable damage
to these components and possible costly repairs to
the vehicle.
Prior to installation, plan the wire routing to avoid
any possible damage to the wire harness. All ca-
bling should be protected against possible crushing
or pinching hazards. Also avoid routing cables close
to potential noise sources such as electric motors,
high power accessories and other vehicle harness-
es.

DIRECTOR
4
1. Connect the rectangular 8-pole connector
of the lead cable (included in delivery) to the
DIRECTOR.
USB input Insert lead cable here
2. Insert the circular plug of the lead cable into the
multi-functional input (Control Input) of the DSP.
3. At rst, connect the ground wire of the lead
cable (Ground / brown) to a ground point (e.g.
metal body of the vehicle - an area which has
been cleaned of all paint residues - or ground
connector of a DSP / amplier). The next step
is to connect the power cable of the lead cable
(+12 V / orange) to a +12 V voltage source (e.g.
positive terminal of the battery or the +12 V con-
nector of a DSP / amplier).
Attention: Check the polarity during the in-
stallation in order to prevent damages of the
DIRECTOR and / or DSP / amplier / battery or
other equipment.
Optionally the illumination wire (Light / blue)
can be connected to an illumination wire of the
car (e.g. dashboard illumination). If the illumina-
tion wire is connected it is possible to use the
automatic dimming function of the DIRECTOR.
Example: Connecting the power supply to
a HELIX DSP is described in the following
section. Connect the ground wire (Ground /
brown) of the lead cable to the ground termi-
nal of the DSP (see gure below / black arrow).
Next, connect the positive wire (+12 V / orange)
to the +12 V terminal of the DSP (see gure be-
low / red arrow).
+12 V GROUND
4. Now you can turn on your sound system and
make your adjustments.
Important: The USB input of the DSP is deacti-
vated as soon as the DIRECTOR is connected
and turned on. If you want to establish a con-
nector between your PC and the DSP please
always use the USB input of the DIRECTOR.
Important: In order that the DIRECTOR is per-
manently recognized by the connected DSP it
must be activated in the “Device Conguration
Menu”.
Warranty disclaimer
The limited warranty comply with legal regulations.
Failures or damages caused by overload or im-
proper use are not covered by the warranty. Please
return the defective product only with a valid proof
of purchase and a detailed malfunction description.
Technical specications are subject to change!
Errors are reserved!
For damages on the vehicle and the device, caused
by handling errors of the module, we can’t assume
liability. These devices are certied for the use in
vehicles within the European Community (EC).
Audiotec Fischer GmbH
Hünegräben 26 · D-57392 Schmallenberg
Tel.: +49 2972 9788 0 · Fax: +49 2972 9788 88
E-mail: contact@audiotec-scher.com
Internet: www.audiotec-scher.com
Other manuals for DIRECTOR
2
Table of contents
Languages:
Other Audiotec Fischer Remote Control manuals


Popular Remote Control manuals by other brands

Heat Controller
Heat Controller Room Air Remote Controller Owner's instruction manual

Remote Control Systems
Remote Control Systems TITAN-TWIN TX manual

FONESTAR
FONESTAR MC-2150 manual

Trust
Trust Smart Home Start-Line AYCT-102 user manual

Mitsubishi Electric
Mitsubishi Electric RC-EX3A Original instructions

Crestron
Crestron HR-150 Do guide


