Auto Styling Truckman 8HTCL00AATOH6E User manual

2nd EdITIOn REvIsIOn 1
ClassiC Top
FITTInG InsTRUCTIOns
ToyoTa Hilux Mk6-7 ExTra
Cab

2
TOyOTa HIlUx Mk6-7 ClassIC TOp
5. From the front of the load bed, measure and
mark the side rails as follows:
Extra Cab: 200mm, 900mm, 1650mm
Tip:
Use masking tape & pencil. Continue
the lines to the inside of the bed liner to aid
alignment later. Mark a cross on top, 15mm
from the inside.
Please read these instructions carefully. If you have any questions regarding the
Failure to comply with these instructions may affect any warranty considerations
Tools Required
13mm Spanner
13mm Socket
Drill
Drill Bits (3 & 9mm)
Silicon Sealant
Also includes:
VHB Wipe
Hardtop Keys
1 x Classic Hardtop 6 x Fixing Plates
6 x Nylock Nuts
6 x M8 Bolts
6 x Large M8 Washers
1 x Protective Tape (Roll)
1. Gel Coat Top
Remove the shrink wrap packaging,
retrieving the kit contents before disposal.
2. Remove the bolts,
washers, fixing plates &
nuts from the kit.
Painted Top
Remove the cardboard packaging and the
kit contents carefully from the pallet.
OVER RAIL BED LINERS can cause the hardtop to leak due to an uneven surface.
Therefore,Auto Styling Truckman highly recommends converting to or replacing with an under rail bed liner.
PREPARATION KIT CONTENTS
3. Thoroughly clean the
pickup’s rear window and
the hardtop’s bulkhead
window.
4. Wipe down the top of
the vehicle bed.

3
TOyOTa HIlUx Mk6-7
NEED ADVICE?
Contact us on 0845 644 4704
HEAVY LIFTING
We recommend the use of 4
people to lift the hardtop.
6. Drill a 3mm pilot hole
15mm from the inside edge
at each mark. Drill again
with an 9mm bit.
8. Lift the top over the
ladder-rack onto the bed.
Keep the rear end slightly
raised until the hardtop is in
position.
7. Remove all swarf and
paint the holes with a
zinc rich primer to prevent
corrosion.
FITTING
12. Drill 3mm pilot holes
to line up with the original
holes. Re-check hardtop
alignment.
Bolt
Large Washer
Threaded Plate
Nylock Nut
14. Bolt the hardtop (without nylock nut) to the vehicle as
shown in the diagram and tighten to 8Nm.
15. Add the nylock nut (also to 8Nm).
13. Complete the holes
with a 9mm drill bit.
11. With the door closed,
measure and mark the
same dimensions as before
onto the top (using Step 9’s
lines as a guide).
9. Insert padded wedges
between the top and the
cab to hold the top as far
back as possible (without
forcing).
10. Align the top centrally
and ensure that the seal
under the hardtop door is
just touching the tailgate.
Auto Styling UK Limited,
Unit 4 Narrowboat Way,
Brierley Hill, DY5 1UF, United Kingdom
Tel: 0845 6444704 Fax: 0845 6445014
Email: [email protected]
Web: www.autostylinguk.com
Notice
It is important that safety warnings in the instructions are adhered to.
Do not attempt to fit this product if you are not competent
to do so. Improper fitting may affect your warranty
considerations. For your safety, we recommend that any
wiring is performed by qualified Auto Electricians.
Due to tolerances of the vehicle fitting of this product may differ
from the exact fitting specifications described in the instructions. It is
the responsibility of the fitter that the product is installed correctly.
Fitting instruction revisions may be found at www.autostylinguk.com
CONTACT
TOyOTa HIlUx Mk6-7
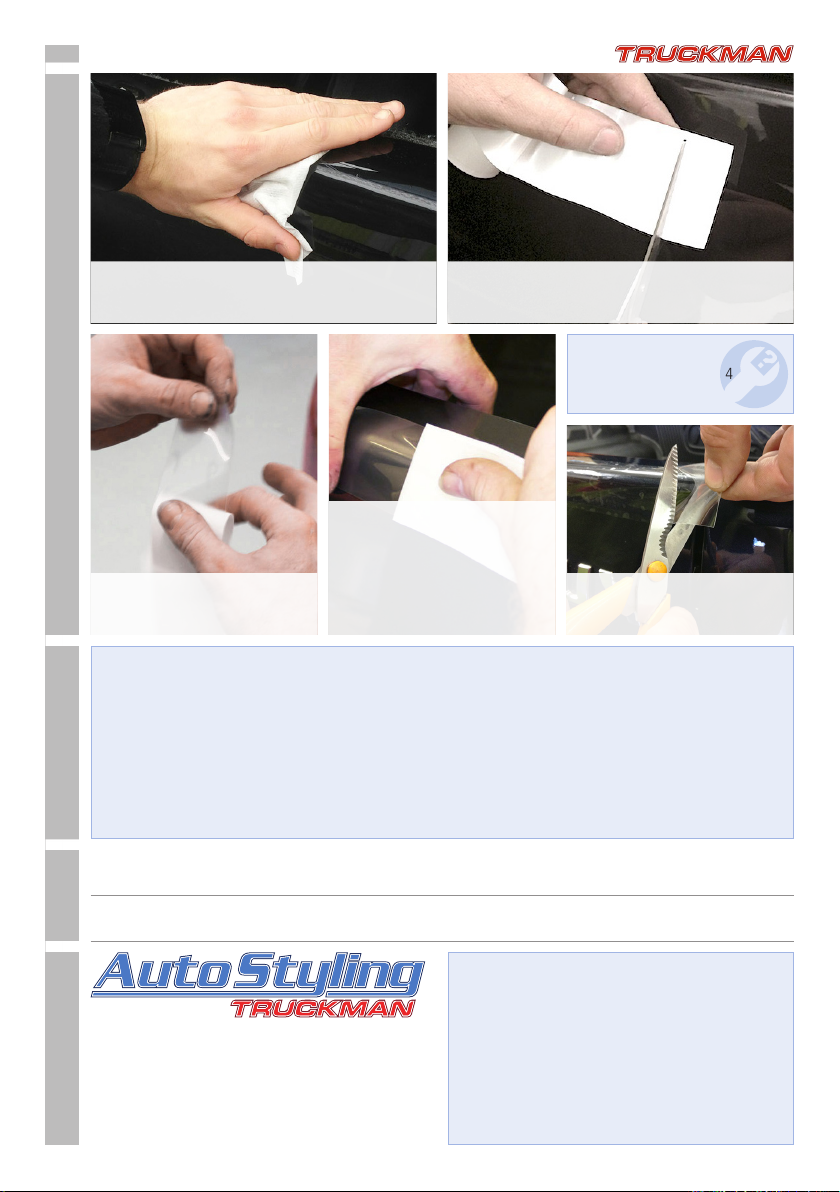
16. Thoroughly clean the top of vehicle’s
tailgate.
17. Unroll the protective tape and cut one
end square.
19. Carefully apply it to
the tailgate where the door
touches, rubbing outwards
to remove any bubbles as
you go.
18. Partly remove the
backing from the tape.
20. Trim the tape square at
the other end.
NEED ADVICE?
Contact us on 0845 644 4704
NOTES FITTING
IMPORTANT NOTES
Bed liners must be under rail for a good fit.
Ensure the tailgate and side windows (if
applicable) are closed when driving.
Do not place animals in the load area
without adequate ventilation.
Do not exceed load limit when using roof rails.
Do not use a pressure washer near the seals.
MAINTENANCE
Use a light oil to lubricate the lock and hinges.
Check the tightness of the fixing clamps / bolts.
(8Nm Torque)
CLEANING
Use ordinary non-ammonia based car cleaning
products and a soft or microfibre cloth.
INFORMATION
Other Auto Styling Automobile Accessories manuals


