AutoTest WorkshopPro 10 User manual

User Manual
Version 1.1
Auto
Test
®
WorkshopPro®10
10″ PREMIUM TABLET BASED DECELEROMETER / BRAKE TESTER
AND WORKSHOP TOOL, WITH BLUETOOTH PRINTER

AutoTest WorkshopPro10 - User Manual User Manual v1.1 Page 2
DECLARATION OF CONFORMITY
We, Auto Test Products Pty Ltd. declare under our sole responsibility that the product WorkshopPro10 is in conformity with the provisions of the
following Council Directive: 1999/5/EC.
A copy of the Declaration of Conformity is available from http://www.autotest.net.au
© AutoTest Products Pty Ltd (AutoTest) [2021].
Copyright in the drawings, information and data recorded in this document (the information) is the property of AutoTest Products. This document and
the information are solely for the use of the authorised recipient and this document may not be used, copied, or reproduced in whole or part for any
purpose other than that for which it was supplied by AutoTest Products. AutoTest Products makes no representation, undertakes no duty, and accepts
no responsibility to any third party who may use or rely upon this document or the information.
Under no circumstances shall AutoTest Products be responsible for any loss of data or income or any special, incidental, consequential or direct
damages howsoever caused. The contents of this document are provided "as is". Except as required by applicable law, no warranties of any kind,
either express or implied, including, but not limited to, the implied warranties of merchantability and fitness for a particular purpose, are made in relation
to the accuracy, reliability or contents of this document. AutoTest Products reserves the right to revise this document or withdraw it at any time without
prior notice.

AutoTest WorkshopPro10 User Manual - User Manual User Manual v1.1 Page 3
Table of Contents
AutoTest®WorkshopPro®10
1. PREFACE ..................................................................................................................................................................... 4
2. FOR YOUR SAFETY .................................................................................................................................................... 4
3. WARRANTY ................................................................................................................................................................. 5
3.1 AUTHORISED SERVICE AGENTS.......................................................................................................................... 5
4. UNPACKING AND FIRST TIME USE .......................................................................................................................... 6
4.1 Activating your Workshop Pro................................................................................................................................... 6
4.1.1 Buying a license..........................................................................................8
4.1.2 Code received from AutoTest ..................................................................10
5. OPERATION ............................................................................................................................................................... 11
5.1 Test Conditions & Test Area ................................................................................................................................... 11
5.2 Set-up in Vehicle ..................................................................................................................................................... 11
5.3 Running a test ......................................................................................................................................................... 12
5.4 Reviewing a test...................................................................................................................................................... 13
5.5 Printing a test .......................................................................................................................................................... 14
5.6 Saving the test to read with NetBrake™................................................................................................................. 14
6. DATABASE ................................................................................................................................................................ 16
6.1 Viewing Test, Deleting Test or More Test Information............................................................................................ 16
7. SETTINGS .................................................................................................................................................................. 17
7.1 Activation................................................................................................................................................................. 17
7.2 Calibration ............................................................................................................................................................... 18
7.3 Bluetooth ................................................................................................................................................................. 19
7.4 Device Activation..................................................................................................................................................... 21
........................................................................................................................................................................................ 21
7.5 Check for Updates .................................................................................................................................................. 21
8. RETURN OF WORKSHOP PRO................................................................................................................................ 22
8.1 Packaging ............................................................................................................................................................... 22
8.2 Shipping .................................................................................................................................................................. 22
8.3 Documentation ........................................................................................................................................................ 22
9. MAINTENANCE AND TROUBLESHOOTING ........................................................................................................... 22

AutoTest WorkshopPro10 User Manual - User Manual User Manual v1.1 Page 4
1. Preface
Thank you for purchasing AutoTest products. Please read this manual completely before installing
and operating the product so as to ensure correct operation of the product. Make certain that this
manual can be accessed whenever necessary.
2. For Your Safety
Read these simple guidelines. Not following them may be dangerous. Read the complete user guide.
Further detailed information is given in this manual.
SWITCH ON SAFELY
Do not switch the device on when wireless device use is prohibited or when it may cause
interference or danger.
SWITCH OFF WHEN REFUELING
Do not use the device at a refuelling point. Do not use near fuel or chemicals.
SWITCH OFF NEAR BLASTING
Follow any restrictions. Do not use the device where blasting is in progress.
USE SENSIBLY
Use only in the positions as explained in the product documentation.
QUALIFIED SERVICE
Only qualified personnel may install or repair this product.
ACCESSORIES AND BATTERIES
Use only approved accessories and batteries. Do not connect incompatible products.
WATER-RESISTANCE
Your device is water-resistant. It is not waterproof
CONNECTING TO OTHER DEVICES
When connecting to any other device, read its user's guide for detailed safety instructions.
Do not connect incompatible products.
RISK OF DAMAGE TO EYES
Wear safety goggles when operating near vehicle battery as Battery acid, fumes, oil and
dust particles might cause damage to the eyes.

AutoTest WorkshopPro10 User Manual - User Manual User Manual v1.1 Page 5
3. WARRANTY
To ensure prompt warranty service should it be required, please complete warranty registration form, and
return to AutoTest Products Pty Ltd within 10 days of purchase of the product. AutoTest Products or an
Authorised Service Centre warrants this product against defects in material and workmanship for a period of
12 months from the original date of purchase. This warranty applies only to products and components
supplied by AutoTest Products which can be identified by the trade name or logo affixed to them or by other
documents.
AutoTest Products does not warrant any products not supplied by AutoTest Products. During the warranty
period, AutoTest Products or an Authorised Service Centre will repair (or at its option replace), any defective
component(s) without charge for labour, provided the product is returned in its original or suitable equivalent
container, freight prepaid, to an authorised AutoTest Service Centre. Transit insurance and return freight will
be at the owner's expense.
In order to obtain calibration, warranty or non-warranty service, ship the product, freight and insurance
prepaid to your nearest AutoTest Service Centre. Attach to the product your name, address, contact numbers,
description of the problem and if a warranty claim, proof of purchase (dated sales receipt or invoice).
AutoTest Products or an Authorised AutoTest Service Centre reserves the right to refuse warranty repair if
accident, abuse, misuse or misapplication has damaged the product in transit or as a result of service or
modifications by other than an Authorised Service Centre, nor are any other warranties expressed or implied,
including any regarding merchantability or fitness for any other particular purpose. AutoTest Products or an
Authorised Service Centre is not responsible for incidental or consequential damages resulting from the
breach of any express or implied warranty, including damage to property and, to the extent permitted by law,
damages for personal injury.
(Express exclusions from warranty) Unless otherwise specified, this warranty does not cover:
a) modified, abused, neglected, accidentally damaged or excessively worn products, or products that
have become damaged or defective as a result of improper use;
b) repairs attempted or made by other than our regional repair centre or authorised warranty service
centre;
c) conditions or malfunctions caused by the reasonable effects of fair wear and tear or the malfunction of
normally wearing parts, which include but are not limited to: Batteries, plugs and leads;
d) consumable items, such as batteries (beyond 6 months from date of purchase), Paper, ink ribbons;
e) AutoTest products that are not distributed through AutoTest’s authorised distributors and resellers.
(Warranty non-transferrable) This warranty is not transferrable beyond the original purchaser.
3.1 AUTHORISED SERVICE AGENTS
The full list of Authorised Service Centres can be found here:
http://www.autotest.net.au/distributors/
Alternatively, you can contact the AutoTest Service Department by Phone
(+61 3) 88403016

AutoTest WorkshopPro10 User Manual - User Manual User Manual v1.1 Page 6
4. UNPACKING AND FIRST TIME USE
Congratulations on your choice of an AutoTest Workshop Pro. Please take the time to read this
User’s Manual before using the AutoTest Workshop Pro in the field. Incorrect or inappropriate use
of this instrument may void the warranty. Retain the packing materials for future shipping and
transport of the unit. Please complete the warranty registration card and post it to AutoTest Products
Pty Ltd, alternatively visit our website www.autotest.net.au and complete your warranty registration
online. Your warranty registration ensures that you are kept up to date on any software or hardware
changes to your AutoTest Workshop Pro. The packing box of your Workshop Pro should contain
the following:
1. AutoTest Workshop Pro tablet
2. 6mm Micro-USB Charger/ Data Cable
3. 5volt Power Plug Adapter
4. Bluetooth printer
5. USB stick with the user manual
6. License verification code
7. Warranty Card
Optional Extras
•AutoLight App
•Pedal Effort Sensor App
4.1 Activating your Workshop Pro
When you power the device, it will automatically open the application. At this point your software will
not have been activated. You will need to follow the subsequent steps in order to activate it.
Note: The license that will be applied by the end of this process expires every 6 months and will
require reactivation upon expiration.
Step 1. Switch on Workshop Pro tablet by holding down the On/Off button (top)
Step 2. Wait for the tablet to complete its booting phase
Step 3. The app should begin without interaction and prompt “
Looking for GPS signal
” (Figure 1).
Figure 1

AutoTest WorkshopPro10 User Manual - User Manual User Manual v1.1 Page 7
NOTE: if instead you see a prompt to Enable Location you need to enable Location settings for the
app by selecting the “Location Settings” (Figure 2)button and enable the slider in the top right of the
Location screen (Figure 3).
Figure 2
Figure 3
If prompted to improve location accuracy you should agree if you intend to connect your tablet to Wi-Fi
or provide it with a Sim card. Once you have agreed/disagreed hit the return button ( ) in the tablet
navigation bar located on the edge of the screen.
If the prompt does not appear Google Location
Accuracy can be clicked manually and enabled as below.
Figure 4
Step 4. At this point, the tablet will require a Wi-Fi connection. If you do not have access to a Wi-Fi
connection, you must contact your local distributor. If you have already connected the Workshop Pro
to Wi-Fi then you can wait, otherwise you need to connect to the Wi-Fi. This process needs to be
repeated every time the Workshop Pro is activated.
AutoTest WorkshopPro10 User Manual - User Manual User Manual v1.1 Page 8
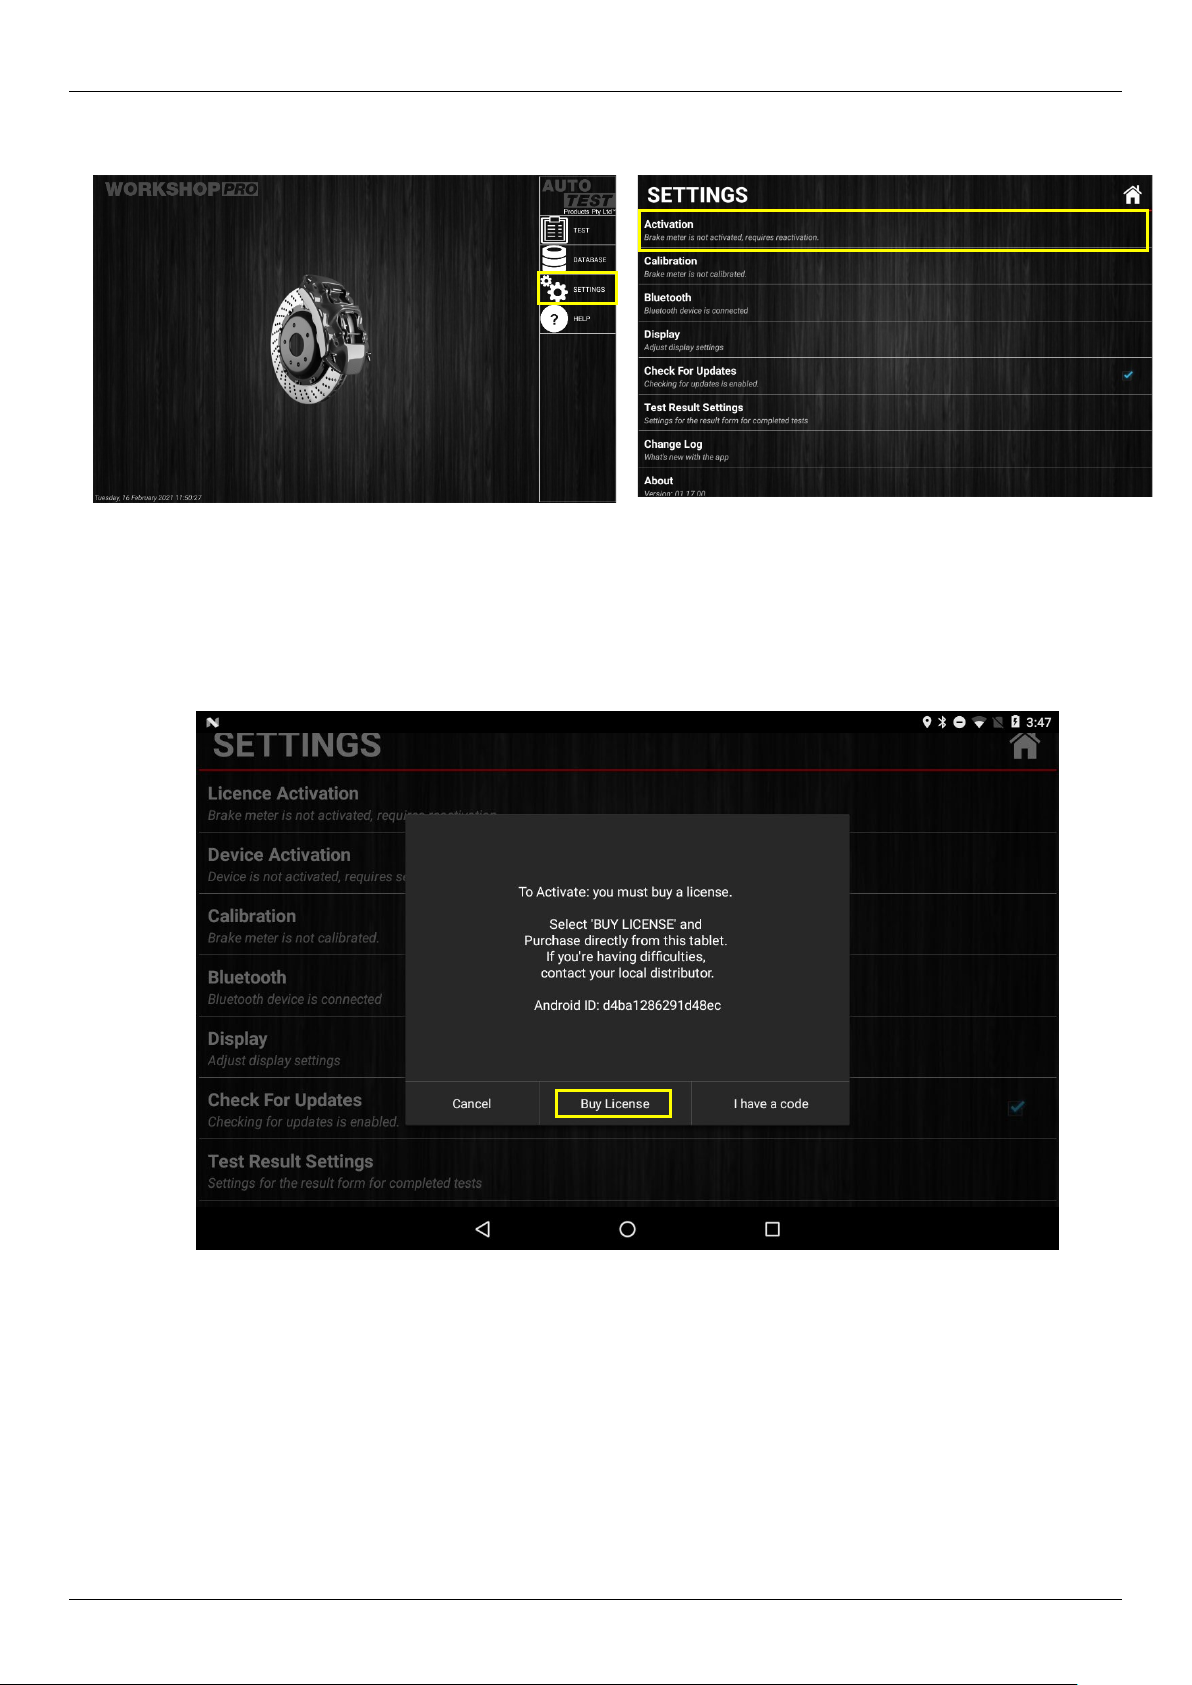
Step 5. Once the prompt disappears and you are on the main application window select “SETTINGS”
(Figure 5) where the “Activation” button will read “Brake meter is not activated, requires
reactivation”
Figure 5
Figure 6
Step 6. Hit the Activation button (Figure 5) and you will be prompted with a banner directing you to
contact your local distributor along with an ID number. Select “Buy License” or if you have already
received a code from your local distributor select “I have a code” and enter the license verification
code provided with your Workshop Pro. If you have any issues with the activation process, please
contact your local distributor.
Figure 7
4.1.1 Buying a license
Step 1: Select Buy License from the prompt in Figure 7.
Step 2: Enter your 5 digit Serial Number on the back of the Workshop Pro 10 and
press “Okay”

AutoTest WorkshopPro10 User Manual - User Manual User Manual v1.1 Page 9
Figure 8
Step 3: Fill out your details in the boxes provided to purchase a license.
Figure 9
Step 4: After clicking “Submit” a prompt will appear asking to confirm if the entered
details are correct.
Step 5: Once the purchase is successfully processed and accepted a prompt will
appear to confirm that your Workshop Pro 10 License is now successfully Activated.

AutoTest WorkshopPro10 User Manual - User Manual User Manual v1.1 Page 10
4.1.2 Code received from AutoTest
Step 1: Enter serial number of the unit in the prompt Serial Number using the keypad.
Figure 10
Step 2Enter verification code you have been provided in the prompt Verification Code using the
keypad.
Figure 11
Step 3: You will be prompted with a window (Figure 11) to submit the form after confirming details
of the unit. If the activation is successful it will prompt “Brakemeter has been activated”.
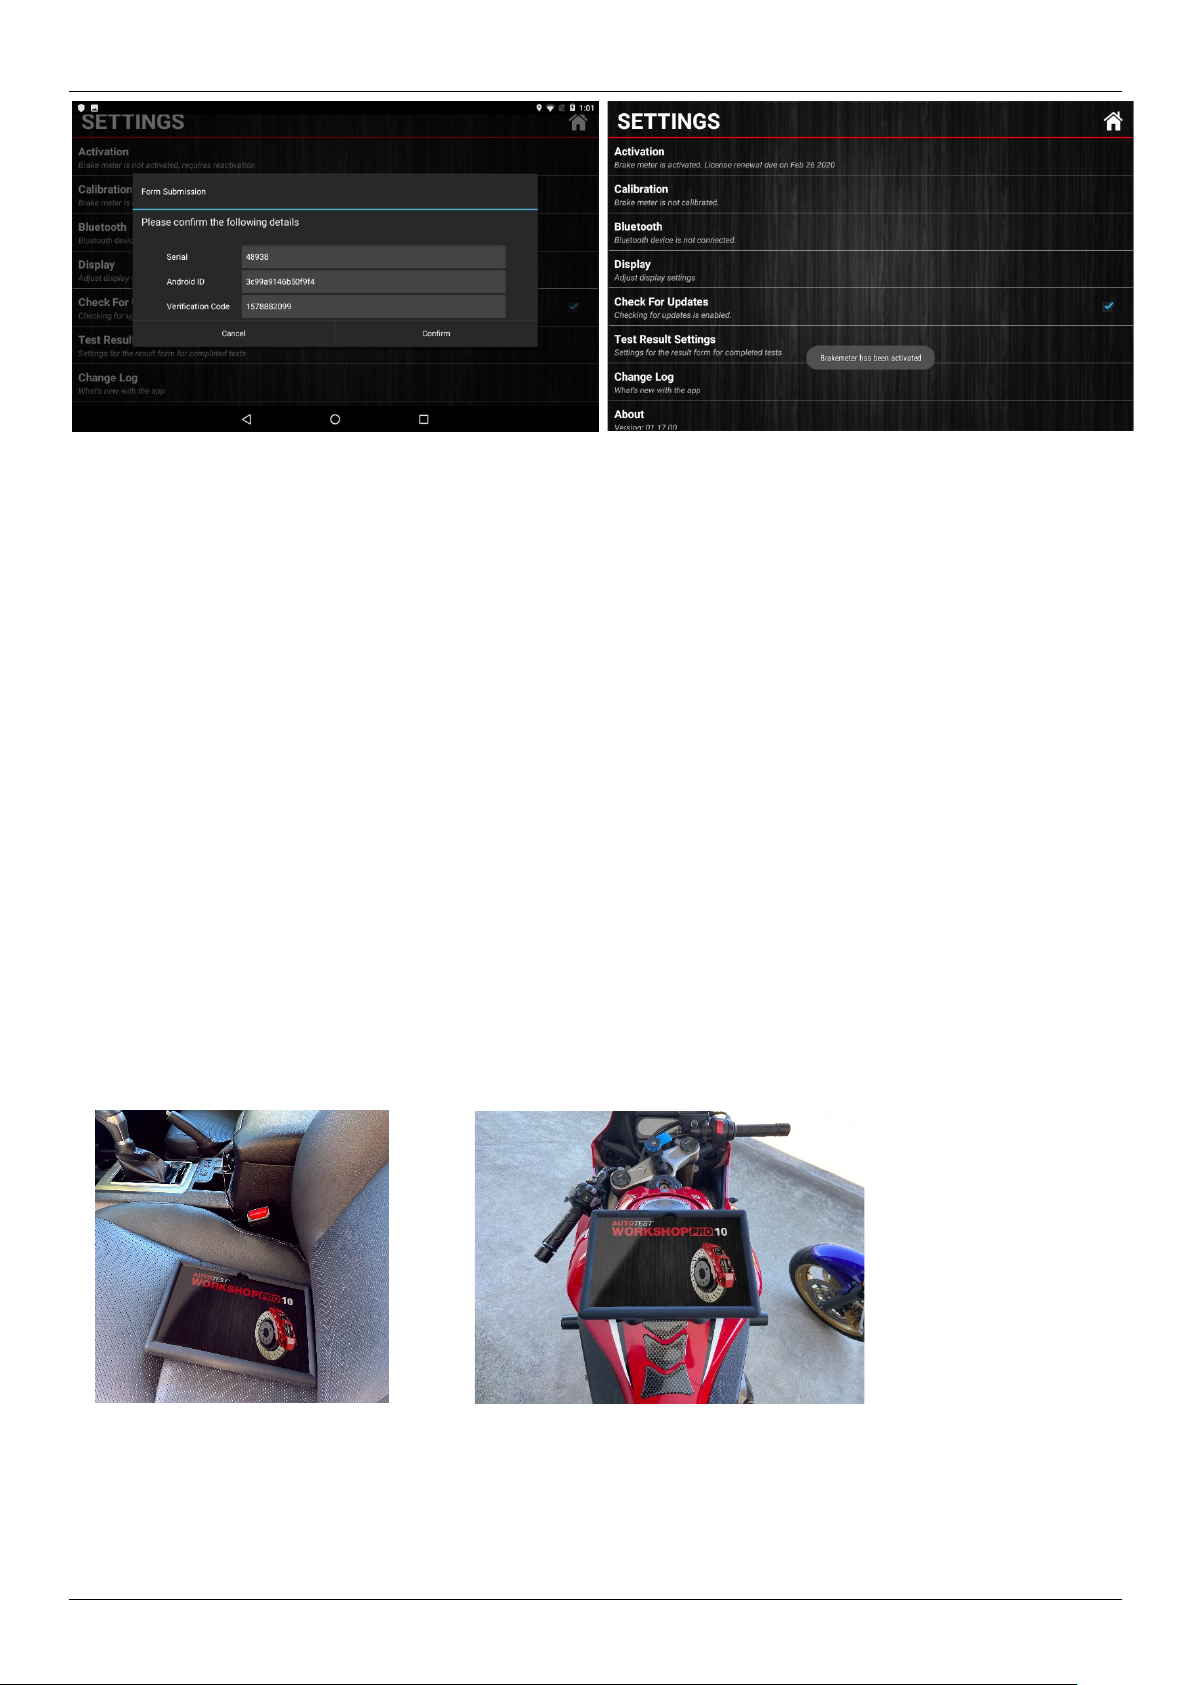
AutoTest WorkshopPro10 User Manual - User Manual User Manual v1.1 Page 11
Note: The license that will be applied expires every 6 months and will require reactivation upon
expiration. You can find the last date to renew the license under “Activation” (Figure 13).
5. OPERATION
Before you begin testing you should calibrate your Workshop Pro, the reason for this is to maintain
creditability in tests. Provided you have an active license you will be able to calibrate at any time by
going into the Settings menu and selecting the Calibration option. You will be prompted with
instructions onscreen to perform the calibration.
5.1 Test Conditions & Test Area
While the various angles of the Workshop Pro will be automatically calculated and compensated for
prior to testing, the greatest accuracy will be obtained when the Brake Meter is level to the surface
of the road. Therefore, the area used for the test should be as flat as possible. The head wind should
be less than 10kph.
5.2 Set-up in Vehicle
Figure 14 Figure 15
Figure 14 & 15: Secured with supplied Velcro to passenger seat. The Workshop Pro may still move on leather seats,
so place on the passenger side floor for conducting test. For motorbike positioning, use suction cups.
Workshop Pro must be secure during the entire duration of the test. Any movement can cause
incorrect deceleration readings. Secure device in pictured
position in the vehicle with the
provided Velcro strips.
Figure 13
Figure 12
AutoTest WorkshopPro10 User Manual - User Manual User Manual v1.1 Page 12
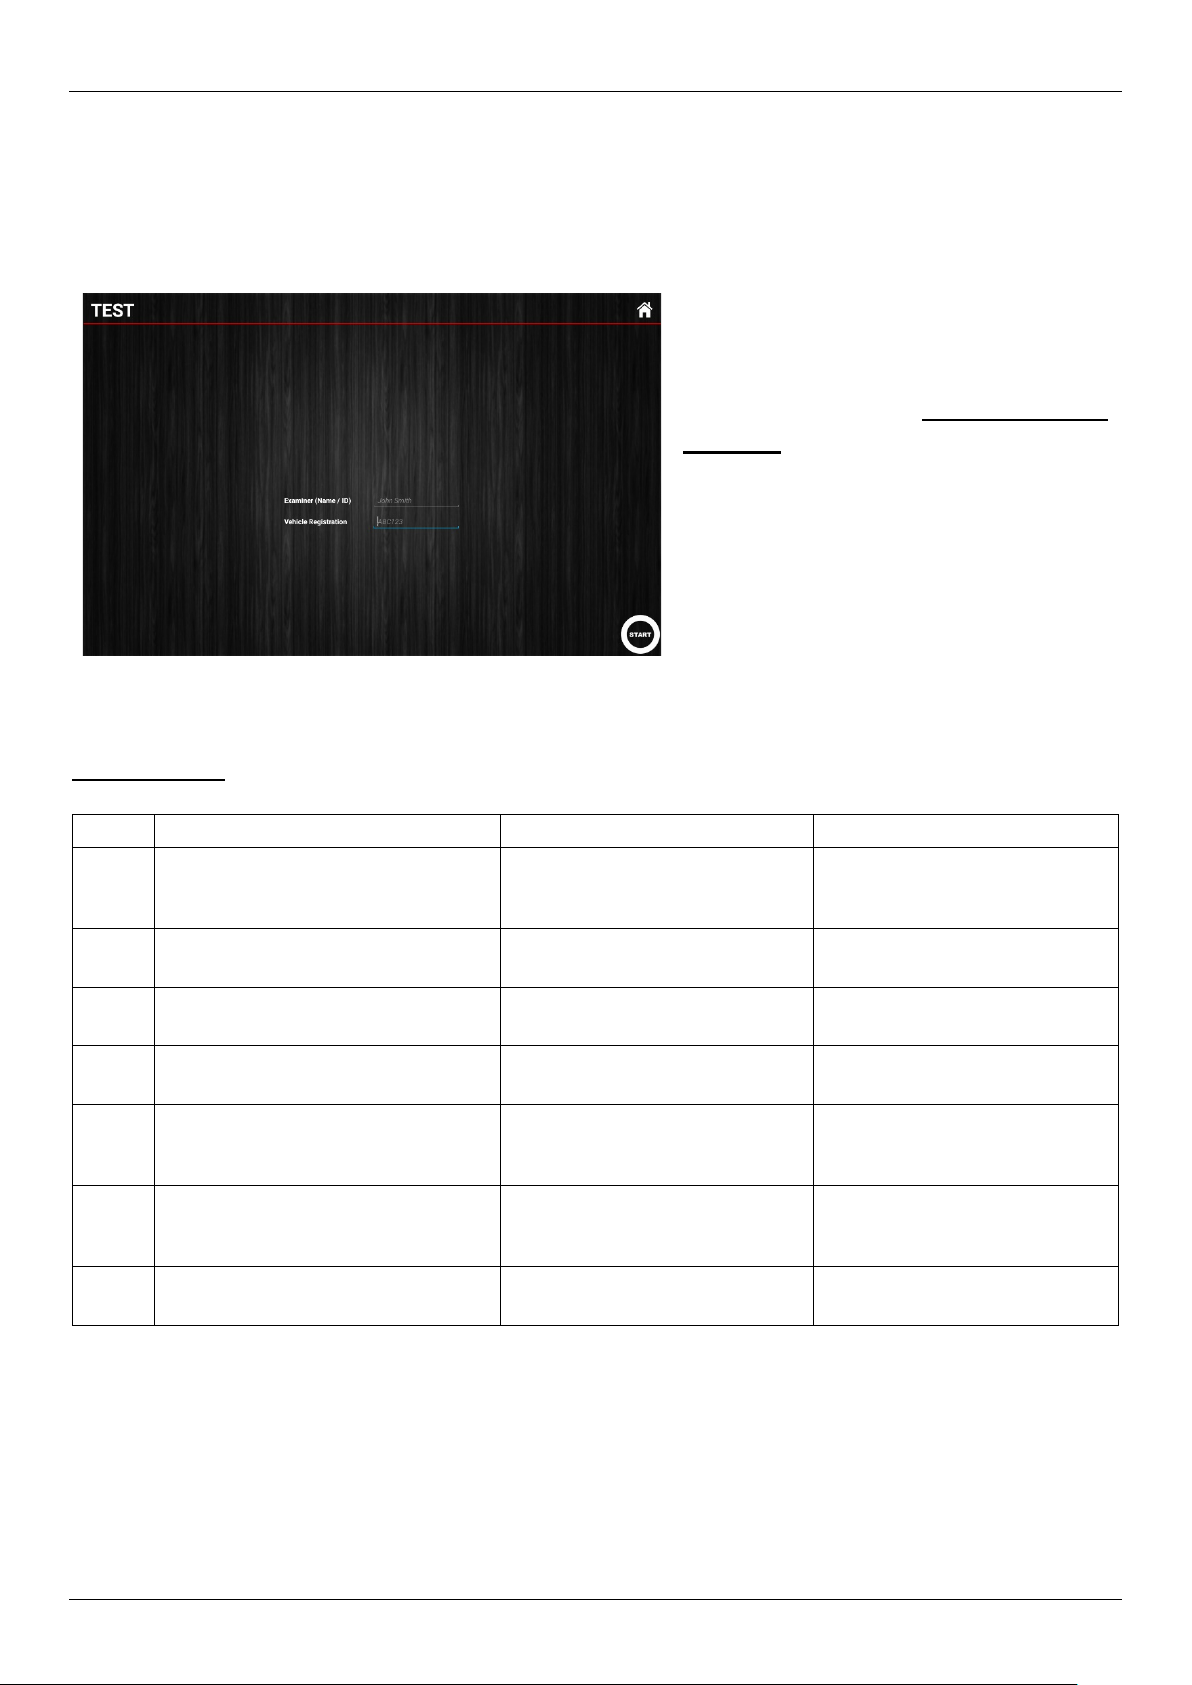
5.3 Running a test
Once your device is activated you can begin a test by selecting the “Test’’ option in the main menu.
This will bring up the Test screen, enter the name of the person conducting the test (or an equivalent
id) followed by the vehicle registration, you may also choose to take a picture of the vehicle you are
testing for record.
Test Process:
Step
Test Status
App Action
User Action
1
User hits “START” after providing
the examiner id and registration
number of the vehicle
Test window begins counting
down from 5
Make sure the tablet completely
secure/stable and don’t bump it
2
Test setup countdown reaches 0
Test window prompts user to
‘Accelerate Vehicle’
Confirm the test is prompting
you to accelerate
3
Test is prompting user to
‘Accelerate Vehicle’
Begin gently accelerating the
vehicle to desired test speed
4
Vehicle arrives at desired test speed
Release the accelerator and
apply the brake immediately
5
User begins deceleration Test window prompts user to
‘Decelerate Vehicle’
Continue to apply the brakes
until the vehicle comes to a
complete stop
6
Test is prompting user to
‘Decelerate Vehicle’
Continue to apply the brakes
until the vehicle comes to a
complete stop
7
Vehicle comes to a complete stop
Test Report is generated and
displayed on App screen
Pull over and review test
Figure 16
After the necessary information in
the test screen is entered make
sure that the device is secured
(Refer to section 5.2 ‘Set-
Up in
Vehicle’) and press the START
button in the bottom right corner.

AutoTest WorkshopPro10 User Manual - User Manual User Manual v1.1 Page 13
5.4 Reviewing a test
The test report component of the application contains the information relating to tests that have been
run. The statistics reported include:
•Location (Longitude, Latitude)
•Average/Peak Deceleration (displayable in G, G%, mS-2)
•Duration
•Speed
•Stopping Distance
•MFDD
•Sideshift
Figure 17
Figure 18
In order to cycle through the 3 different
measurements for Average / Peak
deceleration you need to touch the test
screen where the report says ‘Average
Deceleration’ or ‘Peak Deceleration’
(Figure 17)
and select the corresponding
measurement unit (Figure 17).
Figure 19
Figure 20
Figure 21
When looking at a test result select the report
icon from the top right of the report (Error!
Reference source not found.19). You will be
prompted with a selection panel. Choose
‘Print via Bluetooth’ (Error! Reference
source not found.20) and you will be asked
to select which printer to be used to print the
test.
Make sure the printer you intend to print from
is turned on and select it from the choose
printer dialog. It will begin to print out shortly.
In order to print a test report you need to pair
the Workshop Pro with the supplied Thermal
Bluetooth Printer, if you haven’t done this yet
just co
ntinue through the following print
procedure and the app will redirect you to the

AutoTest WorkshopPro10 User Manual - User Manual User Manual v1.1 Page 14
5.5 Printing a test
5.5.1.1 Saving the test to read with NetBrake®
5.5.1.2 The Workshop Pro is capable of saving test information in a format that will enable the AutoTest®
NetBrake®software suite to generate reports for tests. NetBrake®is a suite of software that allows a user
to database brake tests and report on sites, vehicles, and fleets of vehicles. It also formats reports into an
A4 document.
Before using this feature, you need to have:
•USB-A to Micro-USB cable
•A completed test on your Workshop Pro that you intend to retrieve.
5.5.1.3 AutoTest NetBrake®software installed on a computer.
To save all Tests:
1. Navigate to the Database page where you will see all the tests that have been conducted on
the Workshop Pro.
2. Select the save icon in the top right-hand corner of the page
To save a single Test:
1. Navigate to the test report (via Database) you want to import into NetBrake®
2. Select the report icon (Error! Reference source not found.16)from the top right of the test
report window.
3. Select the ‘Save test for PC’ from the displayed prompt.
5.5.1.4 Retrieve saved tests for the NetBrake®software:
Connect your Workshop Pro to the PC with the installed NetBrake® software using the USB-A to
Micro-USB cable. (Note: if this is the first time then your computer may be installing drivers to
communicate with the WorkshopPro®).
Once the Workshop Pro is connected you need to open the Workshop Pro (HR935) (Figure 22) in
windows explorer by finding the device in the ‘My Computer’ folder.
Bluetooth Pairing screen when appropriate
(Error! Reference source not found.21).

AutoTest WorkshopPro10 User Manual - User Manual User Manual v1.1 Page 15
Figure 22
Navigate to the test data directory (Figure 23): ‘HR935\Phone storage\WorkshopPro\’
Figure 23
Now copy the contents of the Folder (or the Folder itself) to a location on your local Computer and
note where it is stored. Using the NetBrake® software you need to import this new directory (refer to
NetBrake® guide for steps).
NetBrake®.

AutoTest WorkshopPro10 User Manual - User Manual User Manual v1.1 Page 16
6. Database
To review a test you have previously conducted you need to access the “DATABASE” option of
the main menu, all the tests that have been conducted will be added to the subsequent list on the
Database window ( Figure 25).
The registration will be the first section of each record, followed by the time the test was conducted.
You can use the textbox in the top right next to the magnifying glass to filter this list for a particular
value (registration or time)
Figure 24 Figure 25
6.1 Viewing Test, Deleting Test or More Test Information
To view a test simply press the test record you
intend to look at within the database window.
If you want to delete a test or find further
information about it you can long press (press
and hold) the screen corresponding to the test
you’re after.
This will bring up the test option prompt (
Figure 25) where you can choose the option
you desire.
Figure 26
Press Press & Hold
View Test X X
Delete Test X
View Info X

AutoTest WorkshopPro10 User Manual - User Manual User Manual v1.1 Page 17
7. Settings
The “Settings” page will help you manage the features of your Workshop Pro.
Figure 27
7.1 Activation
The “Activation” option will allow you to activate the license for your workshop pro. If the device has
yet to be active the button message will read “Brake meter is not activated, requires reactivation”.
For instructions refer to section 4.1 of the manual.
This button is only active if the Workshop Pro is not activated. Once activated pressing the Activation
button will not do anything.

AutoTest WorkshopPro10 User Manual - User Manual User Manual v1.1 Page 18
7.2 Calibration
NB. May vary according to local regulations.
The Workshop Pro must be calibrated initially and should periodically re-calibrated. The reason for
this is to maintain creditability and accuracy in tests and acceptance of data according to
international standards. Calibration is not required during daily use. Periodic calibration should be
done every 6 months.
If the Workshop Pro is not active the calibration button will not work. To activate the unit, you will
need to follow the process outlined in section 4.1 of this user manual.
Once activated you can navigate from the Main menu > Settings > Calibration where the steps to
complete calibration will be displayed on screen. The steps will involve orientating the tablet in
certain positions and waiting 5 seconds without moving it.
For any steps where you are unable to visually read, the screen a vibration will notify you of the
steps completed.
Calibration Process:
Step
Calibration Status
App Action
User Action
1
User hits “Calibration” within the
settings menu
Calibration displays instructions
with an image and window begin
counting down from 5
Arrange the unit according to
the image/instructions. Make
sure the tablet completely
secure/stable and don’t bump it
2
Test setup countdown reaches 0
Calibration window prompts user
for next orientation with
additional instructions
Complete any further
orientations as directed by the
Calibration window
3
All calibration steps are
completed
Calibration window displays the
recorded values during
calibration
Hit the save icon in the bottom
right of the window
4
Screen prompts “Calibration
saved” towards the bottom of the
screen
Return to the settings menu
and confirm the date calibrated
underneath Calibration button
NB. If a tracible calibration is required, this can be obtained by sending your devices to the nearest
Authorised Service Centre.
AutoTest WorkshopPro10 User Manual - User Manual User Manual v1.1 Page 19
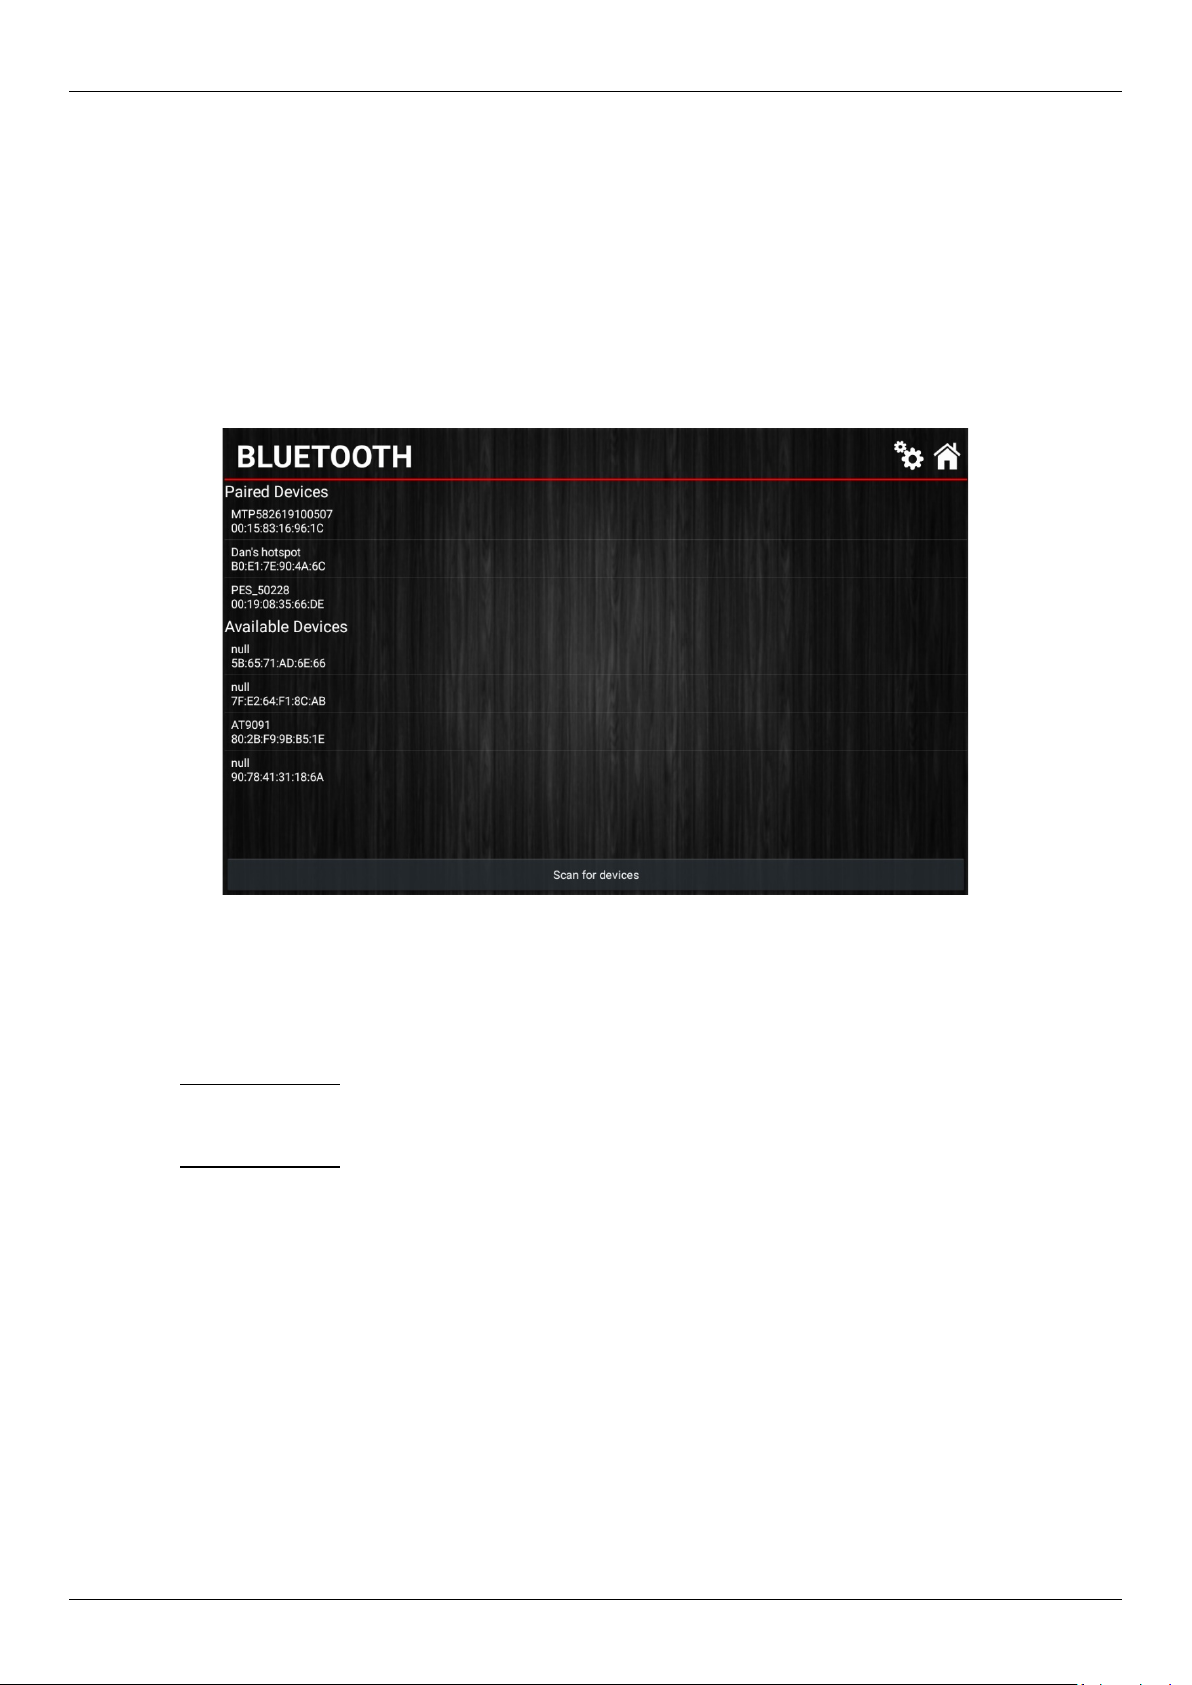
7.3 Bluetooth
The Bluetooth page (Figure 28) will manage which devices are currently connected to the
Workshop Pro. When using the unit with a Bluetooth printer you will have to navigate to this page
in order to pair the two devices.
The “Paired Devices” section of the page will show any entries for devices currently connected
with the Workshop Pro.
The “Available Devices” section of the page will show any entries for devices that are found
during a Bluetooth scan.
Figure 28
To begin pairing a printer for use with the Workshop Pro:
1. Turn on the printer you are going to use
2. At the bottom of the page press “Scan for Devices”
3. Wait for the device to appear underneath the “Available Devices” menu
4. Press and hold the entry corresponding to your printer “Bluetooth”
5. Select “Pair” from the displayed prompt
6. The device should shortly appear underneath the “Paired Devices” menu
7. Press and hold the printer from the “Paired Devices”
8. Select “Test Printer” from the displayed prompt
9. If all has gone well the printer you paired will now print a sample test.
In the event you need to unpair a printer from the Workshop Pro simply press and hold the entry
on the “Paired Devices” and select “Unpair” from the prompt.
A Bluetooth device can alternatively be paired from the tablet’s Bluetooth settings.
To pair a device using the systems Bluetooth settings follow the steps below.
1. Swipe down from the top of the screen to show a quick view of settings.
2. Hold down a finger on the Bluetooth icon as shown below for a long press (approx. 2
seconds). This will open the Bluetooth settings.

AutoTest WorkshopPro10 User Manual - User Manual User Manual v1.1 Page 20
Figure 29
3. Click “Pair New Device”
4. Wait for available devices to be found (be sure the device you are trying to pair with is on
and ready to pair)
5. Press a device to pair with it (and enter a code if required: check with the device manual for
the specific code).
Figure 30 Figure 31
Table of contents
Other AutoTest Test Equipment manuals


