Auvon AS8019 User manual

Attention
The purpose of this Quick Guide is to help you
understand the operation of the TENS unit much
more quickly, and the contents of the quick guide
are not a substitute for the user manual. Please
read the user manual carefully before use to un-
derstand the contraindications and warnings.
Please consult your doctor before use if you’re not
sure whether you can use this device.
Operation
1. Clean the applica-
tion areas.
2. Connect the lead
wire to a pair of pads
and the device.
Quick Guide

3. Attach the pads. 4. Turn on the device.
5. Choose the con-
nected channel. 6. Choose mode.

7. Adjust intensity. 8. Set time.
9. Turn off the device
after massage.
10. Remove the pads.
Do not pull the wire.

Pad Placement Guide
Notes:
Do not overlap the pads.
Do not place the pads on the artery.
Only place the pads on the same side of the arm/leg.
If you want to know more details about the
mode, please read the user manual, and if
you encounter any problem during the use,
please check the user manual for “Trouble
Shooting”.

USER MANUAL
Model AS8019
TENS and Powered Muscle
Stimulator
Relaxation, Anywhere, Anytime
Device Name: TENS and Powered Muscle Stimulator

1. Explanation of Pain ................................................7
2. Explanation of TENS ...............................................7
3. Standard Package ...................................................7
4. Features ..................................................................8
5. Product Illustrations ..............................................10
6. Operating Instructions ...........................................12
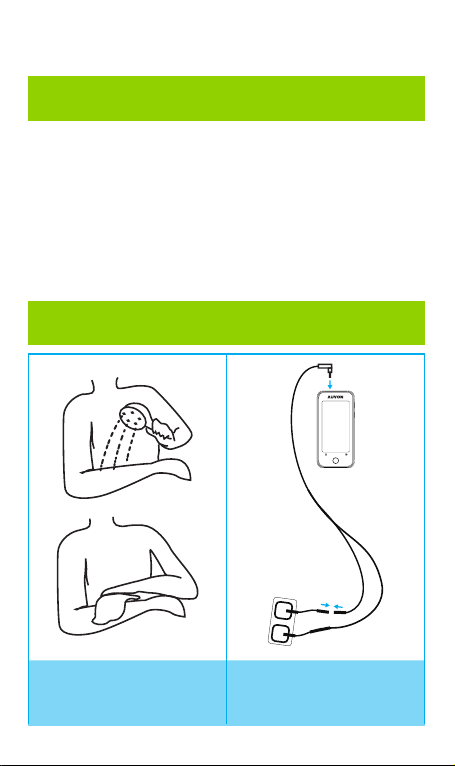
6.1 Notes Before Use........................................12
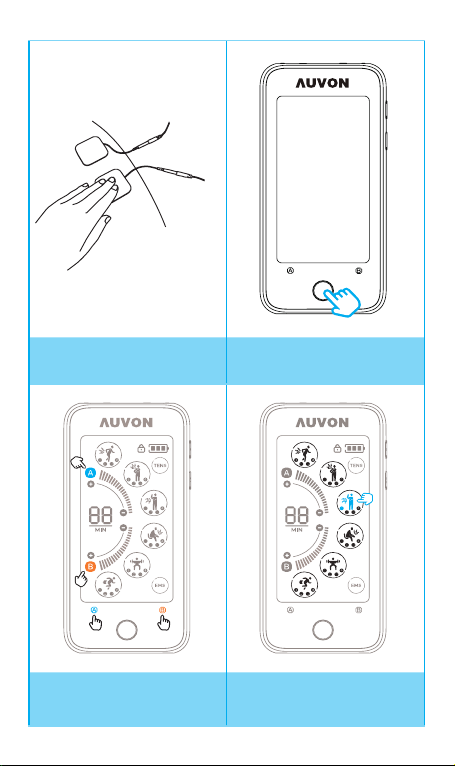
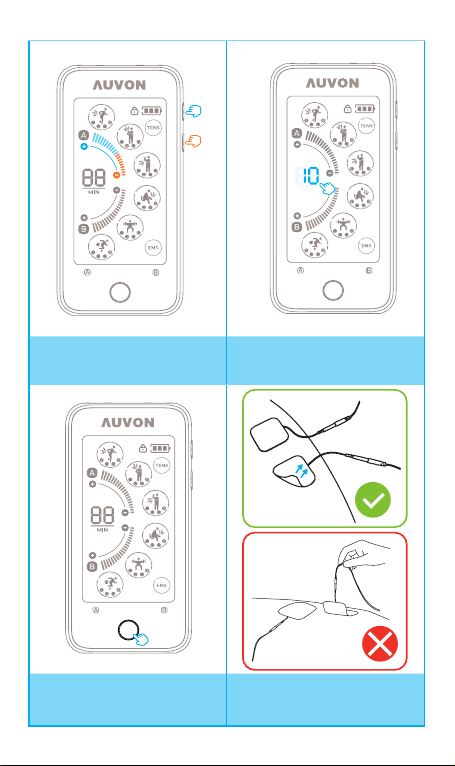
6.2 How to Use .................................................12
6.3 After Use .....................................................17
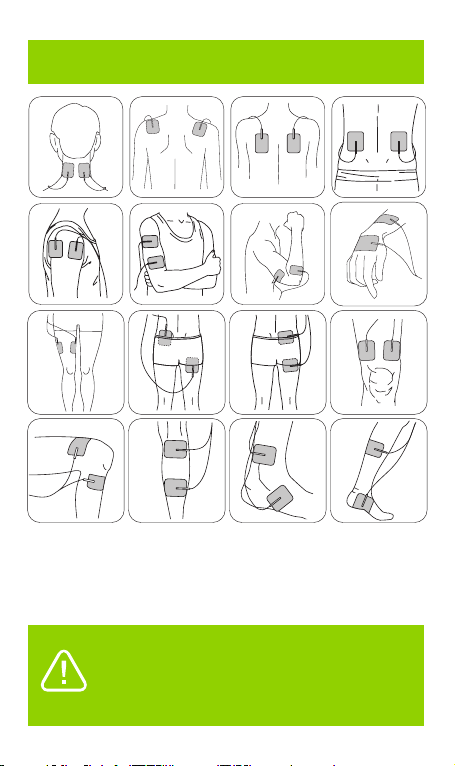
7. Pad Placement Guide............................................18
8. Mode Instruction ...................................................21
8.1 Intensity Recommendation .........................21
8.2 Time Recommendation ...............................21
8.3 Expected Feelings ......................................22
8.4 Mode Specification......................................26
9. TENS Pads Holder ................................................27
9.1 Features......................................................27
9.2 Instruction ..................................................28
10. Safety Precautions and Warnings.......................29
10.1 Pain Management Warnings.....................29
10.2 Prohibited Conditions................................29
10.3 Prohibited Individuals................................29
10.4 Prohibited Areas........................................29
10.5 Prohibited Activities...................................30
10.6 Pads Precautions......................................30
11. Trouble Shooting ...............................................31
12. Symbols ..............................................................37
13. Certification ........................................................38
14. Customer Service ...............................................38
TABLE OF CONTENTS

Email:[email protected]
7
1. Explanation of Pain
Pain is a warning system, a way for the body to tell us
that something is wrong. Pain is important, without it, ab-
normal conditions may go undetected, causing damage
or injury to vital parts of our bodies. Even though pain
is a necessary warning signal of trauma or malfunction
in the body, nature may have gone too far in its design.
Aside from its value in diagnosis, long-lasting persistent
pain serves no useful purpose. Pain does not begin until
coded message travels to the brain where it is decoded,
analyzed, and then reacted to. The pain message travels
from the injured area along the small nerves leading to
the spinal cord. Here the message is switched to differ-
ent nerves that travel up the spinal cord to the brain. The
pain message is then interpreted, referred back and the
pain is felt.
2. Explanation of TENS
Transcutaneous Electrical Nerve Stimulation (TENS) is a
non-invasive, drug-free method of controlling pain. TENS
uses tiny electrical impulses sent through the skin to nerves
to modify your pain perception. TENS does not cure any
physiological problem, and it only helps control pain. TENS
does not work for everyone, but for most patients it is effec-
tive in reducing or eliminating pain, allowing them to return
to normal activities.
3. Standard Package
● AUVON® TENS and Powered muscle stimulator
● Pin Pads
● Pads Holder
● Pouch
● Set of Lead Wires (½ Wire)

Email:[email protected]
8
● USB Cable
● User Manual
4. Features
Mechanism Technical Description
Channel Dual Dual channel with same mode and
dierent intensity.
Pulse
Amplitude
0-200 mA at 500 ohm load each
channel.
Wave Form Symmetrical Bi-Phasic Square
Pulse Voltage 0- 98V (Load: 500 ohm)
Power Source 300mA lithium battery
Size 12.8cm(L)x6.37cm(W)x1.25cm(H)
Weight 97.5 grams.
Pulse Rate From 0-130 Hz
Pulse Width From 100-240μs microseconds

Email:[email protected]
9
Modes
P1-16: TENS;
P17-24: EMS;
2 outputs with 24 modes
Intensity 20 levels of intensity
Timer
20-minute default timer.
Adjustable between 10-90 minutes as
well as a continuous mode for uninter-
rupted usage.
and increases/decreases in 10-minute
intervals.
Set the timer by tapping the time icon
and the unit will turn o when the time
is up.
Low Battery
Indicator
A low battery indicator will show up
on the LCD when the battery is low.
Operating
Condition
Atmosphere Pressure :
700Hpa~1060Hpa.
Remark
There may be a +/-5% tolerance of
all parameters and +/-20%tolerance
of amplitude & voltage.

Email:[email protected]
11
①Two output connectors
②Lock indicator & Lock touch button
③Battery indicator
④Intensity increase button
⑤TENS mode indicator
⑥Intensity decrease button
⑦Intensity decrease touch button (Channel A)
⑧EMS mode indicator
⑨Channel B selection button
⑩Power button & Lock button (HOME)
⑪USB port
⑫Intensity increase touch button (Channel A)
⑬Intensity indicator (Channel A)
⑭Time touch button
⑮Intensity decrease touch button (Channel B)
⑯Intensity indicator (Channel B)
⑰Intensity increase touch button (Channel B)
⑱Channel A selection button

Email:[email protected]
12
6. Operating Instructions
6.1 Notes Before Use
1. Do not use this device during charging. (Fully charged
in 3-4 hours)
2. When the device has no output, it will automatically
shut down if there is no further action within 5 minutes.
6.2 How to Use
1. Clean your skin before use. Use the pads on clean
and flat areas with no sweat and no oil.
2. Connect a pair of electrode pads to one lead wire;
connect the other end of the wire to the left output of
the device. Similarly, the other pair of electrode pads
should be connected to the remaining wire end and
the right output of the device.

Email:[email protected]
13
3. Attach at least one pair of pad to the massager
area, such as shoulder or leg. (Make sure the unit is
o when you attach the pads.)
Note: Adding a few drops of water on the pads and
drying the pads naturally will increase their longevity.
Make sure both pads on the skin are not overlapping.
4. On: Press HOME key
for 2-3 seconds to turn
on the unit.

Email:[email protected]
14
5. Channel Option:
Choose channel A/B by
pressing “A”/”B” button
or tapping “A”/”B” icon
on the screen, and the
selected channel will
flash on and off.
6. Intensity Options.
Press the “+”/”-” but-
ton on the right side
of the machine or tap
the “+”/”-” icon on the
screen to adjust the in-
tensity for the channel
on which the icon is
ashing.
Note: The intensity of
the channel will revert
to the lowest setting
with each mode selec-
tion.

Email:[email protected]
15
7. Mode Option: Switch
mode by tapping the
mode icons on the
screen one by one,
and channel A shares
the same modes with
channel B.

Email:[email protected]
16
8. Time Option: The usage time ranges from 10-
90 minutes as well as the continuous mode (innite
time). Increase time by tapping the time number on
the screen, and the time will increase by 10 minutes
for each tap. The device will automatically turn off
when time is reached.
NOTE: When the device is set in continuous mode
and the channel has output, the massage will go on
until the battery is exhausted unless it is manually
turned o. If the channel has no output and no oper-
ation, the machine will automatically shut down with-
in 5 minutes

Email:[email protected]
17
9. Lock Function:
Press the HOME key
or tap the left side of
the power bar to lock/
unlock the screen. And
the intensity, mode
and time option can be
adjusted only when the
screen is unlocked.
Safety Lock: The ma-
chine will lock automat-
ically in 20 seconds
to avoid unnecessary
touch.
6.3 After Use
1. Turn off the device by pressing HOME key for 2-3 seconds.
2. Unplug the lead wire pin connector from the pads gently.
3. Lift a corner of the electrode and slowly peel it away.
Avoid touching the gel as much as possible.
NOTE: DO NOT peel the electrode off by the wire.
4. Store the electrodes into the storage bag and reseal
tightly to prevent dry-out. Store at room or cool tempera-
ture and keep out of direct sunlight.

Email:[email protected]
18
7. Pad Placement Guide
Neck
Modes: 6
Attach the pads on the back
of the neck. (Do not place the
pads on the left or right side of
the neck.)
Shoulder
Modes: 1-4, 6-18, 20, 22
Attach the pad as shown on
the left. (do not place the pad
on the spine.)
Back
Modes:1-4, 17
Attach the two pads on the
sides of the back, do not at-
tach it on the spine or back-
bone.
Waist
Modes: 1-11, 19, 13-16
Attach the two pads on the
sides of the lower back, do
not attach it on the spine or
backbone.

Email:[email protected]
19
Deltoid
Modes: 2, 3, 4, 9, 14, 19, 22
Attach one pad in front and
one behind the muscle.
Arm
Modes: 1-24
Attach the pads on both sides
of the same arm.
Elbow
Modes: 8, 12, 23
Attach the pads on the upper
and lower side of the same
elbow.
Wrist
Modes: 10
Attach the pads on the upper
and lower side of the same
wrist. (Do not place the pads on
the pulse.)

Email:[email protected]
20
Hip
Modes:
1, 3-6, 9, 13, 15, 19, 22
Attach the pads above and
below the pain area of your
hip. (NOT on the back.)
Leg
Modes: 15
Attach the pads on both sides
of the same leg.
Knee
Modes: 1, 3, 7, 8, 9, 13, 19, 22
Attach both pads above the
knee or above and below the
pain area.
Table of contents
Other Auvon Fitness Equipment manuals