Avallon APAC140HC User manual

!
!
!
!
USER’S!GUIDE!
Installation,!Operation,!and!Maintenance!for!your!product.!
!
!
!
!
!
!
!
!
!
!
!
!
!
!
!
Portable!Air!Conditioner!with!Heater!
Model!–!APAC140HC!
!
!
www.avallon.com!!! !
!
!
!
!
!
V2.2-12012017!

!
ii!
!
!
!
Important!Safety!Information!
!
Improper!handling!can!cause!serious!damage!to!the!Avallon!Portable!Air!Conditioner!and!/!or!injury!to!the!
user.!!!
This!portable!air!conditioner!is!not!intended!for!use!by!children.!Children!should!be!supervised!to!ensure!
that!they!do!not!play!with!this!product.!
!
!
!
!
!
!
!
!
!
!
!
!
!
!
!
!
!
!
!
!
!
!
!
!
!
!
!
!
!
!
!
!
!
!
!!!!ELECTRICAL!SAFETY
!
•
This!unit!is!designed!for!indoor!use!only.!
•
Do!not!use!the!unit!in!extremely!humid!or!wet!environments.!
•
Do!not!wet!the!housing!or!control!panel.!
•
Do!not!pull!the!unit!by!the!cord.!
•
Always!turn!the!unit!off!and!unplug!it!from!the!socket!when!cleaning.!
•
Unplug!the!unit!if!it!is!not!going!to!be!used!for!a!long!period!of!time.!!
•
Do!not!operate!the!unit!with!a!damaged!plug!or!a!loose!socket.!
•
Use!only!the!correct!power!supply!with!appropriate!amperage.!
•
If!the!power!cord!is!damaged,!it!must!be!replaced!by!the!manufacturer,!a!service!agent,!or!a!qualified!
technician.!!
•Do!not!remove!any!part!of!the!casing!unless!you!are!instructed!to!do!so!by!an!authorized!technician.!
!
GENERAL!SAFETY!!
•
This!portable!air!conditioner!is!not!intended!to!be!used!by!children.!
•
Do!not!allow!children!to!play!with!the!controls!or!drop!any!objects!into!the!air!outlets!or!vents.!!
•
Do!not!place!objects!or!let!any!person!sit!on!top!of!the!unit.!!
•
Only!use!in!the!upright!position!on!a!flat,!level!surface!and!provide!at!least!20!inches!of!clearance!from!any!
walls!or!objects.!!
•
Route!the!power!cord!carefully!to!avoid!a!tripping!hazard.!!
•
This!unit!is!intended!for!domestic!and!light!commercial!use!only.!Do!not!use!the!portable!air!conditioner!for!
industrial!purposes.!Any!other!use!may!invalidate!the!warranty.!
!

!
iii!
!
!
!
Operation!of!Safety!Plug!
!
!
!
!
!
!
Your!portable!air!conditioner!is!supplied!with!a!Leakage-Current!Detection!and!Interruption!(LCDI)!safety!
plug.!This!device!provides!protection!to!reduce!the!risk!of!fire!due!to!arcing!faults!in!the!power!supply!cord.!
Before!using!your!portable!air!conditioner,!follow!the!instructions!below!to!ensure!that!the!LCDI!plug!is!
working!properly:!!
!
!
!
!
!
!
!
1. Plug!the!power!cord!into!a!grounded!outlet.!
2. Press!the!TEST!button!on!the!LCDI!plug.!This!should!trip!the!plug!and!cut!the!power!to!the!air!
conditioner.!If!the!plug!does!not!trip!and!you!are!able!to!turn!on!the!unit,!please!contact!Avallon!
support.!
DO!NOT!USE!YOUR!PORTABLE!AIR!CONDITIONER!IF!THE!TEST!FAILS.!
Press!the!RESET!button!to!start!using!your!air!conditioner.!
Do!not!use!the!TEST!and!RESET!buttons!as!an!ON/OFF!switch.!
!
!
!
!
!
!
!
!
!
!
Note:!Electrical!products!should!not!be!disposed!of!with!household!waste.!Please!contact!your!local!
recycling!center!for!more!information!about!how!to!recycle!electronic!waste.!

!
iv!
!
!
!
Table!of!Contents!
!
Important!Safety!Information!..........................................................................................................................!ii!
Operation!of!Safety!Plug!.................................................................................................................................!iii!
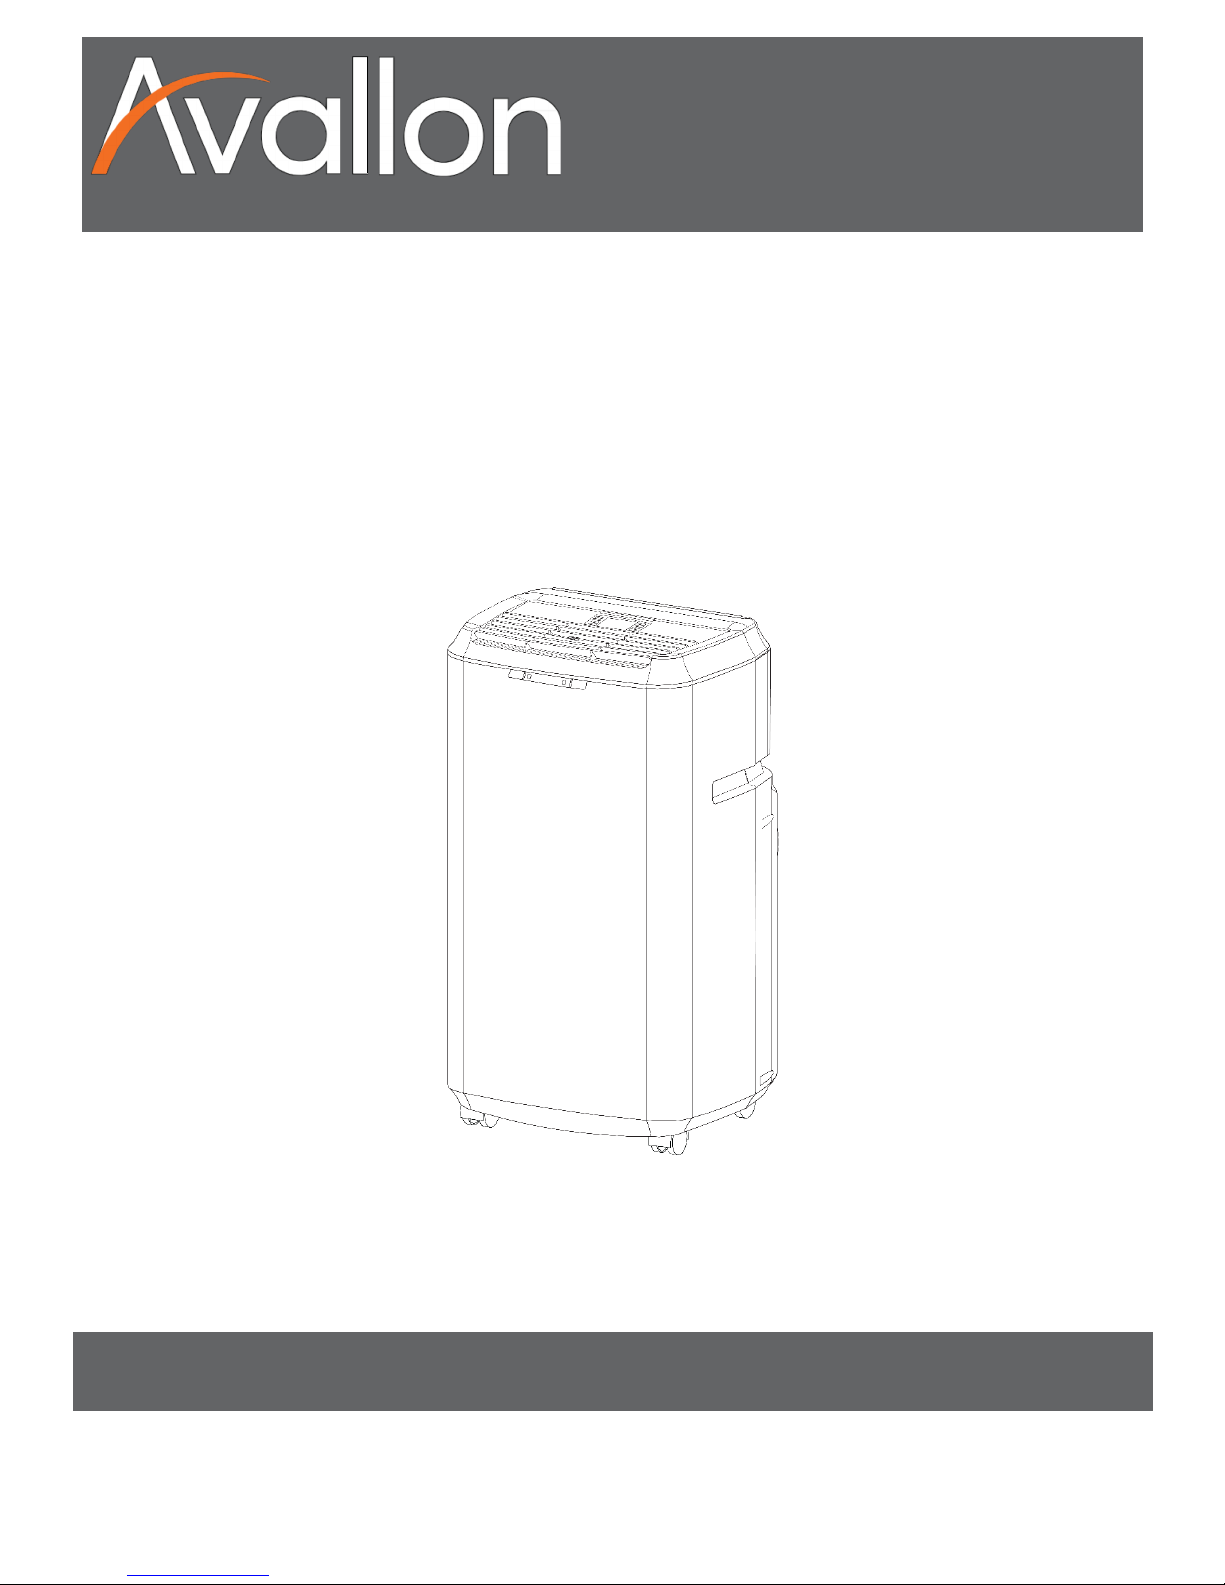
Introduction!.....................................................................................................................................................!1!
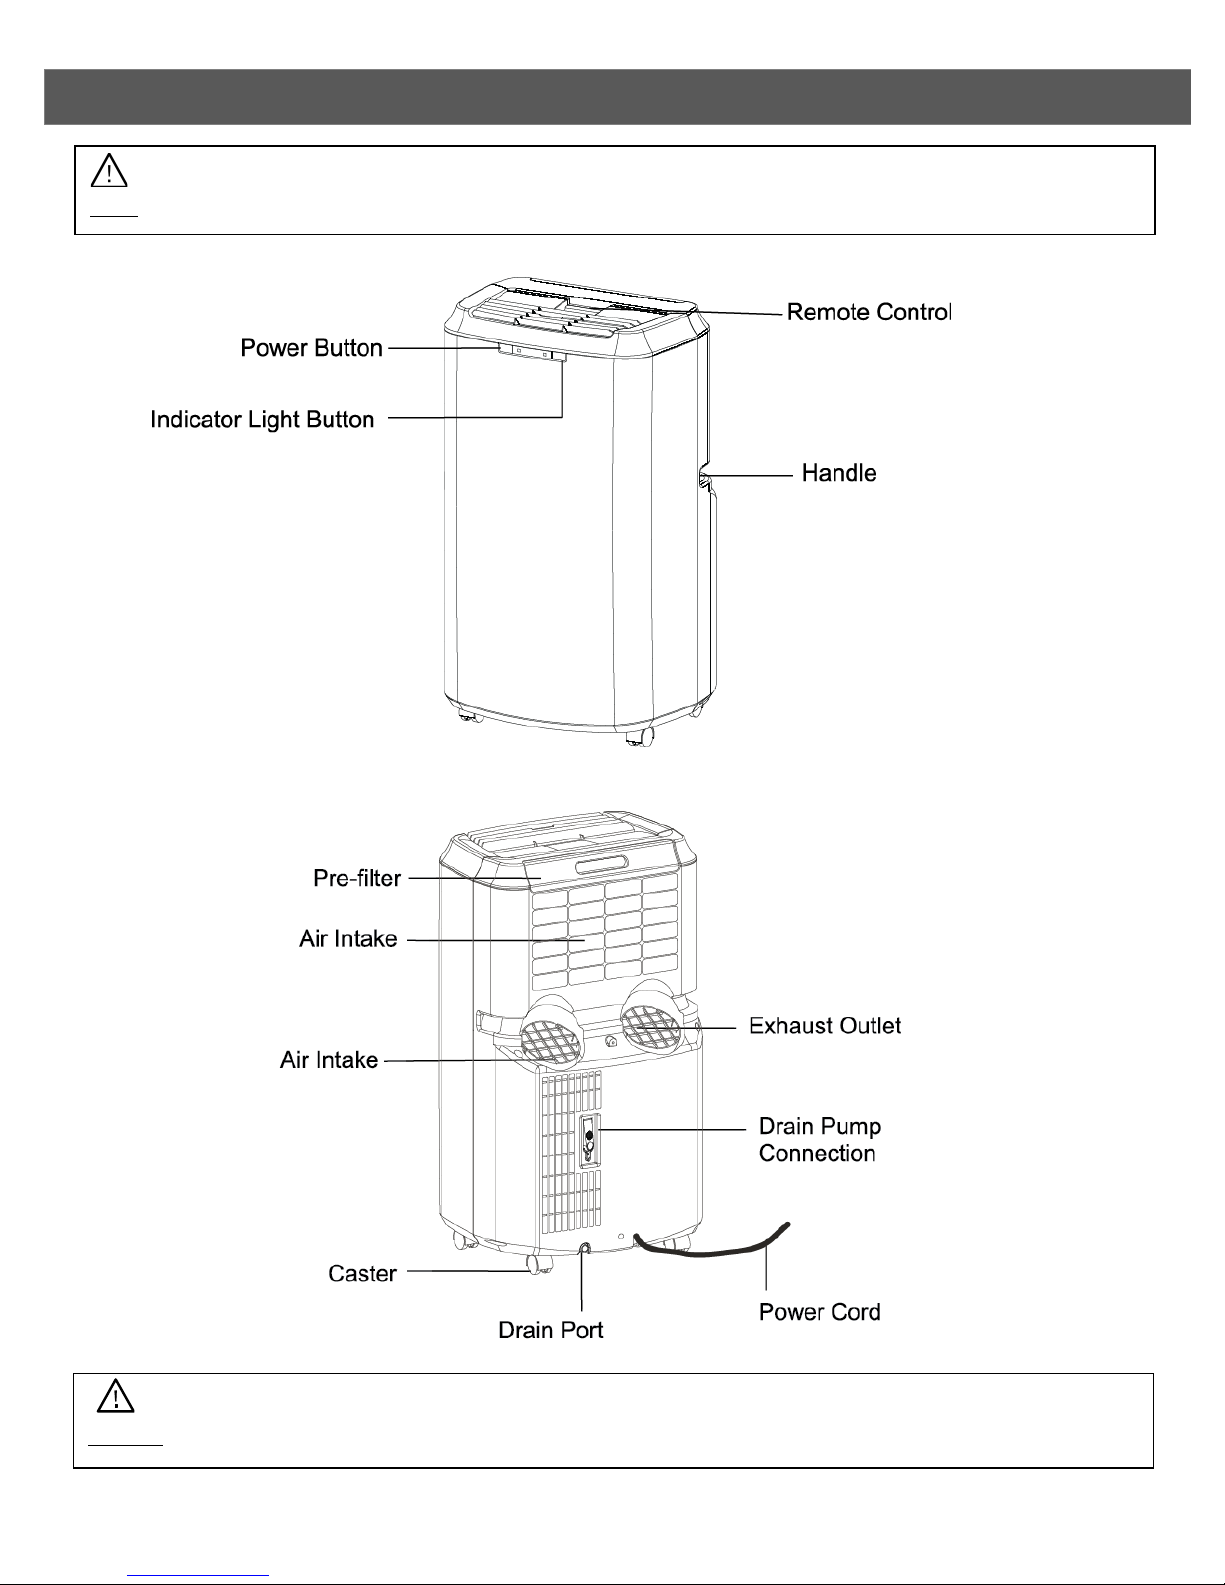
Parts!Identification!...........................................................................................................................................!2!
Front!View!.....................................................................................................................................................!2!
Back!View!......................................................................................................................................................!2!
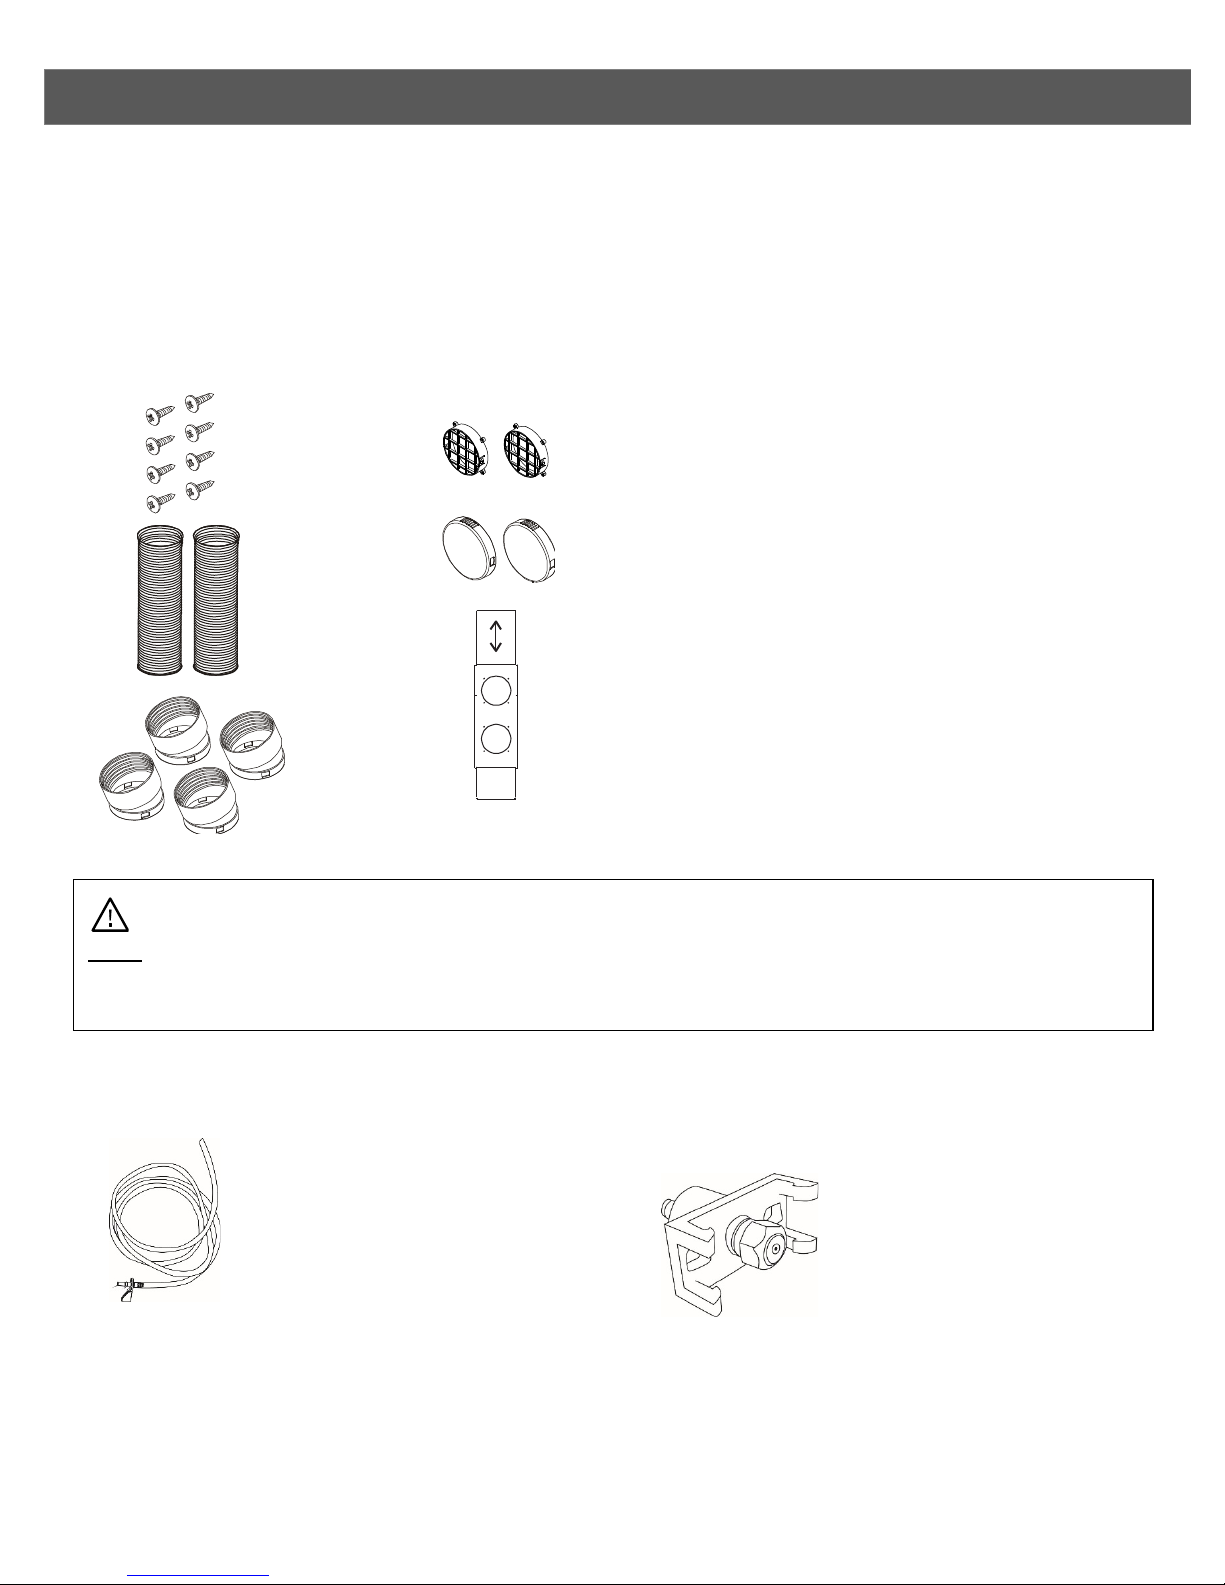
Window!Kit!Installation!Instructions!................................................................................................................!3!
Preparations!for!Installing!the!Window!Kit!...................................................................................................!3!
Window!Kit!Parts!List!....................................................................................................................................!3!
Parts!for!Continuous!and!Misting!Drainage!..................................................................................................!3!
Installation!Location!......................................................................................................................................!4!
Notes!About!the!Exhaust!Hose!.....................................................................................................................!7!
Draining!the!Unit!..............................................................................................................................................!8!
Drainage!Options!..........................................................................................................................................!8!
Operation!.......................................................................................................................................................!11!
Remote!Control!Overview!..........................................................................................................................!11!
Remote!Control!LCD!Indicators!...................................................................................................................!12!
Operating!the!Remote!Control!...................................................................................................................!13!
Auto-Restart:!..............................................................................................................................................!13!
Front!Panel!Lights!and!Controls!..................................................................................................................!16!
Cleaning!and!Maintenance!............................................................................................................................!16!
Cleaning!the!Unit!........................................................................................................................................!16!
Cleaning!the!Pre-Filter!................................................................................................................................!17!
Preparation!for!Storage!..............................................................................................................................!17!
Energy!Saving!Guide!......................................................................................................................................!17!
Troubleshooting!.............................................................................................................................................!18!
Specifications!.................................................................................................................................................!20!
New!Portable!Air!Conditioner!BTU’s!..............................................................................................................!21!
What!is!SACC?!.............................................................................................................................................!21!
Avallon!Product!Warranty!.............................................................................................................................!22!

!
v!
!!
!
!
First!Time!Operating!Instructions:!
Before!use,!make!sure!all!packaging!labels!and!materials!are!removed!from!the!unit.!Be!sure!to!keep!
track!of!all!included!parts!and!pieces!before!discarding!packaging!materials.!It!is!advised!that!you!keep!
the!original!box!and!packaging!materials!in!case!you!need!to!move!or!ship!the!appliance!in!the!future.!
!
This!owner’s!manual!is!provided!for!reference!use!only.!Specifications!may!change!without!prior!notice.!!
Refer!to!the!product!label!on!your!portable!air!conditioner!for!the!latest!technical!information.!
!

!
!
Introduction!
! !
Thank!you!for!purchasing!your!Avallon!portable!air!conditioner.!!Avallon!is!dedicated!to!developing!products!
that!will!enhance!your!lifestyle!with!superior!quality!and!distinctive!features.!!Please!visit!www.avallon.com!
for!more!information!on!your!product!and!other!Avallon!products.!
!
This!manual!contains!important!information!regarding!the!proper!installation,!use,!and!maintenance!of!your!
portable!air!conditioner.!!Following!this!manual!will!ensure!that!your!product!will!work!at!its!peak!
performance!and!efficiency.!
!
Please!save!the!original!product!packaging!in!case!you!need!to!safely!transport!your!portable!air!conditioner.!
!
For!Your!Records:!
Please!write!down!the!model!number!and!serial!number!below!for!future!reference.!!Both!numbers!are!
located!on!the!rating!label!on!the!back!of!your!unit!and!are!needed!to!obtain!warranty!service.!!You!may!
also!want!to!staple!your!receipt!to!this!manual!as!it!is!the!proof!of!your!purchase,!and!is!also!needed!for!
service!under!your!warranty.!
!
Model!Number:!
!
Serial!Number:!
!
Date!of!Purchase:!
!
To!better!serve!you,!please!do!the!following!before!contacting!customer!service:!
!
•!! If!you!received!a!damaged!product,!immediately!contact!the!retailer!or!dealer!that!sold!you!the!
product.!
!
• Read!and!follow!this!instruction!manual!carefully!to!help!you!install,!use,!and!maintain!your!portable!
air!conditioner.!
!
•!! Read!the!troubleshooting!section!of!this!manual!as!it!will!help!you!diagnose!and!solve!common!
issues.!
!
• Visit!us!on!the!web!at!http://www.avallon.com!to!download!product!guides,!additional!
troubleshooting!resources,!and!up-to-date!information.!
!
• If!you!need!warranty!service,!our!friendly!customer!service!representatives!are!available!via!email!at!
[email protected]!or!by!telephone!at!1!(866)!471-7427.!
!
!
!
!
!
!
!
!
!
!

!
2!
!!
!
!
Parts!Identification!!
!
!
Front!View!
!
!
!
!
!
!
!
!
!
!
!
!
!
! !
!
!
!
!
!
!
!
!
!
!
Back!View!
!
!
!
!
! !
!
!
!
!
!
!
!
!
!
!
!
!
!
!
!
!
!
!
!
Caution:!Make!sure!the!drain!plug!is!firmly!installed!before!using!the!unit!to!prevent!leaking.!
!
Note:!The!LCD!display!on!top!of!this!model!is!the!remote!control!and!is!removable.!

!
3!
!!
4!Duct!
Connectors!
!
!
!
Window!Kit!Installation!Instructions!
! !
Preparations!for!Installing!the!Window!Kit!
You!must!vent!your!portable!air!conditioner!when!running!it!in!cooling!mode!or!heat!mode!(certain!models).!
Your!unit!includes!a!window!exhaust!kit!that!can!be!used!to!vent!the!unit!out!of!a!window.!Before!you!begin,!
make!sure!you!have!all!the!parts!necessary!for!installation.!!
Window!Kit!Parts!List!
!
!
!
!
!
!
!
!
!
!
!
!
!
!
!
!
!
!
Parts!for!Continuous!and!Misting!Drainage!
!
!
!
!
!
!
!
!
!
!
!
Note:!There!is!one!duct!connector!that!includes!an!opening!for!the!water!line!for!use!in!the!misting!drain!
operation.!This!connector!must!be!installed!to!the!exhaust!outlet!on!the!unit.!Please!review!pages!8-10!for!
more!details.!
8!Screws!
2!Exhaust!
Hoses!
!
2!Grated!
Adapters!
2!Exhaust!
Covers!
2!Window!Kit!Plates!
•
1!Window!Kit!
Plate!with!Holes!
1!Water!Line!
1!Misting!Nozzle!

!
4!
!!
!
!
Installation!Location!
If!you!have!multiple!windows,!choose!one!that!is!near!an!electrical!outlet!that!will!be!able!to!provide!
sufficient!power!to!your!unit.!See!the!power!requirements!listed!on!the!product!label!printed!on!the!side,!or!
on!the!back!of!your!portable!air!conditioner.!
Your!window!kit!can!be!installed!on!a!horizontal!or!vertical!sliding!window!as!shown!in!the!following!
pictures:!
!
!
!
!
!
!
!
!
!
!
!
!
!
!
!
!
!
!
!
Installing!the!Grated!Adapter!
1. Insert!the!round!grated!adapters!through!the!back!grooved!side!of!the!window!kit!plate!with!holes.!!
!
!
!
!
!
!
!
!
!
!
!
Note:!Exhaust!Covers!may!be!attached!to!the!Grated!Adapters.!You!may!need!to!twist!and!pull!apart!to!
separate!them.!
!
Note:!You!may!need!to!contact!your!electrician!if!your!room’s!circuit!is!not!able!to!power!your!unit.!

!
5!
!!
!
!
!
2. Secure!the!grated!adapters!by!fastening!the!screws!from!the!flat!side!of!the!window!kit!plate!to!the!holes!
on!the!grated!adapter.!
!
!
!
!
!
!
!
Installing!the!Window!Plates!
3. Open!your!window!and!place!the!window!kit!on!the!window!sill!with!the!grooved!side!facing!outward.!
Then,!slide!the!window!kit!plate!to!fit!the!width!of!the!window.!You!can!use!screws!to!secure!the!window!
kit!plate!from!sliding.!
!
!
!
!
!
!
!
4. Lower!the!window!to!secure!the!window!kit!in!place.!You!may!need!to!use!duct!tape!to!better!secure!the!
window!kit.!
!
!
!
!
!
!
!

!
6!
!!
A.
B.
20”
!
!
Attaching!the!Duct!Connectors!to!the!Exhaust!Hose!
5. Attach!the!connectors!to!the!hose.!
A.!!!Extend!the!ends!of!the!exhaust!hose!
B.!!!Thread!the!duct!connector!on!by!turning!it!clockwise!until!it!stops.!
!
!
!
!
!
!
!
!
6. Roll!the!unit!towards!the!window!kit.!Leave!a!space!that!is!at!least!20!inches!to!the!wall.!
!
!
!
!
!
!
!
Connecting!the!Duct!Connector!to!the!Unit!
7. Align!the!slots!on!the!duct!connector!to!the!tabs!and!snap!the!duct!connector!into!the!back!of!the!unit.!
In!order!to!use!the!misting!drain!feature!you!will!need!to!attach!the!duct!connector!with!an!opening!for!
the!water!line!to!the!exhaust!outlet!on!the!unit.!!
!
!
!
!
!
!
!

!
7!
!!
Do not lengthen the
exhaust hose by adding
additional hoses or
attachments.
!
!
Connecting!the!Duct!Connector!to!the!Grated!Adapter!
8. Align!the!slots!on!the!duct!connector!to!the!tabs!on!the!grated!adapter!and!snap!the!duct!connector!into!
place.!
!
!
!
!
!
!
!
After!you!have!installed!the!exhaust!hose!and!window!kit,!you!can!plug!in!your!portable!air!conditioner!and!
start!using!it.!
Notes!About!the!Exhaust!Hose!
Your!portable!air!conditioner!is!designed!to!exhaust!condensate!water!that!is!collected!from!the!air.!This!
water,!in!either!gaseous!or!droplet!form,!will!be!expelled!out!of!the!exhaust!port!of!the!unit.!Please!take!this!
into!account!when!deciding!how!to!vent!it.!
1. The!exhaust!hose!supplied!with!the!portable!air!conditioner!can!be!extended!up!to!48!inches;!however,!
for!maximum!efficiency,!use!the!shortest!length!possible.!
2. Try!to!prevent!any!kinks!or!bends!in!the!exhaust!hose.!Kinks!or!bends!may!trap!exhaust!air!which!can!
radiate!heat!into!the!room!or!potentially!cause!the!portable!air!conditioner!to!overheat!and!shut!itself!
off.!
3. The!exhaust!hose!supplied!with!the!portable!air!conditioner!has!been!specifically!designed!for!this!air!
conditioner.!Do!not!lengthen!the!hose!by!adding!additional!hoses!or!attachments!or!replace!it!with!any!
other!hose.!
!
!
!
!
!
!
!
!
!
!
Warning:!Longer!hoses!are!not!recommended.!

!
8!
!!
!
!
Draining!the!Unit!
When!the!portable!air!conditioner!is!in!cooling!mode,!dehumidify!mode,!or!heat!mode!on!certain!models,!it!
will!remove!moisture!from!the!air.!The!condensed!water!from!the!air!will!be!collected!in!an!internal!
reservoir!and!will!be!evaporated!and!exhausted!out!of!the!exhaust!hose.!However,!in!very!humid!conditions,!
the!internal!reservoir!may!fill!completely.!This!causes!the!air!conditioner!to!turn!off!to!avoid!overflowing!the!
internal!reservoir.!The!WATER!indicator!will!light!up!on!the!Control!Panel.!
Drainage!Options!
Your!Avallon!portable!air!conditioner!comes!with!several!different!options!for!draining!the!water!
accumulated!during!operation.!The!most!common!will!be!the!self-evaporative!mode.!The!unit!will!do!this!
automatically.!This!mode!will!be!sufficient!for!most!environments.!If!you!are!operating!the!unit!in!an!
environment!with!higher!levels!of!humidity!you!may!choose!one!of!the!other!drainage!options!to!help!
remove!the!excess!water.!
Direct!Drainage!
1. Remove!the!rubber!drain!plug!from!the!drain!port.!
2. Connect!a!drain!hose!to!the!drain!port.!
The!portable!air!conditioner!will!now!drain!through!the!drain!hose.!
Continuous!Drain!
This!unit!has!the!capacity!for!continuous!drainage.!It!includes!an!internal!pump!to!help!remove!water.!
This!means!the!unit!will!push!the!water!to!the!drain!instead!of!relying!on!gravity!to!bring!the!water!to!
the!drain.!If!there!is!an!obstacle!in!between!the!unit!and!the!drain,!the!pump!will!push!the!water!over!
that!obstacle!and!through!the!water!line.!In!order!to!run!the!continuous!drain!function,!you!will!need!to!
do!the!following:!
1. Connect!the!included!water!line!to!the!unit.!You!will!need!to!attach!the!quick!connect!adapter!on!the!
end!of!the!water!line!to!the!back!of!the!unit.!
!
!
!
!
!
!
!
!
2. Place!the!other!end!of!the!water!line!(drainage!end)!into!a!drain.!The!unit!will!recognize!that!the!
quick!adapter!is!attached!and!will!automatically!engage!the!water!pump.!The!pump!will!turn!on!once!
the!water!reservoir!becomes!full.!!
!

!
9!
!!
!
!
Misting!Drain!
Your!unit!also!includes!the!unique!Misting!Drain!option.!If!a!drain!is!not!present!this!option!will!allow!
the!unit!to!remove!the!excess!moisture!out!of!the!exhaust!hose!through!a!mist!nozzle.!The!mist!nozzle!
MUST!be!setup!in!the!exhaust!hose!and!NOT!the!intake!hose.!In!order!to!run!the!misting!drain!option,!
you!will!need!to!do!the!following:!
1. Connect!the!included!water!line!to!the!unit.!You!will!need!to!attach!the!quick!connect!adapter!on!the!
end!of!the!water!line!to!the!back!of!the!unit.!
!
!
!
!
!
!
!
!
!
!
!
!
2. Run!the!remaining!water!line!into!the!exhaust!hose!through!the!opening!in!the!exhaust!hose!adapter.!
This!adapter!MUST!be!installed!on!the!exhaust!outlet!of!the!unit.!If!the!adapter!is!not!installed!in!this!
position!you!will!need!to!adjust!the!adapters.!Run!the!excess!water!line!into!the!cavity!of!the!exhaust!
hose.!
!
!
!
!
!
!
!
3. Connect!the!mist!nozzle!to!the!end!of!the!water!line.!Ensure!the!water!line!is!attached!securely!to!the!
mist!nozzle.!
!
!
!
!
!
! !
!
!
Note:!The!water!line!quick!connect!includes!a!trigger!to!let!the!unit!know!a!water!line!is!attached.!The!unit!
will!not!pump!water!out!of!this!drainage!hole!unless!the!quick!connect!water!line!is!attached.!
!
Caution:!The!water!line!will!contain!some!water!if!the!pump!has!been!in!use.!If!you!are!going!to!detach!the!
water!line!from!the!unit!be!sure!to!keep!the!end!of!the!water!line!elevated!once!it!is!detached!to!avoid!
water!spilling.!Drain!the!remaining!water!in!the!water!line!if!you!are!preparing!for!storage!of!the!unit.!

!
10!
!
!
!
4. Attach!the!mist!nozzle!to!the!grated!adapter.!Make!sure!the!mist!nozzle!is!directed!to!mist!outside!of!
the!window!and!not!back!into!the!exhaust!hose.!
!
!
!
!
!
!
!
!
!
The!unit!will!now!automatically!mist!any!excess!water!to!the!outside.!Installing!the!mist!system!in!the!
exhaust!hose!ensures!all!of!the!moisture!is!pushed!completely!away!from!the!window.!
!
!
!
!
!
!
!
!
!
!
!
!
!
!
!
!
!
!
Note:!It!is!recommended!to!attach!the!misting!nozzle!in!a!vertical!position!on!the!grated!adapter.!

!
11!
!
!
!
Operation!
!
Remote!Control!Overview!
!
!
!
!
!
!
Button!
Function!
!Power!
This!button!powers!the!unit!on!or!off.!
!Fan!Speed!
This!button!sets!the!fan!speed.!The! !Automatic,! !High,! !Medium,!or! !Low!
indicator!will!appear!depending!on!the!mode!you!set.!
!Mode!
This!button!sets!the!mode.!The! !Automatic,! !Cool,! !Dehumidify,! !Fan,!or!
!heat!indicator!will!appear!depending!on!the!mode!you!set.!!
!(Down)!
This!button!decreases!the!Temperature,!Timer,!or!Clock!settings.!
!(Clock)!
This!button!is!used!to!set!the!remote!control!clock!
!Timer!
This!button!is!used!to!enable!the!timer.!
!C/F!
This!button!switches!the!temperature!between!Celsius!/!Fahrenheit!!
!(Up)!
This!button!increases!the!Temperature,!Timer,!or!Clock!settings.!!
!
!
!
!
!
!
!
!
!
!
!
Note:!To!use!the!remote,!reach!directly!behind!the!display!and!pull!up!and!out!to!detach!it!from!the!unit.!

!
12!
!
!
!
Installing!the!Batteries!
1. Remove!the!cover!on!the!back!of!the!remote!control.!!
2. Insert!the!batteries!with!the!(+)!and!(-)!ends!pointing!in!the!correct!direction.!
3. Slide!the!cover!back!on.!
!
!
!
!
Remote!Control!LCD!Indicators!
!
!
!
! !
!
!
Indicators!
!
Transmitter!
This!indicator!appears!when!the!Power!or!Timer!button!is!signaling!the!unit.!
Fan!Speed!
This!indicator!shows!the!set!fan!speed!between! !Automatic,! !High,!!!!!!!!!!!!!!
!Medium,!and! !Low.!
Mode!
This!indicator!shows!the!set!mode!between! !Automatic,! !Cooling,!!!!!!!!!!!!!!!!
!Dehumidify,! !Fan!Only,!and! !Heat.!
Temperature!Setting!
This!indicator!shows!the!set!temperature.!
Fahrenheit!and!Celsius!
This!indicator!shows!if!the!set!temperature!is!in!Fahrenheit!or!Celsius.!
Clock!
This!indicator!shows!the!Clock’s!time.!The!remote!control!has!a!24-Hour!clock.!
Timed!Hours!
This!indicator!shows!the!number!of!timed!hours!when!the!Timer!is!enabled.!
Timer!
This!indicator!shows!if!the!On!Timer!or!Off!Timer!is!enabled.!
!
Mode!Indicator!
Function!
!Automatic!
The!unit!will!cool,!dehumidify,!or!heat!(some!models)!depending!on!the!ambient!
temperature.!The!mode!and!fan!speed!changes!automatically.!The!front!panel!lights!
will!change!to!reflect!the!running!mode.!
!Cooling!
The!unit!will!cool.!The!front!panel!lights!will!be!blue.!
!Dehumidify!
The!unit!will!remove!moisture!from!the!air.!The!front!panel!lights!will!be!yellow.!
!Fan!Only!
The!unit!will!run!as!a!fan!and!circulate!air.!The!front!panel!lights!will!be!green.!
!Heat!!
Available!on!certain!models.!The!unit!will!heat.!The!front!panel!lights!will!be!red.!
!
!
Caution:!Use!only!AAA!batteries.!Remove!the!batteries!if!the!remote!control!will!not!be!used!for!one!month!
or!longer.!Do!not!attempt!to!recharge!batteries!not!designed!to!be!recharged.!All!batteries!should!be!
replaced!at!the!same!time.!Do!not!mix!old!and!new!batteries.!Do!not!dispose!of!batteries!in!a!fire!as!they!
may!explode.!

!
13!
!
!
!
Operating!the!Remote!Control!
Power!
Use!the! !Power!button!to!turn!the!portable!air!conditioner!on!and!off.!!
By!default!when!you!first!use!the!power!button,!the!unit!will!begin!to!operate!in!cooling!mode!and!the!
front!panel!will!be!illuminated!in!blue.!The!unit!will!remember!the!last!used!mode!/!settings!if!you!shut!
down!and!restart.!!
Auto-Restart:!If!power!to!the!unit!is!interrupted,!the!air!conditioner!will!restart!itself!in!its!last!used!
mode!/!settings!once!power!is!restored.!The!compressor!will!restart!after!3!minutes.!!
Cooling!Mode!
Cooling!mode!cools!and!dehumidifies!the!air.!If!the!ambient!temperature!drops!below!the!temperature!
you!selected,!the!compressor!turns!off!and!the!unit!functions!with!the!fan!only.!When!the!temperature!
rises!above!the!temperature!you!selected,!the!compressor!turns!on!again.!The!front!panel!lights!will!be!
blue.!Whether!your!desired!temperature!can!actually!be!reached!depends!on!the!ambient!conditions.!
The!room!temperature!remaining!above!the!set!temperature!is!normal.!
To!operate!the!unit!in!cooling!mode:!
1. Make!sure!the!power!cord!is!plugged!into!a!power!outlet.!
2. Press!the! !Power!button!on!the!remote!control.!
3. Press!the! !Mode!button!until!the! !cooling!indicator!is!selected.!
4. Select!the!fan!speed!by!using!the! !Speed!button.!
5. Set!the!thermostat!by!using!the! !Up!and! !Down!buttons.!The!thermostat!is!adjustable!
between!61°F!-!89°F!in!one!degree!increments.!You!can!switch!between!Fahrenheit!and!Celsius!by!
pressing!the! !button.!
!
!
!
Dehumidifying!Mode!
During!the!Dehumidifying!mode,!the!unit!will!condense!water!out!of!the!air!and!exhaust!it!through!the!
exhaust!hose.!The!ambient!temperature!in!the!room!will!probably!drop!by!a!few!degrees!while!using!the!
Dehumidifying!mode.!The!front!panel!lights!will!be!yellow.!
To!operate!the!unit!in!dehumidifying!mode:!!
1. Make!sure!the!power!cord!is!plugged!into!a!power!outlet.!!
2. Press!the! !Power!button!on!the!remote!control.!
3. Press!the! !Mode!button!until!the! !dehumidify!indicator!is!selected.!
!
!
!
!
!
!
Note:!The!exhaust!hose!must!be!used!in!Cooling!mode!in!order!to!cool!a!room.!
!
Notes:!If!the!room!temperature!is!below!77°F,!the!fan!will!always!run!on!low!speed!in!this!mode.!If!you!do!
not!use!the!exhaust!hose!in!Dehumidify!Mode,!you!must!manually!drain!the!water!from!the!unit.!

!
14!
!
!
!
Heat!Mode!!
Only!available!on!certain!models!
This!mode!allows!the!unit!to!run!as!a!heat!pump.!The!unit!must!be!vented!for!it!to!expel!the!cold!air!out!
of!the!exhaust.!!
To!operate!the!unit!in!heat!mode:!!
1. Press!the! !Mode!button!until!the! !heat!indicator!is!selected.!!!
2. Set!the!thermostat!by!using!the! !Up!and! !Down!buttons.!The!thermostat!is!adjustable!
between!61°F!–!77°F!in!one!degree!increments.!
!
Fan!Only!Mode!
Fan!Only!mode!is!used!to!circulate!the!air!in!your!room.!No!temperature!setting!is!needed.!The!front!
panel!lights!will!be!green.!
To!operate!the!unit!in!Fan!Only!mode:!!
1. Make!sure!the!power!cord!is!plugged!into!a!power!outlet.!!
2. Press!the! !Power!button!on!the!remote!control.!
3. Press!the! !Mode!button!until!the! !Fan!Only!indicator!is!selected.!
4. Press!the! !Speed!button!to!select!the!fan!speed.!You!can!choose!between! !Automatic,!!!!!!!!!!!!!
!High,! !Medium,!and! !Low.!!
!
!
!
Automatic!Mode!
In!Automatic!mode,!the!unit!will!cool,!dehumidify,!or!heat!(certain!models)!depending!on!the!ambient!
temperature.!As!the!temperature!in!the!room!changes,!the!mode!and!fan!speed!will!change!
automatically.!The!front!panel!lights!will!change!depending!on!the!mode.!!
To!operate!the!unit!in!Automatic!mode:!!
1. Make!sure!the!power!cord!is!plugged!into!a!power!outlet.!!
2. Press!the! !Power!button!on!the!remote!control.!
3. Press!the! !Mode!button!until!the! !Automatic!indicator!is!selected.!!
Fan!Speed!
The! !Fan!Speed!button!is!used!to!change!the!fan!speed!while!in!Cooling!and!Fan!Only!modes.!!
Press!the! !Fan!Speed!button!to!select!the!fan!speed.!The! !Automatic,! !High,! !Medium,!or! !Low!
indicator!can!be!selected.!
!
!
!
!
!
!
Note:!Fan!Only!mode!does!not!require!that!the!exhaust!hose!be!attached.!
!
Note:!You!will!not!be!able!to!change!the!fan!speed!if!the!unit!is!in!Automatic!or!Dehumidify!mode.!

!
15!
!
!
!
Clock!
The! !Clock!button!is!used!to!set!the!Clock.!
To!set!the!Clock:!
1. Press!and!hold!the! !Clock!button!until!the!Clock!indicator!starts!blinking.!
2. Set!the!time!by!using!the! !Up!and! !Down!buttons.!Holding!down!the!buttons!longer!than!1!
second!will!change!the!time!in!fast!mode.!The!clock!is!a!24-Hour!clock!so!if!it!is!6:00!PM!you!would!
set!the!time!to!be!18:00.!
3. To!save!your!settings!press!and!hold!the! !Clock!button!until!the!Clock!indicator!stops!blinking.!
Use!the!Chart!below!to!set!the!24-hour!clock:!
!
!
!
!
!
!
!
!
!
!
Timer!
The!timer!can!be!used!to!either!turn!the!unit!on!or!off!after!a!number!of!elapsed!hours.!The!timer!is!
adjustable!between!1-24!hours!in!one!hour!increments.!
!
How!to!set!the!unit!to!automatically!turn!on:!
1. Press!the! !Timer!button!while!the!unit!and!remote!are!powered!off.!The!On!Timer![ ]!
indicator!will!be!selected!and!the!timed!hour!indicator!will!be!blinking.!
2. Use!the! !Up!and! !Down!buttons!to!set!the!number!of!hours!you!want!to!pass!before!the!
unit!turns!on.!!
3. Press!the! !Timer!button!again!to!set!the!timer.!The!timed!hour!indicator!will!stop!blinking.!After!
the!selected!time!passes,!the!unit!will!automatically!turn!on.!
!
How!to!set!the!unit!to!automatically!turn!off:!
1. Press!the! !Timer!button!while!the!unit!and!remote!are!powered!on.!The!Off!Timer![ ]!
indicator!will!be!selected!and!the!timed!hour!indicator!will!be!blinking.!
2. Use!the! !Up!and! !Down!buttons!to!set!the!number!of!hours.!!
3. Press!the! !Timer!button!again!to!set!the!timer.!The!timed!hour!indicator!will!stop!blinking.!The!
unit!will!automatically!turn!off!after!the!selected!time!elapses.!
!
!
12-Hour!
24-Hour!
1:00!PM!
2:00!PM!
3:00!PM!
4:00!PM!
5:00!PM!
6:00!PM!
7:00!PM!
8:00!PM!
9:00!PM!
10:00!PM!
11:00!PM!
12:00!AM!
13:00!
14:00!
15:00!
16:00!
17:00!
18:00!
19:00!
20:00!
21:00!
22:00!
23:00!
00:00!
!
Note:!To!cancel!the!timer,!press!the! !Power!button!or!set!the!timer!to!“00”.!
This manual suits for next models
2
Table of contents
Other Avallon Air Conditioner manuals