Avantco 177DHC13 User manual

User Manual
2 www.AvantcoEquipment.com
Index
Safety information ..............................................3
Parts diagram ....................... .............................4
Operating instructions .....................................5 - 6
Cleaning and maintenance ..........................7 - 16
Wiring diagram ...................................................17
Troubleshooting ..................................................18
Warranty information .

User Manual
www.AvantcoEquipment.com 3
Important Safeguards
1. When using electrical appliances, basic safety precautions should always be
followed including the following:
2. Read all instructions
3. Close supervision is necessary when any appliance is used by or near children.
4. Make sure the appliance is OFF when not in use, before putting on or taking off
parts, and before cleaning.
5. Do not operate any appliance with a damaged cord or plug or after the appliance
malfunctions, or is dropped or damaged in any manner. Return appliance to the
nearest authorized service facility for examination, repair or electrical or mechanical
adjustment.
6. Do not use outdoors.
SAVE THESE INSTRUCTIONS

User Manual
4 www.AvantcoEquipment.com
Parts Key
Parts Diagram # Part Name Replacement Part Item #
1 Lid 177PDHCLID
2 Bowl
3Mixing Auger
4 Bowl Hook-on Handles
5 Dispenser Housing
6 Power Switch 177PDHCPS
7 Thermostat 177PDHCTHRM
8 Lower Dispenser Housing
9 Paddle 177PDHC13P (DHC-13),
177PDHC26P (DHC-26)
10 Pan
11 Lid for Boiler Tank Water Level Indicator Tray
12 Boiler Tank Water Level Indicator Tray
13 Tap Handle 177PDHCHNDL
14 Drip Tray Maximum Level Indicator
15 Drip Tray Grid
16 Drip Tray
17 Boiler Tank Drainage Cap
Not Pictured Bowl Gasket 177PDHCBG
Not Pictured Heating Element 177PDHCELM
Not Pictured Faucet Gasket 177PDHCGF
Not Pictured Faucet Screw Gasket 177PDHCGFS
Not Pictured Interior Faucet Gasket 177PDHCGI
Not Pictured Motor 177PDHCMTR
Parts Diagram
17

User Manual
www.AvantcoEquipment.com 5
Operating Instructions
remove the lid and pou r the beverage prepared accor dlng t o the manu-
facturer’s lnstructlons lnto the bowl;
Starting Up
Fig.6
Fig.7
Fig.9
Fig.9

User Manual
6 www.AvantcoEquipment.com
Operating Instructions
the machlnes wlth LCD offer the opportunlty to make a visual check to see
hen the product has reached the required temperature inside the bowl.
w
arnlng: during bowl and/or boller switch off the machine us-
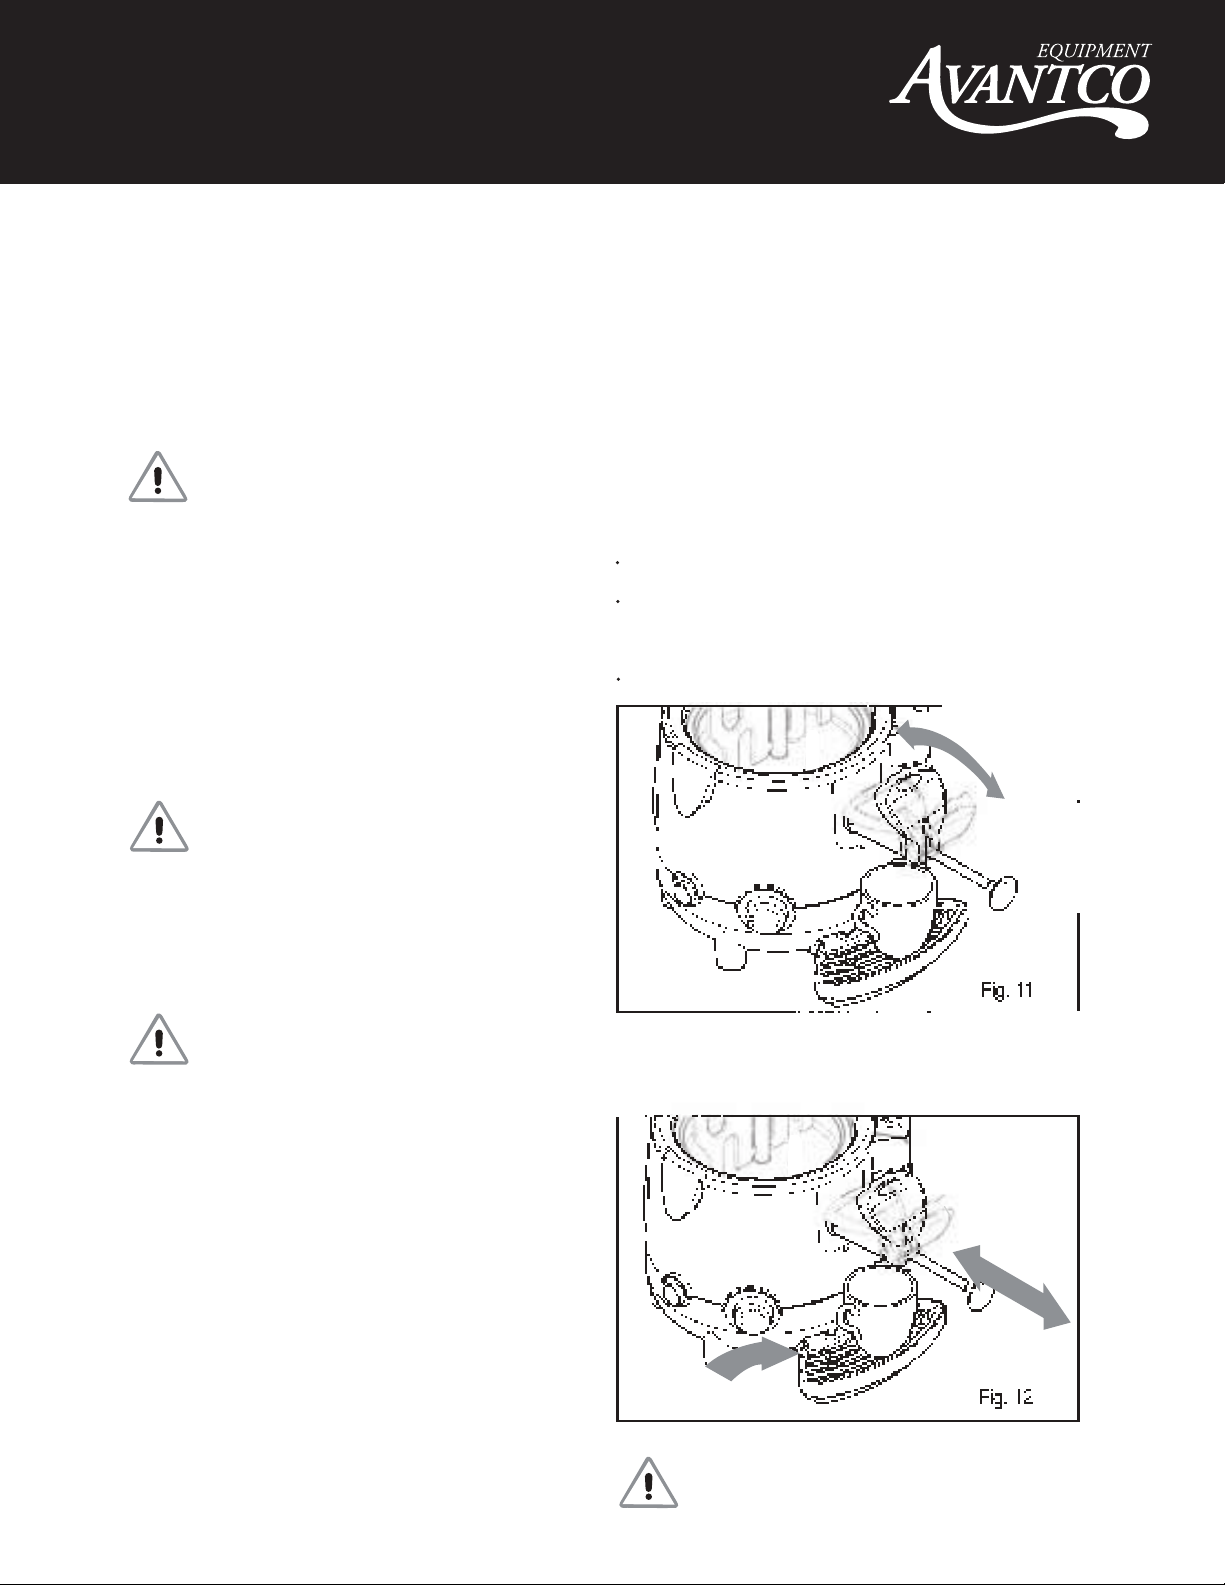
To dispense hot chocolate proceed as follows;
place a cup beneath the tap;
use the lever on the tap (the product is dispensed when the lever is pressed
or pulled) until the required amount of product has been poured inside the
gradually release the tap lever so that it returns to the standby position (tap off).
cup;
ing the main swltch (LED off).
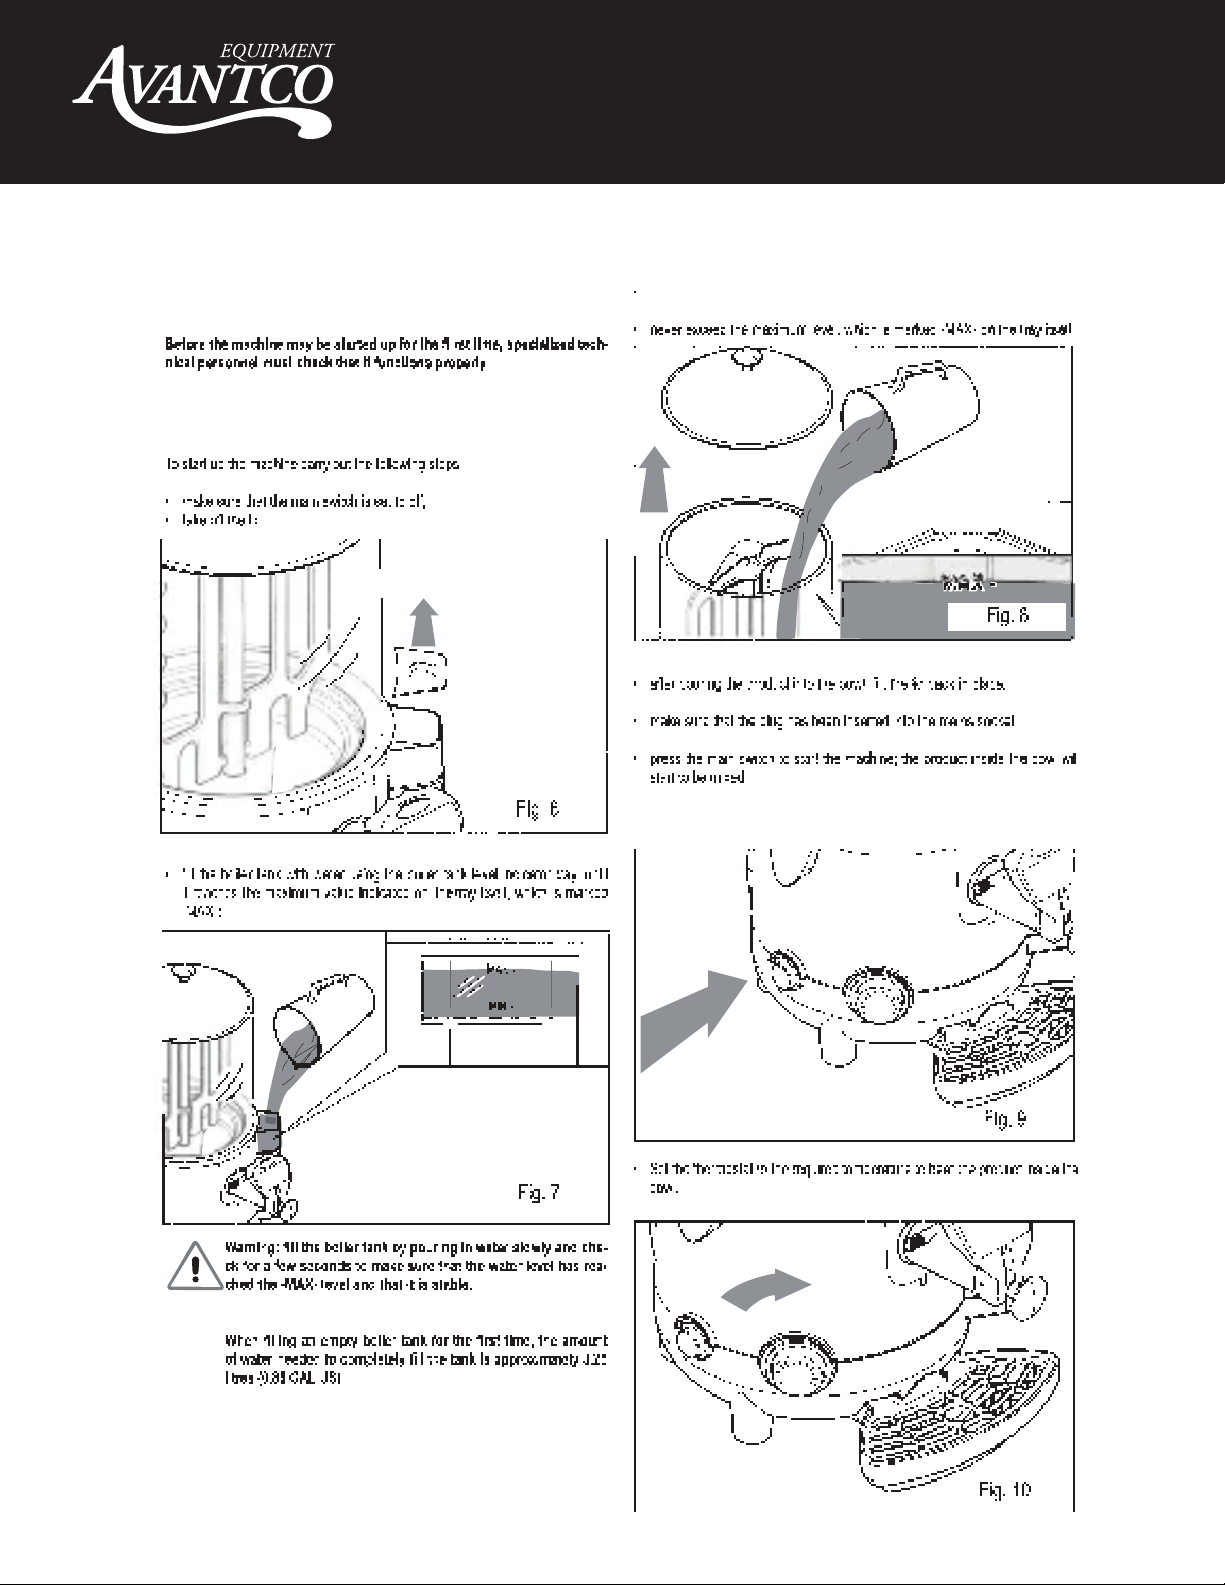
Warning: check to make sure that the water level never falla be-
low the minimum level, whlch is marked -MIN-; this will prevent
machine operations from being shut down.
- 115 V madel:
W
A level sensor wlll shut down machine operation as soon
as the water level falls below the minimum; to restore op-
eration, the boiler tank must be topped up. lf the machine
does not restart after the tank has been topped up, contact
a specialized technician.
Warning: never operate the machine without water in the boiler
as this would damage the heating element. a temperature sen-
sor will in any case cut out power to the heating element if there
is no water in the boiler. To restore the machine to normal op-
lf the product is especially thick, it is advisable to keep the rod
pulled out at the maximum position; any clogging in the dis-
pensino line may be removed by sliding the rod back and forth
while keeping the machine, as shown in the Fig. 12.
Warning: never touch the bowl or lid while the machine is oper-
ating, since they are very hot, Always use the knob when mov-
ing the bowl lid.
eration press the pushbutton underneath the base.
Warning: for correct machine operation, only use demineralized
water in the boiler tank.
Dispensing the product
It is advisable to keep the rod in the maximum dispensing posi-
tion to help the product to flow at the required rate.
Dispensing the Product
Fig.11

User Manual
www.AvantcoEquipment.com 7
Cleaning and Maintenance
Cleaning and Sanitation Procedures

User Manual
8 www.AvantcoEquipment.com
Cleaning and Maintenance
7.2 Emptying the bowl
7.3 Removing the bowl

User Manual
www.AvantcoEquipment.com 9
Cleaning and Maintenance
unhook the bowl hook-on handles, as illustrated in the figure, to free the bowl
slide the mixing auger upwards with one hand, taking care to grip it by the
place the bowl on a flat surface and using both hands, romove the gasket by
sliding it upwards in the direstion shown by the arrow.
Removing the tap is prohibited if the bowl contains the product
or any other liquid.
To remove the tap, proceed as follows:
move the rod to the maximum dispensing position;
rotation pin;
from the machine body;
release the bowl from the machine body, using two fingers to prise it away
from the fixed steel part of the mixer auger (A) and the others to grip the
outer edge of the bowl (B): Gradually pull the bowl harder until it comes away
from its seating;
slide the bowl upwards using both hands;
7.4. Rem oving the tap
7.4 Removing the tap

User Manual
10 www.AvantcoEquipment.com
Cleaning and Maintenance
press the button (A) securing the tap to the machine and then remove the
tap (B) with both hands, as illustrated in the figure;
7.5. Cleaning the pan
lt is necessary to remove all parts fitted to the pan.
Remove any product left in the bowl, see paragraph 7.2;
remove the bowl from the machine, see paragreph 7.3;
remove the tap from the machine, see paragraph 7.4;
clean the entire surface of the pan using a damp cloth and/or a non-abrasive
sponge;
clean the channel connecting the bowl and the tap, using a cleaning brush,
as illustrated in the figure;
refit the tap;
pour a little water inside the pan;
use the tap to drain out all of the water from the pan so as to eliminate any
small product residues inside the dispensing channel.
7.5 Cleaning the pan

User Manual
www.AvantcoEquipment.com 11
Cleaning and Maintenance
7.6 Disassembling the tap

User Manual
12 www.AvantcoEquipment.com
Cleaning and Maintenance
7.7 Assembling the bowl

User Manual
www.AvantcoEquipment.com 13
Cleaning and Maintenance
Fig. 37 shows a bpwl which is not correctly assembled; here the bowl does NOT insert the mixer into its seating following the steps descrlbed in paragr
7.3 in reverse order.
perfectly adhere to the machine edge.
Fix the bowl to the machine body using the relevant hook-on handles, as
To reassemble the tap, carry out in reverse all of the disassembly steps
trated previously (Fig. 32 to Fig. 27).
illustrated in the figure;
insert the mixer auger into its seating;
aph
7.8.2. Assembling the tap
illus-
To fi t the lever (F) push the rod (D) from the inside until the guides protrude;
7.8 Assembling the tap

User Manual
14 www.AvantcoEquipment.com
Cleaning and Maintenance
To fl t the tap corre ctly b ack in place proceed as foll ows;
Note: t he tray needs to be emptied out a nd cleaned every time
t hat t he re d f lo at fitted t o t he gr i d rise s; t hi s is t o st o p llq ui d
from leaking out.
lift the tray with grid and pull it outwar ds t o r e m ove it fro m lts seating;
wash the tr ay and grid separately wi th lukewar m wat er.;
dry all of the com pon ent s;
reposition the grid on top of the tray;
fit the tra y back in place an d press down to secure i t to the mach ine.
Carry out the following steps:
prepare the sanitising solution
(see paragraph 7.7);
fill the b owl with the s anitising solution;
leave the solution to act for about 30 minutes;
empty out the sanitising solution from the bowl;
then rinse out the bowl and inside surfaces thoroughly to elim inate all resi-
dues of sanitizing solution.
Rem o ve the b o wl lid from the ma c hine;
Warnin g! th e ther m os t at m u st be s et t o - OF F-.
in sanitising product.
rinse thoroughly using clean water.
clean the surface using a damp cloth and/or a non-abrasive spon g e soaked
T he drip tray shou l d b e em pt i e d and cleane d dally.
hold d own the butt on , m akin g sure that the rod is c omp letely e xtra ct ed;
introduce t he tap into t he seat provided and push until the pushbutt on re-
turns to its initial p osition.
7.8.3 Fitting the tap
7.10. Cleaning t he drip tray
7.9. Internal sanitization
7.11. Cleaning the b owl lid
7.8.1 Fitting the tap
7.9 Internal sanitization
7.10 Cleanining the drip tray
7.11 Cleaning the bowl lid

User Manual
www.AvantcoEquipment.com 15
Cleaning and Maintenance
7.12 Emptying the boiler
7.13 Cleaning and de-scaling the boiler tank

User Manual
16 www.AvantcoEquipment.com
Cleaning and Maintenance
All
Fig. 48
Fig. 49
7.14 Resetting the temperature sensor

User Manual
www.AvantcoEquipment.com 17
Wiring diagram
115 Volts

User Manual
18 www.AvantcoEquipment.com
Troubleshooting
7.Trouble Possible Causes Solution
six months time of purchase
This warranty does not apply to, and Avantco is not responsible for any warranty claims on products sold or used
outside of the contiguous United States.
This manual suits for next models
1
Table of contents
Other Avantco Dispenser manuals
Popular Dispenser manuals by other brands

Better Packages
Better Packages BP555e Service manual

Team Kalorik
Team Kalorik TKG GW 900 manual

Bobrick
Bobrick SureFlo B-8281 troubleshooting guide

Vaportek
Vaportek VAPORTRONIC 2.0 Series Use and Operating Instructions

Schülke
Schülke touchless D1 installation guide

Mondial Designs Limited
Mondial Designs Limited BEBEDORO Instruction and Technical Service Manual

Cornelius
Cornelius SPIRE 4.2 Manual Installation

Cornelius
Cornelius NITROPRO MINI Quick reference guide

CLINIMAX
CLINIMAX Simex ELEGANCE 04035 manual

Purell
Purell Touch Free Dispensing System instructions

HOSPECO
HOSPECO HEALTH GARDS HG-3L instructions

Andermatt BioVet
Andermatt BioVet Liebig Instructions of use