manuals.online logo
Brands
  1. Home
  2. •
  3. Brands
  4. •
  5. Avaya
  6. •
  7. Gateway
  8. •
  9. Avaya W310 User manual

Avaya W310 User manual

W310/W110 Quick Setup Guide
Using the W310 Device Manager
P/N: 21-300179 Release 2.0 October 2004© 2004 Avaya, Inc.
1WARNING: Only trained and qualified personnel should be allowed to install
or replace this equipment.
Unpack the hardware and make your connections.
a. Unpack the W310 from its shipping box.
b. Check the W310 package contents for the following:
— one W310
—oneACpowercord
— one RJ45 to DB9 serial adapter cable
— one CD that contains the user documentation
— this setup guide
Also, you should have at least one W110 Light Access Point in a
separate package. The W110 includes a Quick Start Guide and a CD.
c. Attach the AC power cord to the Power jack on the W310 rear panel.
All front panel LEDs will illuminate briefly. Once the boot up and
self-tests are complete, the LED labeled PWR will turn solid green.
d. Connect the Ethernet cables from your W310 port(s) to the W110’s
LAN port or a wired Ethernet network station. Start with port 1 on the
W310 to make your W110 connections. Once you make the connec-
tion(s), the associated Link LED will light. The Link LEDs are
located underneath the ports.
Port 1 is located in the bottom left hand corner.
The associated LINK LEDs are located directly
below each port.
Connect the Console cable
to the W310 Console port.
(Step 2)
Connect the Ethernet
cable from the W310
port to the W110 LAN
port
1
(cont)
e. Make sure the W310 and W110 are communicating properly. To verify
communication, do the following:
— For the W310 - The PoE (Power over Ethernet) LED for the port
that is connected to the W110 will turn solid green indicating
power is enabled and it is delivering power. If no W110 is
connected (or detected), the PoE LED will flash.
— For the W110 - The Ethernet LED will either be solid yellow or
green indicating that there is a 10BaseT or 100BaseT connection.
f. Now you are ready to assign a new IP address to the W310.
2Assign a network IP address to the W310.
a. Connect the Console cable to the port labeled Console on the W310
front panel (see above).
b. Connect the other end of the cable to a PC or terminal.
c. Start your terminal communication program (such as Microsoft®Win-
dows’ HyperTerminal).
d. Configure the serial port settings for using a terminal or terminal emu-
lator as follows:
— Baud Rate - 9600 bps
— Data Bits - 8 bits
— Parity - None
— Stop Bit - 1
— Flow Control - None
— Terminal Emulation - VT-100
Example: In HyperTerminal, you are prompted for the COM Port
configuration settings when you first create the connection to the
W310.
e. When you are prompted for a Login Name, enter the default login:
root.
f. When you are promoted for a password, enter the default user level
password: root. You are now in Supervisor Level.
g. At the CLI (W310-1>#) prompt, type:
set interface inband <vlan> <ip_address> <netmask>
— Replace <vlan>,<ip_address> and <netmask>
with the VLAN set to 1, the IP address and subnet mask of the
switch.
3Use the W310 Device Manager to assign SSIDs (wireless network name) to
the W110s.
IMPORTANT: The W310 Device Manager web interface will prompt you to
install the Java Runtime Environment version 1.4.2 if you do
not have it installed, or, if you have an earlier version. Click
Yes to install or you will not be able to access the web
interface.
a. Open your browser.
b. Enter the IP address you assigned in Step 2 to the W310. Use the for-
mat http://aaa.bbb.ccc.ddd where aaa.bbb.ccc.ddd
is the IP address of the switch.
c. Enter the default User Name and Password: root
d. After the W310 Manager loads, click Configure and then SSID Table
from the menu bar. The SSID Table appears.
e. To create a new SSID, click the Insert button on the bottom of the
page. A new row displays underneath the "default." You can create up
to 15 additional SSIDs.
3
(cont.)
f. Click the checkbox for each W110 you want to associate with the
SSID. The W110s are numbered to match the ports on the W310. By
default no ports are selected.
NOTE:
You can edit the "default" SSID row if necessary by selecting any of the
parameters. However, you cannot delete the default SSID.
g. Now you are ready to set the security for the wireless network.
4Set the wireless network security.
a. On the SSID Table dialog (Step 3), click the Security Mode
column. The default Security Mode is none, but it is recommended
that you set a security type for the wireless network to avoid improper
access.
b. From the drop-down menu, select the type of wireless network secu-
rity you want to use.
— Select WEP. WEP or Wired Equivalent Privacy (WEP)
encrypts the data portion of each packet exchanged on an
802.11 network using an encryption key.
Set the WEP key strings. WEP Key 1 is the default key if you
are using the same WEP key for all SSIDs. Click on the text
box for the key and type in an ASCII character string. Key 1 is
also the default Effective WEP Key.
If you need to enter a WEP key for additional SSIDs, you must
always use WEP Key 1 for each SSID. After you enter the key,
select Key 1 from the Effective WEP Key drop-down menu.
CAUTION: For WEP, make sure you enter the exact number of ASCII
characters required. If you do not enter the correct number, the
key will go back to the default.
Depending on the encryption type, you must use the exact
number of ASCII characters, as listed below.
64-bit encryption requires a five (5) character string.
128-bit encryption requires a 13 character string.
152-bit encryption requires a 16 character string.
4
(cont.)
— Select WPA. WiFi Protected Access (WPA) is a replacement
for WEP that provides the following:
Improved packet encryption using the Temporal Key
Integrity Protocol (TKIP) and the Message Integrity
Check (MIC).
Per user, per session dynamic encryption keys.
Dynamic key redistribution.
Client/server mutual authentication.
IMPORTANT: WPA uses 801.1x authentication to communicate with a
RADIUS server and to authenticate clients. You must setup
the RADIUS server in order to use this security mode.
Click on the Rekeying Interval field and type in a number in
seconds in this field. This interval determines how often a
client’s encryption key is changed. Use a value from 60 to
65535 seconds.
IMPORTANT: Steps cthrough eare optional steps.
c. Optionally, select whether you want to enable Broadcast. Use the
drop-down menu to change the selection. When enabled, the SSID is
included in the beacon broadcast. The default is disabled.
d. Optionally, select whether you want to enable Closed System. Use the
drop-down menu to change the selection. When enabled, clients must
have the same SSID as the Access Point in order to communicate. The
default is disabled.
For example, a client set to “Any” will not be able to associate with an
Access Point if it has an SSID named “Engineering”.
e. Optionally, select the VLAN for the SSID. By default, the VLAN is
set to “by the user group table”. Click on the field to enter a value
between 1 and 3072.
f. Click Apply. Now you are ready to configure the mobility parameters
for the SSID.
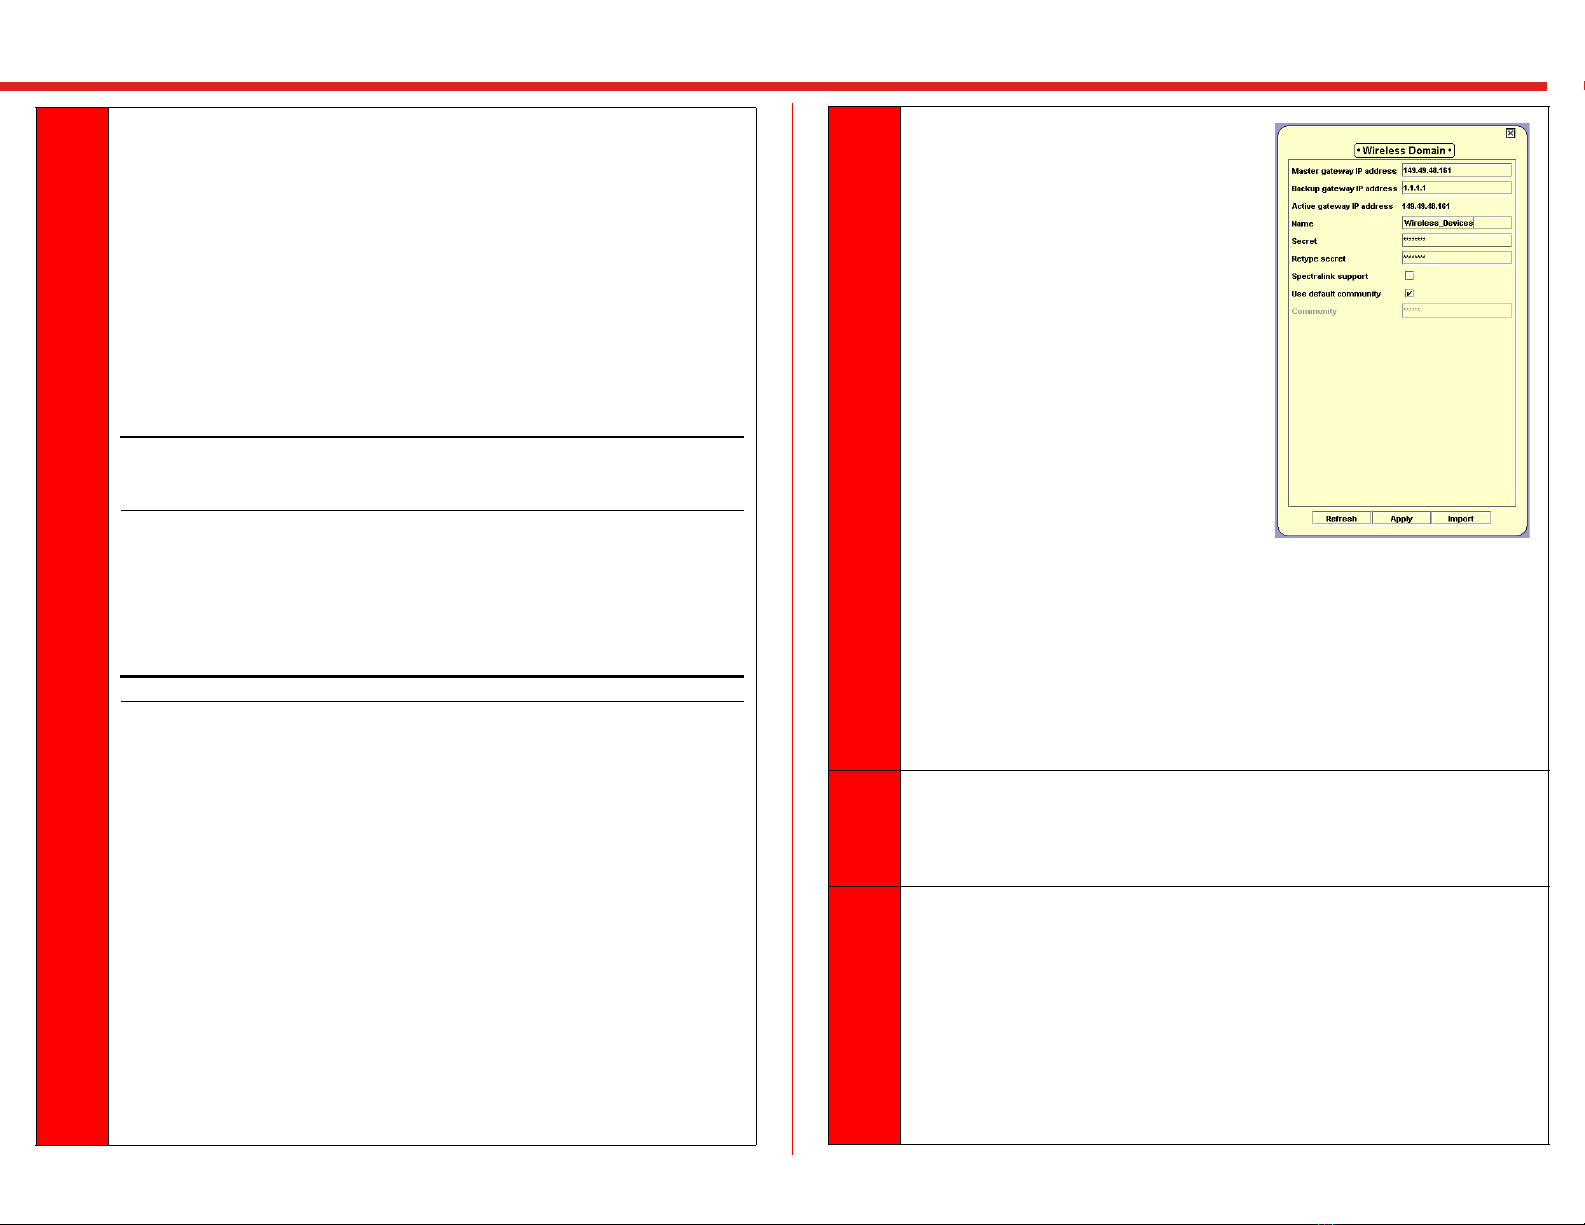
5Configure the mobility master gateway
(W310) parameters. The master gateway
contains the mobility gateway database.
a. From the W310 Manager menu
bar, click Configure and then
select Wireless Domain
Configuration. The Wireless
Domain dialog appears.
b. Enter the Master gateway IP
address (W310). You need to
make this entry even if the W310
you are installing is the only one
on the network.
c. Enter a Backup gateway IP
address, if you have more than
one W310.
d. Click Apply.
e. For the parameters you have set - SSID Table and Wireless Domain
(Steps 3, 4 and 5), you can import this configuration to other W310s
by clicking the Import button on each of the W310 Device Manager
dialogs. The configuration is imported from the active wireless
domain gateway.
6Copy the running configuration to the startup configuration. From the menu
bar, select Actions and then Commit. This saves and re-executes the settings
specified in this procedure.
7For more information on advanced configuration features, it is recommended
that you reference the W310 Installation and Configuration Guide for detailed
descriptions and procedures.
Set policy.
Make changes to the LAP settings.
Configure the RADIUS server settings.
Change the security or authentication method of the wireless network.
Configure User Groups and Access Point Groups.

Other manuals for W310

2

This manual suits for next models

1

Other Avaya Gateway manuals

Avaya Advanced Gateway 2330 User manual

Avaya

Avaya Advanced Gateway 2330 User manual

Avaya Media Gateway G250 User manual

Avaya

Avaya Media Gateway G250 User manual

Avaya G860 Wiring diagram

Avaya

Avaya G860 Wiring diagram

Avaya G650 Instruction Manual

Avaya

Avaya G650 Instruction Manual

Avaya G700 User manual

Avaya

Avaya G700 User manual

Avaya G430 User manual

Avaya

Avaya G430 User manual

Avaya G450 Manager User manual

Avaya

Avaya G450 Manager User manual

Avaya INDeX Media Gateway User manual

Avaya

Avaya INDeX Media Gateway User manual

Avaya G450 Manager Instruction sheet

Avaya

Avaya G450 Manager Instruction sheet

Avaya S8500 Series User manual

Avaya

Avaya S8500 Series User manual

Avaya Media Gateway G350 User manual

Avaya

Avaya Media Gateway G350 User manual

Avaya IG550 Instruction Manual

Avaya

Avaya IG550 Instruction Manual

Avaya G700 User manual

Avaya

Avaya G700 User manual

Avaya G450 Manager User manual

Avaya

Avaya G450 Manager User manual

Avaya Media Gateway G250 Instruction Manual

Avaya

Avaya Media Gateway G250 Instruction Manual

Avaya one-X Quick Edition G11 Global Analog... User manual

Avaya

Avaya one-X Quick Edition G11 Global Analog... User manual

Avaya IG550 Instruction Manual

Avaya

Avaya IG550 Instruction Manual

Avaya SG5 Manual

Avaya

Avaya SG5 Manual

Avaya RAD IPmux-14 TDMoIP Supplement

Avaya

Avaya RAD IPmux-14 TDMoIP Supplement

Avaya Media Gateway G250 Installation guide

Avaya

Avaya Media Gateway G250 Installation guide

Avaya G450 Manager Installation guide

Avaya

Avaya G450 Manager Installation guide

Avaya one-X Quick Edition G11 Global Analog... User manual

Avaya

Avaya one-X Quick Edition G11 Global Analog... User manual

Avaya G700 Instruction Manual

Avaya

Avaya G700 Instruction Manual

Avaya G450 Manager User manual

Avaya

Avaya G450 Manager User manual

Popular Gateway manuals by other brands

Dynamix DW IAD - 162 user manual

Dynamix

Dynamix DW IAD - 162 user manual

Enterasys SNS-TAG-HPA installation guide

Enterasys

Enterasys SNS-TAG-HPA installation guide

Kiwi TLG3901BV2 user manual

Kiwi

Kiwi TLG3901BV2 user manual

iLumi MeshTek BLE-Ethernet-WiFi-USB Gateway user manual

iLumi

iLumi MeshTek BLE-Ethernet-WiFi-USB Gateway user manual

SharkRF openSPOT2 user manual

SharkRF

SharkRF openSPOT2 user manual

Advantech EKI-1242NR Series user manual

Advantech

Advantech EKI-1242NR Series user manual

Cisco DPC2425 user guide

Cisco

Cisco DPC2425 user guide

IXXAT CME/PN Hardware manual

IXXAT

IXXAT CME/PN Hardware manual

ICP DAS USA GT-541 user manual

ICP DAS USA

ICP DAS USA GT-541 user manual

Miboxer WL-433 instructions

Miboxer

Miboxer WL-433 instructions

GRASS VALLEY IPG-4901 Guide to installation and operation

GRASS VALLEY

GRASS VALLEY IPG-4901 Guide to installation and operation

HMS Networks Intesis INMBSMEB 0100 Series Installation sheet

HMS Networks

HMS Networks Intesis INMBSMEB 0100 Series Installation sheet

Zennio KLIC-PA user manual

Zennio

Zennio KLIC-PA user manual

AudioCodes Mediant 800 MSBG installation manual

AudioCodes

AudioCodes Mediant 800 MSBG installation manual

Webdyn home installation guide

Webdyn

Webdyn home installation guide

Patton electronics SmartNode 4554 Getting started guide

Patton electronics

Patton electronics SmartNode 4554 Getting started guide

CTS VRG5-31412 Series user manual

CTS

CTS VRG5-31412 Series user manual

Moxa Technologies MGate 5121 Series user manual

Moxa Technologies

Moxa Technologies MGate 5121 Series user manual

manuals.online logo
manuals.online logoBrands
  • About & Mission
  • Contact us
  • Privacy Policy
  • Terms and Conditions

Copyright 2025 Manuals.Online. All Rights Reserved.