Avermedia AverComm H300 User manual

ENGLISH
User Manual

ENGLISH
T
Ta
ab
bl
le
e
o
of
f
C
Co
on
nt
te
en
nt
ts
s
Introduction
........................................................................................................................................... 1
Package Contents
.................................................................................................................................. 1
Get Familiar with the AVerComm H300/H100
.......................................................................................... 2
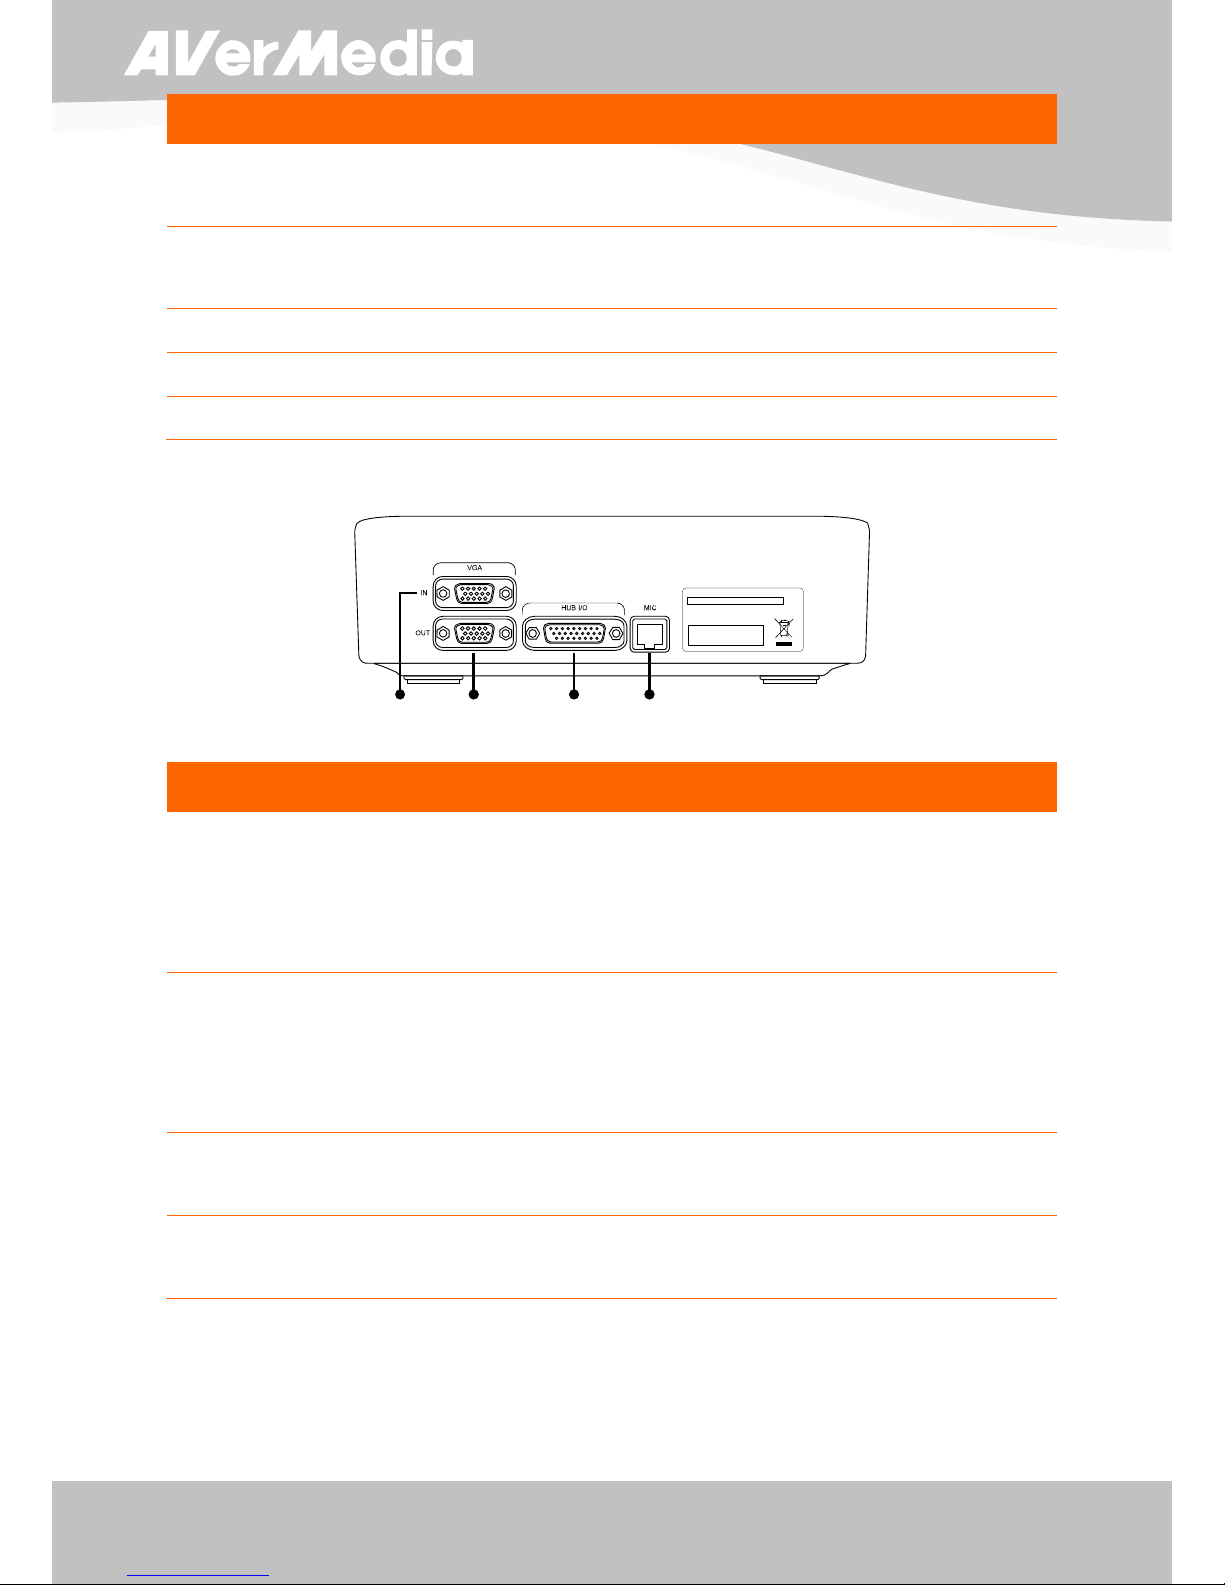
Main System .................................................................................................................................... 2
Table Hub......................................................................................................................................... 3
MIC................................................................................................................................................... 4
Camera ............................................................................................................................................ 4
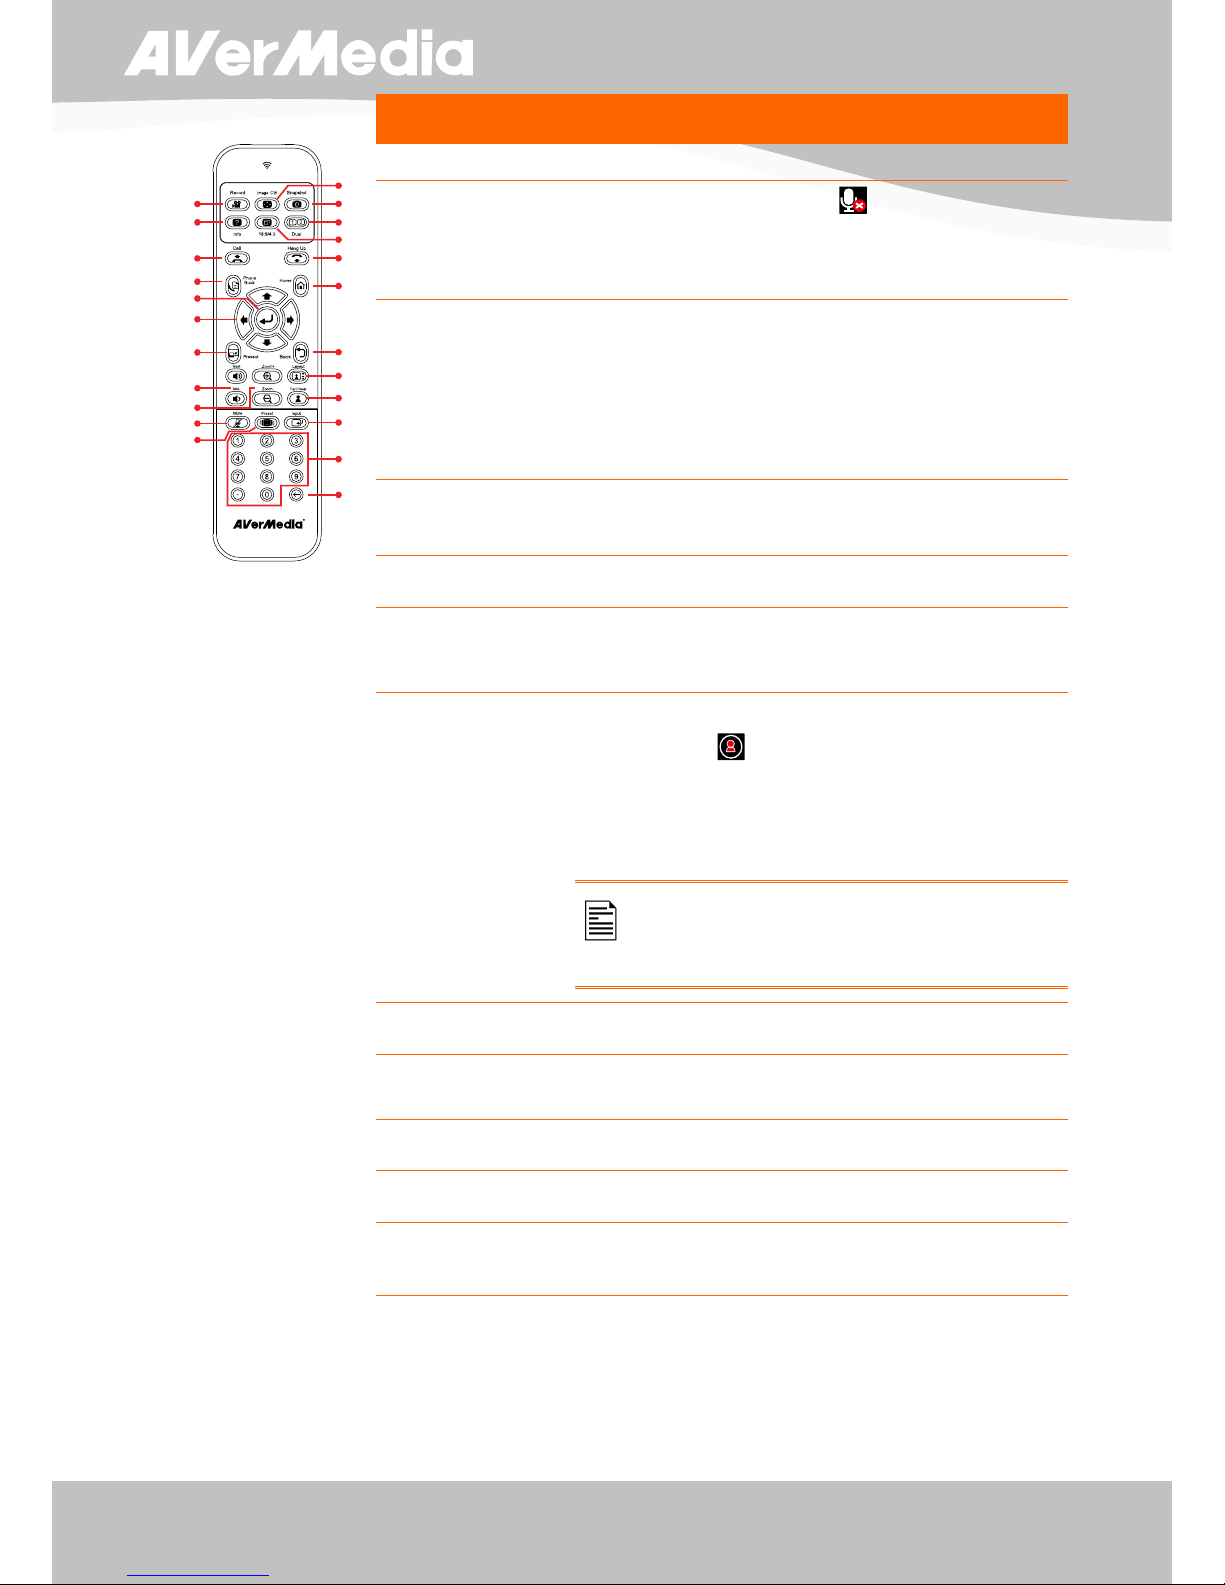
Remote Control................................................................................................................................ 5
Table Hub Control Panel.................................................................................................................. 7
Making the Connections
......................................................................................................................... 8
Connecting a VGA display device output......................................................................................... 8
Connecting a TV display output....................................................................................................... 9
Connecting the camera to main system .......................................................................................... 9
Connecting the Table Hub and Main System................................................................................. 10
Connecting the MIC....................................................................................................................... 10
Connecting the LAN........................................................................................................................11
Connecting a Computer..................................................................................................................11
Connecting the Power.....................................................................................................................11
Connecting a DVD player or Camcorder....................................................................................... 12
Setting Up AVerComm H300/H100
........................................................................................................ 12
Camera .......................................................................................................................................... 12
Infrared Sensor .............................................................................................................................. 13
Running the AVerComm H300/H100
..................................................................................................... 13
Navigating the Menus and Settings............................................................................................... 13
Using the On-screen keyboard and numeric pad.......................................................................... 13
Home Menu Screen
.............................................................................................................................. 14
Cam Ctrl......................................................................................................................................... 14
To Adjust the AVerComm H300/H100 Camera......................................................................... 14
Dial................................................................................................................................................. 15
To Make a Call Using Dial......................................................................................................... 15
Phonebook..................................................................................................................................... 15
To Add Group............................................................................................................................ 16
To Edit Group............................................................................................................................ 17
To Delete Group........................................................................................................................ 18
To Add Phonebook Entries ....................................................................................................... 20
To Edit Phonebook Entries ....................................................................................................... 22
To Delete Phonebook Entries ................................................................................................... 23
Call History..................................................................................................................................... 24
To Check the IN/OUT Calls....................................................................................................... 24
To Make a Call in Call History................................................................................................... 25
Setting............................................................................................................................................ 26

ENGLISH
Administrator.................................................................................................................................. 26
Enable/ Disable Administrator Setting ...................................................................................... 26
Quick Start ..................................................................................................................................... 28
To Setup the AVerComm H300/H100 ....................................................................................... 28
To Setup the Language............................................................................................................. 29
To Setup the System Name...................................................................................................... 29
LAN configuration ..................................................................................................................... 30
To Setup the Network ............................................................................................................... 31
To Setup the Date and Time..................................................................................................... 31
General Setting.............................................................................................................................. 32
To Enable/Disable Far Control of Near Camera:...................................................................... 32
To Set the Monitor Aspect Ratio ............................................................................................... 33
To Set the Screen Saver Timer................................................................................................. 34
To Set the Auto Turn Off Timer ................................................................................................. 34
To Set the Auto Answer Setting ................................................................................................ 35
Network.......................................................................................................................................... 36
To Set the Gatekeeper........................................................................................................... 36
To Set the Firewall ................................................................................................................. 37
Video /Audio................................................................................................................................... 38
To Enable/Disable keypad tone........................................................................................... 39
To Adjust the Mic Gain Level ............................................................................................... 39
To Specify the Video/Audio Codec...................................................................................... 40
To Set the Camera White Balance Setting ........................................................................ 41
To Set the Camera Exposure Setting ................................................................................. 41
Reset System................................................................................................................................. 42
To Reset the System ............................................................................................................. 42
Setting the Camera Preset Point ................................................................................................... 43
To Set the Camera Preset Point:.............................................................................................. 43
Testing the Network ....................................................................................................................... 44
To Test the Network: ................................................................................................................. 44
To Test the Video and Audio: .................................................................................................... 45
Managing the AVeComm System Using the WebTool................................................................... 45
To Access AVerComm H300/H100 using the Internet Browser:.................................................... 46
To Add, Edit and Delete Phonebook in WebTool:.......................................................................... 46
To Download Phonebook Entries in WebTool:............................................................................... 47
To Edit and Save the Downloaded Phonebook Entries :............................................................... 48
To Upload Phonebook Entries in WebTool: ................................................................................... 49
To Download Call History in WebTool:........................................................................................... 50
To Add Phonebook Entry from the Call History list: ....................................................................... 51
To Update the System:................................................................................................................... 51
To Back up the System Setting:..................................................................................................... 52
To Restore the System Setting: ..................................................................................................... 53
Using the AVerComm H300/H100 .................................................................................................... 54

ENGLISH
Making a call.................................................................................................................................. 54
To Call Using the Phonebook: .................................................................................................. 54
To Call Using Dial: .................................................................................................................... 55
To Call Using Call History: ........................................................................................................ 56
To End MCU Call: ..................................................................................................................... 57
Recording your Meeting................................................................................................................. 57
To Playback the Meeting Recording on AVerComm H300/H100.............................................. 58
To Playback the Meeting Recording Using AVerComm VCplayer............................................ 59
Troubleshooting................................................................................................................................ 60
Audio.............................................................................................................................................. 60
Video / Display............................................................................................................................... 60
Network.......................................................................................................................................... 61
General .......................................................................................................................................... 62
Limited Warranty............................................................................................................................... 62
Federal Communications Commission Statement (Class A) ....................................................... 63
Class A ITE: ....................................................................................................................................... 64
CE Class A (EMC).............................................................................................................................. 64
DISCLAIMER...................................................................................................................................... 64
TRADEMARKS................................................................................................................................... 64
COPYRIGHT....................................................................................................................................... 64
Remote Control Battery Safety Information................................................................................... 64

1
ENGLISH
I
In
nt
tr
ro
od
du
uc
ct
ti
io
on
n
Thank you for choosing AVerMedia AVerComm H300/H100. AVerComm H300/H100 is a video
conferencing device which allows you to see and communicate with your client. With H300, you
can create a 4-party video conference call with your board members from different countries or
locations. This saves you time and travel expenses.
AVerComm H300/H100 uses 5-megapixel camera sensor and gives you high definition 720p
video quality. AVerComm H300/H100 Table Hub comes with a built-in speaker. You can hook up
the 2nd display device in the Table Hub like an LCD projector for a bigger screen or with a dual
screen setup which allows you to have your presentation and video conference shown
simultaneously. By using a USB flash drive, you can record the meeting and review it anytime
on AVerComm H300/H100 or on PC with the bundled AVerComm VC player and share it with
your meeting attendees.
P
Pa
ac
ck
ka
ag
ge
e
C
Co
on
nt
te
en
nt
ts
s
Make sure the following items are included in the package.
AVerMedia® AVerComm
H300/H100 (main system,
camera, table hub and mic)
Remote Control
L-Bracket
(camera stand)
Manual CD
2 AAA Batteries
Phone to RCA Cable
Power Adapter
Power Cord
* The power cord will vary
depending on the standard
power outlet of the country
where it is sold.
S-Video Cable
RCA Cable
VGA Cable
6P4C Cable
26Pin-DSub Cable
(female/female)
26Pin-DSub Cable
(male/male)
RJ-45 Cable

2
ENGLISH
G
Ge
et
t
F
Fa
am
mi
il
li
ia
ar
r
w
wi
it
th
h
t
th
he
e
A
AV
Ve
er
rC
Co
om
mm
m
H
H3
30
00
0/
/H
H1
10
00
0
Main System
(1) (2) (3)
Main system front panel (fig. 1.1)
Name
Function
(1) USB Flash Drive port
Insert a USB flash drive for recording the meeting.
(2) Network Status
Check the network connection.
(3) Power
Turn on/off the main system.
(1) (2) (3) (4) (5) (6) (7) (8) (9) (10) (11) (12)
Main system back panel (fig. 1.2)
Name
Function
(1) LAN
Use an RJ-45 Ethernet cable and connect it to RJ-45 Ethernet
port. Make sure to connect AVerComm H300/H100 to an IP-
based network.
(2) VIDEO OUT
Output the video signal from the main system on an TV thru RCA
video connection.
(3) S-VIDEO OUT
Output the video signal from the main system on an TV thru S-
Video connection.
(4) AUDIO OUT
Outputs the audio signal from the main system to a TV or
speaker system thru RCAleft and right audio connections.
(5) HUB I/O
Send and receive signal between the main system and table
hub.
(6) VGA OUT
Output the video signal from the main system on a flat panel
monitor/LCD TV or LCD/DLP projector thru RGB connection.
In dual monitor mode, this will be the main screen.
(7) VIDEO IN
Receive the video signal from a media device thru RCA video
connection.

3
ENGLISH
Name
Function
(8) S-VIDEO IN
Receive the video signal from a media device thru S-Video
connection.
(9) AUDIO IN
Receive the audio signal from the audio device thru RCA left and
right audio connection.
(10) CAMERA
Receive the image from the camera to the main system.
(11) NTSC/PAL
Set the correct TV display output system.
(12) DC 19V
Connect the power adapter into this port.
Table Hub
A Ve rM e d ia IN FO R M A TIO N, In c .
A tte n tio n : D O NO T OPEN THE C ASE
Warrantyvoidif thecasehasbeenopened.
AVerCommHSeries(Hub)
ModelNo.: V2D1
(1) (2) (3) (4)
Table Hub back panel (fig. 1.2)
Name
Function
(1) VGA IN
Input the signal from a computer or other sources. Connect this
port to the VGAoutput port of a computer. Press PRESENT on
the remote and select VGA IN to share and display the computer
image with the video conferencing camera image.
(2) VGA OUT
Output the video signal from the main system on a flat panel
monitor or LCD/DLP projector thru VGA connection. In dual
monitor mode, this port will display the local screen or present
screen when the content is being shared.
(3) HUB I/O
Send and receive signal between the main system and Table
Hub.
(4) MIC port
Receive the audio signal from the MIC to main system. Use the
6P4C cable to connect the mic and Table Hub.

4
ENGLISH
MIC
(2)
(1)
(fig. 1.3)
Name
Function
(1) Mute
Turn on/off the mic.
(2) MIC port
Use the 6P4C cable and connect the other end to the
Table Hub MIC IN port.
Camera
(1) (2)
(fig. 1.4)
Name
Function
(1) IR Sensor
Aim the remote control here to operate the unit.
(2) CAMERA
Send the signal from the camera to the main system.

5
ENGLISH
Remote Control
The remote control requires two (2) “AAA” size batteries (supplied), make sure batteries are
installed properly before using. Aim the remote control to the AVerComm H300/H100 camera
infrared sensor to operate the unit.
* Available in AVerComm H300 model only.
Name
Function
(4)
(8)
(3)
(5)
(23)
(22)
(12)
(10)
(17)
(16)
(2)
(1) (18)
(19)
(20)
(14)
(6)
(7)
(9)
(15)
(13)
(11)
(21)
(fig. 1.5)
(1) Call
Start a call or add another party.
(2) Phone Book
Search contact to make a call.
Enter to add, edit, delete or create group
contact entry.
(3) Enter
Make a selection in OSD menus or on-screen
keyboard.
Accept incoming call.
Display the site name and icon during the
meeting.
(4) ▲,▼,◄, &
►
Use these buttons to navigate through the
selections in OSD menus or on-screen
keyboard.
Pan and tilt the camera to adjust the visual
angle of the camera.
Move around within the zoomed in camera
image or the captured image.
(5) Present
Share either the video/image from the VGA IN
port or the captured image.
This present icon will appear on the screen
to indicate sharing the present image. The
present icon will disappear in 5 sec.
(6) Vol +/-
Increase/decrease the speaker volume.
(7) Zoom +/-
Zoom in/out the camera image or the captured

6
ENGLISH
Name
Function
(4)
(8)
(3)
(5)
(23)
(22)
(12)
(10)
(17)
(16)
(2)
(1) (18)
(19)
(20)
(14)
(6)
(7)
(9)
(15)
(13)
(11)
(21)
image.
(8) Mute
Turn on/off the MIC. This mute icon will
appear when the mic is turned off. The mute
icon will become translucent in 5 sec.
(9) Preset
Press hold for 3 sec to set the position of the
camera preset point from the selected
number. The preset point can be set from 0-9.
Press to move the camera target to the
selected preset point number.
(10) Backspace
Move back one space and delete one
character at a time.
(11) Numeric Pad
Use to enter numeric number.
(12) Input
Switch the input source between AVerComm
H300/H100 camera, S-Video, or Video.
(13) Far/Near
Select to control either near site or far site
camera. The cam ctrl icon will appear on
the screen to show which camera site you are
going to control. The cam ctrl icon will
disappear in 5 sec.
The camera from the far site can only
be operated when the enable far site to
control the camera is permitted.
(14) Layout
Change to different split screen mode.
(15) Back
Return to previous OSD menu selection or exit
OSD mode.
(16) Home
Call up the main screen.
(17) Hang Up
End the call.
(18) 16:9/4:3
Toggle between 16:9 or 4:3 to match the
monitor aspect ratio.

7
ENGLISH
Name
Function
(4)
(8)
(3)
(5)
(23)
(22)
(12)
(10)
(17)
(16)
(2)
(1) (18)
(19)
(20)
(14)
(6)
(7)
(9)
(15)
(13)
(11)
(21)
(19) Dual
Switch to Dual monitor mode. This split the
video conference screen and present screen.
The video conference screen will be displayed
on the monitor connected to the VGAOUT of
the main system and the present screen will be
displayed on the monitor connected to the VGA
OUT of the table hub.
(20) *Snapshot
Capture the image from the camera.
You can share the captured image using the
Present function. See (5) Present.
(21) *Image Ctrl
Zoom and pan, tilt the displayed captured
image in the shared screen.
(22) *Record
Start/Stop meeting recording. The recording
can only be saved in a USB storage drive.
The record icon will appear on the screen to
show which site is recording. The record icon
will become translucent in 5 sec.
(23) Info
Display the call statistics information.
Table Hub Control Panel
(4)
(2)
(1)
(3)
Table Hub control panel (fig. 1.6)
Name
Function
(1)QUICK PRESENTATION
Share the data from VGA IN.
(2)VOL +/-
Increase/decrease the speaker volume.
(3)LAYOUT
Change to different split screen mode.
(4)SPEAKER
Location of the speaker.

8
ENGLISH
M
Ma
ak
ki
in
ng
g
t
th
he
e
C
Co
on
nn
ne
ec
ct
ti
io
on
ns
s
Before making the connection, make sure the power of all devices are turned off. If you are not
sure on where to connect, simply follow the illustrated connections below and also refer to the
user manual of the device you are connecting the AVerComm H300/H100 with.
Make sure to connect all the connection before connecting the power.
C
Co
on
nn
ne
ec
ct
ti
in
ng
g
a
a
V
VG
GA
A
d
di
is
sp
pl
la
ay
y
d
de
ev
vi
ic
ce
e
o
ou
ut
tp
pu
ut
t
Locate the VGA input port of the graphics display device and connect it to VGA OUT 1 (main
system) or VGA OUT 2 (Table Hub) port of AVerComm H300/H100. Both VGA OUT 1 and 2 can
be used at the same time. For sharing data from VGA IN or the captured image in PRESENT
mode, the present screen will be displayed in VGA OUT 2 when you split the video conference
screen and present screen in DUAL mode.

9
ENGLISH
C
Co
on
nn
ne
ec
ct
ti
in
ng
g
a
a
T
TV
V
d
di
is
sp
pl
la
ay
y
o
ou
ut
tp
pu
ut
t
Locate the S-VIDEO, VIDEO or SCART RGB of the TV/LCD monitor and connect it to
AVerComm H300/H100.
Make sure NTSC/PAL switch setting is set to proper TV system.
C
Co
on
nn
ne
ec
ct
ti
in
ng
g
t
th
he
e
c
ca
am
me
er
ra
a
t
to
o
m
ma
ai
in
n
s
sy
ys
st
te
em
m
Locate the CAMERA port of the camera and connect it to the CAMERA port of the main system.

10
ENGLISH
C
Co
on
nn
ne
ec
ct
ti
in
ng
g
t
th
he
e
T
Ta
ab
bl
le
e
H
Hu
ub
b
a
an
nd
d
M
Ma
ai
in
n
S
Sy
ys
st
te
em
m
Locate the HUB I/O port of the table hub and connect it to HUB I/O port of the main system.
26 Pin D-Sub cable
(male/male)
A V e rM e d ia IN FO R M A TIO N, I n c .
Atte n tio n : D O NO T O PEN THE C ASE
Warrantyvoid ifthecasehasbeen opened.
AVerCommHSeries(Hub)
ModelNo.: V2D1
C
Co
on
nn
ne
ec
ct
ti
in
ng
g
t
th
he
e
M
MI
IC
C
Locate the MIC port of the table hub and use the supplied 6P4C cable then connect it to Mic
port.
Press the button on top of AVerComm H300/H100 Mic to turn on/off the mic.

11
ENGLISH
C
Co
on
nn
ne
ec
ct
ti
in
ng
g
t
th
he
e
L
LA
AN
N
Use an RJ-45 Ethernet cable and connect it from the LAN port of AVerComm H300/H100 to
RJ-45 wall jack or Ethernet hub.
Make sure to connect it to an IP-based network.
RJ-45 cable
RJ-45 wall jack
C
Co
on
nn
ne
ec
ct
ti
in
ng
g
a
a
C
Co
om
mp
pu
ut
te
er
r
Locate the VGA output port of the computer or laptop and connect it to VGA IN port of
AVerComm H300/H100 Table Hub.
To share the data, press PRESENT and select “VGA”.
C
Co
on
nn
ne
ec
ct
ti
in
ng
g
t
th
he
e
P
Po
ow
we
er
r
Connect the power adapter to a standard 100V~240V AC power outlet.
To prevent shock, make sure the connection ports in the main system are
connected before connecting the power and turning on the power.
Make sure to use the supplied 19V power adapter.
Power adapter
Power cord
Wall outlet

12
ENGLISH
C
Co
on
nn
ne
ec
ct
ti
in
ng
g
a
a
D
DV
VD
D
p
pl
la
ay
ye
er
r
o
or
r
C
Ca
am
mc
co
or
rd
de
er
r
Locate the S-VIDEO, VIDEO and AUDIO output port of the media player (i.e., DVD player) or
camcorder to share the video instead of the image from the camera and connect it to S-VIDEO
IN, or VIDEO IN and Audio IN port of AVerComm H300/H100.
Make sure NTSC/PAL switch setting is set to proper TV system.
For better video quality, we strongly suggest using S-Video Connection.
S-VIDEO
VIDEO
SCART
SCART
OUTPUT
DVD
AUDIO
AUDIO
Speaker
S-Video to SCART cable
(not supplied)
S-Video cable
RCA cable
RCA to SCART cable
(not supplied)
2 Phone to RCA Cable
Camcorder
S
Se
et
tt
ti
in
ng
g
U
Up
p
A
AV
Ve
er
rC
Co
om
mm
m
H
H3
30
00
0/
/H
H1
10
00
0
This section provides useful tips on how to setup the AVerComm H300/H100 to meet your
needs.
Camera
The AVerComm H300/H100 camera design can be panned (Ø +- 100 deg range), tilted (Ø +-
25 deg range) and zoomed (7X) with the use of the ▲, ▼, ◄ and ►, and Zoom +/- buttons on
the remote control.
Avoid manually adjusting the camera to prevent misalignment and damaging the
pan and tilt motor. Always use the remote control to pan and tilt the camera head.
100°
100° 0° 0°
25°
25°

13
ENGLISH
Infrared Sensor
Aim the remote control at the camera infrared sensor to operate the unit.
R
Ru
un
nn
ni
in
ng
g
t
th
he
e
A
AV
Ve
er
rC
Co
om
mm
m
H
H3
30
00
0/
/H
H1
10
00
0
Upon running the AVerComm H300/H100 for the first time or the system is being reset, the
system will instantly direct you to Quick Start menu. See Quick Start.
Navigating the Menus and Settings
1.In the Home menu, press ► and ◄on the remote to
toggle between the 5 selections.
2.Press to make a selection or the new setting to
take effect.
Using the On-screen keyboard and numeric pad
1. Use the ▲, ▼, ◄ and ► buttons to move the
selection and to make a selection.
2. Select and press to void the action and
return to the previous or Home menu.
3. Select and press to delete all the entered
characters or number.
4. Select and press to delete one character
or number.
5. Select and press to save and take effect
the action and return to previous menu.

14
ENGLISH
6. For numeric pad, you may use the number button on
the remote and press to save and take effect
the action and return to previous menu. Before
you press , make sure in the numeric pad the
is selected.
H
Ho
om
me
e
M
Me
en
nu
u
S
Sc
cr
re
ee
en
n
There are 5 selections on the Home menu screen: Cam Ctrl, Dial, Phonebook, Call History, and
Setting. Upon running the AVerComm H300/H100, the Home menu screen will be displayed.
Simply use the ►and ◄buttons to move between selections and press to make a selection.
You can easily place a call and select the site contact either in Phonebook, Call History, or Dial.
The administrator can also set security password to prevent changing the system setting and
WebTool access.
Cam Ctrl
The Cam Ctrl allows you to adjust the visual angle of the camera, before making a call.
To Adjust the AVerComm H300/H100 Camera
1. Select Cam Ctrl and press . The screen will
completely show the camera image and hide the
Home menu.
2. Using the remote control, press ◄and ► to pan, ▲
and ▼ to tilt, and Zoom+ and Zoom- to increase and
decrease the camera magnification.
3. Press to call up the Home menu again or to
return to previous.

15
ENGLISH
Dial
The Dial allows you to make a call by entering the IP address and set the call quality setting.
To Make a Call Using Dial
1. Select Dial and press . The on-screen numeric
pad will appear.
To set the Call Quality, use ▲, ▼, ◄ and ► buttons
to move the selection box to the Call Quality drop-
down list and press to select the value.
2. Use the numeric button on the remote to enter the IP
address and press to make a call.
Phonebook
The Phonebook allows you store, edit, delete contact information, group contact by category,
search contact and make a call. The group and site name of the contacts in the directory will be
displayed in alphabetical order. You may also use the WebTool to work on the phonebook
entries.

16
ENGLISH
To Add Group
1. Select Phonebook and press .
2. Select Group and press .
In grouping the contacts, you can easily
categorize the contacts into a specific group such
as client, vendor, company, branch, and etc.
3. Select New Group and press .
4. Use the ▲, ▼, ◄ and ► buttons to move the
selection in the on-screen keyboard and press to
make a selection. Select and press to
save the new group name.
Other manuals for AverComm H300
1
This manual suits for next models
1
Table of contents
Other Avermedia Conference System manuals
Popular Conference System manuals by other brands

KEHUA TECH
KEHUA TECH KM-ACU user manual

Nolan
Nolan X Series User instructions and safety

VITRA
VITRA Tens Flap Assembly instructions

Philips
Philips LFH9750 - Desktop 9750 Digital Transcriber user manual

Opus Technologies
Opus Technologies ST-DUO2 Installation and user manual

Polycom
Polycom ViewStation SP128 user guide