Jabbla Tellus 6 User manual

Tellus 6
Tellus i6
Operating instructions

© Copyright Jabbla
All rights reserved. No part of this publication may be reproduced, transmitted, transcribed, stored in an automated retrieval system or translated
into any language or computer language in any form or by any means, either electronically, mechanically, optically, chemically, manually or in any
other way without the prior written consent from Jabbla.
This document is a translation of the originalDutchuser manual.
Version 20210728

Tellus 6 / Tellus i6
Content
A Introduction 3
1 Introduction.............................................................................................................................. 3
2 Intended use.............................................................................................................................3
3 Prohibited use.......................................................................................................................... 3
4 Service life............................................................................................................................... 3
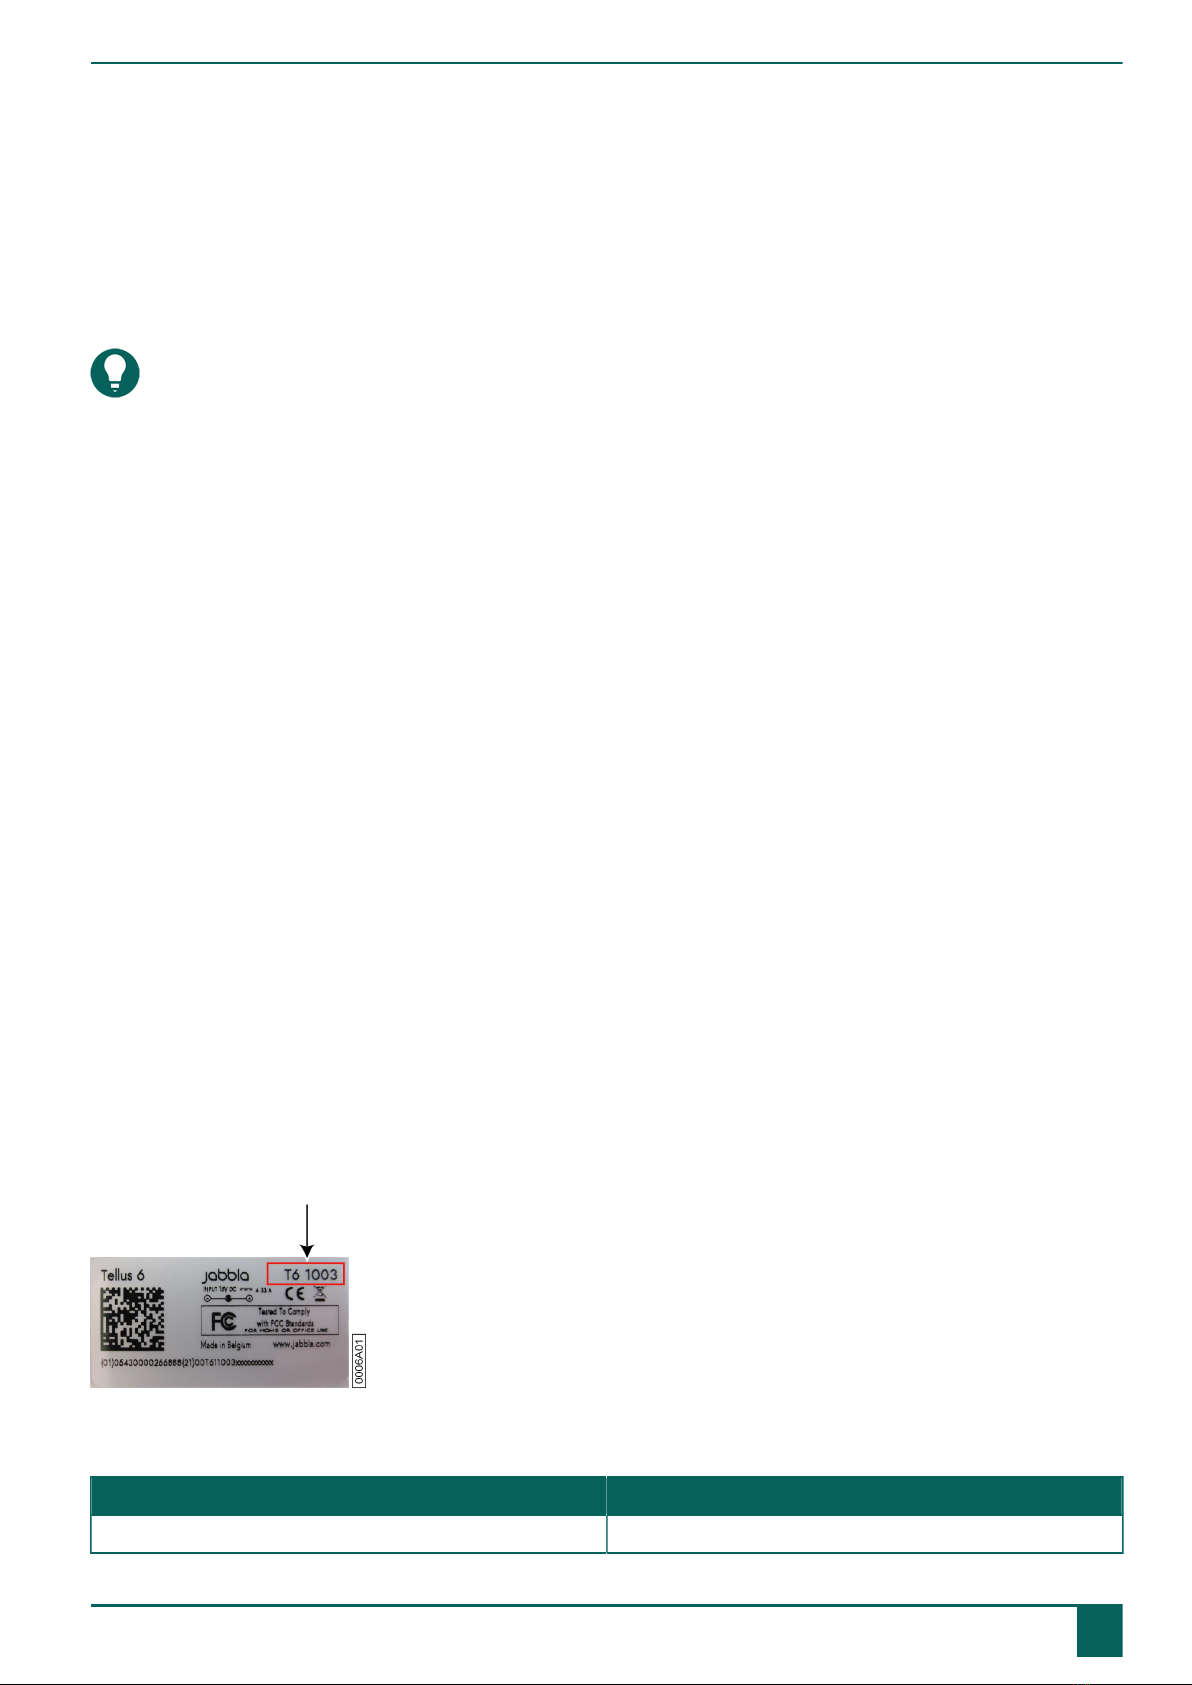
5 The type plate.......................................................................................................................... 3
6 Technical data...........................................................................................................................3
B Description and operation 5
1 Description and operation......................................................................................................... 5
2 What's in the box?................................................................................................................... 5
3 Options.................................................................................................................................... 5
4 First use................................................................................................................................... 5
C Getting started 7
1 Basic device functions............................................................................................................... 7
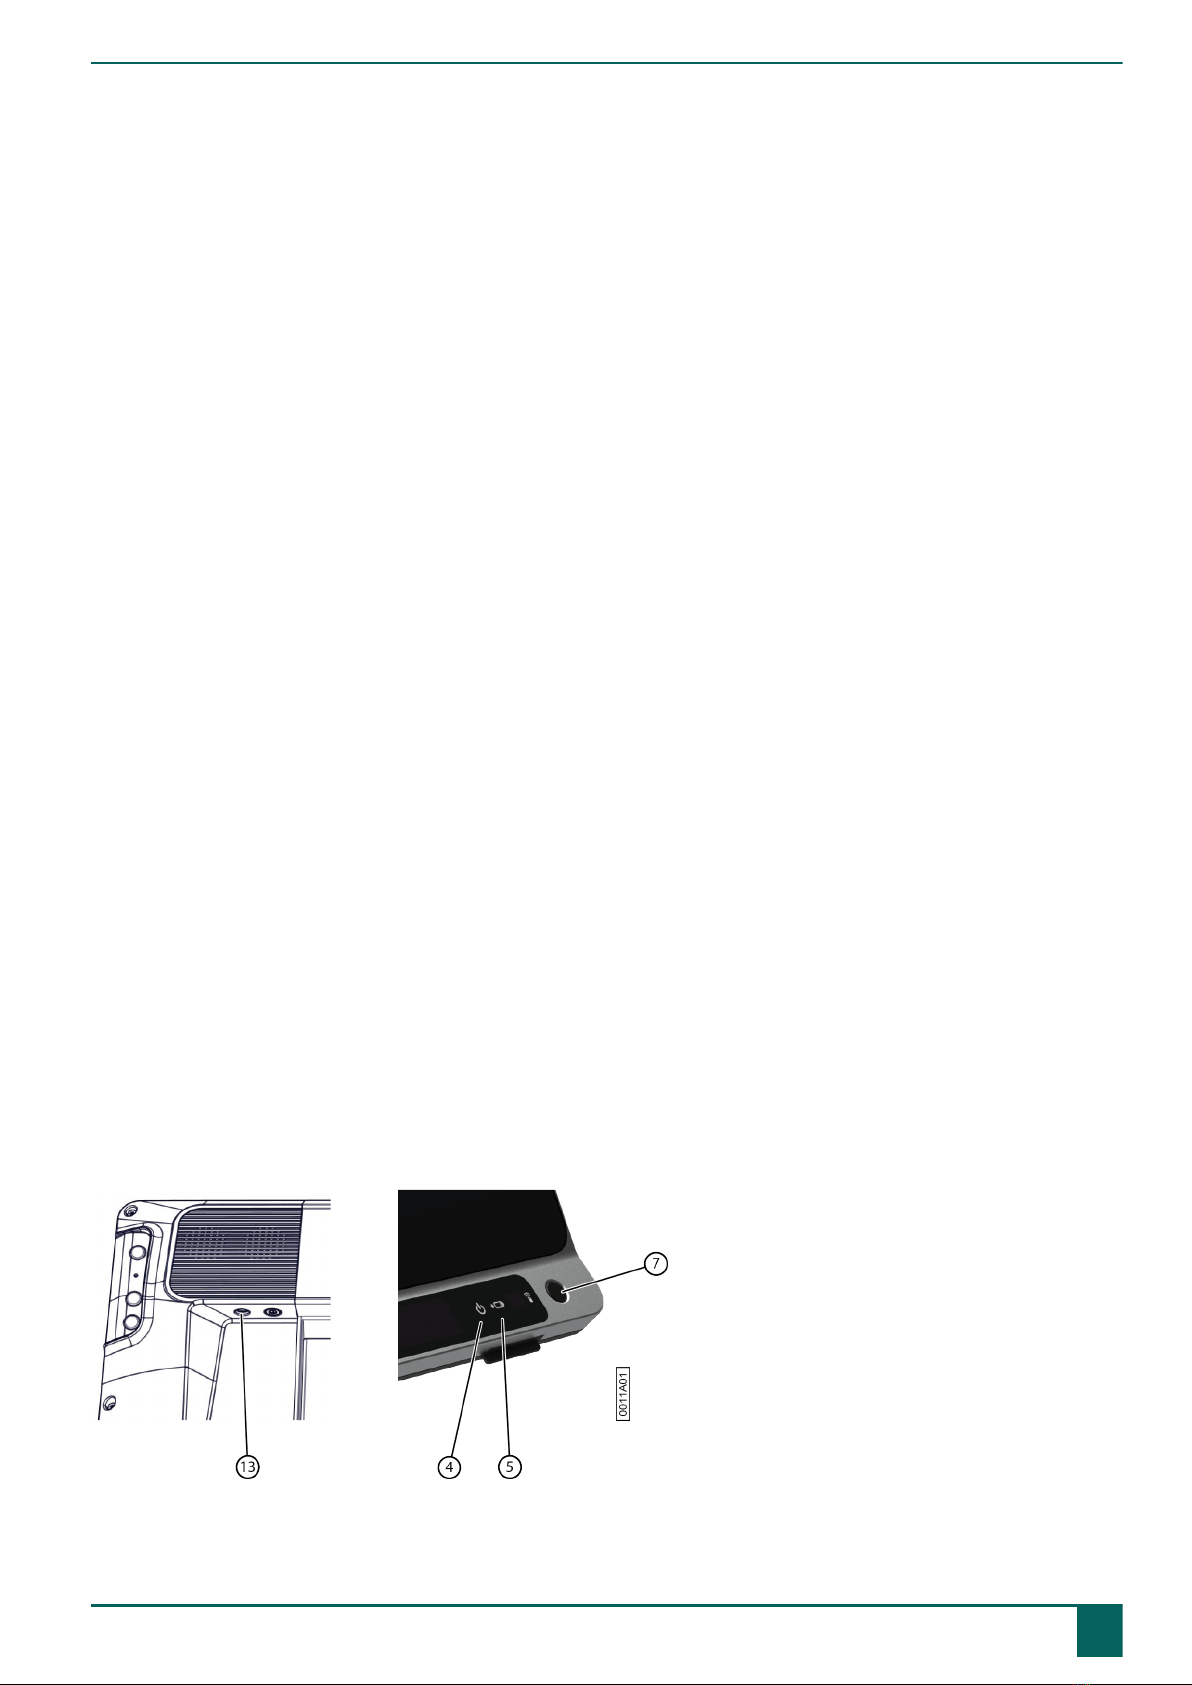
1.1 Getting to know the device...............................................................................................................................................7
1.2 Starting up the device......................................................................................................................................................9
1.3 Shutting down the device................................................................................................................................................. 9
1.4 Putting the device into sleep mode..................................................................................................................................10
1.5 Waking the device from sleep mode............................................................................................................................... 10
1.6 Pausing eye control (Tellus i6)......................................................................................................................................... 11
1.7 Ending eye control pause (Tellus i6).................................................................................................................................11
1.8 Checking the battery status..............................................................................................................................................11
1.9 Charging the device.......................................................................................................................................................12
1.10 Displaying full screen..................................................................................................................................................... 13
1.11 Exiting full screen...........................................................................................................................................................13
2 Startup options........................................................................................................................13
2.1 Starting with a specific user............................................................................................................................................ 13
2.2 The portal or pageset a user chooses to start up with........................................................................................................14
2.3 Starting Mind Express with full screen..............................................................................................................................14
3 Importing documents............................................................................................................... 14
3.1 Importing a ready-to-use pageset..................................................................................................................................... 14
3.2 Importing a pageset from the Mind Expresswebsite........................................................................................................... 14
3.3 Importing a pageset from a drive.................................................................................................................................... 15
3.4 Importing a pageset from another user onto your device................................................................................................... 15
4 Control options....................................................................................................................... 16
4.1 Choosing the (current) control method............................................................................................................................. 16
4.2 Choosing the startup control method................................................................................................................................16
5 Working with Mind Express..................................................................................................... 16
6 Cloud backup and sharing....................................................................................................... 17
6.1 Linking a user profile to a Google Account and backing it up............................................................................................17
6.2 Sharing a backed-up user profile.....................................................................................................................................18
6.3 Adding a shared user profile to your user profiles............................................................................................................ 18
6.4 Uploading the changes to a user in a profile shared with you............................................................................................ 19
D Safety 20
1 Safety.................................................................................................................................... 20
1

Tellus 6 / Tellus i6
E Control 21
1 Control options....................................................................................................................... 21
1.1 Touchscreen control........................................................................................................................................................ 21
1.2 Mouse control................................................................................................................................................................ 21
1.3 Scanning control............................................................................................................................................................ 21
1.4 Keyboard control............................................................................................................................................................22
1.5 Eye tracking (Tellus i6 only)............................................................................................................................................ 22
2 Calling and sending/receiving text messages............................................................................27
3 Using the device environmental control.................................................................................... 27
F Settings 28
1 Setting the buttons on the back of the device........................................................................... 28
2 Switching the loudspeakers on or off....................................................................................... 28
3 Setting the volume amplification factor.....................................................................................29
4 Switching the headphones on or off.........................................................................................29
5 Eye control pausing by activating and setting up gaze (Tellus i6)................................................ 29
6 Sleep mode activating and setting up with gaze (Tellus i6).........................................................29
7 Starting up the device using a switch....................................................................................... 29
8 Setting up the switches........................................................................................................... 30
9 Testing the switches................................................................................................................ 30
10 Setting the language of the Tellus menu................................................................................... 30
G Maintenance and troubleshooting 32
1 Maintenance........................................................................................................................... 32
1.1 Repairs..........................................................................................................................................................................32
1.2 Cleaning the device....................................................................................................................................................... 32
1.3 Storing the device for an extended period....................................................................................................................... 32
2 Troubleshooting...................................................................................................................... 32
2.1 Finding the device serial number.................................................................................................................................... 32
2.2 Finding the version information....................................................................................................................................... 32
2.3 Displaying license information for Mind Express............................................................................................................... 33
2.4 Troubleshooting..............................................................................................................................................................33
2.5 Resetting the device....................................................................................................................................................... 33
H Decommissioning and disposal 35
1 Decommissioning.....................................................................................................................35
2 Disposal................................................................................................................................. 35
Index 36
2

Tellus 6 / Tellus i6
A Introduction
1 Introduction
The device is a versatile communication tool based on the Mind Express graphic communication program. The device
uses Windows 10 as its operating system.
TIP
If you are not familiar with Windows 10, we advise that you only perform the actions described in this user guide
and in the user guide of the Mind Express program.
The device has a 14" touchscreen at the front and a 4" screen at the back. Switches can be connected directly. Jabbla-IR
remote control is available as standard. During the development of the device a lot of attention was paid to the casing.
Not only is the screen area waterproof, but the design also guarantees optimum acoustics and robust protection of the
internal computer platform. Additional connections are located on the back of the device.
To make optimal use of the device, we recommend that you read this user guide carefully before using the device. A basic
knowledge of the Mind Express program is recommended. The user guide regularly refers to the use of Mind Express.
2 Intended use
The device has a communication supporting function. This device is intended for general use in everyday life for people
with a communication disorder (who are not able to speak or cannot speak clearly). Users must have adequate motor and
mental abilities to use the device.
The device is designed for use indoors and outdoors.
3 Prohibited use
The device must not be used for clinical, therapeutic or diagnostic purposes.
The device may not be used for purposes other than those specified in the intended use.
No modifications may be made to the device without consulting with and permission from Jabbla. Carrying out
modifications can have consequences for safety, the warranty and compliance with regulations.
4 Service life
The expected service life of the device is 5 years. The quality and service life of the battery depend on the use.
5 The type plate
You will find the type plate with the serial number of the device on the rear panel.
6 Technical data
Specification Explanation
Processor Intel® Core™ i5-8265U
A Introduction
1 Introduction 3

Tellus 6 / Tellus i6
Specification Explanation
Operating system Microsoft Windows® 10
Hard drive 500 GB SSD
Internal memory 8 GB DDR3
Screen 14" capacitative full HD touchscreen (1920 x 1080 pixels)
Second screen 4" OLED
USB 1 x USB A 3.2 gen 1 and 1 x USB C 3.2 gen 1
Battery Li-Ion battery
Weight 2,450 g (5.40 lbs)
Dimensions •Width: 345 mm (13.58")
•Height: 250 (9.84")
•Depth: 20 mm - 40 mm (0.79" - 1.57")
Front webcam 5 MP
Back webcam 13 MP TiltCam
Mounting Integrated DAESSY and REHADAPT compatibility
Connectivity WLAN, Bluetooth, Z-Wave, Jabbla-IR
Audio •1 integrated microphone
•4 integrated speakers
Inputs for switches 2
A Introduction
46 Technical data

Tellus 6 / Tellus i6
B Description and operation
1 Description and operation
The device is a specially developed computer platform with a 14" high-resolution touchscreen at the front and a 4" screen
at the back. A full description of all buttons and connections can be found in Getting to know the device on page 7.
The device uses Windows 10 as its operating system.
The device is a versatile communication tool based on the Mind Express graphic communication program. Thanks to Mind
Express, voice messages can be created by selecting images and/or symbols. Selection is made by:
•touch screen
•mouse
•keyboard
•switches
•eye tracking
The device is equipped with an infrared receiver and an infrared transmitter. This enables you to control devices such as
televisions, radios, DVD players using infrared codes.
You can also operate the lighting and switches using an integrated Z-Wave controller.
2 What's in the box?
The device is supplied with the following parts:
•power supply with plug and cable
•operating instructions
•Mind Express
3 Options
The accessory pack option includes:
•keyboard
•mouse
•USB stick
•USB hub
•Carry case
4 First use
1. Connect the supplied power adapter between the device (13) and the power supply.
The battery charge indicator (5) will light up and remain amber while charging. As soon as the battery is fully charged,
the battery charge indicator changes to green.
B Description and operation
1 Description and operation 5

Tellus 6 / Tellus i6
2. Start up the device. Press the on/off button (7).
During the device startup the on/off indicator (4) will light briefly at one second intervals. Once the device has started
up and is ready for use, the on/off indicator will stay on.
B Description and operation
64 First use

Tellus 6 / Tellus i6
C Getting started
1 Basic device functions
1.1 Getting to know the device
Front view
No. Identification Explanation
1 Touch screen The device has a 14” touch screen.
2 Front camera The device is equipped with a camera at the front. It
can also be used to take a photo (e.g., a selfie).
3 Eye-tracking camera (with eye-tracking LEDs)
Only for Tellus i6
Detects the movements of the eyes.
4 On/off indicator The on/off indicator shows the status of the device:
•fast blinking on startup
•slow blinking in sleep mode
5 Battery charge indicator The battery charge indicator lights up as soon as
the device is connected to the mains through the
supplied power adapter. The indicator is amber while
charging. The indicator changes to green as soon as
the battery is charged.
6 Infrared receiver The infrared receiver is used to record the infrared
codes.
7 On/off button This allows you to switch the device on/off or revert
to sleep mode.
Rear view
C Getting started
1 Basic device functions 7

Tellus 6 / Tellus i6
No. Identification Explanation
8 Escape button This button is NOT programmable but can be
disabled. Press this button briefly to simulate a right
click at the next touch off the screen. Press and hold
this button for 1.5 seconds to simulate an ESCAPE.
9 Reset Press this button if the device freezes and can no
longer be controlled. After pressing, the device will
switch itself off after which it can be started up again.
10 Microphone opening This is the microphone opening which is used for
sound to reach the device's internal microphone
when recording. The device has 1 integrated
microphone.
11 Up Button This button is programmable. By default, the
following functions are programmed:
•Short press: the Windows function Master
Volume Up
•(Only for Tellus i6) long press: the Mind Express
function Calibrate. This launches the eye-tracking
calibration.
12 Down Button This button is programmable. By default, the
following functions are programmed:
•Short press: the Windows function Master
Volume Down
•(Only for Tellus i6) long press: the Mind Express
function Show the eye monitor. This is a toggle
function: one long press and hold will undo the
function.
C Getting started
81 Basic device functions

Tellus 6 / Tellus i6
No. Identification Explanation
13 Connection to power supply This connection is to charge the device using the
power adapter included.
14 Jack for headphones This output is for connecting headphones to the
device. The speakers are not automatically disabled
when you connect the headphones. Headphones and
speakers are controlled through the software.
15 USB-3.2 GEN 1-port The USB port enables you to connect USB-compatible
devices and peripherals such as a mouse, keyboard,
printer, ...
16 Tray stand The device has a folding stand. The stand is designed
so that the device can be ergonomically supported
on a tray.
17 Integrated mounting system For mounting with DAESSY and REHADAPT systems.
18 USB C port The USB port enables you to connect USB-compatible
devices and peripherals such as a mouse, keyboard,
printer, ... You cannot charge the device through this
port.
19 Switch 1 connection This input is for connecting switch 1.
20 Switch 2 connection This input is for connecting switch 2.
21 Speakers The device has 4 powerful loudspeakers.
22 Cooling fins For heat dissipation. Do not cover the cooling fins.
23 Second screen This displays the message the user is speaking. This
function can be disabled by the user.
24 Infrared transmitter This enables infrared signals to be broadcast, for
example to control a television.
25 Rear camera The device is equipped with a TiltCam at the back.
The TiltCam is controlled by Mind Express and
includes zoom, tilt and pan functions.
1.2 Starting up the device
Press the on/off button (7) on the device to switch on the device.
The device will start up Windows and then Mind Express.
If the device was in sleep mode (on/off indicator flashing slowly), the device will be ready for use again within a second.
See also
Shutting down the device on page 9
Resetting the device on page 33
C Getting started
1 Basic device functions 9

Tellus 6 / Tellus i6
1.3 Shutting down the device
1. In the Windows taskbar, click Start > On/Off > Exit.
2. Click Exit.
The on/off indicator (4) switches off.
See also
Starting up the device on page 9
Resetting the device on page 33
Putting the device into sleep mode on page 10
1.4 Putting the device into sleep mode
Sleep mode is an energy-saving mode that allows you to quickly wake up your computer again. By default, after 3 minutes
the Tellus 6 automatically switches to sleep mode. The Tellus 6 can also be put to sleep manually.
Do one of the following:
•Click Start and choose Sleep next to the Exit button.
•Briefly press the on/off button (7).
•(Only with Tellus i6, if Sleep On Gaze is activated) Stare at the eye control camera and wait a (configurable) time until
you hear first one beep and then two beeps in succession. If you only stare until after the first beep, the device goes
into eye control pause.
See also
Shutting down the device on page 9
Waking the device from sleep mode on page 10
Pausing eye control (Tellus i6) on page 11
1.5 Waking the device from sleep mode
If the display of the device is switched off, and the on/off indicator (4) is flashing every three seconds, the device is in
sleep mode.
C Getting started
10 1 Basic device functions

Tellus 6 / Tellus i6
Carry out one of the following actions to wake the device from sleep mode:
•Press on the screen.
•Press the on/off button (7).
•Click a mouse button.
•Press a key on the keyboard.
•(Only for Tellus i6) Stare at the eye control camera until the device comes out of sleep mode.
See also
Putting the device into sleep mode on page 10
1.6 Pausing eye control (Tellus i6)
When Pause On Gaze is activated, you can temporarily interrupt the eye control yourself using eye control.
Look at the eye-tracking camera and wait a (configurable) time until you hear one beep. If you watch even longer, the
device may go into sleep mode if Sleep On Gaze is activated.
See also
Putting the device into sleep mode on page 10
Ending eye control pause (Tellus i6) on page 11
1.7 Ending eye control pause (Tellus i6)
Stare at the eye control camera until the device comes out of the eye control pause.
See also
Pausing eye control (Tellus i6) on page 11
1.8 Checking the battery status
You can check the battery level and status of the device in several ways:
C Getting started
1 Basic device functions 11

Tellus 6 / Tellus i6
•Via the on/off indicator (4) on the device itself, which can be one of the following colors:
Color of indicator Battery level
Green 25% - 100%
Amber 10% - 25%
Red 0% - 10%
•Via a cell with the actions Display battery level and Read battery level out loud, see the Mind Express user guide.
•Via the battery icon on the Windows taskbar.
•Via the Mind Express settings ( Menu > Settings > tab Battery).
See also
Charging the device on page 12
1.9 Charging the device
The device does not charge via the USB-C port.
The length of time you can use the device without charging, depends for a large part on:
•the audio volume
•the time set before the device reverts to sleep mode
•your Bluetooth/WLAN (Wi-Fi) use
•your use and the brightness of the screen
•the accessories connected
If the device is used a lot, it is recommended to recharge the device daily. The device can still be used while charging.
NOTE
The device may remain connected to the power adapter as it is protected against overcharging. If the power
adapter is not connected, the device will also discharge very slowly when not in use.
1. Check the power status. See Checking the battery status on page 11.
C Getting started
12 1 Basic device functions

Tellus 6 / Tellus i6
2. Connect the supplied power adapter between the device (13) and the power supply.
The battery charge indicator (5) will light up and remain amber while charging. As soon as the battery is fully charged,
the battery charge indicator changes to green.
See also
Checking the battery status on page 11
1.10 Displaying full screen
Choose Menu > Full screen.
See also
Exiting full screen on page 13
1.11 Exiting full screen
Choose one of the following options:
•On a device that is connected to a physical keyboard: press ESC.
•On the device itself: use the ESC-button provided to exit full screen.
NOTE
If a password has been set in order for a user to leave full screen, then the correct password must be entered first.
2 Startup options
2.1 Starting with a specific user
1. Choose Menu > Settings.
2. Choose System.
The Settings tab appears.
3. In the System settings options group, in Start with a specific user, choose Yes.
C Getting started
2 Startup options 13

Tellus 6 / Tellus i6
4. In Name of this user, choose a contact from the drop-down list.
5. Choose OK.
2.2 The portal or pageset a user chooses to start up with
1. Go to the user's portal.
2. Choose Menu > Settings.
3. Choose My Profile.
4. In the Profile settings options group, in Start up with select one of the following options from the drop-down list:
•, Portal.
•The pageset you want to start up with.
5. Choose OK.
2.3 Starting Mind Express with full screen
For a user profile you can specify that Mind Express always starts in full screen.
1. Go to the user's portal.
2. Choose Menu > Settings.
3. Choose My Profile.
4. In the Profile settings options group, in Start with full screen, choose Yes.
5. Choose OK.
3 Importing documents
3.1 Importing a ready-to-use pageset
Mind Express already contains a number of ready-to-use pagesets that you can assign to a user.
1. Open the user's portal.
2. Choose Menu > Import.
The Import window appears.
3. Choose Ready-made pagesets.
4. Choose one of the following categories on the left:
•Symbol communication
•Text communication
•Games and music
•Education
•Apps
5. Select one or more ready-to-use pagesets on the right.
6. Choose Import pagesets.
The selected ready-to-use pagesets are imported and displayed in the last position of the portal's last page. If you
overwrite an already existing pageset with the same name, you will lose it irretrievably.
3.2 Importing a pageset from the Mind Expresswebsite
You can import a number of ready-made pagesets from the Mind Express website for a user.
1. Open the user's portal.
2. Choose Menu > Import.
The Import window appears.
3. Choose From Mind Express sharing website.
C Getting started
14 3 Importing documents

Tellus 6 / Tellus i6
4. Choose one of the following categories on the left:
•Symbol communication
•Text communication
•Games and music
•Education
•Apps
5. Select one or more pagesets on the right.
NOTE
Choose Read more for more information about the pageset.
6. Choose Import pagesets.
The selected pagesets are imported and displayed at the back of the portal.
NOTE
If there is a pageset with the same name in the portal, a warning is displayed. Preferably choose Make a new
copy: [file name (no.)].
If you choose Overwrite, you will irretrievably lose the original pageset.
Choose Skip if you want to keep the original pageset.
3.3 Importing a pageset from a drive
You can import an exported pageset or a user.
NOTE
•Only what was actually placed in a cell will be exported/imported:
•pictures in cells in the pageset itself
•sounds, music and videos programmed into a pageset through the actions Play file, Play sound, Sound
recording, ...
•By browsing in a folder, what will NOT be exported/imported must be shown:
•sound or video files played through the actions Display content, Playlist, Shuffle playlist, ...
•camera images
•photos, pictures, ... in a slideshow
•All settings associated with the user's profile are NOT exported/imported, for example the contacts,
pronunciation dictionary, ...
1. Open the user's portal.
2. Choose Menu > Import.
The Import window appears.
3. Choose From disk.
The Windows window Open appears.
4. Browse to the location on a drive where the pageset has been saved, select it and choose Open.
The Choose a page type window appears.
5. Enter a unique name and choose a symbol and background color for the pageset. You can use the button to add
an image of your own.
6. Choose Import file.
The pageset is imported and opens immediately.
3.4 Importing a pageset from another user onto your device
If you have other user profiles in Mind Express, then it is easy to import pagesets from another user to the current user.
1. Choose Menu > Import.
The Import window appears.
2. Choose From another user.
The Choose user and pageset to import window appears.
C Getting started
3 Importing documents 15

Tellus 6 / Tellus i6
3. Select a user.
4. Select a pageset.
5. Choose Import file.
The pageset is imported and opens immediately.
4 Control options
4.1 Choosing the (current) control method
You can always adjust the control method by which the user selects a cell: mouse/touch, scanning switches, joystick or
eye control.
TIP
All of these control methods can be adapted to the individual needs and wishes of the user.
1. Go to the user view or the portal.
2. Choose Menu > Choose access method.
3. Choose one of the following methods:
• Mouse/Touch
• Joystick
• Scanning
• Eye tracking
See also
Choosing the startup control method on page 16
4.2 Choosing the startup control method
You can set which control method Mind Express should always start with: mouse/touch, scanning switches, joystick or eye
control.
1. Choose Menu > Settings.
2. Choose Access.
3. Choose General.
4. In Start up with, choose one of the following methods from the drop-down list:
• Mouse/Touch
• Joystick
• Scanning
• Eye tracking
5. Choose OK.
See also
Choosing the (current) control method on page 16
5 Working with Mind Express
NOTE
Discover all the capabilities of Mind Express via Menu > Help.
Switch from the user view to the edit view or vice versa using the F2 key or via Menu > Edit.
In the editing view you can then choose one of the three tabs to work with cells, pages or pagesets.
Via the Cell tab you can:
C Getting started
16 4 Control options

Tellus 6 / Tellus i6
•quickly fill one or more cells:
1. Select an empty cell.
2. Start typing: as a word is formed, suggestions from pictures and labels appear in the cell.
If the cell is not empty, then only the label of the existing cell is changed.
If no suitable picture is found, choose the Cell tab in the edit panel to switch to the Choose image dialog.
3. Press Enter to confirm and to go to a next cell.
•add or change pictures
•add or change labels
•set the style of the cells
•add actions to cells
•make cells (in)visible
•make cells (non)selectable
•make cells (non)draggable
•copy cells
•moving cells using cut and paste
•set up a different dwell time for cells
Via the Page tab you can:
•add pages:
•copy pages:
•set up a page:
•delete a page:
•add and delete rows and columns
Via the Pageset tab you can:
•set the pageset preferences
•translate pagesets
•correct text in a pageset
•replace pictures
6 Cloud backup and sharing
6.1 Linking a user profile to a Google Account and backing it up
You can link a Mind Express user profile to his or her Google account and upload it there as a backup.
Backed-up profiles are marked in the list of user profiles with the icon (via Menu > Change user).
After performing this procedure in the Google Drive of the selected Google account, you can check that there is a Mind
Express folder containing a new backup folder for this user profile.
If you return to this user's Cloud settings after carrying out this procedure, you can share the user profile with another
user, for example with an instructor. The instructor can then download this profile and add, delete or change pagesets,
pages or cells. The instructor can choose when he or she uploads these changes. The user will be notified of these
changes.
1. Go to the user's portal or pageset.
2. Choose Menu > Settings.
3. Choose My Profile.
4. Choose the Cloud settings tab.
5. If the user profile is already linked to a Google account, go to step 10.
6. In the Cloud settings options group, in Create backup, choose Sign in with Google.
A new tab opens in your default browser.
7. In your browser, select the Google Account you want to use for backing up.
C Getting started
6 Cloud backup and sharing 17

Tellus 6 / Tellus i6
8. In your browser, you MUST give all requested permissions and finally confirm them all again.
You will be notified via your Google Account's Gmail and asked to confirm again that you have actually given
permission. Give your permission once again.
9. Close your browser window and return to Mind Express.
After some time, the user profile is linked to the Google account and the first backup has been made. This will be
specified with the Backup status.
10.Choose one of the following options to create new backups:
•A manual backup: choose Create a new backup.
•An automatic daily backup: in Automatic backup, choose Yes and in Every day at set the time in hh:mm, for
example 18:45. To do this, Mind Express must be active and logged in with this user. Otherwise, the backup will
be executed automatically at the next log-in with this user.
11. Choose OK.
6.2 Sharing a backed-up user profile
After a user has backed up a user profile in the cloud using their Google account, the user can share the backed-up user
profile with another Mind Express user, for example with the instructor.
The instructor can then download this profile later and add, delete or change pagesets, pages or cells. The instructor can
choose when to upload these changes to the user.
1. Go to the user's portal or pageset.
2. Choose Menu > Settings.
3. Choose My Profile.
4. Choose Cloud settings.
5. In Remote edit, choose .
6. In the Google accountname input field, enter the Google email address of the person with whom the user profile is
to be shared and choose OK.
The email address appears in the list below Remote edit.
The user profile is now shared with the other person's Google account. This person will receive an invitation from this
Google account via email to collaborate. He or she can now add your shared user profile to his or her users.
6.3 Adding a shared user profile to your user profiles
After a user has shared a backed-up user profile with you, you can add it to your user profiles. A user profile shared with
you, that you have added, can be recognized by the icon.
When you carry out modifications remotely (add, delete or change pagesets, pages or cells) in a user profile shared with
you, you can upload these modifications whenever you wish. You can also publish these changes immediately if you are
asked to do so, when switching to another user or when exiting Mind Express. The user will be notified of these uploaded
changes. You can also edit licensed content in edit view (e.g., Jabbla's Score symbol vocabulary), but you cannot use it in
the user view.
NOTE
You need an Internet connection to carry out modifications remotely, in order to verify that you have the right to
access the user's portal and edit the documents remotely. After all, the user can revoke these rights at any time by
stopping sharing a backed-up user profile. You never have the right to view or change the settings of a user profile
shared with you.
1. Choose Menu > Change user.
2. Choose Add profile. The Welcome - Create your profile window appears.
3. Choose Remote edit.
The Remote edit window appears.
4. If you are already logged into Google, go to step 7.
5. Choose Sign in with Google.
C Getting started
18 6 Cloud backup and sharing
This manual suits for next models
1
Table of contents
Other Jabbla Conference System manuals