A
AV
Ve
er
rM
Me
ed
di
ia
a®
®
A
AV
Ve
er
rV
Vi
is
si
io
on
n
S
SP
PC
C3
30
00
0
Q
Qu
ui
ic
ck
k
G
Gu
ui
id
de
e
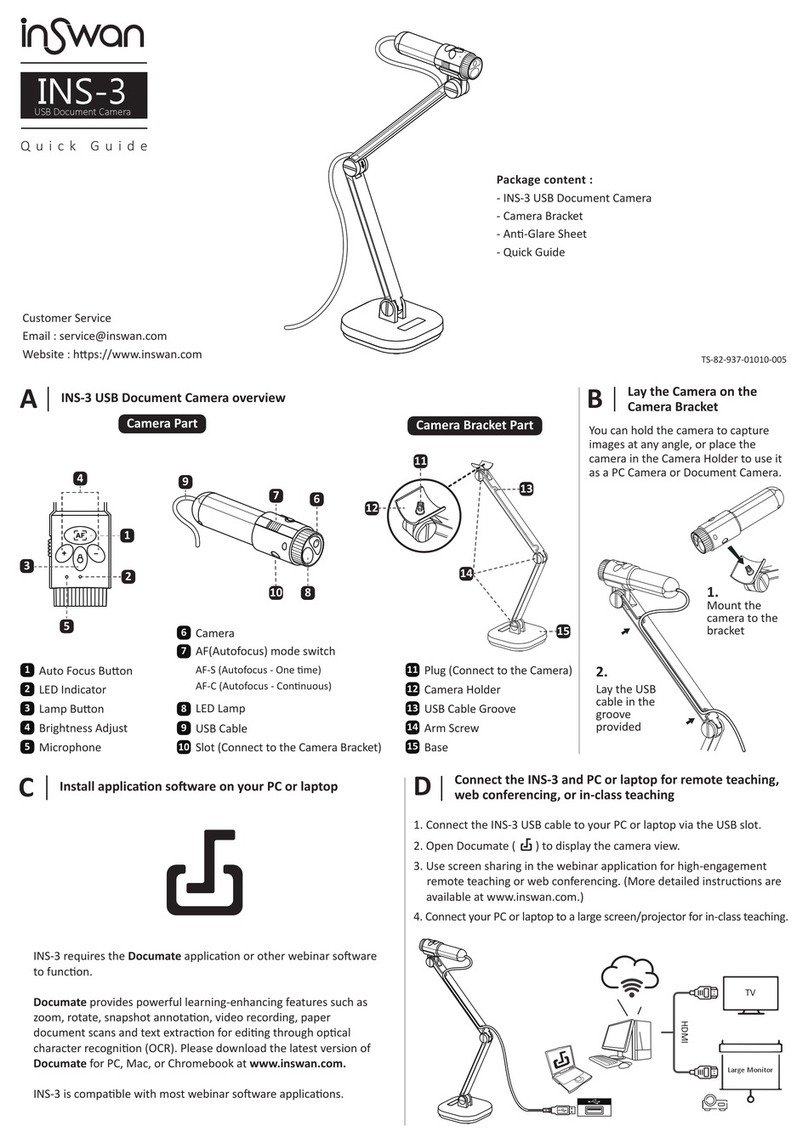
Button Functions :
(1) Turn the unit on or standby mode.
(2) Display video signals from RGB
input port.
(3) Display captured images.
(4) Display live video from SPC300
camera.
(5) Show/hide a dot like a laser
pointer on the screen in camera
mode.
(6) Show/hide a frame on the screen
in camera mode
(7) Change the color of the pointer or
box.
(8) Change the size of the box.
(9) Divide the screen into 2 parts.
Right side display live video and
left side display 8-thumbnail
picture preview.
(10) Display a thumbnail picture
preview screen overlay on live
camera preview. Also, switch the
position of the thumbnail picture
preview screen on to different
corners.
(11) Select the memory source
between SD or built-in memory.
(12) Pull up/exit OSD main menu and
sub-menu.
(13) Automatically adjust the focus.
(14) Adjust the focus to near/far.
(15) Zoom in/out the image in camera
and playback mode.
(16) Return to original normal view.
(17) Move around, and make
selection or adjustment in
Playback, Box, Pointer, Visor,
Resize, Split Screen, PIP
function and menu.
(18) Capture an image.
(19) Permanently remove the selected
image.
(20) Display, start and toggle to
hide/show on-screen display
timer.
(21) Freeze/unfreeze the live camera
display.
(22) View the selected thumbnail
image on the entire screen.
(23) Rotate the image by 90°.
Remote Control
(25)
(16)
(15)
(17)
(14)
(13)
(12)
(3)
(2)
(4)
(6)
(5)
(7)
(9)
(8)
(11)
(10)
(23)
(21)
(20)
(1)
(26)
(24)
(22)
(18)
(19)
Control Panel
(3)(4)(1)
(2) (18) (28)
(27)(12) (13)(21) (29)(17)
(23) (30)
(24) Change the shaded area to semi-
transparent, opaque or transparent.
(25) Convert display image into BW,
Negative and Positive (true color).
(26) Cover/uncover a part of the screen in
camera mode.
(27) Turn the LED light on/off.
(28) Zoom in/out the image.
(29) Lock/unlock Auto White Balance (AWB).
(30) Adjust the brightness level in camera
mode.
Remote Control Sensor
Arm Latch
90°
Camera Head Latch
SD Slot
SD card
(not supplied)
Microscope Connection
Microscope
Adapter
Microscope
Microscope Connection
OSD Tree
Press the MENU button to call up and exit from the main
menu or sub-menu display. Then use ▲or▼buttons to select
the items in the menu list. Use ENTER button to enter sub-
menu. To adjust the setting, press ◄or►buttons.
Video Output OSD
EXPOSURE
WHITE BALANCE
BRIGHTNESS
CONTRAST
TIMER
RESOLUTION
MEMORY
USB CONNECTION
DEFAULT
0 59 100
MANUAL
50 HZ
60 HZ
FLICKER
ON
OFF
AUTO
NIGHT VIEW
RED
BLUE
MEASURE
MANUAL
1
SLIDE SHOW
EMBEDDED
SD
SOURCE
NO
YES
FORMAT
AUTO
MANUAL
FLICKER
NIGHT VIEW
EXPOSURE
PRESENTATION
SLIDE SHOW
TIMER
-50 0 50
BRIGHTNESS
-50 0 50
CONTRAST
1024 X 768
800 X 600
640 X 480
RESOLUTION
SOURCE
FORMAT
MEMORY
USB CAMERA
MASS STORAGE
USB CONNECTION
NO
YES
DEFAULT
THEME
EFFECT
ROTATE
BOX
POINTER
VISOR
SPLIT SCRN
PIP
ROTATE
MIRROR
TEXT
GRAPHICS
HIGH FRAME
MICROSCOPE
THEME
COLOR
B/W
NEGATIVE
EFFECT
ROTATE
Activate/deactivate
the function.
AUTO
MANUAL
WHITE BALANCE
SETTING
MENU
0 80 255
RED
0 77 255
BLUE
5
SEC
10
0
PRESENTATION
0
MIN
120
Playback OSD
EMBEDDED
SD
MEMORY SOURCE
NO
YES
DELETE
SLIDE SHOW
MEMORY SOURCE
DELETE
MENU
