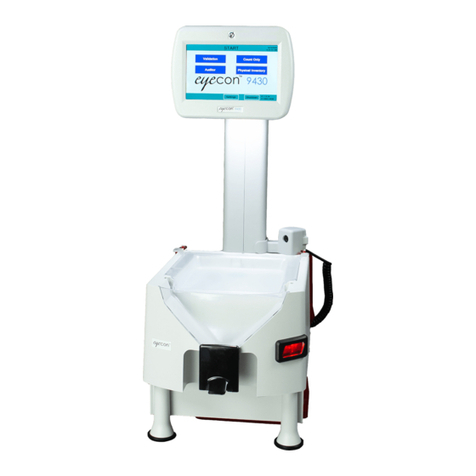
Avery Weigh-Tronix Eyecon 9420 User manual

Eyecon 9420
Pill Counting, Inventory and Validation System
Quick Reference Guide
AWT35-501652
Issue AA

Avery Weigh-Tronix is a trademark of the Illinois Tool Works group of companies whose ultimate parent company is Illinois Tool
Works Inc (“Illinois Tool Works”). Copyright © 2017 Illinois Tool Works. All rights reserved.
No part of this publication may be reproduced by making a facsimile copy, by the making of a copy in three dimensions of a two-dimensional
work and the making of a copy in two dimensions of a three-dimensional work, stored in any medium by electronic means, or transmitted
in any form or by any means, including electronic, mechanical, broadcasting, recording or otherwise without the prior written consent of the
copyright owner, under license, or as permitted by law.
This publication was correct at the time of going to print, however Avery Weigh-Tronix reserves the right to alter without notice the
specification, design, price or conditions of supply of any product or service at any time.
Eyecon_9420_qug_en_501652.book

Eyecon 9420 Quick Reference Guide 3
Quick Reference Guide
This Quick Reference Guide is not intended to cover all aspects of the Eyecon 9420's
capabilities. Refer to the Instruction Manual at www.eyeconvpc.com for more details on
other modes and specific operations.
Eyecon package contents
(1) Eyecon 9420 Visual Pill Counter
(2) Pill Spatulas
(1) Quick Reference Guide
(1) Red Penicillin Contamination Platter
(1) Yellow Sulfa Contamination Platter
(1) AC power cord for USA and Canada operation
General description
Powering up the Eyecon
1. Insert the power cable into the receptacle located on the back of the Eyecon.
2. The Eyecon must be installed near an easily accessible socket outlet. Plug the
Eyecon power cord into the outlet.
3. When the Eyecon 9420 is first connected to AC power, it will automatically turn
on. The display area will illuminate within a few seconds.
4. The terms of the Eyecon End User License Agreement (EULA) must be
accepted before the unit can be used for the first time.
5. When the START screen is displayed the Eyecon is ready for use.
CAUTION: The Eyecon contains components that can be damaged by rough
handling. Unpack all items carefully.
The Eyecon uses advanced machine vision technology to
accurately count tablets and capsules (pills). Each drug has an
associated Drug Number, drug name and shadow pill used for
counting. Photos of the counting platter are captured five times
per second and analyzed to determine the number of pills on
the tray.
Color Touch Screen
Counting Platter, tilting
Funnel and Funnel Gate
Barcode Scanner, 2D
Penicillin and Sulfa Platter Storage

4 Eyecon 9420 Quick Reference Guide
Shut down the Eyecon
Scanner
The Eyecon comes standard with a barcode imager capable of decoding 1-D and 2-D
barcodes.
Configuration settings
Press the Settings button on the bottom of the START screen. The SCAN USER
LOGIN screen appears. See illustrations below.
If user information has not been entered into your Eyecon, then press the Skip Login
button and the Configuration Manager screen, shown below, appears.
The main list of settings is shown on the left side of the screen. This can be scrolled up
and down by moving the list with your finger. The second part of the list is shown in the
right hand illustration above. Click on one of the parameters to view the available
choices and make your selection.
WARNING!: It is essential to Shutdown or Restart the Eyecon from the
Shutdown button on the touchscreen to prevent unnecessary Windows
generated issues. Avoid turning off the Eyecon by removing power.
Press Settings and this screen appears

Eyecon 9420 Quick Reference Guide 5
Quick Reference Guide
Below is a table showing all the settings, choices and brief explanations for each. For
more information see the User Instructions (PN AWT35-501651).
Rx validation
Ensures the proper medication is dispensed by
validating the drug number included in the barcode
on the patient vial label or Rx pamphlet matches the
drug number associated with barcode on the stock
item.
1. From the START screen press Validation,
shown at right.
2. Scan or enter User ID if SCAN USER LOGIN is enabled.
Eyecon 9420 Configuration Manager
Main Menu Item Description
General
Access this to see information about the 9420, enable or disable the Auto Close
Recorded Message, Drug Substitution, Stock Item Verification, Allow an Under-
fill or Over-fill and to calibrate the platter.
Barcode Access this to set the Barcode Type, lengths, offsets, to enable or disable the
Rx Scan in Count Mode and to enter the Barcode Test Mode.
Data Access this to set the Transaction Purge Time, Delete Report Data and see the
Tray Photo Count.
TCP/IP Use this to access the TCP/IP settings
Pharm. Mgmt. SW Access this to setup an interface between Eyecon and your pharmacy system.
Remote Server Access this to configure the Eyecon to send Rx fill results back to your
pharmacy system.
Multi-Eyecon Access this to manage communication among multiple connected Eyecons
Double Check Access this to set up double counts and back counts.
Login/Scan Out Access this to set up user login and scan out parameters.
Test Access this to test the scanner, camera, touchscreen and speaker.
Auto Updater Access this to manage updates for the Eyecon.
Trained Drugs Access this to import or export the trained pill images to or from this Eyecon.
Backup/Restore Access this to backup and restore the database or configuration.
Inventory Access this to manage inventory data.
For additional information, reference the Instruction Manual or call 866-260-6540.

6 Eyecon 9420 Quick Reference Guide
3. The SCAN VIAL LABEL screen will be
displayed, shown at right.
NOTE: Pressing Cancel in the lower left corner of
display moves back one screen.
Scan Rx vial/prescription barcode
1. Hold the barcode on the Rx label or
paperwork about 2 to 5 inches from the
scanner beam, with the red dot centered
on the barcode producing an audible beep.
The SCAN STOCK ITEM screen, shown
at right, will be displayed.
2. Proceed to Counting and dispensing on
page 6.
Physical inventory
The Physical Inventory mode provides a way to maintain accurate inventory levels.
From the START screen press Physical Inventory. To count inventory, follow the
instructions starting at Counting and Dispensing on page 4.
Count full stock bottle(s)
1. Press the Unit of Use button on the top right of the Counting screen.
2. A numeric keyboard will be displayed. Key in the number of full bottles to be
counted and press OK.
Count
1. From the START screen press Count Only.
2. The SCAN STOCK ITEM screen, shown
at right will be displayed.
3. Proceed to the Counting and Dispensing
section below.
Counting and dispensing
1. Hold the barcode on the stock item about 2 to 5 inches from the scanner beam,
with the red dot centered on the barcode.

Eyecon 9420 Quick Reference Guide 7
Quick Reference Guide
2. Once the barcode is recognized, a beep will be heard and the next menu will
appear.
3. Dispense the desired quantity on the counting platter.
4. It is quicker to over-pour slightly in one motion, rather than sprinkling pills on
multiple times to achieve the target amount.
5. Never pour more than can easily fit flat, unstacked, on the tray. If more pills are
required than can fit, press the Add to Total button to save the current amount
and then follow the instructions to complete the count.
6. Rapidly and vigorously, lift the tray slightly and bang it down against the
bumpers, to knock pills off of each other and into a single layer. For flat pills,
you may need to use the spatula to assist with de-stacking. View one of our
videos at https://www.eyeconvpc.com/Eyecon9420TrainingVideos for more
assistance.
7. In Validation mode the Quantity window will change color depending on the
target quantity status.
Yellow = under target quantity
red = over target quantity
green = target quantity.
Note: Pills must be distributed in a single layer on the counting platter (not
stacked). A warning message will occur if individual pills cannot be
discriminated..
8. After ensuring that all excess pills have been removed from the funnel, place
one finger on top of the funnel gate to ensure it has closed completely, then lift
the counting platter to near vertical so that pills flow into funnel. Next place the
vial under the tongue of the funnel gate to lift it up and allow the pills to flow
into the vial. See Dispensing Techniques on page 6.
9. Continue filling Rx's by scanning the NDC bar code on a stock bottle anytime
in either the Scan Stock Bottle or Counting Pills screen if you need to use an
additional bottle to achieve the desired count..
NOTE: Pressing Cancel in the lower left corner of display moves back one screen.
Pour pills on the counting platter efficiently
1. When pouring pills onto the counting platter, quickly pour from the stock bottle
distributing pills evenly in a single layer while visually estimating your target
quantity.
2. Speed is critical so slightly over pouring from the stock bottle is more effective
than slowly trying to reach your target by pouring a few pills at a time.
If you do over pour from the stock bottle, simply remove the excess into the funnel by
using the spatula. After achieving the desired quantity, return any excess back to stock
bottle by lifting the funnel gate with the stock bottle positioned under the funnel opening.
Don't manually count off the excess pills. For example, if your target is 60 and you've
poured 87, estimate a scrape off of 20 to 25 pills. If you're still not within 7 pills, scrape
off another group. When you get within 7 pills or less, you can easily scrape off the
number required to reach your desired amount.

8 Eyecon 9420 Quick Reference Guide
Example of correct pill distribution
Pour pills onto counting platter utilizing the entire
platter surface. Make sure not to stack the pills on
top of each other.
Example of incorrect distribution (pill stacking)
This message will occur if pills are
stacked or foreign substances such as
incorrect pill or desiccant pack is on
the counting platter.
Drug number not found in the database
If a drug bar code is scanned and number is not
found in the database, the screen at right
appears. At this screen:
1. Use the keypad to enter the correct NDC
with dashes and press OK.
2. If the NDC is found, the fields in the
screen at right will be populated. If not,
enter the Drug Name, Package Quantity
and Schedule.
Press Save to save the information.
3. The TRAIN PILL VERIFICATION screen
may appear. If the item is a gel cap or a
unit-of-use type (syrup, syringe, ointment,
etc...) then select Hand Count, which will
take you to a Hand Count screen.
Otherwise, press Train Pill and go to step
4.

Eyecon 9420 Quick Reference Guide 9
Quick Reference Guide
4. When the screen shown at right appears,
place 2 pills near the center of the tray but
not touching each other, one pill on its
side the other resting flat. If a pill will not
stand on its side, lay both pills flat. Press
Train Pill.
5. If the shadow images displayed represent
the pills on the platter, press Yes. The pill
is now trained and Eyecon has stored the
drug name and shadow pill image in the
database.
6. Proceed with standard Counting and
Dispensing steps.
Drug number Found but no shadow pill image
If a drug’s bar code is scanned and the drug name and pill photo are recalled but the
shadow pill image is not trained the Train Pill Verification screen will appear. Go to step
3in Drug number not found in the database on page 8.
Drug number barcode doesn't exist on stock bottle or won't scan
1. At the Scan Stock Item screen press
Manual Entry.
2. The keyboard screen will be displayed.
3. Enter the drug number in the format
printed on the stock bottle taking care to
assure digits and any hyphens are
properly inserted.
4. Press OK and continue.
Dispensing large quantities or inventory management
When dispensing more pills than the counting platter will
hold without pills stacking, an accumulate function is
available.
1. With pills dispensed on the platter, the actual live
quantity will be displayed as QTY, the Total QTY
shows the sum of the prior saved amounts plus the
Current QTY.
2. Press Add To Total to permanently save the
current poured quantity as part of the Total QTY.
3. Verify no pills fell into the funnel; if so, return those
to the stock bottle.

10 Eyecon 9420 Quick Reference Guide
4. Tilt counting platter to pour pills into funnel and then transfer them to the vial or
a temporary container if counting inventory.
5. Pour additional pills and continue accumulating to desired quantity.
Dispensing small pills - technique
1. To dispense small pills, lift/tilt the Counting Platter to
fill the funnel area with pills.
2. Grip the vial as illustrated, with your hand wrapped
around the mouth of the vial. Raise the funnel gate to
fill the vial. Never use your other hand to raise the
funnel gate in order avoid spilling pills!
Dispensing Large Pills - Technique
Large pills can bridge / bind in the funnel area. To prevent
bridging follow this technique.
1. Grip the bottle as illustrated at right and raise the
funnel gate completely open before lifting / tilting
the Counting Platter.
2. With the bottle in position under the funnel gate, lift
/ tilt the Counting Platter slowly to allow pills to
flow through the funnel into the bottle without
bridging.
Cleaning the Machine
Be sure to keep the Eyecon unit clean and free of dust. Do not use harsh detergents or
spray water on the Eyecon unit.
It is recommended the Eyecon unit be cleaned whenever pill dust is building up.
Powder and pill dust tends to accumulate on surfaces such as the rapid fill tray and
funnel gate. Follow the note below for effective cleaning.
You can use isopropyl alcohol in a spray bottle to wet surfaces and then wipe with a
soft cloth or paper towel.

Eyecon 9420 Quick Reference Guide 11
Quick Reference Guide

12 Eyecon 9420 Quick Reference Guide
Avery Weigh-Tronix USA
1000 Armstrong Dr.
Fairmont MN 56031
Toll Free: 866-260-6540
www.eyeconvpc.com
Table of contents
Other Avery Weigh-Tronix Medical Equipment manuals
Popular Medical Equipment manuals by other brands

Getinge
Getinge Arjohuntleigh Nimbus 3 Professional Instructions for use

Mettler Electronics
Mettler Electronics Sonicator 730 Maintenance manual

Pressalit Care
Pressalit Care R1100 Mounting instruction

Denas MS
Denas MS DENAS-T operating manual

bort medical
bort medical ActiveColor quick guide

AccuVein
AccuVein AV400 user manual