manuals.online logo
Brands
  1. Home
  2. •
  3. Brands
  4. •
  5. Avid Technology
  6. •
  7. Computer Hardware
  8. •
  9. Avid Technology HDX-192 User manual

Avid Technology HDX-192 User manual

HDX-192 DSP Expansion Card Installation Guide 1
HDX-192 DSP Expansion Card Installation Guide
HDX-192 DSP Expansion Cards add mixer and plug-in process-
ing capacity to a VENUE | S6L system. HDX cards are installed
in the VENUE | E6L engine.
Important: HDX-192 Cooling Kits
All HDX-192 cards must have a Fan assembly. Depending on
when your purchased your HDX-192 card(s) the Cooling Kit
(Avid Part Number 9900-71328-01, HDX Shroud Upgrade)
mightalreadybeinstalled.IfanyofyourHDX-192card(s)donot
have a Fan assembly, contact Avid support at the following link
to obtain the Cooling Kit (free of charge) and follow the included
instructions to install. The Cooling Kit also requires VENUE
software version 5.7 or higher.
https://www.research.net/r/HDXCoolingKitForm
Required Materials
• HDX-192 DSP Expansion Card package, which includes:
• (1) HDX-192 DSP Card
• (1) HDX TDM Flex Cable
• Phillips #1 screwdriver (not included)
• Anti-Static wrist strap (not included)
• Foam or other soft surface to place the card on (not included)
Installing the DSP Card
Installing a DSP card in E6L consists of the following steps:
• Removing the E6L engine core
• Installing the card
• Connecting the HDX TDM cable between HDX cards
• Replacing hardware
• Confirming Installation
Removing the E6L Engine Core
HDX cards are installed in the E6L engine core, which slides out
of the E6L chassis.
To remove the E6L engine core:
1Put on your anti-static wrist band and configure according to
its instructions.
2Shut down your system, and disconnect any cables connected
to your E6L engine.
3Place your E6L on a table or other flat surface that provides
enough room for the E6L engine core to be removed comfort-
ably. Make sure your surface is clear of any debris.
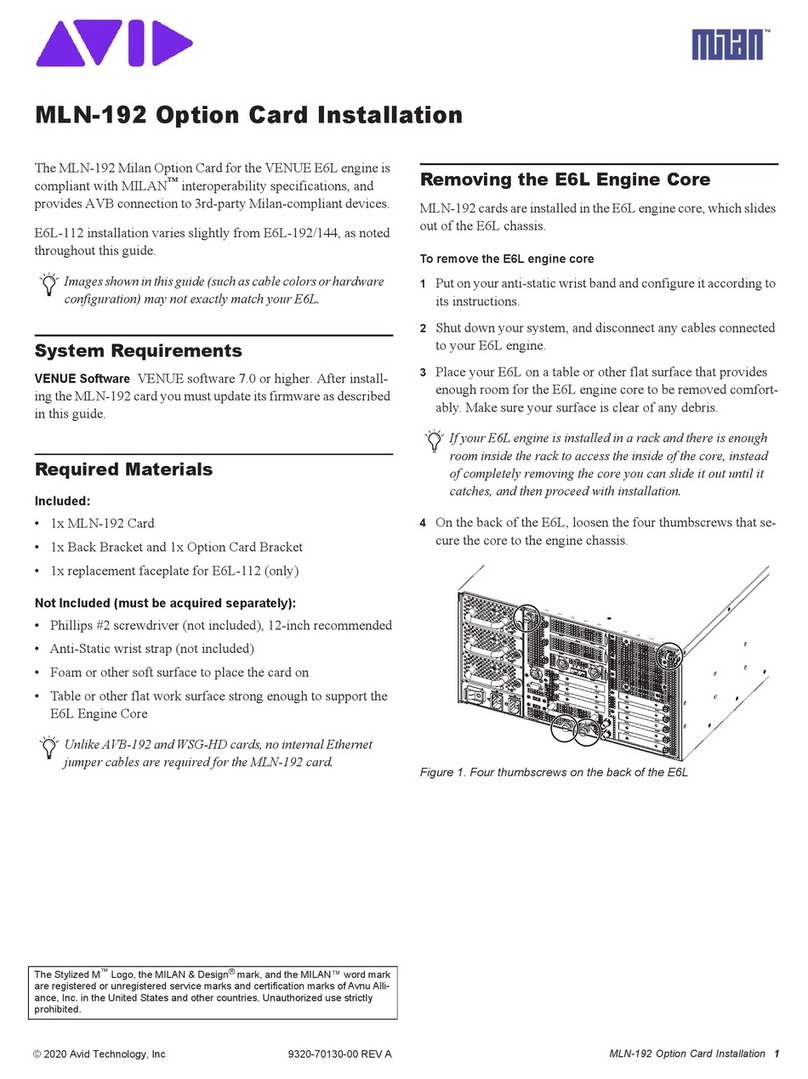
4On the back of the E6L, loosen the four thumbscrews that se-
cure the core to the engine chassis.
5Simultaneously pull the two bottom thumbscrews outward so
the latches they are attached to are fully extended, as shown in
Figure 2.
HDX-192 with Fan assembly
HDX-192 without Fan assembly
Not all images in this guide show the Fan assembly.
Figure 1. Four thumbscrews on the back of the E6L
© 2018 Avid Technology, Inc 9320-70072-00 REV A
HDX-192 DSP Expansion Card Installation Guide 2
6Using the handle, slowly slide the core partially out, locate the
interiorcatchontherightsideofthetray, and press it to release
the core from the chassis.
7Slowly slide the core out of the E6L chassis completely, and
place it on your work surface.
Installing the Card
The E6L engine core has four PCIe slots for DSP cards, and are
numbered sequentially from top to bottom 1–4 as you face the
open side of the engine core. Install your DSP expansion card in
theopenPCIeslotbelow thecurrentlyinstalled card(s).Youmust
first remove the retaining bracket before installing the card.
To remove the DSP card retaining bracket and install the card:
1Looking inside the core from the right side, locate the DSP as-
sembly retaining bracket.
2Locate the thumbscrew that secures the bracket to the bottom
of the unit and loosen it completely.
3Locate the two Phillips head screws on the top of the bracket,
remove them, carefully remove the bracket, and set them all
aside.
4Locate the open PCIe slot below the topmost currently in-
stalled DSP card, and remove the blank faceplate by unscrew-
ing the corresponding screw. Set the screw aside to secure the
HDX card after it is installed. The faceplate can be discarded.
Figure 2. Latches fully extended
Figure 3. Location of the interior catch
The core will not slide out of the E6L chassis until the latches
are fully extended and the catch has been released. If you ex-
perience any resistance, make sure the latches are fully ex-
tended before pulling.
Make sure all HDX-192 cards have a Fan assembly. For
more information, see the HDX-192 Cooling Kit Guide in-
cluded with the Cooling Kit (and available for download
from your Avid account.
Figure 4. HDX card Bracket thumbscrew
Figure 5. Removing one of two HDX card bracket screws
Figure 6. Open PCIe slot (right, 2nd slot shown), and blank faceplate
removed (left)
HDX-192 DSP Expansion Card Installation Guide 3
5Remove the DSP card from its packaging and place it on your
foam surface, oriented as shown in Figure 7.
6Disconnect the power cables connected to any HDX cards in-
stalled above the slot in which you are installing the card.
7Align the DSP card’s PCIe connector with the corresponding
PCIe slot, and gently press the card into the PCIe slot.
8When the DSP card is properly seated in its slot, tighten the
screw on the front bracket of the HDX card to secure it to the
chassis.
9Locate a loose black and yellow HDX card power cable at the
bottom of the unit, and, with the cable connector locking clip
facing down, push the connector into the port until it clicks.
Make sure the connector is securely connected.
10 Reconnect a power cable to the top card. All HDX cards
should have power cables attached.
Figure 7. Top view of the HDX card
Figure 8. Disconnecting the power cable of the top HDX card
Figure 9. Pressing the HDX card into the slot
Figure 10. Tightening the front bracket screw
Figure 11. Connecting HDX power cables
HDX-192 DSP Expansion Card Installation Guide4
Connecting the HDX TDM Cable
In systems that have more than one card, you must connect all the
HDX cards to each other with HDX TDM cables (custom SATA
cables). Each HDX card has two ports along the top of the card,
labeled IN and OUT. Data communication across multiple cards
is achieved by connecting the cable from the OUT port of the first
card to the IN port of the next card.
To connect the HDX TDM cable:
1Connect the end of the HDX TDM cable labeled OUT to the
OUT port of the upper HDX card.
2Connect the other end of the HDX TDM cable, labeled IN, to
the IN port of next the HDX card, as shown in Figure 12
3For any additional cards, connect each additional card to its
preceding card using additional HDX TDM cables as de-
scribed above, until all cards are connected. (Each HDX card
is packaged with an HDX TDM cable.)
Replacing E6L Hardware
Afterinstalling thecards,replace the retainingbracket and putthe
core back into the E6L chassis.
To replace E6L hardware:
1Carefullyplace the HDX card assembly retaining bracket back
intoposition, making sure to not disturb the surface of the DSP
cards in the process, and tighten the captive thumbscrew se-
curing the bracket to the bottom of the E6L engine core.
2Replace the two screws at the top of the retaining bracket.
3Slide the core back into the E6L chassis, making sure the con-
nectors face outward.
When the core is fully seated into the chassis, the two latches
at the bottom of the chassis should fully collapsed.
4Tighten the four thumbscrews to secure the core to the chassis.
Confirming Installation
After installing HDX cards, confirm that you successfully in-
stalled them.
To confirm installation:
1Connect power to the E6L, and connect an audio network ca-
ble from your S6L control surface to E6L.
2Power on your S6L and E6L.
3On the external VENUE software screen, go to the Options >
Devices page. In the HDX DSP section, tap the tab (1–4) cor-
responding to the slot in which you installed the card. The 18
DSPs provided by the HDX card should appear as Available.
Figure 12. Properly Connected Flex Cable
Figure13.Options> Devicespageshowing theDSPsavailableon the
HDX card installed in slot 2

Other Avid Technology Computer Hardware manuals

Avid Technology 9320-62787-00 User manual

Avid Technology

Avid Technology 9320-62787-00 User manual

Avid Technology FOH Rack User manual

Avid Technology

Avid Technology FOH Rack User manual

Avid Technology Avid Adrenaline User manual

Avid Technology

Avid Technology Avid Adrenaline User manual

Avid Technology Milan MLN-192 User manual

Avid Technology

Avid Technology Milan MLN-192 User manual

Avid Technology Snake Card User manual

Avid Technology

Avid Technology Snake Card User manual

Avid Technology Pinnacle PCTV DVB-T User manual

Avid Technology

Avid Technology Pinnacle PCTV DVB-T User manual

Popular Computer Hardware manuals by other brands

RTimes X502N product manual

RTimes

RTimes X502N product manual

TRENDnet TEW-301PC user manual

TRENDnet

TRENDnet TEW-301PC user manual

Samsung MT3204 Series installation manual

Samsung

Samsung MT3204 Series installation manual

StarTech.com EC13941A1B instruction manual

StarTech.com

StarTech.com EC13941A1B instruction manual

Analog Devices ADRV902 Series troubleshooting guide

Analog Devices

Analog Devices ADRV902 Series troubleshooting guide

ZALMAN VF2000 LED user manual

ZALMAN

ZALMAN VF2000 LED user manual

Dolby Laboratories Spectral Processor 740 brochure

Dolby Laboratories

Dolby Laboratories Spectral Processor 740 brochure

HP OmniBook 3100 reference guide

HP

HP OmniBook 3100 reference guide

GSi GS-LCD101S V-POD quick guide

GSi

GSi GS-LCD101S V-POD quick guide

Linear Technology DC1307A Demo Manual

Linear Technology

Linear Technology DC1307A Demo Manual

DOD VoFX owner's guide

DOD

DOD VoFX owner's guide

ENERMAX Liqmax III ARGB ELC-LMT360-W-ARGB user manual

ENERMAX

ENERMAX Liqmax III ARGB ELC-LMT360-W-ARGB user manual

iWave FIM-2410 user manual

iWave

iWave FIM-2410 user manual

HP HP27110B Installation and reference manual

HP

HP HP27110B Installation and reference manual

Drawmer 1976 Operator's manual

Drawmer

Drawmer 1976 Operator's manual

Citrix SD-WAN Series instructions

Citrix

Citrix SD-WAN Series instructions

SeaLevel SeaLINK/PC.SC user manual

SeaLevel

SeaLevel SeaLINK/PC.SC user manual

Renesas HD6417641 Hardware manual

Renesas

Renesas HD6417641 Hardware manual

manuals.online logo
manuals.online logoBrands
  • About & Mission
  • Contact us
  • Privacy Policy
  • Terms and Conditions

Copyright 2025 Manuals.Online. All Rights Reserved.