Avipas AV-1160 User manual

Model: AV-1160
H.264 HD Color Box Camera
User Manual
V1.1
Please Read this User Manual
throughout before using
www.avipas.com

HD Color Box Camera User Manual
- 1 -
Attentions
•Electric Safety
Installation and operation must be in accord with electric safety standard.
•Caution to transport
Avoid stress, vibration or soakage during transport, storage and installation.
•Polarity of power supply
The power supply of the product is ±12V, the max electrical current is 2A. Polarity of the power supply plug is
shown in the drawing below.
•Careful of installation
Do not grasp the camera lens when carrying it. Don’t rotate camera lens by hand. Mechanical damage may result
from doing so.
This series product must be placed on a smooth platform or surface. It cannot be installed slantwise.
If the camera is used with TV or computer, the base can be fixed by four double-sided adhesive trays.
Don’t apply in corrosive liquid, gas or solid environment to avoid any cover (organic material) damage.
Make sure no obstacle is in the rotation range.
Never power on before installation is completed.
•Don’t disassemble discretionarily.
We are not responsible for any unauthorized modification or dismantling.
•Attention!
Specific frequencies of electromagnetic field may affect camera image!

HD Color Box Camera User Manual
- 2 -
Content
1. FAST INSTALLATION ....................................................................................................................................- 3 -
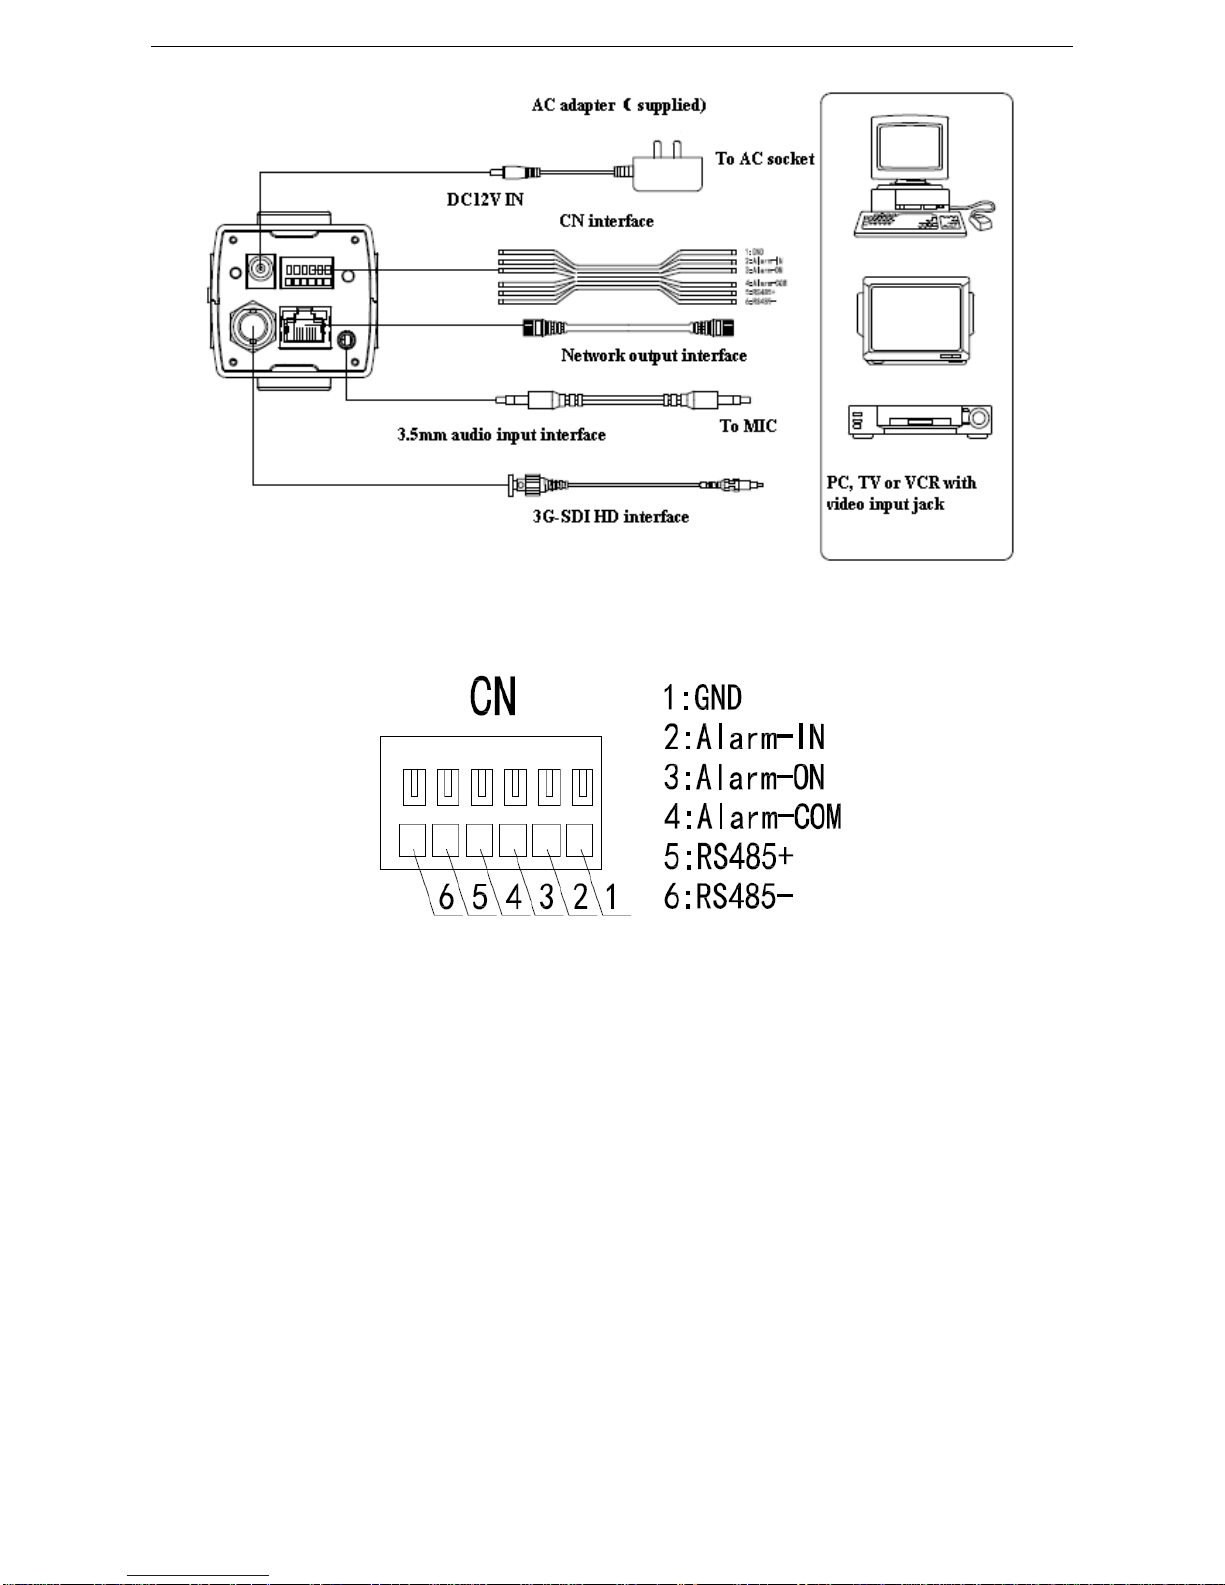
1.1 CAMERAINTERFACE .........................................................................................................................................- 3-
1.2 POWER ON........................................................................................................................................................- 3-
1.3 VIDEO OUTPUT........................................................................................................................................................- 4-
1.4 BRACKET MOUNTING..............................................................................................................................................- 4-
2. PRODUCT OVERVIEW..................................................................................................................................- 5 -
2.1 PRODUCT INTRODUCTION ........................................................................................................................................- 5-
2.1.1 Dimensions......................................................................................................................................................- 5 -
2.1.2 ACCESSORIES........................................................................................................................................................- 5-
2.2 MAIN FEATURES......................................................................................................................................................- 6-
2.2.1 Camera performance.......................................................................................................................................- 6 -
2.2.2 Network performance......................................................................................................................................- 6 -
2.3 TECHNICAL SPECIFICATIONS ....................................................................................................................................- 6-
2.4 INTERFACE ILLUSTRATIONS .....................................................................................................................................- 7-
2.4.1 External Interface............................................................................................................................................- 7 -
2.4.2 RS-485 interface..............................................................................................................................................- 8 -
3. APPLICATION INSTRUCTIONS..............................................................................................................- 9 -
3.1 VIDEO OUTPUT........................................................................................................................................................- 9-
3.1.1 Power-On Initial Configuration ......................................................................................................................- 9 -
3.1.2 Video output.....................................................................................................................................................- 9 -
3.2 MENU SETTINGS.................................................................................................................................................- 9-
3.2.1 Main menu.......................................................................................................................................................- 9 -
4. NETWORK CONNECTION......................................................................................................................- 14 -
4.1 CONNECTING MODE ..............................................................................................................................................- 14 -
4.2 IE LOG IN..............................................................................................................................................................- 15 -
4.2.1 Web client ......................................................................................................................................................- 15 -
4.2.2 Preview..........................................................................................................................................................- 16 -
4.2.3 Playback........................................................................................................................................................- 16 -
4.2.4 Configuration ................................................................................................................................................- 16 -
4.2.5 Video configuration .......................................................................................................................................- 17 -
4.2.6 Network configuration...................................................................................................................................- 19 -
4.2.7 System configuration .....................................................................................................................................- 20 -
4.2.8 Logout............................................................................................................................................................- 21 -
5 CAMERAMAINTENANCEAND TROUBLESHOOTING .......................................................................- 22 -
5.1 CAMERAMAINTENANCE .......................................................................................................................................- 22 -
5.2 TROUBLESHOOTING...............................................................................................................................................- 22 -

HD Color Box Camera User Manual
- 3 -
1. FAST INSTALLATION
1.1 Camera Interface
Figure 1.1 AV-1160
1. RESET
2. RS485 and alarm interface
3. DC12V power supply socket
4. Power indicator
5. 3G-SDI interface
6. Network interface
7. Audio in interface
8. Auto iris interface
9. Function key
10. Lens interface
11.1. Tripod screw hole
11.2. Tripod screw hole
1.2 Power On
Connect the camera to DC12V power adapter. When the power indicator light is on, the camera is ready to use.

HD Color Box Camera User Manual
- 4 -
1.3 Video Output
AV-1160 has two video output options: LAN and 3G-SDI.
•Video output via LAN:
Ethernet cable connection: port No.6 in Figure 1.1.
Webpage Login: open your browser and enter 192.168.5.163 in the address bar (factory default); press Enter to
enter the login page; message: “player is not installed, please download and install!" will show; click on the
message, and follow the instructions to install the plug-in video player. After successful installation, restart the
browser and enter the user name: admin and password: admin (factory default). Press Enter to enter the preview
interface. Users can control camera settings, perform video recording, playback, configuration, etc.
•Video output via 3G-SDI:
SDI cable connection: port No.5 in Figure 1.1.
Connect the camera to a monitor via SDI cable. Video output is available upon camera is power on.
1.4 Bracket Mounting
1) Bracket installation accessory introduction
2) Bracket installation steps

HD Color Box Camera User Manual
- 5 -
2. Product overview
2.1 Product introduction
2.1.1 Dimensions
2.1.2Accessories
When you unpack, check if all the supplied accessories are included:
Accessory
Power adapter 1pcs
User manual 1pcs
Warranty card 1pcs

HD Color Box Camera User Manual
- 6 -
2.2 Main Features
2.2.1 Camera performance
AV-1160 box camera has a refined design, and offers multiple functions, high performance and various interfaces.
The features include advanced ISP processing algorithms to provide vivid images with a strong sense of depth, high
resolution and fantastic color rendition. It supports H.264/H.265 encoding which makes motion video fluent and
clear even with less than ideal bandwidth conditions.
1) Superb high-definition image: it employs 1/2.8 inch high-quality CMOS sensor. Resolution is up to 1920x1080
with frame rate up to 60 fps.
2) Low noise and high SNR: low-noise CMOS effectively ensures a high SNR of the captured video. Advanced
2D/3D noise reduction technology is also used to further reduce the noise while maintaining the image sharpness.
3) Multi-format video output: support 3G SDI and LAN interfaces. 3G-SDI is available for 100m transmission at
1080p60.
4) Multiple video compression options: support H.264/H.265 video compression; support compression of 1
channel 1920x1080 with frame up to 60 fps and 2 channel 1920x1080 with 30 fps.
5) Multiple network protocols: support ONVIF, RTSP, RTMP protocols and RTMP push mode, easy to link to
streaming media server (Wowza, FMS)
6) Support multiple control protocols: can recognize and support VISCA, PELCO-D, PELCO-P protocols.
Support VISCA control protocol through IP port.
7) Wide application: tele-education, lecture capture, webcasting, videoconferencing, tele-training, tele-medicine,
interrogation and emergency command systems.
2.2.2 Network performance
1. Audio input interface: support 16000,32000,44100,48000 sampling frequency and AAC, MP3,PCM audio
coding.
2. Multiple audio/video compression: support H.264/H.265 video compression; AAC, MP3 and PCM audio
compression; support compression of 1 channel 1920x1080 with up to 60 fps and 2 channel 1920x1080 with
30 fps.
3. Multiple network protocols: support ONVIF, RTSP, RTMP protocols and RTMP push mode, easy to link to
streaming media server (Wowza, FMS)
2.3 Technical specifications
Model
Camera Parameter
Sensor
1/2.8” high-quality HD CMOS sensor
Effective Pixels
16: 9; 2.07 megapixel
Video Format
1080P60/30/25/59.94/29.97 ,720P60/30/25/59.94/29.97
Auto Iris
DC driving mode
Digital Zoom
X5
Minimum Illumination
0.5Lux (F1.8, AGC ON)
DNR
2D﹠3D DNR
White Balance
Auto/Manual/One Push/ 3000K/ 4000K/5000K/6500K

HD Color Box Camera User Manual
- 7 -
Focus
Auto/Manual
Aperture
Auto/Manual
Electronic Shutter
Auto/Manual
BLC
ON/OFF
WDR
OFF/ Dynamic level adjustment
Video Adjustment
brightness, color, saturation, contrast, sharpness, B/W mode, gamma curve
SNR
>55dB
Input/output Interface
Video Interface
3G-SDI
Image Code Stream
Dual streams output
Video Compression Format
H.264/H.265
Control Interface
RS-485
Control Protocol
VISCA/Pelco-D/Pelco-P; Baud Rate: 115200/9600/4800/2400bps
5 Control Keys
UP/DOWN/LEFT/RIGHT/CONFIRM keys for OSD setting, EPTZ controlling
HD IP Interface
100M IP port (10/100BASE-TX), Support VISCA protocol control through IP port.
Network Protocol
RTSP, RTMP, ONVIF
Power Interface
Standard DC interface
Other Parameter
Power Adaptor
Input AC110V-AC220V, output DC12V/1A, support POE (optional)
Input Voltage
DC12V±10%
Input Current
400mA(max)
Consumption
4.8W (max)
Store Temperature
-10℃~+60℃
Store Humidity
20%~95%
Working Temperature
-10℃~+50℃
Working Humidity
20%~80%
Dimension
126.8mmX55mmX58.6mm
Weight
0.5kg
Remote Operation (IP port)
remote upgrade, remote reboot and remote reset
Accessory
12V/1A power supply, user manual, warranty card
Optional Accessory
Installation Bracket
2.4 Interface Illustrations
2.4.1 External Interface
1) External interface ofAV-1160:
RS485 interface, alarm input output, audio input interface, 3G-SDI output ,LAN, DC12V power interface,
auto iris interface.

HD Color Box Camera User Manual
- 8 -
2.4.2 RS-485 interface
RS-485 interface specifications are shown as below:

HD Color Box Camera User Manual
- 9 -
3. Application Instructions
3.1 Video Output
3.1.1 Power-On Initial Configuration
Connecting the DC12V power cable to the camera, wait for the power indicator light to be on.
3.1.2 Video output
Connect the video output cable: the user select the output mode accordingly. See Figure 1.4.1 for reference (output
interface introduction).
1) Network output: connect the camera and a computer via network cable. Open the web browser, enter
camera IP address (factory default 192.168.5.163) in the address bar, then input the user name and password
(factory default are “admin”) to login and enter the preview page.
Note: If you forget your user name, password, or IP address, you can manually restore the default settings
using the RESET key at the bottom of the machine.
2) 3G-SDI output: connect the monitor with the video output interface, image will show on the monitor.
3.2 MENU SETTINGS
3.2.1 Main menu
In the normal working mode, press 【Function】key to see the main menu (as shown in No. 9 Figure 1.1). Use
scroll arrow to move or highlight the selected item.
LANGUAGE: language setting: Chinese / English
Exposure: enter the sub menu
Color: enter the sub menu
Image: enter the sub menu
Noise Reduction: enter the sub menu
Video Format: enter the sub menu
Version: enter the sub menu
Restore Default: restore the factory default settings, select YES or NO to confirm
[↑↓] Select: move the pointer
MENU
================
Language English
(Exposure)
(Color)
(Image)
(Noise Reduction)
(Video Format)
(Version)
(Restore Default)
Back
[↑↓]Select [←→]Change Value
[Menu]Back [Home]OK

HD Color Box Camera User Manual
- 10 -
[← →] Change value: enter the submenu to modify parameters
[MENU] Back: press [MENU] to return
[Home] OK: press [Home] to confirm
3.2.2 Exposure
Move the pointer to 【Exposure】in the Main Menu, click the【HOME】to enter the 【Exposure sub menu】
as shown below.
MODE: Auto, Manual, Shutter priority, Iris priority and Brightness priority.
EV: On/Off (only available in auto mode)
Compensation level: -7~7 (only available in auto mode when EV is ON)
BLC: ON/OFF (only available in auto mode)
Anti-Flicker: OFF/50Hz/60Hz (only available in Auto/Iris priority/Brightness priority modes)
Gain limit: 0~15 (only available in Auto/ Iris priority /Brightness priority mode)
BRIGHTNESS: 0~23 (only available in Brightness priority mode)
WDR: Off/1~8
Shutter priority: 1/25, 1/30, 1/50, 1/60, 1/90, 1/100, 1/120, 1/180, 1/250, 1/350, 1/500, 1/1000, 1/2000, 1/3000,
1/4000, 1/6000, 1/10000 (only available in Manual or Shutter priority mode)
IRIS priority: OFF, F11.0, F9.6, F8.0, F6.8, F5.6, F4.8, F4.0, F3.4, F2.8, F2.4, F2.0, F1.8 (only available in
Manual or Iris priority mode)
3.2.3 COLOR
Move the pointer to the 【COLOR】in the Main Menu, click 【HOME】and enter the 【COLOR sub menu】as
shown below.
WB Mode: Auto, 3000K, 4000K, 5000K, 6500K, Manual, One Push
Red Gain: 0~255 (only available in Manual mode)
Blue Gain: 0~255 (only available in Manual mode)
Saturation: 60%, 70%, 80%, 90%, 100%, 110%, 120%, 130%
Hue: 0~14
AWB Sensitivity: high/middle/low
Color style: default, style 1~4
Color temp: high/middle/low
EXPOSURE
=================
Mode Auto
EV OFF
BLC OFF
Flicker 50Hz
G. Limit 7
WDR 5
[↑↓]Select [←→]Change Value

HD Color Box Camera User Manual
- 11 -
3.2.4 IMAGE
Move the pointer to the 【IMAGE】in the Menu, click【HOME】and enter the 【IMAGE sub menu】as shown
below.
Brightness: 0~14
Contrast: 0~14
Sharpness: 0~15
Flip-H: On/Off
Flip-V: On/Off
B&W mode: color, black/white
Gamma: default/0.47/0.50/0.52/0.55
DCI: Dynamic Contrast: Off/1~8
3.2.5 NOISE REDUCTION
Move the pointer to 【NOISE REDUCTION】in the Main Menu, click【HOME】and enter the 【NOISE
REDUCTION】as shown below.
IMAGE
================
Brightness 6
Contrast 8
Sharpness 7
Flip-H OFF
Flip-V OFF
B&W-Mode Color
Gamma Default
DCI 1
[↑↓]Select [←→]Change Value
[Menu]Back
COLOR
================
WB Mode Auto
Saturation 80%
Hue 7
AWB Sensitivity High
Color style Default
Color temp Middle
[↑↓]Select [←→]Change
Value
[Menu]Back

HD Color Box Camera User Manual
- 12 -
2D NOISE REDUCTION:Auto/close/1~7
3D NOISE REDUCTION: Close/1~8
Dynamic Hot Pixel: Close/1~5
3.2.6 Video Format
Move the pointer to【Video Format】in the Main Menu, click【HOME】and enter the【Video Format】as shown
below.
3.2.7 Version
Move the pointer to【VERSION】in the Main Menu, click【HOME】and enter the【VERSION】as shown below.
Note: version information would change accordingly after FM upgrading.
3.2.8 RESTORE DEFAULT
Move the pointer to 【RESTORE DEFAULT】in the Main Menu, click【HOME】and enter the 【RESTORE
DEFAULT】as shown below.
VIDEO FORMAT
================
1080P60 1080P50
1080I60 1080I50
1080P30 1080P25
720P60 720P50
720P30 720P25
1080P59.94 1080I59.94
1080P29.97 720P59.94
720P29.97
[↑↓]Select
[Menu]Back
[Home]OK
VERSION
=================
Version 2.0.0.2 2016-1-27
Back
NOISE REDUCTION
=================
NR-2D Auto
NR-3D 3
Dynamic Hot Pixel OFF
[↑↓]Select [←→]Change Value
[Menu]Back

HD Color Box Camera User Manual
- 13 -
Restore default: YES/NO.
RESTORE DEFAULT
=================
Restore Default? NO
[↑↓]Select [←→]Change
Value

HD Color Box Camera User Manual
- 14 -
4. Network Connection
4.1 Connecting Mode
Direct connection: connect the camera and computer via Ethernet cable.
Internet connection: connect the camera to Internet via Router or Switch so that the user can log into the
device using browser.
Note: Please do not put the power cable and Ethernet cable in places where can be easily touched to
prevent video quality loss caused by unstable signal transmission due to poor contact of cables.
The computer must be assigned to the network segment which the camera IP address belongs to. The device
will not be accessible if not in the right segment. I.E. The camera default IP address is 192.168.5.163, then segment
5 must be added in the computer. Specific steps are as below:
Open the Local Area Connection Properties on computer, select the “Internet protocol version 4(TCP/IPv4)”.
Double click or click the property “Internet” protocol version 4 (TCP/IPv4) to enter the Internet Protocol Version
4(TCP/IPv4) Properties window. Select “Advanced” to enter the Advanced TCP/IP Setting and add IP and subnet
mask in the IP browser. Click “Confirm” to finish adding IP segment. User can add the corresponding network
segment according to the revised IP address of the camera.
Note: The IPaddress to be added cannot be the same as that of the other computers or devices. The existence
of this IPaddress needs to be verified before adding.
To verify whether the network segment has been successfully added, click “Start” and select “Operation” and
input cmd, then click CONFIRM and open DOS command window. Type ping 192.168.5.26, press Enter to see
information shown below:
User can also verify network connection following the steps above after the camera self-check. If IP is
default, open DOS command window and input 192.168.5.163. Press Enter to see if the network connection is
normal.

HD Color Box Camera User Manual
- 15 -
4.2 IE Log In
4.2.1 Web client
1) Web client Log In
Input the IP address of the device 192.168.5.163 in the address filed of the web browser, and click Enter to enter the
Web Client Login page as shown below in the picture. The user can login as administrator or normal user. If login
as administrator (Default User name/ Password: admin), then the user can access preview, playback, configuration
and cancel functions; If the user logs in as normal user (Default User name/ Password:user1 or user2), then the user
can only access preview, playback and cancel functions, no access to configuration.
Note: web access supported browsers: IE, Chrome, Firefox, Safari. Web plug-in supports IE only.
2)Download/Install Plug in
When the user uses IE browser to access the web conferencing camera for the first time, the login page will
show the message “Playback plug-in is not installed, please download and install!”. Click on this message,
download and install MRWebXinstall.exe according to information prompts.
Note: Web plug-in supports IE only.
After installing the plug-in, input user name and password (factory default user name and password: "admin",
the user can change the user name and password after login) to enter the Web client management interface.

HD Color Box Camera User Manual
- 16 -
4.2.2 Preview
After successfully logging into the management interface, video preview interface will show. The user can control
PTZ, zoom, focus, video capture, sound, focus, full screen, set, run, delete the preset positions and other operations.
1) Login as administrator
Factory default user name/password: admin.
The user can operate PTZ control, zoom, focus, video capture, sound, full screen, set run, and delete preset
positions, and also preview, playback, configuration, and log off.
2) Login as normal user
Factory default user name/password: user1 or user2
The user can operate PTZ control, zoom, focus, video capture, sound, full screen, set, run, and delete preset
positions, and also preview, playback and log off.
NOTE: There is no configuration access for normal user.
4.2.3 Playback
1) Playback video files
First, please record, snapshot and save the file when previewing. Click "Playback" to enter playback page (video
search), and then select the file type: "Video File", click Search. Click the video file to play.
2) Playback picture files
First, please record, snapshot and save the file when previewing. Click "Playback" to enter playback page (video
search), and then select the file type: "Image File", click Search. Click the image file to view.
4.2.4 Configuration
Click “Configuration” tab to enter the device parameters setting page.
Parameters are as following: Local configuration, audio configuration, video configuration, network configuration,
PTZ configuration, internet access configuration, system configuration. For detailed description, please refer to the
table below.
Menu
Explanation
Local configure
Include video preview mode, record video packing time, record video storage route
settings etc.
Audio configure
Include audio compressing format, sampling frequency, sampling precision,
compressing code rate settings etc.

HD Color Box Camera User Manual
- 17 -
Video configure
Include video encoding, video parameters, character-overlapping, character size, video
output setting etc.
Network configure
Include basic parameters, Ethernet, DNS, wireless network setting etc.
System configure
Include equipment property, system time, user management, version update, Reset,
Reboot device settings etc.
1) Local configuration
Video preview mode: the user can choose real-time priority or fluency priority so that the delay will be
minimum in real time priority mode and the bandwidth will be maximum in fluency priority mode. Settings can be
adjusted based on the user’s need (Default value: real time normal (2), real time best (1), fluency normal (3),
fluency good (4) and fluency best (5)).
Recording packing time(minute): set video recording packing time (default: 10, range from 1~120 minutes).
Recording/Snapshot file storage route: set local video recording/snapshot file storage route (default
D:\MyIPCam\).
Click Save button to save the changes and reboot the camera to make settings effective.
2)Audio configuration
Switch: choose to enable/disable the audio.
Compressing format: set audio compressing format, and the device will reboot automatically after setting
change (default: MP3, other options: PCM, AAC).
Sampling frequency: set sampling frequency, and the device will reboot automatically after setting change
(default: 44100, other options: 16000,32000 and 48000).
Sampling precision: set sampling precision (default: 16bits).
Compressing code rate: set audio compressing code rate (default: 64bits, other options: 32,48,96,128bits).
Note: click “SAVE”, a message will show. Restart the device for the changes to take effect.
4.2.5 Video configuration
1) Video encoding
Code stream: different video output mode settings, use main/dual streaming mode (main stream/secondary
stream).
Compression Format: set the video compression format. Save and reboot to take effect (primary/secondary stream
default: H.264, other option: H.265).
Video size: set video image resolution. Save and reboot to take effect (main stream default: 1920*1080, other
options: 1280*720; secondary stream default: 640*320, other options: 320*180, 1280*720, 1920*1080).
Stream rate control: set rate control mode. Save and reboot to take effect (main/secondary stream default: variable
bit rate, other option: fixed rate).
Image quality: set the image quality. Image quality can be changed only when rate control is set to variable bit rate
(main stream default: better, secondary stream default: not good. Other options: best, better, good, bad, worse,
worst).
Rate (Kb/s): set the video bit rate (main stream default: 4096Kb/s, other option: 64-12288Kb/s; secondary stream
default: 1024Kb/s, other option: 64-10240Kb/s).
Frame rate (F/S): set the video frame rate (main/secondary stream default: 25F/S, other option for main stream:
5-60F/S, other option for secondary stream: 5-30F/S).
Keyframe interval: set the key frame interval (main/secondary stream default: 75F, other options for main stream:
1-300F; secondary stream: 1-150F).
Click the "Save" button, a message will show: "saved successfully". The changes will take effect.
2) Stream release
Switch: turn on/off the main/secondary stream.
Protocol: main/secondary stream applies RTMP protocol.
Host Port: server port number (default: 1935, other options: 0-65535).
HostAddress: server IP addresses (default: 192.168.5.11)
Stream Name: choose a different stream name (default: live / av0, other option: live / av1).
User: set the user name.
Password: set the password.
Click the "Save" button, a message will show: "saved successfully". The changes will take effect.
Method of obtaining RTSP: rtsp: // device IP address: 554 / live / av0 (av0 main stream; av1 secondary stream)
3) Video parameters
a. Focus: focus mode, focus range, focus sensitivity can be set.

HD Color Box Camera User Manual
- 18 -
Focus mode: set the focus mode (default: auto, other option: manual).
Focus range: set the focus range (default: middle, other options: upper and lower)
Focus sensitivity: set the focus sensitivity (default: low, other options: high, medium)
b. Exposure: exposure mode, exposure compensation, back light compensation, anti-flicker, gain limit,
wide dynamic, shutter speed, aperture value and brightness can be set.
Exposure mode: set the exposure mode (default: automatic, other options: manual, shutter priority,
aperture priority, brightness priority).
Exposure compensation: exposure compensation setting. Valid when in auto mode (default: off).
Exposure compensation value: set the exposure compensation value. Valid when it is set to auto mode
(default 0, other options: -7 to 7).
BLC: set back light compensation. Valid when it is set to auto mode (default: off).
Anti-flicker: set up anti-flicker mode. Valid when in automatic, aperture or brightness priority mode
(default: 50Hz, other options: closed, 60Hz).
Gain limit: set the gain limits. Active when it is in the status of aperture or brightness priority (default: 7,
other options: 0-15).
Dynamic range: set the dynamic range (default: 3, other options: 0-8).
Shutter speed: active when it is in the status of manual or shutter-priority (default 1/90, other options:
1/90, 1/100, 1/120, 1/180, 1/250, 1/350, 1/500, 1/725, 1/1000, 1/1500, 1/2000, 1/3000, 1/4000, 1/6000, 1/10000).
Aperture value: set the aperture value. Active when it is in the status of manual or aperture-priority
(default: F1.8, other options: closed, F9.6, F8.0, F6.8, F5.6, F4.8, F4.0, F3.4, F2 .8, F2.4, F2.0, F1.8).
Brightness: set the brightness value. Active when it is in the status of brightness priority (default: 7, other
options: 0-23).
c. Color: white balance, saturation, color, white balance, sensitivity, color temperature, gain red and blue
gain can be set.
White balance modes: set the white balance mode (default: automatic, other options: 3000K, 4000K,
5000K, 6500K, manual, One-push).
Note: click the “Correction” button when the One-push white balance mode is selected.
Saturation: set the saturation (default: 80%, other options: 60%, 70%, 80%, 90%, 100%, 110%, 120%,
130%). Auto white balance sensitivity: sensitivity of auto white balance (default: low, other options: high,
medium).
Chroma: set the chrome (default: 7, other options: 0-14).
Color temperature: set color temperature (default: high, other options: low, middle).
Red gain: set the red gain, effective when it is in manual mode (default: 255, options: 0-255).
Blue gain: sets the blue gain, effective when it is in manual mode (default: 199, options: 0-255).
d. Image: brightness, contrast, sharpness, black and white mode, gamma curve, and H/V flip can be set.
Brightness: set the brightness (default: 6, options: 0-14).
Contrast: set the contrast (default: 8, options: 0-14).
Sharpness: set the sharpness value (default: 7, options: 0-15).
Black and white mode: set black and white mode (default: color).
Gamma: Gamma value setting (default: 0.45, options: 0.50, 0.52, 0.55).
Flip Horizontal: flip horizontally (default: Off).
Flip Vertical: flip vertically (default: Off).
e. Noise reduction: 2D noise reduction, 3D noise reduction and dynamic dead pixel correction can be set.
2D Noise Reduction: set 2D noise reduction level (default:Auto, options: 1-7 and Off).
3D Noise Reduction: set 3D noise reduction level (default: 3, options: 1-7 and Off).
Dynamic dead pixel correction: set Dynamic dead pixel correction (default: Off, options: 1-8).
Note: click “Refresh” to make changes of any parameters of a, b, c, d, e effective .
4) Character-overlapping
Display date and time: set whether to display the time and date (default: display).
Display Title: set whether to display the title (default: display).
Font Color of Time: set font color of time and date (default: white, options: black, yellow, red, blue).
Font Color of Title: set font color of title (default: white, options: black, yellow, red, blue).
Moving characters: set the display position of moving date, time and title, click the "up, down, left,

HD Color Box Camera User Manual
- 19 -
right" buttons to move to the corresponding character position.
Title Content: set title content (default: CAMERA1).
Time Content: set time content (default: 1970/01/10 05:36:00)
Click the "Save" button, a message will show: "saved successfully". The changes will take effect.
5)Character Size
Main stream character size: set the character size of the main stream display. The device will restart
automatically after the changes are made (default: 24, options: 24,16).
Secondary stream character size: set the character size of the secondary stream display. The device will
restart automatically after the changes are made (default: 16, options: 24,16).
Click the "Save" button, a message will show: "saved successfully". The changes will take effect.
6)Video output
1080P60, 1080P50, 1080P30, 1080P25, 1080P59.94, 1080P29.97, 1080I60, 1080I50, 1080I59.94, 720P60, 720P50,
720P30, 720P25, 720P59.94,7 20P29.97.
Click the "Save" button, a message will show: "saved successfully". The changes will take effect.
4.2.6 Network configuration
1) Network port
Data Port: set the data port, the device will restart automatically after change is made (default: 3000, options:
0-65535).
Web Port: set web port, the device will restart automatically after change is made (default: 80, options: 0-65535).
Onvif Port: set Onvif port, the device will restart automatically after change is made (default: 2000, options:
0-65535).
Soap Port: set Soap port (default: 1936, options: 0-65535).
RTMP Port: set RTMP port (default: 1935, options: 0-65535).
RTSP Port: set RTSP port, the device will restart automatically after change is made (default: 554, options:
0-65535).
Visca Port: set Visca port, the device will restart automatically after change is made (default: 3001, options:
0-65535).
Click the "Save" button, a message will show: "saved successfully". The changes will take effect.
Method of obtaining RTMP: rtmp: // device IP address: 1935 / live / av0 (av0 main stream; av1 secondary stream)
2) Ethernet parameters
DHCP: enable or disable obtaining IP automatically. Save the change and reboot the device to take effect (default:
OFF).
IPAddress: set the IP address. Save the change and reboot the device to take effect (default: 192.168.5.163).
Note: this IP address is the same as the one used to login to the Web page.
Subnet Mask: set the subnet mask (default 255.255.5.0).
Default Gateway: set the default gateway (default 0.0.0.0).
PhysicalAddress: set the physical address (the parameter is read-only and cannot be modified).
Click the "Save" button, a message will show: "saved successfully". The changes will take effect. (Note: prevent IP
conflicts when modify).
3) DNS parameters
Preferred DNS server: set the preferred DNS server (Default 0.0.0.0).
Alternate DNS server: set the alternate DNS server (Default 0.0.0.0).
Click the "Save" button, a message will show: "saved successfully". The changes will take effect.
4) GB28181
Switch: set whether open GB28181.
Time Synchronization: set whether synchronization time is set.
Stream Type: set the stream type (default: main stream, option: secondary stream).
Sign effective time (in seconds): default: 3600, options: 5-65535.
Heartbeat time (seconds): default: 60, options: 1-65535.
Register ID: 34020000001320000001
Register User name: IPC
Register Password: 12345678
Equipment ownership: Users can add their own.
Table of contents
Other Avipas IP Camera manuals

Avipas
Avipas AV-1560 User manual

Avipas
Avipas AV-105 User manual

Avipas
Avipas AV-1161 User manual

Avipas
Avipas AV-1360 User manual

Avipas
Avipas SWIT-AV-1362 User manual

Avipas
Avipas AV-1360 User manual

Avipas
Avipas AV-1563 User manual

Avipas
Avipas AV-1361 User manual

Avipas
Avipas AV-1080 User manual

Avipas
Avipas AV-1250 User manual