Avipas AV-1563 User manual

1
Preface
Thanks for using this HD Video Conferencing Camera.
This manual introduces the functions, installation process and operation of the HD camera. Prior to installation
and usage, please read the manual thoroughly.
Precautions
This product should only be used under the specified conditions in order to avoid any damage to the camera:
◼Do not subject the camera to rain or moisture.
◼Do not remove the cover. Otherwise, you may risk receiving an electric shock. In case of unintended
equipment operation, contact an authorized engineer.
◼Never operate under unspecified temperature, humidity or power supply.
◼Please use soft dry cloth to clean the camera. If the camera is very dirty, clean it with diluted neuter
detergent; do not use any type of solvents, which may damage the surface.
Note:
This is a class A production. Electromagnetic radiation at certain frequencies may affect the image quality of
TV in home environment.

2
Content
1. Camera Installation…………………………………………………………………...……………………….…………4
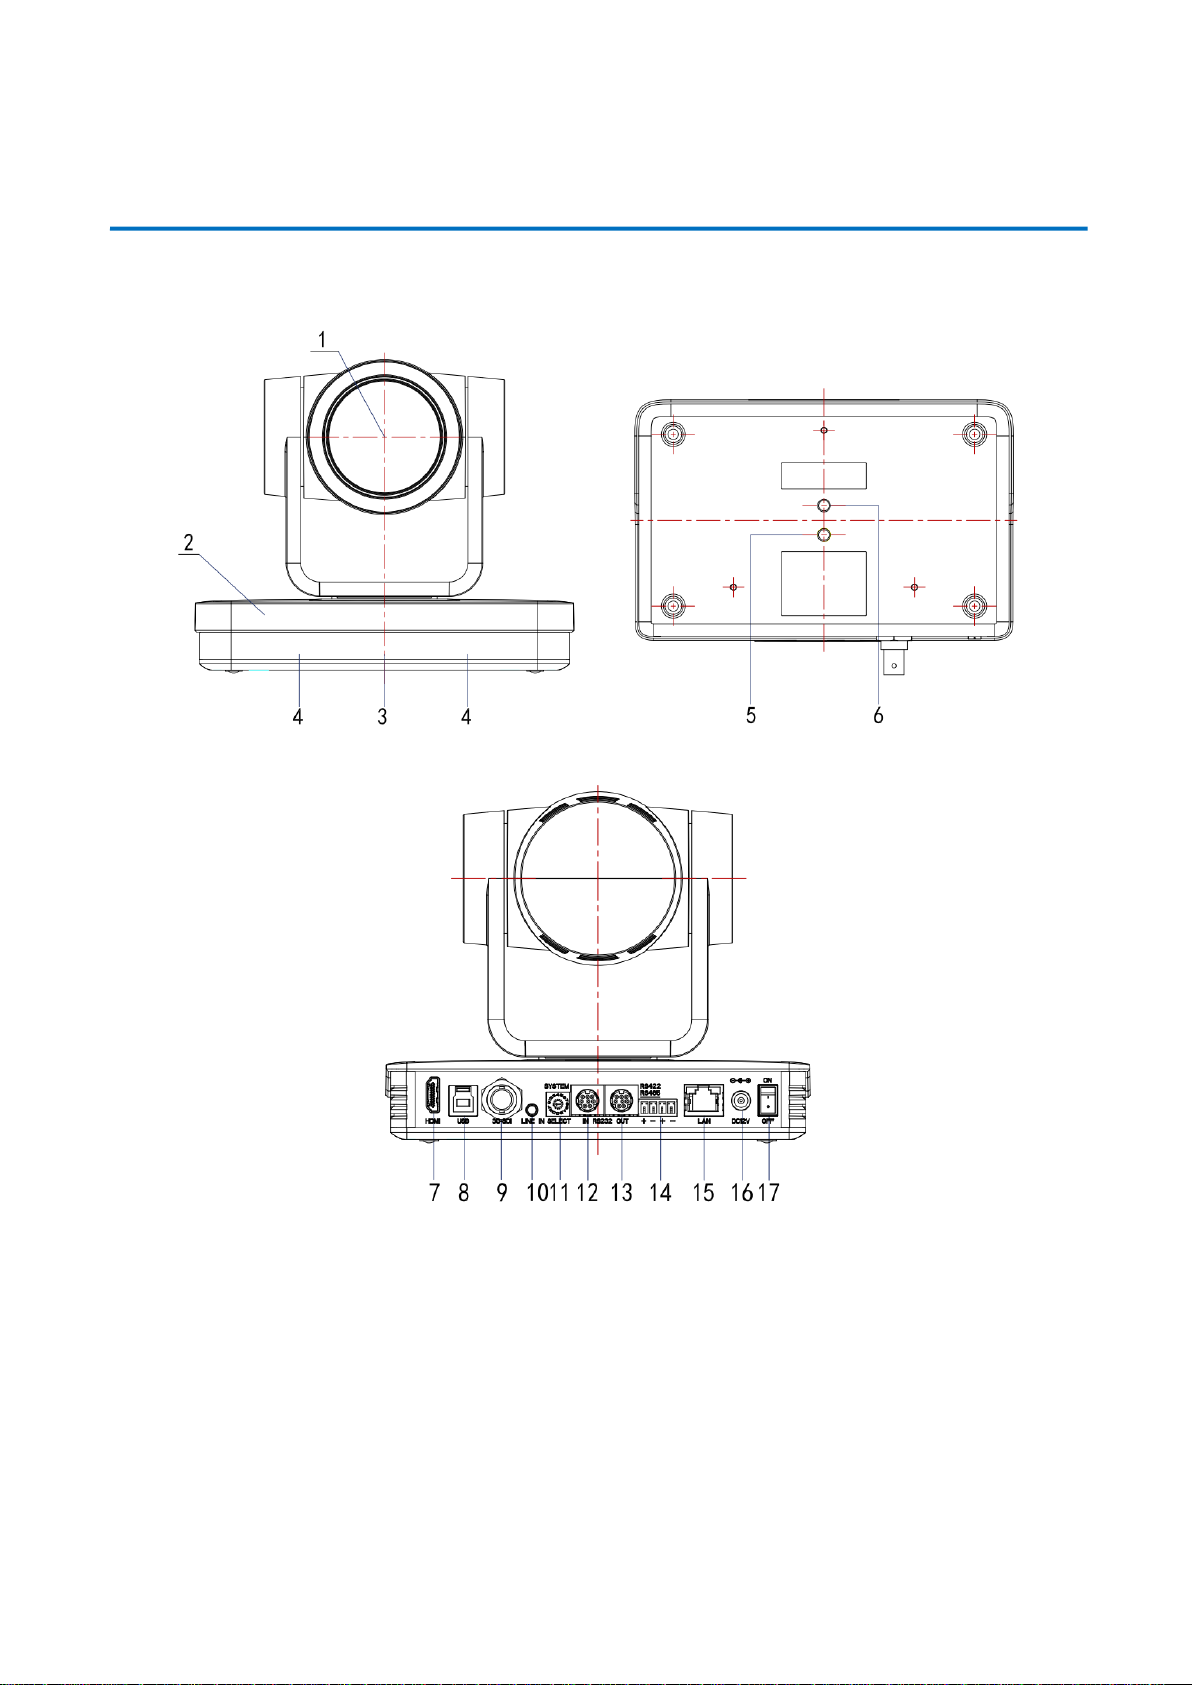
1.1 Camera Introduction……………………………………………………………………..…….………...….5
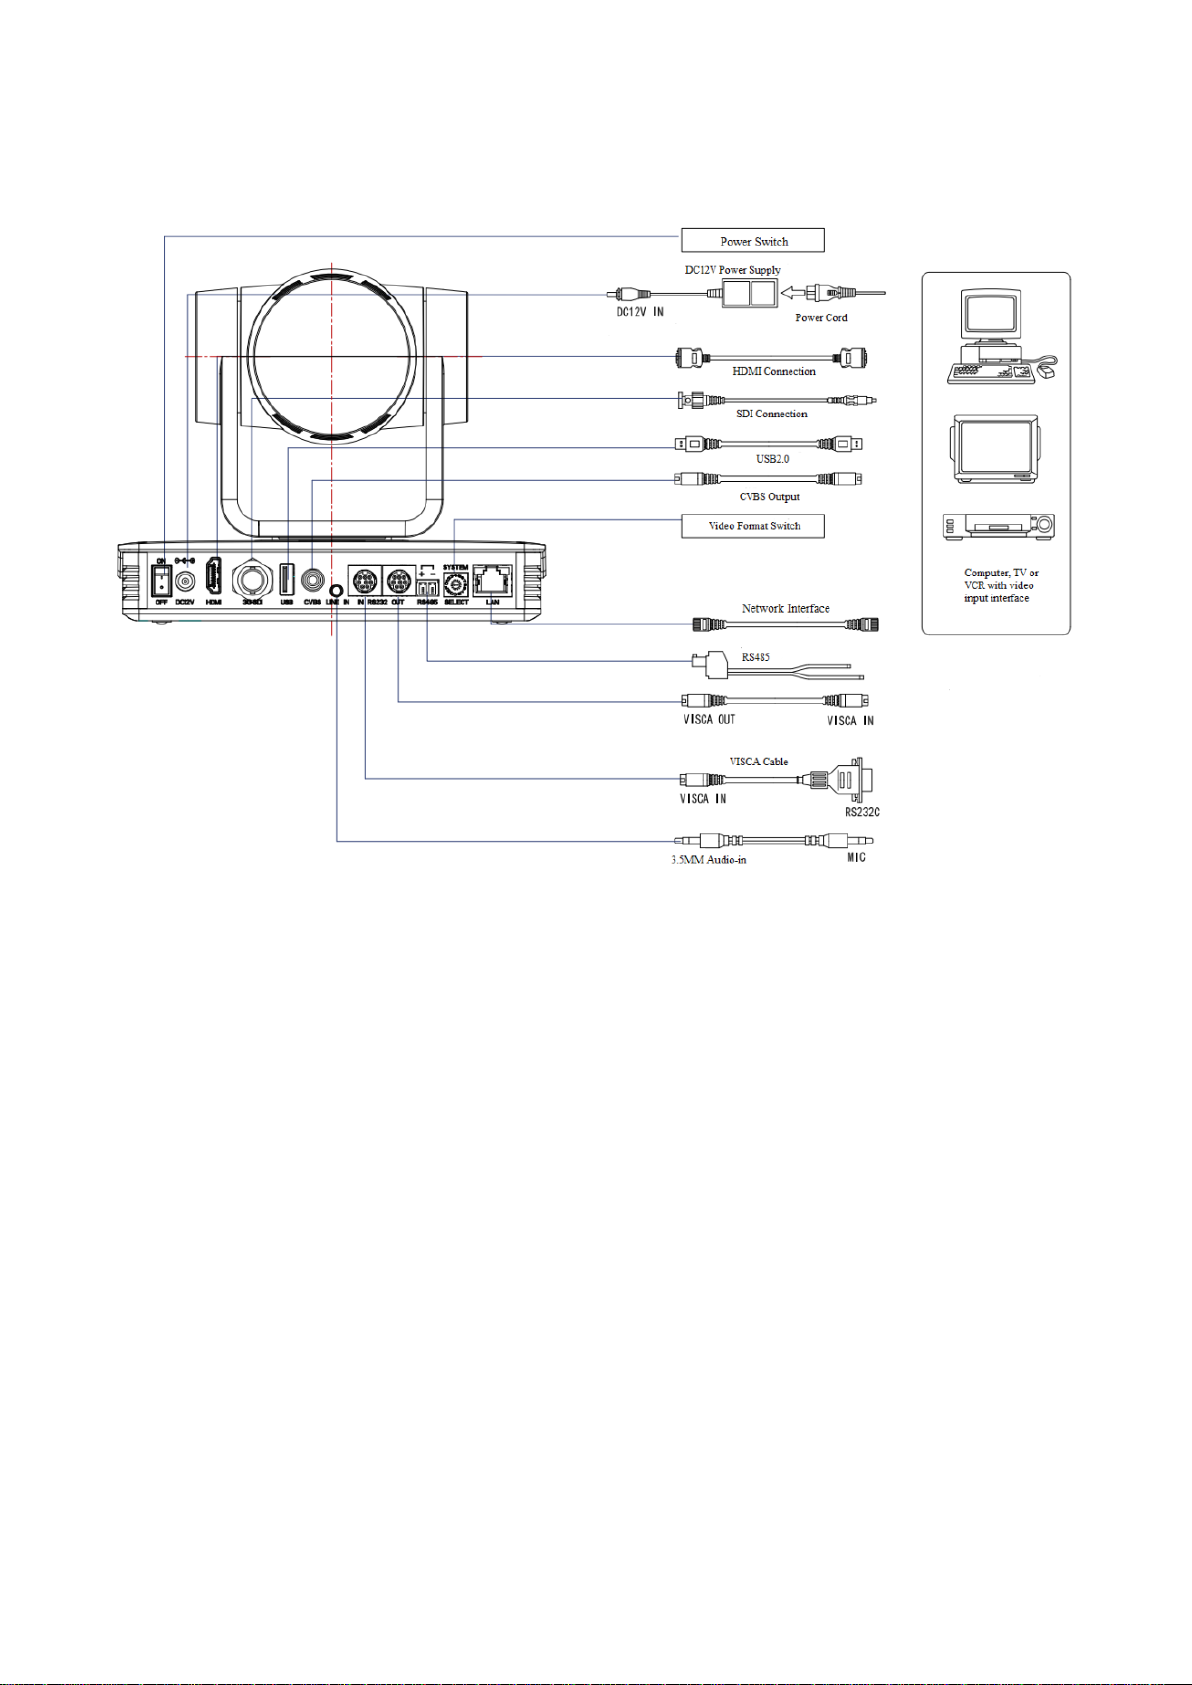
1.2 Interfaces and Connection…………………………………………………………….………..…………...5
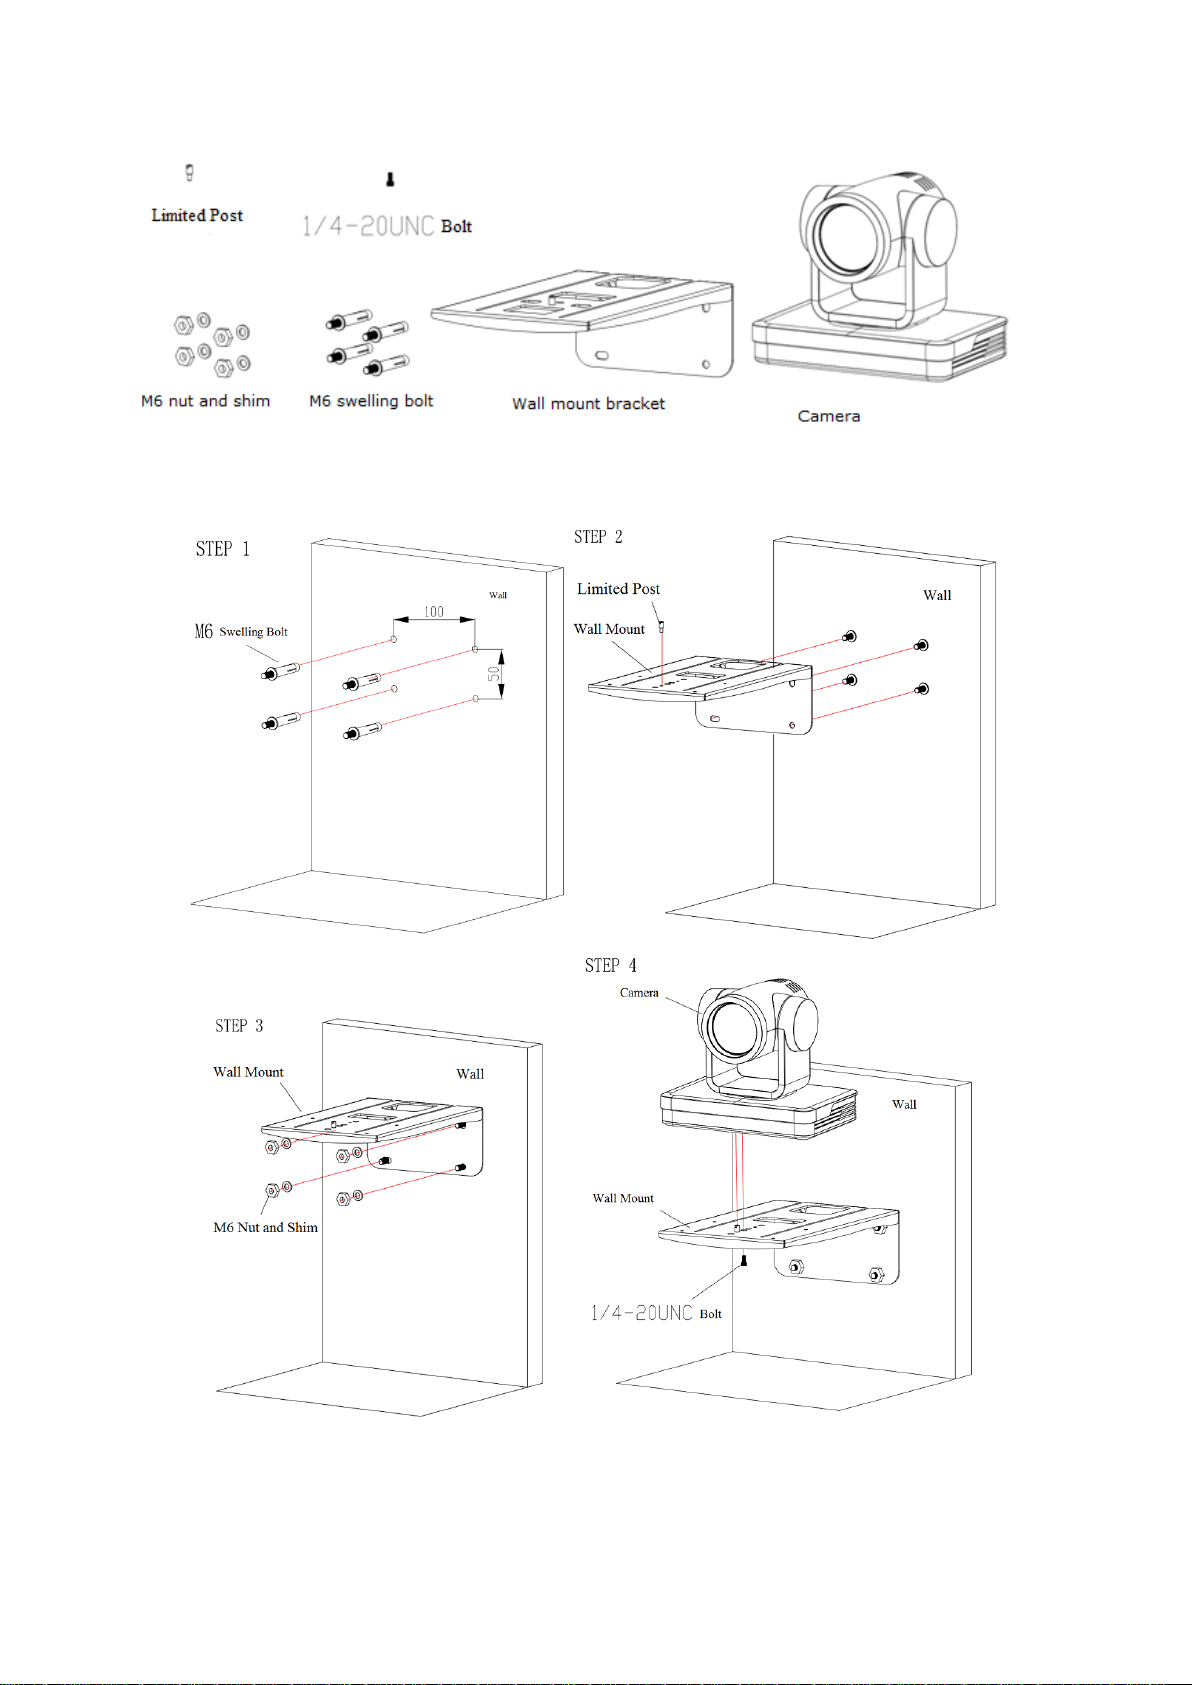
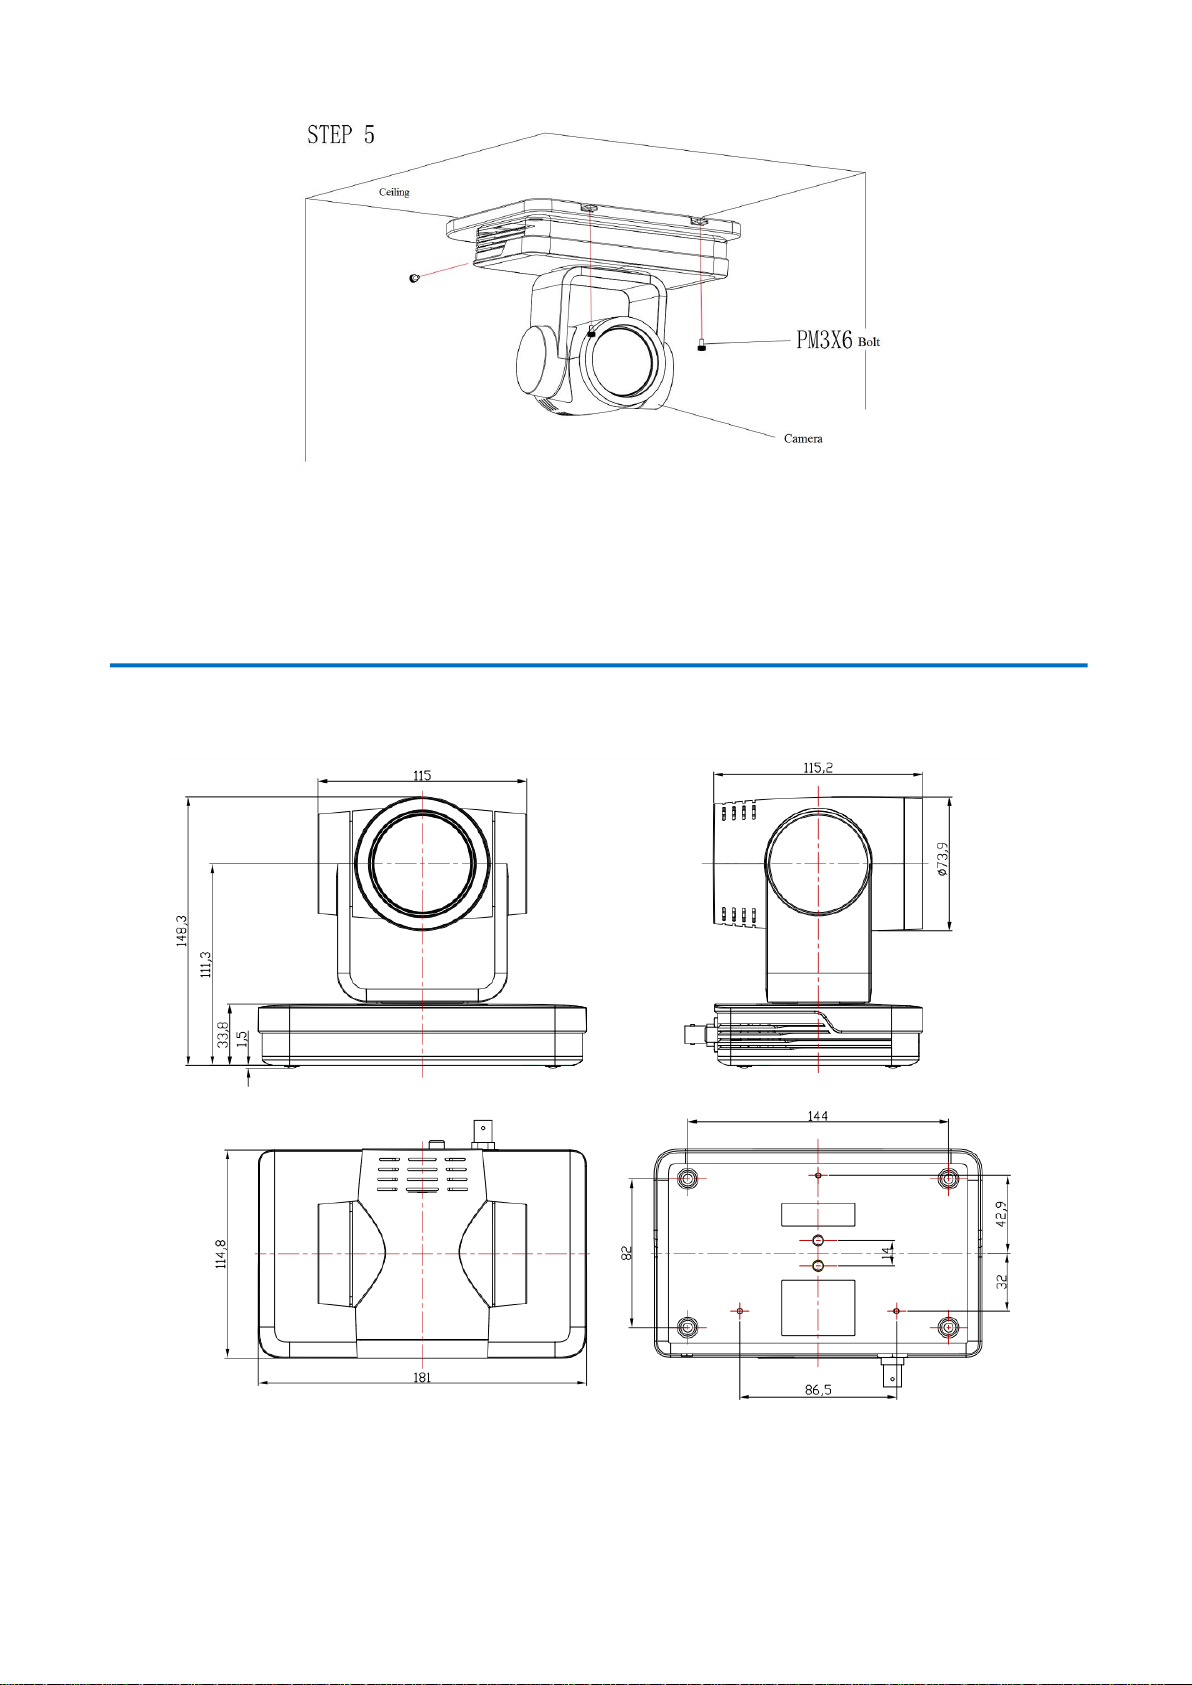
1.3 Mounting Brackets………………………………………………………………………………….……....5
2. Product Overview…………………………………………………………………………...……………………..8
2.1 Dimensions..…………………...………………………………………………………...……...…………..8
2.2 RS-232 Interface……………………………………...……………………………...………...……………9
2.3 Rotary DIP Switch………………………………………………………………………………...…….....10
2.4 Main Features……………………………………………………………………………………………...11
2.5 Specifications………………………………………………………………………………..………….….11
3. Remote Control……………………………………………………………………………………...……………13
3.1 Fuctions for IR Remote Control……………………………………………….………………………......13
3.2 Camera Menu ……..………………………………………...………………………..…………………...14
4. Network Configuration……………………………………………...…………………...……………………….15
4.1 Network Connection…………………………………………...…………………..………………………15
4.2 IE Login…………………………………………………………...………………..……………………...16
4.3 Streaming……………………………………………………...…………………..……………………….17
4.4 Software Upgrade…...…………………………………………………...…………..…………………….18
5. Serial Port Communication and Control………………………………………………………………..……..…19
5.1 VISCA Protocol Return Command………………………………………………………………………..19
5.2 VISCA Protocol Control Command…………………………………………………………….…………19
5.3 VISCA Protocol Inquiry Command………………………………………………………….…………….22
5.4 Pelco-D protocol command list…………………………………………………………….……………...24
5.5 Pelco-P protocol command list……………………………………………………………..……………...25
6. Maintenance and Troubleshooting………………………………………………………………………………..26
6.1 Maintenance………………………………………………………………………….…………………….26
6.2 Troubleshooting………………………………………………………..……………..……………………26

3
Attentions
⚫Electric Safety
Installation and operation must accord with electric safety standard.
⚫Use caution to transport
Avoid stress, vibration or soakage in transport, storage and installation.
⚫Polarity of power supply
The power supply of this product is +12V, the max electrical current is 2A. Polarity of the power supply plug
is shown in the drawing below.
⚫Installation precautions
Do not grasp the camera lens when carrying it. Do not touch camera lens by hand. Mechanical damage may
result from doing so.
Do not use in corrosive liquid, gas or solid environment to avoid any cover (plastic material) damage.
Make sure there is no obstacle within rotation range.
Do not power on before installation is completed.
⚫Do not dismantle the camera
We are not responsible for any unauthorized modification or dismantling.
CAUTION!
Certain frequencies of electromagnetic field may affect the image of the camera!
SuppliedAccessories
When unpacked, check if all supplied accessories are included:
Camera .......................................................1PCS
AC power adaptor ......................................1PCS
Power cord...................................................1PCS
RS232 cable.................................................1PCS
Remote control ............................................1PCS
User manual.................................................1PCS

4
1. Camera Installation
1.1 Camera Interface Illustration
Figure 1.1 Interface of SU Model
1. Camera Lens
2. Camera Base
3. Remote Control Receiving Indicator
4. Infrared Receiver
5. Tripod Screw Hole
6. Screw Hole for Tripod
7. HDM Output
8. USB3.0 Output
9. SDI Output
10. Audio Input Interface (Line-in)
11. Rotary DIP Switch
12. RS232 Control Interface (input)
13. RS232 Control Interface (output)
14. RS422 Interface (Compatible with RS485)
15. Network Interface (LAN)
16. DC12V Input Power Supply Socket
17. Power Switch

5
1.2 Interface and Connection
Figure 1.2 Wiring Diagram
1) After powering on and initialization, camera will automatically go to preset position 0 (Center position as
default).
2) The default cam address for the IR remote control is #1.
1.3 Mounting Brackets
Note: Ceiling or wall mounting brackets can only be mounted on a template and concrete wall.
For safety reason, plasterboard is not recommended.
1) Wall Mount:

6

7
2) Ceiling Mounting

8
2. Product Overview
2.1 Dimensions
Figure 2.2 Product Dimensions

9
2.2 RS-232 Interface
1). RS-232 Interface Definition
Connection to PC or Camera Controller
Camera
WindowsDB-9
1.DTR
1.DCD
2.DSR
2.RXD
3.TXD
3.TXD
4.GND
4.DTR
5.RXD
5.GND
6.GND
6.DSR
7.IR OUT
7.RTS
8.NC
8.CTS
9.RI
2). RS232 Mini-DIN 8-pin: Port Definition
3). RS232 (DB9) Port Definition
NO.
Port
Definition
1
DTR
Data Terminal Ready
2
DSR
Data Set Ready
3
TXD
Transmit Data
4
GND
Signal Ground
5
RXD
Receive Data
6
GND
Signal Ground
7
IR OUT
IR Commander Signal
8
NC
No Connection
NO.
Port
Definition
1
DCD
Data Carrier Detect
2
RXD
Receive Data
3
TXD
Transmit Data
4
DTR
Data Terminal Ready
5
GND
System Ground
6
DSR
Data Set Ready
7
RTS
Request to Send
8
CTS
Clear to Send
9
RI
Ring Indicator

10
4). VISCA networking as shown below:
Camera cascade connection
Camera 1
Camera 2
1.DTR
1.DTR
2.DSR
2.DSR
3.TXD
3.TXD
4.GND
4.GND
5.RXD
5.RXD
6.GND
6.GND
7.IR OUT
7.OPEN
8. NC
8.OPEN
2.3 Rotary DIP Switch
Dial-up
video format
Dial-up
video format
0
1080P60
8
720P30
1
1080P50
9
720P25
2
1080I60
A
1080P59.94
3
1080I50
B
1080I59.94
4
720P60
C
720P59.94
5
720P50
D
1080P29.97
6
1080P30
E
720P29.97
7
1080P25
F
video format to be set
on the menu
Note: please reboot the camera after switching the video format for changes to take effect.

11
2.4 Main Features
AV-1563 camera features advanced ISP processing algorithms to provide vivid images with a strong sense of depth,
high resolution and fantastic color rendition. It supports H.265/H.264 encoding which makes motion video fluent
and clear even under less than ideal bandwidth conditions.
⚫Full HD resolution: 1/2.8 inch high-quality CMOS sensor. Resolution is up to 1920*1080 with a frame rate up
to 60 fps.
⚫30x optical zoom lens:with 65° FOV without distortion.
⚫Auto-focus technology: fast, accurate and stable auto-focus technology.
⚫Low noise and high SNR: super high SNR achieved with low noise CMOS. Advanced 2D/3D noise reduction
technology further reduces the noise while ensuring image clarity.
⚫Multiple video output interface options: HDMI, SDI, USB3.0, LAN. Simultaneously output video signal via
HDMI, SDI, USB3.0 and LAN. LAN supports POE, USB3.0 support dual stream output, SDI output could be
up to 1080P@60fps.
⚫Multiple audio/video compression standards: support H.264/H.265 video compression, up to 1920×1080
resolution @60 fps; support AAC, MP3 and G.711A audio compression, 8000,16000,32000,44100,48000
sampling frequency.
⚫Built-in gravity sensor: support PTZ auto-flip function and easy installation.
⚫Multiple network protocols: support ONVIF, GB/T28181, RTSP, RTMP protocols; support RTMP push
mode,easy to be connected directly to streaming server (Wowza, FMS, etc.); support RTP multicast mode.
⚫Control interface: RS422 (compatible with RS485), RS232-IN, RS232-OUT for cascading.
⚫Multiple control protocols: support VISCA, PELCO-D, PELCO-P, VISCA over IP and ONVIF protocols.
⚫Multiple presets: up to 255 presets (10 presets using remote control).
⚫IR/Wireless remote control: users can choose IR remote control or wireless remote control via IP according
to different applications.
⚫Versatile for applications: online-education, lecture capture, webcasting, video conferencing, tele-medicine,
etc.
2.5Specifications
Camera Parameter
Optical Zoom
30X 4.3~129mm
Sensor
1/2.8-inch high-quality HD CMOS sensor
Effective Pixels
16: 9, 2.07 megapixel
Video Format
HDMI/SDI video format
1080P60/50/30/25, 1080I60/50, 720P60/50
LAN video format
1080P60/50/30/25/59.94/59.97, 1080I60/50/59.94, 720P60/50/59.94/29.97
USB3.0 interface video format
Main Stream: YUY2/MJPEG/NV12/H.264/H.265: 1920*1080P30, 1280*720P30,
1024*576P30, 960*540P30, 800*448P30, 720*480P30, 640*360P30, 640*480P30,
320*176P30
Sub Stream: YUY2/NV12: 640*360P30, 640*480P30, 320*176P30; MJPEG/H.264/H.265:
1920*1080P30, 1280*720P30, 1024*576P30, 960*540P30, 800*448P30, 720*480P30,
640*360P30, 640*480P30, 320*176P30
View Angle
65° (W) ~ 2.34°(T)
AV
F1.6 ~ F4.7
Digital Zoom
10x

12
Minimum Illumination
0.5Lux (F1.8, AGC ON)
DNR
2D & 3D DNR
White Balance
Auto / Manual/ One Push/ Specify color temperature (range: 2400k-7100k)
Focus/Aperture/
Electronic Shutter
Auto/Manual/One Push Focus
Iris
Auto/Manual
Shutter
Auto/Manual
BLC
ON/OFF
WDR
OFF/ Dynamic level adjustment
Video Adjustment
Brightness, Color, Saturation, Contrast, Sharpness, B/W mode, Gamma curve
SNR
>50dB
Input/output Interface
Video Output
HDMI, SDI, LAN, USB3.0
Video Stream
Dual stream output
Video Compression
Format
LAN: H.265, H.264
USB3.0: YUY2, MJPEG, H.264, NV12, H.265
Audio Input Interface
Double track 3.5mm linear input
Audio Output Interface
HDMI, SDI, LAN
Audio Compression
Format
AAC/MP3/G.711A
Control Interface
RS232-IN, RS232-OUT, RS422
Control Protocol
VISCA/Pelco-D/Pelco-P, Baud Rate: 115200/38400/9600/4800/2400bps
Power Interface
HEC3800 outlet (DC12V)
Input Voltage
DC12V±10%
Input Electric Current
Maximum: 1A
Power Consumption
Maximum: 12W
Network Protocols
RTSP, RTMP, ONVIF, GB/T28181;
Network VISCA control protocol (VISCA over IP);
USB Communication
UVC (Video)
PTZ Parameter
Pan/Tilt Rotation
±170°, -30°~+90°
Pan Control Speed
0.1 - 100°/sec
Tilt Control Speed
0.1- 45°/sec
Preset Speed
Pan: 100°/sec, Tilt: 45°/sec
Preset Number
255 presets (10 presets via remote control)
Other Parameter
Stored Temperature
-10℃~+70℃
Storage Humidity
20%~95%
Working Temperature
-10℃~+50℃
Working Humidity
20%~80%
Dimension
7.1*4.5*5.9inch (181*115*149mm)
Weight
2.5lbs (1.15kg)

13
3. Remote Control
3.1 Functions for IR Remote Control
1). In this manual, “press the key” means a short press rather than a long-press and hold. A note will be given if a
long-press for more than one second is required.
2). When a key-combination is required, do it in sequence. For example 【*】+【#】+【F1】means press 【*】
first and then press【#】and lastly press【F1】.
1. Standby Button
Press this button and hold it for 3 secs to enter standby mode. The camera will do
self-testing and return back to 【HOME】position. (Note: If Preset 0 is set, and with no
operation for 12s, the camera will automatically turn to Preset position 0.
2. CameraAddress Selection
Press the camera address number to control the particular camera with the address setting.
3. Number Keys
To set or call 0-9 presets.
4. *, #, Key Combination
To use as combination with 【F1-F4】to set camera address.
【*】+【#】+【F1】: Camera Address No.1
【*】+【#】+【F2】: Camera Address No. 2
【*】+【#】+【F3】: Camera Address No. 3
【*】+【#】+【F4】: Camera Address No. 4
5. Focus Control
【AUTO】: to enter auto focus mode.
【MANUAL】: to enter manual focus mode.
Switch the camera focus mode to manual by pressing FOCUS【+】or FOCUS【-】to
adjust.
6. Zoom Control
ZOOM【+】: Lens near; ZOOM【-】: Lens far
7. Set/ Clear Presets
【SET PRESET】+【0-9】number key: To set presets
【CLEAR PRESET】+【0-9】number key: To clear presets
8. Pan-Tilt Control Buttons
Press the Up, down, left and right buttons to adjust the camera position. Press
【HOME】to return to the center position.
9. BLC Control
【BLC ON/OFF】: To turn on/off the back light.
10. Menu Settings
【MENU】: to open/ close the OSD menu; to enter/ exit the OSD menu, or to return to the previous submenu.

14
11. Key Combination Functions
1) 【#】+【#】+【#】: Clear all presets
2) 【*】+【#】+【6】: Restore factory defaults
3) 【*】+【#】+【9】: Flip switch
4) 【*】+【#】+【AUTO】: Enter the auto mode
5) 【*】+【#】+【3】: Set language to Chinese
6) 【*】+【#】+【4】: Set language to English
7) 【*】+【#】+【MANUAL】: Restore the default user
name, PSW and IP address
8)【#】+【#】+【0】: Switch the video format to 1080P60
9)【#】+【#】+【1】: Switch the video format to 1080P50
10)【#】+【#】+【2】: Switch the video format to 1080I60
11)【#】+【#】+【3】: Switch the video format to 1080I50
12)【#】+【#】+【4】: Switch the video format to 720P60
13)【#】+【#】+【5】: Switch the video format to 720P50
14)【#】+【#】+【6】: Switch the video format to 1080P30
15)【#】+【#】+【7】: Switch the video format to 1080P25
16)【#】+【#】+【8】: Switch the video format to 720P30
17)【#】+【#】+【9】: Switch the video format to 720P25
3.2 Camera Menu
1. Menu Options
【MENU】: Enter /exit the OSD menu or return to the previous sub-menu
【HOME】:Enter the sub-menu
【↑】【 ↓】: Choose item
【←】【 →】: Modify values
2. Menu Structure

15
4. Network Configuration
4.1 Network Connection
Direct connection: Connect the camera and computer via an Ethernet cable directly.
Internet connection mode: Connect the camera to Internet (via a Router or a Switch).
The computer must be assigned to the network segment where the camera IP address belongs to. The device will
not be accessible otherwise.
The camera’s default IP address is 192.168.5.163, and in this case, your computer’s IP must be 192.168.5.xxx.
Open “Network and Sharing Center”, select “Ethernet”, “Ethernet Status”, “Properties”. Double click “Internet
protocol version 4 (TCP/IPv4)”. In the TCP/IPv4 Properties window; select “Advanced” to access TCP/IP settings.
Set computer’s IP, subnet mask and default gateway accordingly. Click the “Confirm” to finish the adding of IP
segment. If you’re using a camera with default settings, the recommended settings for your computer is:
IP: 192.168.5.160
Subnet mask: 255.255.255.0
Default gateway: 192.168.5.1

16
Note: please make sure the IP address to be added is not the same as any other device connected to your
computer.
To verify the network segment has been successfully added, click “Search”icon and input “cmd”. Then click
“Command Prompt”and open DOS command window. Ping 192.168.5.26 and press Enter key to display
information as shown below:
Connect the camera to your computer, power on. Open DOS command window, and ping 192.168.5.163, then press
Enter key.
4.2 IE Login
1) Web Page Login
Input the default IP address 192.168.5.163 in the browser and click Enter. User can login as administrator or as
normal user. If login as administrator (Default User name/Password: admin), users can preview, playback, and set
configuration; If login in as normal user (Default User name/Password:user1 or user2), users can only preview,
playback, camera configurations cannot be changed.
Note: Web access support IE and Chrome browsers.
2) Download and Install Plug in for IE login
First-time login: a pop-up message will show on the bottom of IE browser: “Playback plug-in is not installed,

17
please download and install!”. Click on this message, download and install MRWebXinstall.exe following the
information.
4.3 Video Encode
1). Video Stream Capture
Configurations -> Video Configure-> Video Encode
Configure the parameters according to the network settings.
Note: stream name live/av0 (live/ XXX)
For example:
The default IP address of the camera is 192.168.5.163. To obtain video via RTSP stream, please use the URL
below:
rtsp://192.168.5.163/live/av0(av0 main stream)
rtsp://192.168.5.163/live/av1(av1 sub stream)
2). Push Video Stream
Configurations -> Video Configure-> Stream Publish

18
To push RTMP stream to a server/ platform (public network), make sure the camera’s IP configurations are set to be
consistent with the public network, otherwise it will not connect to server successfully. For connection details,
please refer to: avipas.com-> SUPPORT -> HOW TO MATERIALS -> How to live stream.
Host address: server address. Can be a domain name or an IP address
Host port: server default port number
Stream name: live/test (live/ XXX)
Username and password: you will find the username and password on your server, otherwise leave it empty
Access URL:rtmp://host domain name: host port/live/xxx
Or (rtmp://host IPaddress: host port/live/xxx)
4.4 Software Upgrade
1). Log in to the web page to access camera settings.
2). Go to “Configurations”tab -> System Configure-> Update

19
3). Click "Browse…" to select the “.mrg”update file, then click upgrade button to start the upgrading process.
4). A "successful upgrade" message will prompt, and camera will reboot after completion of update.
Re-log in to check the firmware version to make sure software upgrade is successful.
Click “Reboot”-> "restore factory default" to restore camera to factory default and reboot. (default IP
192.168.5.163, user name: admin; password admin).
5. Serial Port Communication and Control
AV-1563 could be controlled through RS232/RS485 interface; RS232C serial parameters are as below:
Baud rate: 2400/4800/9600/115200 bits / sec; Start bit: 1; data bits: 8; Stop bit: 1; Parity: None.
5.1 VISCA Protocol Return Command
Ack/Completion Message
Command packet
Note
ACK
z0 41 FF
Returned when the command is accepted.
Completion
z0 51 FF
Returned when the command has been executed.
z = camera address + 8
Error Messages
Command packet
Note
Syntax Error
z0 60 02 FF
Returned when the command format is different or when a
command with illegal command parameters is accepted
Command Not
Executable
z0 61 41 FF
Returned when a command cannot be executed due to
current conditions. For example, when commands
controlling the focus manually are received during auto
focus.
5.2 VISCAProtocol Control Command
Command
Function
Command packet
Note
AddressSet
Broadcast
88 30 0p FF
p:Address setting
IF_Clear
Broadcast
88 01 00 01 FF
I/F Clear
CommandCancel
8x 21 FF
CAM_Power
On
8x 01 04 00 02 FF
Power ON/OFF
Off
8x 01 04 00 03 FF
CAM_Zoom
Stop
8x 01 04 07 00 FF
Tele (Standard)
8x 01 04 07 02 FF
Wide (Standard)
8x 01 04 07 03 FF
Tele (Variable)
8x 01 04 07 2p FF
p = 0(low) - F(high)
Wide (Variable)
8x 01 04 07 3p FF
Direct
8x 01 04 47 0p 0q 0r 0s FF
pqrs: Zoom Position
Stop
8x 01 04 08 00 FF
Table of contents
Other Avipas IP Camera manuals

Avipas
Avipas AV-1080 User manual

Avipas
Avipas SWIT-AV-1362 User manual

Avipas
Avipas AV-1360 User manual

Avipas
Avipas AV-1160 User manual

Avipas
Avipas AV-1330 User manual

Avipas
Avipas AV-1250 User manual

Avipas
Avipas AV-1360 User manual

Avipas
Avipas AV-1560 User manual

Avipas
Avipas AV-1361 User manual

Avipas
Avipas AV-1161 User manual
Popular IP Camera manuals by other brands

Reolink
Reolink Lumus Operational Instruction

Ovislink
Ovislink AirLive WL-5400CAM user manual

Cisco
Cisco 6500PD installation guide

Avermedia
Avermedia AVerDiGi SF1301 user manual

Grandstream Networks
Grandstream Networks GXV3674_HD/FHD_VF v2 Quick installation guide

Dericam
Dericam B-xE Series Quick installation guide