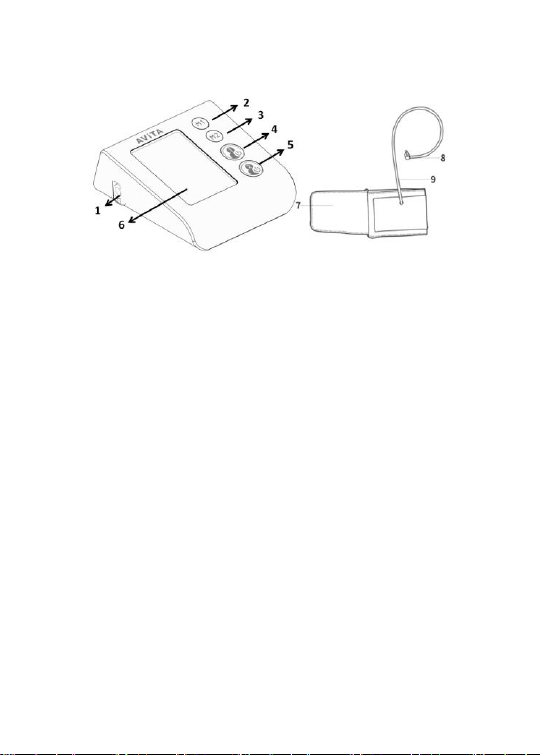
Avita BPM924-00 User manual

Arm Type Blood Pressure Monitor
Model: BPM924-00
INSTRUCTION MANUAL
PLEASE READ THIS INSTRUCTION MANUAL COMPLETELY
BEFORE OPERATING THIS UNIT
EN
RoHS REACH
MDSS GmbH
Schiffgraben 41
30175 Hannover Germany
AViTA Corporation
9F., No. 78, Sec. 1, Kwang Fu Rd.,
San Chung Dist., New Taipei City 24158, Taiwan, China
China, AViTA(WUJIANG)
Importer
Distributor

Contents
Intended Use....................................................................................................................... 1
Important Information before Use ........................................................................... 4
Product Identification ..................................................................................................... 6
Description of LCD Display........................................................................................... 7
Battery Installation ........................................................................................................... 8
Setting the Date and Time............................................................................................ 9
Placement of the Pressure Sleeve............................................................................10
Measurement of Pulse Rate and Blood Pressure .............................................14
Hypertension Indicator ................................................................................................16
Irregular Heartbeat Detector.....................................................................................17
Memory Function ...........................................................................................................18
Error Codes........................................................................................................................20
Troubleshooting ..............................................................................................................21
Cleaning and Disinfecting...........................................................................................22
Technical Specification .................................................................................................23
EMC Tables.........................................................................................................................24
Explanation of Symbols................................................................................................26

1
Intended Use
The product automatically measures human being‟s Systolic, Diastolic
blood pressure and pulse rate by oscillometric method. The
measurement results are displayed on the LCD. Measurement position
is at human being‟s upper arm. The intended use of this
over-the-counter device is for adults with upper arm circumference
ranging from 220 mm to 420 mm (Approx.8.7 ~ 16.5 inches) and for
home use. When the device detects the appearance of irregular
heartbeats such as atrial or ventricular premature beats during
measurement, an indicated symbol will appear with measuring
readings.
This device is designed only for adults.
Type of Use/ Reuse
Multiple patient multiple use
Intended User
The Arm type blood pressure monitor is intended or both professional
and consumer, and the patient is the intended operator.
Patient selection criteria: Handicapped persons and children are the
exception, as of handicapped persons and children need assistance by
another person to use the device.
Contra-indications
•Please do not place the cuff over a wound as this may cause further
injuries.
•If an intravenous treatment is being carried out or a venous catheter
is inserted in the arm, blood pressure measurements can lead to
injury. Never use the cuff on the arm to which these conditions apply.

2
•If you are prone to hematoma, do not put on a cuff nor carry out a
blood pressure measurement.
Consult your doctor before measuring your own blood pressure if…
•If you have any of the following conditions, it is essential you consult
your doctor before using the device: cardiac arrhythmia,
Cardiovascular disease, very low blood pressure, diabetes,
circulatory problems, diabetes, liver function disorders or narrowing
of blood vessels, blood disorders, pregnancy, pre-eclampsia,
hypotension, chills, shaking, tremors, implanted electrical implants
(e.g. pacemaker).
•You are on dialysis or taking anticoagulant medication
(anticoagulants), platelet aggregation inhibitors or steroids.
•You tend to bruise easily and/or are sensitive to pressure pain.
CAUTION:
•Beware of blood flow interference and resulting harmful injury to the
patient caused by continuous cuff pressure.
•Do not use the device at the same time as other medical electrical
devices (ME equipment). This could lead to a malfunction of the
device and/or an inaccurate measurement.
•Measurement results fundamentally depend on the measurement
location and the position of the patient (sitting, standing, reclining).
They are also influenced by e.g. physical activity and physiological
preconditions of the patient. For comparable values, carry out the
measurement in the same location and in the same position.
•Do not use the device outside of the specified storage and operating
conditions. This could lead to incorrect measurements.
•Please note that when inflating the cuff, the functions of the limb in
question may be impaired.
•During the blood pressure measurement, the blood circulation must
not be stopped for an unnecessarily long time. If the device

3
malfunctions remove the cuff from the arm.
•The blood pressure monitor is made from precision and electronic
components. The accuracy of the measurements and service life of
the device depend on its careful handling.
•Do not drop the device.
•Do not perform measurements more frequently than necessary. Due
to the restriction of blood flow, some bruising may occur.
•Retake the measurement if unexpected readings are obtained
•Ensure that the cuff is not placed on an arm in which the arteries or
veins are undergoing medical treatment, e.g., intravascular access or
therapy, or an arteriovenous (AV) shunt.
•Do not use the cuff on people who have undergone a mastectomy.
•Do not place the cuff over wounds as this may cause further injury.
•High BMI health condition users may result varied.
•The blood pressure monitor must not be used in connection with a
high-frequency surgical unit.
•Do not use the device in the vicinity of strong electromagnetic fields
and keep it away from radio systems or mobile telephones.
•The measured values taken by you are for your information only -
they are no substitute for a medical examination. Discuss the
measured values with your doctor and never make your own medical
decisions based on them (e.g. regarding dosages of medicines).
•The device is only intended for the purpose described in these
instructions for use. The manufacturer is not liable for damage
resulting from improper or incorrect use. No modification of this
equipment is allowed.
•If the irregular heart beat symbol appears often, it may indicate heart
rhythm disorders. Please consult your doctor in that case. Severe
heart rhythm disorders may sometimes produce lead to
measurements or reduce the measurement accuracy. Please discuss
with your doctor whether taking your own blood pressure is
appropriate for you.

4
Important Information before Use
1. Blood pressure measurements should only be interpreted by a
physician or a trained health care professional who is familiar with
your medical history. Through regular use of this device and
recording of your measurements, you can keep your physician
informed of the changes in your blood pressure.
2. Perform your measurement in a quiet place. You should be seated in
a relaxed position.
3. Avoid smoking, eating, taking medication, alcohol consumption or
physical activity 30 minutes prior to taking a reading. If you are
exhibiting signs of stress, avoid taking your measurement until the
feeling subsides.
4. Rest 15 minutes prior to taking a reading.
5. Remove any constrictive clothing or jewelry that may interfere with
the cuff placement.
6. Keep the monitor stable during measurement to achieve an
accurate reading. Remain still; do not talk during the measurement.
7. Record your daily blood pressure and pulse readings on a chart.
8. Take your readings at the same time, each day or as recommended
by your physician to get an accurate indication of change in your
true blood pressure.
9. Wait a minimum of 15 minutes between readings to allow for the
blood vessels to return to normal. The wait time may vary
depending on your individual physiological characteristics.
10. Although such cases are rare, for those with an extremely weak
pulse or irregular pulse, errors may result which prevent proper
measurement. If abnormal variations are noticed, consult with your
physician or trained healthcare professional.
11. This device is intended for adult use. While taking a measurement,
you can stop the inflation or deflation process of the cuff at any
time by pressing the POWER button.

5
12. If any serious incident that has occurred in relation to the device
should be reported to the manufacturer and the competent
authority of the Member State in which the user is established.
13. Do not expose the device to extreme temperatures, humidity dust or
direct sunlight as this may cause it to malfunction.
14. Please comply with the storage and operating conditions defined in
„Technical Specification‟. Storing or using the device outside of
the specified temperature and humidity range can affect
measurement accuracy or the function of the device.
15. If the device was not stored within the minimum/maximum
permissible storage conditions, a waiting period of at least 2 hours
must be observed before using it under the specified operating
conditions („Technical Specification‟) or an ambient temperature
of approx. 20 °C.
For Customer Service, the blood pressure monitor is calibrated when
manufactured; it is recommended that the accuracy should be
maintained and calibrated by manufacture triennially (every 3 years). To
obtain the service please contact AViTA Corp. for the address of the
repair location. Enclose with the Proof of Purchase. Include $10.00 USD
for the return shipping and handling. Accompany with a letter, with your
name, address, phone number, and description of the specific problem
or routine check-up. Pack the device carefully with bubble wraps (if
there is) to prevent damages cause during transit. Due to possible
losses in transit, it is recommended insuring the device with return
receipt requested. If in any way of assistance of setting up, using,
maintaining or to report unexpected operation/adverse events please
contact manufacturer or local representative for further assistance.

6
Product Identification
1
Air socket
2
Memory button ( M1 key)
3
Memory button ( M2 key)
4
Start/Stop button (User 1 Power key)
5
Start/Stop button (User 2 Power key)
6
Display
7
Cuff
8
Cuff connector
9
Cuff tube

7
Description of LCD Display
Low battery indicator
WHO indicator
Date & Time
Irregular Heartbeat Symbol
Memory Symbol and Memory Set
Heartbeat Symbol
Pulse rate
Pressurize
Release air
User 1
User 2
Systolic Pressure
Diastolic Pressure

8
Battery Installation
Low battery warning:
It is necessary to replace the batteries when the Low Battery symbol
“ ” appears on the display, or when the display does not turn
on after the POWER key is pressed.
Replacing the Battery:
1. Press down on latch and lift the cover on the bottom of the monitor.
2. Insert or replace 4x 1.5 V AAA batteries into the battery
compartment, ensuring to match the indicated polarity symbols.
Always use new batteries.
3. Replace the battery cover.
CAUTION:
Risk of explosion if battery is replaced by an incorrect type. Dispose of
used batteries according to the instructions.
NOTE: Battery-operated
1. Please properly dispose of the batteries away from small children
and heat. Avoid the children accidentally swallow the battery.
2. It is recommended to remove the batteries if the unit will not be
used for more than 1 month.
3. Batteries must be disposed of in accordance with local
environmental and institutional policies.
4. It is recommended not to use rechargeable, unqualified or different
spec battery may damage the device or cause circuit shortcut.

9
Setting the Date and Time
It is necessary to set the date and time for the unit every time batteries
are initially installed or replaced.
To set the date and time, proceed as follows:
•Loading 4 AAA alkaline batteries; the Year value will begin to flash on
the display.
•Press the “M2” key to advance the display to the desired year, press
the “M1” key to confirm the year.
•Next, the month will blink. Repeat step 2 to set the month and date,
then hours, then minutes.
•After setting the minutes, the unit will automatically exit out of the
date/time setting mode and shut off.

10
Placement of the Pressure Sleeve
It is important to avoid smoking, eating, taking medication, alcohol
consumption or physical activity 30 minutes prior to taking a reading. If
for any reason you are unable to or should not use your left arm, please
modify the instructions for cuff application to your right arm. Your
physician can help you identify which arm is best for you to take
measurements from.
1. Remove any constrictive clothing or jewelry that may interfere with
cuff placement.
2. Be seated at a table or desk with your feet flat on the floor.
3. The cuff should not be plugged into the monitor until after the cuff is
applied to your arm.
Note:
Blood pressure naturally varies from one arm to the other; therefore,
measure your blood pressure on the same arm to ensure comparability
of the two readings.

11
4. Position the cuff on a solid surface with the tubing facing up and
away from you. The metal ring/bar on the cuff should be to the left of
the tubing.
5. Open the cuff by pulling or rolling the bottom of the cuff to the right.
This should open the cuff without fully unrolling it, creating a cylinder.
Do not fully unwrap or unroll the cuff.
6. Insert your left arm into the created cuff cylinder.

12
7. The bottom edge of the cuff should be positioned approximately
one inch above the elbow joint.
8. Please reaching underneath your left arm with your right hand, pull
the end of the cuff towards your body to tighten the cuff. Wrap and
secure the cuff, making sure in place as shown.
9. The cuff should fit comfortably, yet snugly around your arm. You
should be able to insert one finger easily between your arm and the
cuff.

13
10. Insert the cuff into the monitor.
Note:
If you are not comfortable with applying your cuff, please seek the
assistance of another member of your household or work with your
physician to practice the cuff application. Incorrectly applied cuffs may
result in inaccurate readings.

14
Measurement of Pulse Rate and Blood Pressure
1. Press the Start/Stop button (User 1 Power key or User 2 Power key) to
turn the power on. After full display is shown, the unit displays the
value “0”.
2. After the self-test, the blood pressure monitor starts to measure. The
cuff will automatically begin to inflate, with the display showing the
increasing pressure in the cuff.
3. As the pressure increases, the indicator will increase upwards
according to the pressure value on the display.
4. As the cuff inflates, the monitor automatically determines your ideal
inflation level. This monitor detects your blood pressure and pulse
rate during inflation.
5. To detect the heartbeat, the heartbeat symbol will appear and
continuous flashes on the LCD display.
6. Your blood pressure measurement and pulse will display
simultaneously on the screen.

15
7. The Hypertension Indicator will indicate your reading range on the
display separately.
8. Press the Power key to turn the unit off and conserve energy and
battery life.
The unit will automatically shut-off approximately 2 minutes.
Note:
1. Users are recommended to use BPM924-00 daily at a fixed time,
frequency of usage from 1 to 3 times can be suggested from
physician or doctor‟s advice.
2. Base on individual body condition the typical operation time takes
approximately 30 seconds to 1 minute.

16
Hypertension Indicator
This unit features our unique Hypertension Indicator. The World Health
Organization has established globally accepted standards for the
assessment of high or low blood pressure readings. The below chart
should be considered only as a guideline, always consult with your
physician or health care professional to interpret your individual results.

17
Irregular Heartbeat Detector
Your digital blood pressure monitor features an Irregular Heartbeat
Detector. This feature allows users to accurately monitor blood pressure
even if an irregular heartbeat should occur. When an irregular heartbeat
“ ”is detected, the icon will appear on the display.
Note:
Please consult with your physician or trained healthcare professional for
further information regarding an irregular heartbeat and if this symbol
appears frequently.
INPORTANT INFORMATION:
This blood pressure monitor is not designed for use by people with
arrhythmias nor for diagnosing or treating an arrhythmia problem. As a
safeguard, we recommend that if you have arrhythmias such as atrial or
ventricular premature beats and atrial fibrillation or any other special
conditions you should check with your physician before using your
blood pressure monitor.

18
Memory Function
Recalling Measurements in Memory:
You can recall up to 100 measurements for each user, plus those
average values stored measurements in memory to share with your
physician or trained healthcare professional.
If you press the M1 or M2 key, the unit will first display the average of
last 3 currently stored measurements. Continue to press the M key to
successively view the average value of the morning measurements and
evening measurements for the last 7 days will be displayed.
The duration of morning is AM5:00 –AM9:00,
The duration of evening is PM6:00 –PM8:00
If you press the M1 or M2 key again, the measurements will appear on
the display from most current to oldest. And the memory number will
appear on the display.
All results for a given measurement will display, including measurement
results, pulse rate, Hypertension Indicator, Irregular Heartbeat alert, and
date/time stamp.
Table of contents
Other Avita Blood Pressure Monitor manuals

Avita
Avita BPM68 User manual

Avita
Avita BPM67 User manual

Avita
Avita BPM835-AJ User manual

Avita
Avita BPM19B User manual

Avita
Avita BPM655-LJ User manual

Avita
Avita BPM32B User manual

Avita
Avita BPM924-0J User manual

Avita
Avita BPM60 User manual

Avita
Avita BPM82 User manual

Avita
Avita NOVAMA BP60 User manual