Avlite AV-426-ICAO Manual

Version 4.0
AV-426-ICAO
Radio Controlled Solar Aviation Light
Installation & Service Manual

AV-426-ICAO
Solar Aviation Light
405.7mm
15.9in
294.9mm
11.6in
168.70mm
6.6in
200.8mm
7.9in
Diam 15.9 x 25.4 slot
(0.63" x 1 ")
200.8mm
7.9in
168.7mm
6.6in
502mm
19.8in
391mm
15.4in
12vdc input for
cable connection
(auxiliary charging
port system)
Integrated
handle
4 Integrated
user-replaceable
solar panels
Push button switch
to cycle through
operational modes
Internal
2.4GHz RF module
LED light unit,
with visible and
near infrared
lighting outputs
Global
2.4GHz
RF Radio
control
External ON/OFF
switch
Standard Model Compact Model

Latest products and information available at www.avlite.com
3
AV-426-ICAO
Radio Controlled Solar Aviation Light
Table of Contents
Introduction..........................................................................................Page 4
Technology...........................................................................................Page 4
AV-426-ICAO Model .............................................................................Page 5
Activation .............................................................................................Page 6
Avlite Radio Controller........................................................................Page 7
Assembly & Installation of Radio Controller ....................................Page 8
Radio Controller Menu........................................................................Page 9
Radio Controller System Setup........................................................Page 11
Using the Radio Control to Activate the Aireld
Lighting System (ALS)......................................................................Page 19
Installation..........................................................................................Page 27
Simple Approach Lighting................................................................Page 30
Runway End Identier Light (REIL) .................................................Page 32
Maintenance and Servicing ..............................................................Page 34
Trouble Shooting ...............................................................................Page 39
Documentation ..................................................................................Page 41
AV-SB Solar Booster™......................................................................Page 42
Solar Booster™ Installation Procedure...........................................Page 43
Other Avlite Products Available .......................................................Page 45
Version No. Description Date Created By
1.0 Manual Launch October 2016 J. Ohle
2.0 Manual Update August 2017 C. Bernardo
3.0 Manual Update May 2018 Y.Chambers
4.0 Manual Update October 2018 Y.Chambers

Latest products and information available at www.avlite.com
4
AV-426-ICAO
Radio Controlled Solar Aviation Light
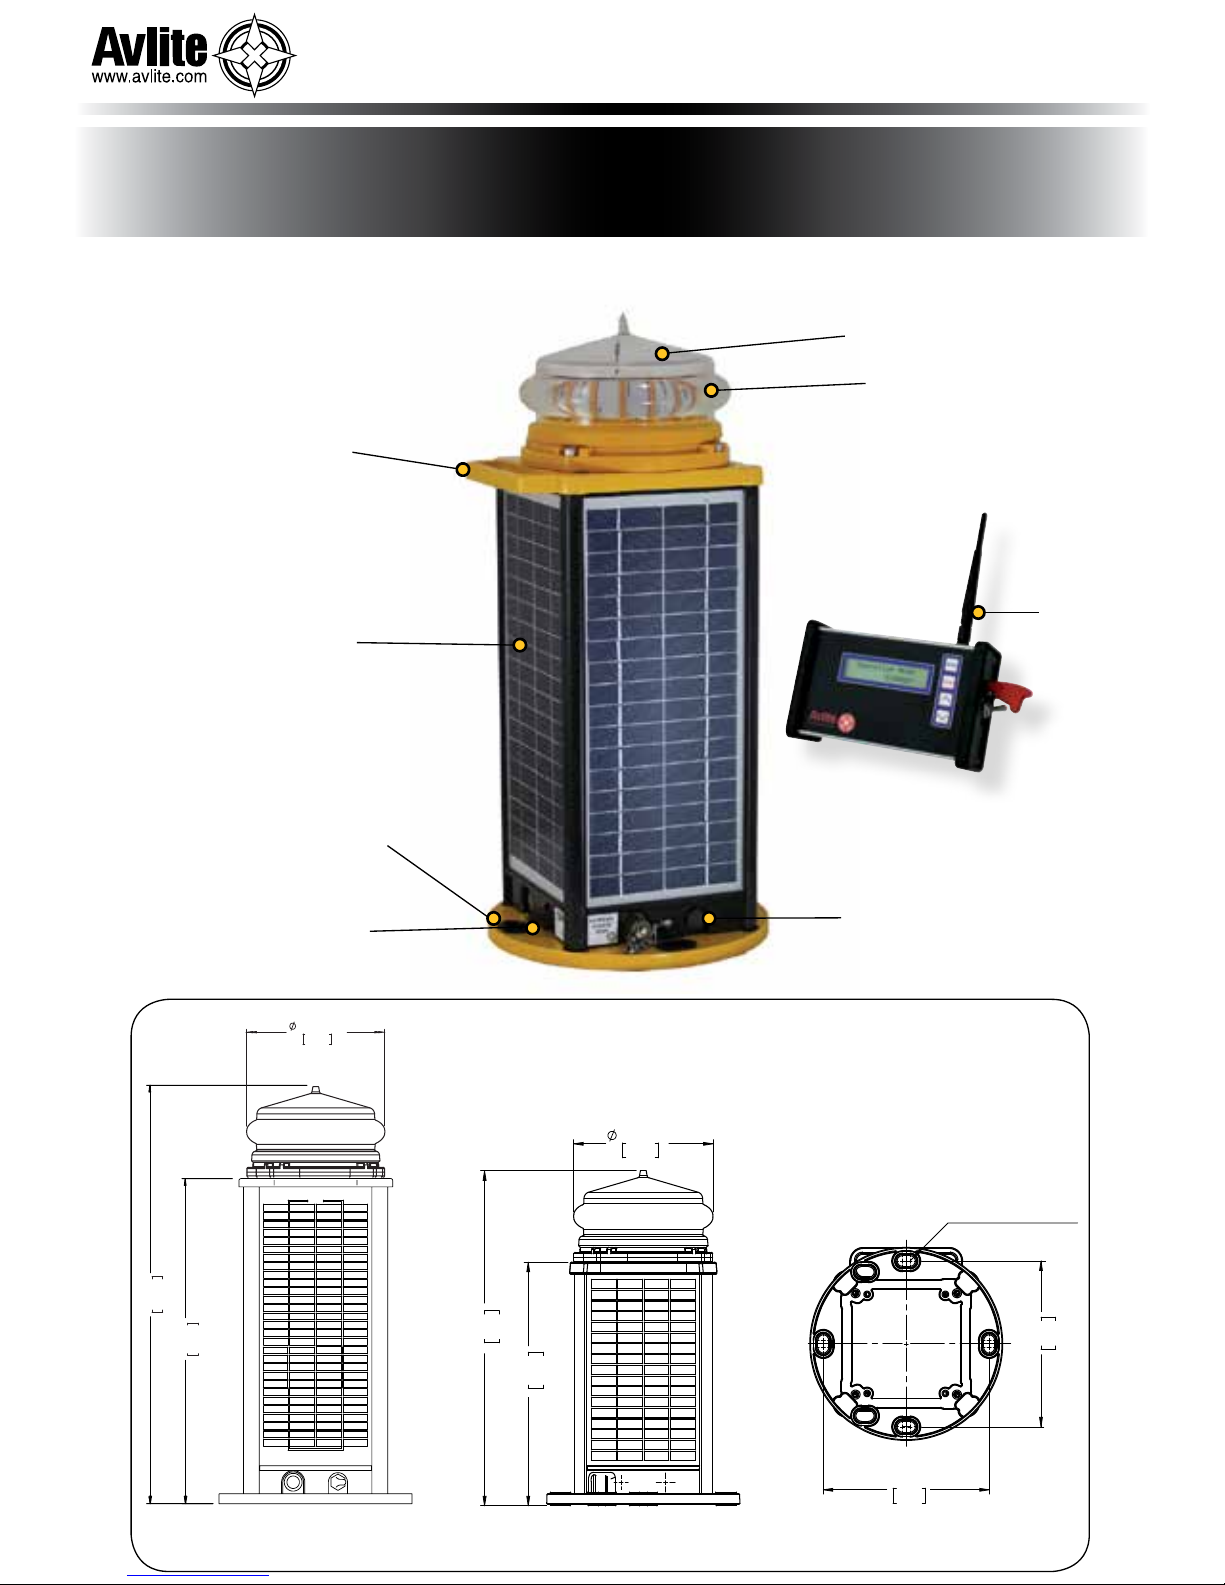
IntroductionIntroduction
Congratulations! By choosing to purchase an Avlite light, you have become the
owner of one of the most advanced solar LED aireld lights in the world.
Avlite Systems draws on more than 25 years experience in the design and manufacture of navigation
aids, and particular care has been taken to ensure your light gives years of trouble free service.
As a commitment to producing the highest quality products for our customers, Avlite has been
independently certied as complying with the requirements of ISO 9001:2015 quality management
system.
By taking a few moments to browse through this booklet, you will become familiar with the versatility of
your light, and be able to maximise its operating function.
Please remember to complete the Avlite warranty registration card accompanying your light.
Technology
Avlite Systems is a world-class solar lighting systems manufacturer with a proven
reputation for rapid, innovative, and agile technology solutions designed specically
for defense, government, civil and humanitarian aid operations in the most remote,
toughest environments.
Electronics
Avlite employs leading in-house electronic engineers in the design and development of software and
related circuitry. All individual electronic components are sourced directly by Avlite procurement staff
ensuring that only the highest quality components are used in our products.
LED Technology
All aviation lights use the latest advancements in LED (Light Emitting Diode) technology as a light
source. The major advantage of LED’s over traditional light sources is well established in that they
typically have an operational life in excess of 100,000 hours, resulting in substantial savings to
maintenance and servicing costs.
Precision Construction
Commitment to investing in the design and construction of injection-moulded parts including optic
lenses, light bases and a range of other components ensures that all Avlite products are of a
consistent and superior quality.
Optical Performance
Avlite manufactures a range of aviation LED lenses moulded from multi-cavity dies. The company has
superior in-house lens manufacturing capabilities to support outstanding optical performance.
Award-winning, Patented Technology
Several United States and Australian patent registrations are held on Avlite’s range of innovative
designs, with other regional patents pending in Canada, United Kingdom and Europe.

Latest products and information available at www.avlite.com
5
AV-426-ICAO
Radio Controlled Solar Aviation Light
AV-426-ICAO
The robust design of the AV-426-ICAO self-contained light ensures up to 12 years of reliable
service with minimal ongoing maintenance.
Specically designed to survive the harshest environments the AV-426-ICAO features seven
stage powder coated aluminium top, base and internal chassis. The corners are made from UV
stabilised rubber.This method allows the customer to change a solar panel in the unlikely event
of damage.
The top casting is constructed with an integrated handle that helps with any manual handling
of the unit.
The high impact resistant polycarbonate lens ensures even light visibility.
The solar panels provide efcient and year round charging of the large 12V 20Ah SLA battery.
The four hole bolt pattern will t directly onto any 200mm OD mount.
The AV-426-ICAO is tted with an external ON/OFF switch; this means the light can be turned
on once in position, with the ick of a switch. It is also tted with an external charging port for
charging the battery while it is stored for extended periods.
When the AV-426-ICAO is used in conjunction with an RF Network (FCC compliant), a number
of options are available such as the ability to use visible and IR LEDs tted to the same light
head.
All this is backed by Avlite’s industry leading, 3-year warranty.
To suit localised standards, the AV-426-ICAO can be supplied with optic head to comply with
either FAA L861 or ICAO Annex 14 photometrics.

Latest products and information available at www.avlite.com
6
AV-426-ICAO
Radio Controlled Solar Aviation Light
Charging the Battery
New lights should be left in the sun for several days to ensure battery is charged before
placing in service.
Preferred Installation Location
For best light performance, ensure solar modules are not covered and are in clear view of
the sky with no shadows.
Lantern Operation
The AV-426-ICAO is activated via the ON/OFF switch, at the base of the unit.
Activation
4
4-pin
Connector 2-pin
Connector
6
5
7
9
2
8
3
1
10
11
12
13
10 amp
multi point
regulator
wiring to
solar panels
av425_rev1_exploded_psp.dxf
Item Description Quantity
1 AV426 Base 1
2AV426 Lens Assembly 1
3 Battery 12v 24Ah 1
4 Battery Clamp 1
5 Washer M4 2
6 M4 Cap Screw 2
7M5 Nylock Nut 2
8O-Ring, ID 145 x 4.0 1
9 Socket Head Screw M6 x 16 4
10 Mounting Insert 4
11 External Charging Port 1
12 ON/OFF Switch 1
13 Momentary Button 1
Fig 2. AV-426-ICAO Solar Light components

Latest products and information available at www.avlite.com
7
AV-426-ICAO
Radio Controlled Solar Aviation Light
Avlite Radio Controller
The Avlite Radio Controller is a compact handheld unit that allows complete control of the aireld
lighting system. The unit allows for easy activation, inspection and testing of the aireld lights. The
Avlite Radio Controller works on the 2.4GHz ISM Band using a low power RF module. The backlit,
LCD can be seen during day or night. The straightforward menu makes the ALS easy to operate.
The Avlite Radio Controller comes standard with an IP68 rated charging plug, omni-directional
antenna and ON/OFF switch and cover.
The Radio Controller and charger come in an IP68 ‘Pelican’ Case to protect it from the harsh
environment to which it may be subjected.
The Avlite Radio Controller can be rack mounted in a standard 19” rack for use with other aireld
electronic equipment such as Pilot Activated Lighting Control (PALC).
Fig 4 Radio Controller Side View Fig 5 Radio Controller Front View
1 LCD Screen
2 MENU Button
3 SEND Button
4 UP Button
5 DOWN Button
6 6” Di pole Omni Directional, Right Angle Whip Antenna
7 Charging Port – IP68 sealed plug. (Charger not shown)

Latest products and information available at www.avlite.com
8
AV-426-ICAO
Radio Controlled Solar Aviation Light
Assembly & Installation of Radio Controller
The installation of the Radio Controller includes the following steps:-
• Unpacking
• Initial Inspection
• Assembling & Charging the Radio Controller
• Using the Radio Controller
Components
Your pelican case contains the following:
• 2.4GHz Radio Controller
• Charger
• Power Supply for charger
• Programming Cable
Please contact your Avlite ofce if there is any hardware missing.
Initial inspection
Inspect the Radio Controller for damage. If there is any damage, please contact your Avlite ofce.
Retain original packing material for possible future use.
Assembly & Charging
The Radio Controller can be activated after raising the aerial into the upright position, see Fig 5.
It is advisable to charge the Radio Controller before use.
Turning the Unit On
To turn the unit on, lift the red missile cover and turn the switch to the ON position.
The radio controller will take 5 seconds to start up and it may take up to 30 seconds for the embedded
RF Module to be congured, before a command can be sent.
Charging the Radio Controller
a. Unscrew the protective cap from the charging port, on the left side of the Radio Controller.
b. Insert the charging terminal into the Radio Controller.
c. Plug the charger into a wall socket and turn the charger on.
d. The light on the charger will ash Green, Orange, Red then back to Orange.
e. The charger has a LED to indicate the charge sequence.
i. Green – Unit is fully charged. The Radio Controller can be left connected in state.
ii. Orange – Unit is charging. The unit will charge for a maximum of 8 hours before automatically
shutting down.
iii. Red – A fault is occurring, please contact Avlite Ofce.

Latest products and information available at www.avlite.com
9
AV-426-ICAO
Radio Controlled Solar Aviation Light
Radio Controller Menu
This section of the document will provide a short explanation of all the menu screens on the control unit.
Operation Mode
The Operation Mode denes how the light will respond to different environmental conditions & user inputs.
There are three operational modes that can be selected via the controller. ON, STANDBY & DUSK to
DAWN.
ALWAYS ON Operation Mode
The light is Always On. The light will be on both night & day until it is commanded to OFF. While the
light is in this mode it will only turn off when the battery drops below the Flat Battery Voltage level. (AV-
426-ICAO = 10.5V)
STANDBY Operation Mode
LEDs are OFF but light will respond to and pass commands sent by the radio controller. This mode
should be used if the lights have been installed outside but are not currently required.
Note: The light is not completely powered down in a manner suitable for storage. If the light is to be
stored in a warehouse or other dark environment the ON/OFF switch should be turned off.
DUSK to DAWN Operation Mode
The light is turned on and off based on the light sensor input. Sensors include a light sensor internal to
each light and the light will turn on when the ambient light threshold falls below 100 lux and will turn off
once the ambient light threshold reaches 150 lux.
Advanced Op Mode
This enables you to select visible or near IR LEDs.The options include VISIBLE LEDs & IR/NVG LEDs.
Note: this menu will not be enabled if the selected Operation Mode is STANDBY
Light Group
This menu is used to select the current light group. The controller can select any one of the 15 individual
light groups. Taxiway lights, sign lights and runway lights are able to be controlled seperately using
programmable groups.
( 0 -> 15) or select all radio lights at once.
Note: The units are set with a light group of 0 in the factory.
LED Intensity
Default = LOW
This menu is used to select the intensity of the LEDs on the light. The options include Low, Medium & High.
a. Low – LED intensity is set to low setting
b. Medium - LED intensity is set to medium intensity
c. High - LED intensity is set to high intensity
Note: this menu will not be enabled if the selected operational mode is STANDBY
Timeout Mode
This menu is used to setup the LED high intensity timeout feature found in each light. Light will revert from
high intensity to low intensity after a programmable duration. The options include Enabled LOW, Disable.
a. Enabled LOW – The immediate LED intensity is selected via the LED Intensity menu, after Timer
Duration the LED Intensity will revert back to the LOW setting
b. Disable – The high intensity LED timeout is disabled. The LED intensity will be selected via the LED
intensity menu.
Note: this menu will not be enabled if the selected operational mode is STANDBY

Latest products and information available at www.avlite.com
10
AV-426-ICAO
Radio Controlled Solar Aviation Light
Timeout Duration
This menu is only visible when the timeout Mode is enabled. This menu is used to select the timeout
duration, the time before the LED intensity reverts back to its LOW intensity state. The timeout duration
can be set from 1 minute to 60 minutes.
Diagnostic
This feature can be used to check the battery voltage in every light in the aireld. The command can be
sent any time and it will not affect the current state of the light. If the light is in STANDBY mode the light
will ash as shown below and revert to STANDBY mode after the diagnostic has been completed. For
addional diagnostic information please see Section 3 of the ‘Radio Control System Setup’ section of this
manual.
EXTERNAL POWER Diagnostic
Checks for external power connection
NODE (MAIN NET) Diagnostic
Checks which lights are nodes in the main network
NODE (SUB NET) Diagnostic
Checks which lights are nodes in the sub network
BATTERY (HEALTHY) Diagnostic
Battery above 12.5V
BATTERY (LOW) Diagnostic
Battery above 10.5V, but below 12.5V
BATTERY (FLAT) Diagnostic
Battery below 10.5V
Radio Encryption
The AV-426-ICAO is tted with 128bit Radio Encryption. This includes user-adjustable encryption keys
and 12 user-adjustable channel settings.
Synchronization
The integrated mesh network radio system can provide true synchronization ash patterns including are
paths and approach sequences.
Sending Commands
Every time the SEND button is pressed a command is sent containing all the current settings in the Radio
Controller.
The SEND button can be used after changing one setting or after changing multiple settings.
(1 x 1 second ash)
(2 x 300 milli second ashes)

Latest products and information available at www.avlite.com
11
AV-426-ICAO
Radio Controlled Solar Aviation Light
Radio Control System Setup
Your radio control system has been shipped preprogrammed with a default 128 bit encryption key.
It is not necessary to alter the default encryption key, however, if required the encryption key can be
changed (see Secion 1.5. i).
Note: If you change the radio control encryption key in Section 1, it will be necessary to change
the encryption key in ALL the lights in the system
To ensure trouble free set up of the Radio control System it is necessary to step through the following
set up procedures. The setting up of the Radio control system is divided into 3 sections
Section 1 - Programming the Radio Control System (must be done before Section 2 and 3)
Section 2 - Programming the light, using a direct cable connection
Section 3 - Operating the lights using the controller
Section 1
Programming the Radio Control System
1. Fold out the aerial on the top of the ALS 2.4 GHz Handheld Radio Controller.
2. Turn on the ALS 2.4GHz Handheld Radio Controller by actuating the red rocket switch on the side
of the controller
3. Press and hold the menu button for 3 seconds
4. The screen will display the following massage:
5. The Menu contains the following Sub menu
(Press the Menu button to step between the menu items)
a. [Screen back light]
Using the [UP] or [DOWN} keys select from:
[0-100%]
b. [Connection Method]
Using the [UP] or [DOWN} keys select from:
[Radio Control] - standard wireless connection
[Direct Connection] - use for programming light

Latest products and information available at www.avlite.com
12
AV-426-ICAO
Radio Controlled Solar Aviation Light
c. [Flash Code Selection]
Using the [UP] or [DOWN} keys select from:
[Disable]
[Enable]
d. [Sync Menu Selection]
Using the [UP] or [DOWN} keys select from:
[Disabled]
[Enabled]
e. [Advanced Operation]
Using the [UP] or [DOWN} keys select from:
[Disabled]
[Enabled]
f. [Diagnostic]
Using the [UP] or [DOWN} keys select from:
[Disabled]
[Enabled]
g. [Radio Information]
Displays the address of the radio in the ALS2.4GHz Hand Held Controller
Note: There are no user-adjustable settings in this menu item
h. [Radio Channel]
Note: There are two sub menus in this menu. To toggle between the two Sub menus, press
both the [UP] and [DOWN] keys together at the same time.
Using the [UP] or [DOWN} keys select from:
[Encrypted]
[Unencrypted]
Using the [UP] or [DOWN} keys select from:
[0C-17]
i. [Radio Encryption Key]
Note: If you change the radio control encryption key in Section 1, it will be necessary to
change the encryption key in ALL the lights in the system
Using the [UP] and [DOWN] keys set the encryption key. Hold down the key to scroll quickly to
the required number.
Pressing both the [UP] and [DOWN] keys together will toggle across the encryption key in
banks of 2 digits.
Set the encryption key in banks of 2 digits.
For Example:
To set an encryption Key of 12345678910111213141
The digits would be set in pairs of 12 34 56 78 91 01 11 21 31 41
Using the [UP] or [DOWN] keys select any combination from
[00000000000000000000 to FFFFFFFFFFFFFFFFFFFF]
Record and keep this Encryption key secure in case the controller becomes lost or
broken.

Latest products and information available at www.avlite.com
13
AV-426-ICAO
Radio Controlled Solar Aviation Light
The encryption key can be re-entered into the new controller without the need to
reprogram all the lights in the Radio Control System.
Encryption key cannot be 00000000000000000000
Press [SEND] to save the Radio Control System settings
Note: Failure to select appropriate settings and save the settings will result in the Radio Control
System not being appropriately optioned.
Congratulations you have now set up your Radio Control System. Please continue to the next
section to setup each light in the system.
Section 2
Programming the light using the cable interface and hand held controller
NOTE: In this programming mode it is necessary to press send to save each option as each
option is selected in the sub menu, before moving to the next sub menu item. Failure to press
send before moving to the next menu item will result in selections not being saved.
1. The programming port is located under the light head. It is necessary to remove the light head to
access this programming port.
2. Ensure that the light is turned off at the master switch on the control panel at the base of the solar
unit
3. Remove the 4 socket head cap screws and remove the light head from the solar unit enough to
access the programming port. The light needs to remain connected the solar unit. Remove the
blue waterproof cap from the programming port.
4. Connect the programming cable to the light head.
5. Connect the programming cable to the programming/charging port located on the left hand side of
the ALS2.4GHz handheld radio controller.
6. Turn on the controller at the Red Master switch located on the right hand side of the ALS 2.4 GHz
handheld radio controller.
Programming Port
Replace blue cap after
programming

Latest products and information available at www.avlite.com
14
AV-426-ICAO
Radio Controlled Solar Aviation Light
7. Turn on the light at the master switch on the solar chassis.
8. Unit is ready to receive programming signals.
Note: Light head needs to be connected to the solar chassis during programming to be able to
recieve power enabling it to be programmed.
9. Press and hold the [MENU] button for 3 Seconds. The screen will display the following message.
10. Using the menu key scroll down the submenu to [CONNECTION METHOD]
11. Using the [UP] and [Down] keys select [DIRECT CONNECTION]
12. Press [SEND]
13. This Menu contains the following Sub Menu
Press [MENU] to scroll through the menu
Note: In this menu the programmed option will be indicated by a, if the option is indicated by an X
then this option has not been selected and saved. Press [SEND] to save options at each change.
a. Lantern Info
This displays the current Light information only, there are no adjustable options.
Type
Version
Radio

Latest products and information available at www.avlite.com
15
AV-426-ICAO
Radio Controlled Solar Aviation Light
b. Operation Mode
Using the [UP and [DOWN] keys select from the following:
[Always On]
[Dusk till Dawn]
[Standby]
Press [SEND] after selection
c. Advanced Operation Mode (if Advanced Operation Mode is enabled during Radio Control
System Programming - Section 1)
Using the [UP and [DOWN] keys select from the following:
[Visible LEDS]
[IR/NVG LEDS]
Press [SEND] after selection
d. Light Group
Using the [UP and [DOWN] keys select from the following:
[0-15] (Select any one of the 0-15 light groups)
Press [SEND] after selection
e. Intensity
Using the [UP and [DOWN] keys select from the following
[Low]
[Medium]
[High]
Press [SEND] after selection
f. Flash Code (if Flash Code is enabled during Radio Control System Programming - Section 1)
Using the [UP and [DOWN] keys select from the following
[000 to 1FF]
A full list of available ash codes is available from Avlite
Press [SEND] after selection
g. Sync Offset (if Synchronisation is enabled during Radio Control System Programming -
Section 1)
Note: Sync offsets can be set using an absolute value or a percentage (Flash Delay) of the
ash sequence or a combination or both. If you select Sync Offset value and also Sync delay
value, the combination offset/delay value will be the combined total off both values.
Using the [UP and [DOWN] keys select from the following:
[-10.23 to +10.23] seconds
Press [SEND] after selection
h. Sync Delay (if Synchronisation is enabled during Radio Control System Programming -
Section 1)
Using the [UP and [DOWN] keys select from the following
[0 to 99.6%]
Press [SEND] after selection

Latest products and information available at www.avlite.com
16
AV-426-ICAO
Radio Controlled Solar Aviation Light
i. Radio Channel
Note: There are two sub menus in this menu. To toggle between the two Sub menus, press
both the [UP] and [DOWN] keys together at the same time.
Using the [UP] or [DOWN} keys select from:
[Encrypted]
[Unencrypted]
Using the [UP] or [DOWN} keys select from:
[0C-17]
Press [SEND] after selection
j. Radio Encryption Key (If Encryption is Enabled during Radio Control System
Programming- Section 1)
Set the encryption key in banks of 2 digits.
For Example
To set an encryption Key of 12345678910111213141
The digits would be set in pairs of 12 34 56 78 91 01 11 21 31 41
Using the [UP] and [DOWN] keys set the encryption key. Hold down the key to scroll quickly to
the required number.
Pressing both the [UP] and [DOWN] keys together will toggle across the encryption key in
banks of 2 digits.
[Insert Radio Encryption Key]
Note: Radio Encryption Key must be the same key as set in the Radio Control system
(section 1)] or the light will not respond to the controller.
Press [SEND] after selection
Note: Turn the light off at the master switch, before disconnecting the Hand Held Radio interface cable.
The light must be depowered before the settings will take effect.
Repeat this process for every light in the system
Important: When you have nished programming all of the lights the Radio Controller must be put
back into Radio Connection Mode
1. Using the menu key scroll down the submenu to [CONNECTION METHOD]
2. Using the [UP] and [Down] keys select [RADIO CONNECTION]
3. Press [SEND] to save settings.
Failure to place the Radio Controller back into RADIO CONNECTION mode will cause the Radio
Controller to be unable to communicate with the lights
Congratulations you have now programmed your lights to your Radio Control System please
continue to the next section.

Latest products and information available at www.avlite.com
17
AV-426-ICAO
Radio Controlled Solar Aviation Light
Section 3
Operating the lights using the ALS 2.4GHz Handheld Controller
Note: Some menu options may not appear if they were not enabled in the Radio Control System set
up menu, and programmed in to the light.
1. Fold out the aerial on the top of the ALS 2.4 GHz handheld Controller.
2. Turn on the ALS 2.4GHz Handheld radio Controller by actuating the red rocket switch on the side
of the controller
3. The Menu contains the following Sub menu
Press the [MENU] button to scroll through the Sub Menu
a. Operation Mode
Using the [UP and [DOWN] keys select from the following:
[Always On]
[Dusk till Dawn]
[Standby]
b. Advanced Operation Mode (If Enabled during Radio Control System Programming-
Section 1)
Using the [UP and [DOWN] keys select from the following:
[Visible LEDS]
[IR/NVG LEDS]
c. Light group
Using the [UP and [DOWN] keys select from the following:
[0-15] (Select any one of the 0-15 light groups)
[All] (Selects all of the light groups)
d. Intensity
Using the [UP and [DOWN] keys select from the following:
[Low]
[Medium]
[High]
e. Timeout Mode
Using the [UP and [DOWN] keys select from the following:
[Enabled, Low] (Recommended)
[Disabled]
f. Timeout Duration
Using the [UP and [DOWN] keys select from the following:
[1-60 Minutes]
g. Flash Code (If Enabled during Radio Control System Programming- Section 1)
Using the [UP and [DOWN] keys select from the following
[000 to 1FF]

Latest products and information available at www.avlite.com
18
AV-426-ICAO
Radio Controlled Solar Aviation Light
h. Sync Mode (If Enabled during Radio Control System Programming- Section 1)
Using the [UP and [DOWN] keys select from the following:
[Full] (Use for Flare Path or Approach sequence)
[Basic] (Use for synchronised Flashing)
[Disabled]
i. Diagnostic
For the following diagnostic tests to following diagnostic ash results can be displayed for the light.
Using the [UP and [DOWN] keys select from the following
[Node Sub Net]
Pass= Conrms light is a node on the Sub Network
[Node Main Net]
Pass= Conrms light is a node on the Main Network
[External Power]
Pass= Conrms external power is connected via HVPS
[Battery Flat]
Pass= Conrms battery voltage is under 10.5 Volts
[Battery Low]
Pass= Conrms battery voltage is between 10.5 and 12.5 Volts
[Battery Healthy]
Pass= Conrms battery voltage is over 12.5 Volts
Press [Send] to receive a diagnostic ash sequence
When the controller is in operation mode, multiple changes can be set and sent at the same time. It is
not necessary to press send after each change.
(1 x 1 second ash)
(2 x 300 milli second ashes)

Latest products and information available at www.avlite.com
19
AV-426-ICAO
Radio Controlled Solar Aviation Light
Using the Radio Control to Activate the
Aireld Lighting System (ALS)
The Radio Controller is very easy to use and by reading through the How To section below, all of the
advanced features will be well within your grasp.
Make sure that all the lights in the same Light Group.
Turn All the Lights ON
• Turn the Radio Controller On
• Use the arrow keys to adjust the operational Mode to ON
• Press MENU button once to reach Light Group
• Set the Light Group to ALL
• Press SEND button
• Every radio light within range of the control unit will now turn on.
Setup the Lights to Operate in DUSK till DAWN mode
• Turn the Control unit On
• Use the arrow keys to adjust the operational Mode to DUSK till DAWN
• Press MENU button once to reach Light Group
• Set the Light Group to ALL
• Press SEND button
• Every radio light within range of the control unit will now turn on at night, during the day the lights will
turn off automatically.
Runway B Only is to be HIGH Intensity, but Runway A will Remain in Current
Conguration
• On Runway A, set the light group to 0 (follow the instruction in Section 2 in the ‘Radio Control System
Setup’ section of this manual.
• On Runway B, set the light group to 1 or any group different to Runway A..
• Turn the Control unit On
• Use the arrow keys to adjust the operational Mode to Always On
• Press MENU button to reach Light Group
• Set the Light Group to 1
• Press MENU button to reach LED Intensity
• Use the arrow keys to adjust the LED Intensity to HIGH
• Press MENU button to reach Advanced Operation Mode
• Use the arrow keys to select Visible LEDs
• Press SEND button
- Runway A will not change state.
- Runway B will now be High Intensity.

Latest products and information available at www.avlite.com
20
AV-426-ICAO
Radio Controlled Solar Aviation Light
Runway B Only is to be HIGH Intensity, with a Timeout of 8 Minutes and Runway A will
be I/R Low Intensity
• On Runway A, set the light group to 0.
• On Runway B, set the light group to 1.
• Turn the Control unit On
• Use the arrow keys to adjust the operational Mode to Always On
• Press MENU button to reach Light Group
• Set the Light Group to 1
• Press MENU button to reach LED Intensity
• Use the arrow keys to adjust the LED Intensity to HIGH
• Press MENU button to reach Timeout Mode
• Use the arrow keys to adjust the Timeout Mode to Enabled LOW
• Press MENU button to reach Timeout Duration
• Use the arrow keys to adjust the Timeout Duration to 8 Minutes
• Press SEND button
- Runway A will not change state.
- Runway B will now be High Intensity. After 8 minute Runway will revert back to LOW intensity.
• Press MENU button until you reach Light Group
• Set the Light Group to 0
• Press MENU button once to reach LED Intensity
• Use the arrow keys to adjust the LED Intensity to LOW
• Press MENU button to reach Advanced Operation Mode
• Use the arrow keys to select IR/NGV LEDs
• Press SEND button
- Runway A will be in LOW Intensity IR mode
- Runway B will not change state. Lights on Runway B will still receive and pass on the message
intended for Runway A.
Table of contents
Other Avlite Lantern manuals
Popular Lantern manuals by other brands

A. Mallios
A. Mallios Pamal WP quick start guide

WHITECROFT LIGHTING
WHITECROFT LIGHTING Aerial Industry installation instructions

SLV
SLV 184620 instruction manual

illumicare
illumicare MR16 Installation sheet

smart & green
smart & green bulbLITE2 Instruction

Heitronic
Heitronic Potsdam Installation and operating instructions

Hoselink
Hoselink L445 user manual

HAMPTON BAY
HAMPTON BAY ELSMERE Use and care guide

Heitronic
Heitronic 35322 Installation and operating instructions

Naturally Solar
Naturally Solar 1600093 Care and use instructions

Portfolio Outdoor
Portfolio Outdoor FY05-030 User instruction

Occhio
Occhio Mito Raggio operating instructions