Carmanah M850 User manual

Carmanah M850 & M860 Self-Contained LED Lantern Instructions v1.1Jan 2016
1
Carmanah M850 & M860 LED Lantern Instructions
The Carmanah M850 and M860 lanterns are self-contained, omni-directional LED marine
lanterns for use on lighted buoys and structures with a nominal range of 3 to 7 nautical miles.
This document provides the following information:
●Overview Page 2
●Important Notes of Concern Page 3
●General Information (SECTION 1) Page 4
●Solar Sizing Program (SECTION 2) Page 6
●Lantern Quick Start Guide & Programming (SECTION 3) Page 7
●Lantern Selection (SECTION 4) Page 14
●Receipt, Storage, Recharging, Installation,
Servicing, and Troubleshooting (SECTION 5) Page 15
●Ordering Instructions (SECTION 6) Page 24
●Enersys Cyclon Battery Safety Data Sheet (SDS) APPENDIX A
●Carmanah USCG Product Item List APPENDIX B
Carmanah M850 & M860 Self-Contained LED Lanterns
All manuals and user guides at all-guides.com
all-guides.com

Carmanah M850 & M860 Self-Contained LED Lantern Instructions v1.1Jan 2016
2
Overview
The Carmanah M850 and M860 lanterns are manufactured by:
Carmanah Technologies Inc.
250 Bay Street
Victoria, British Columbia
Canada, V9A 3K5
Phone: 1-877-722-8877
Website: http://www.carmanah.com
The lanterns are self-contained: the solar panels, battery, flasher, daylight control, and lantern
assembly are all housed as a single unit. The M850 and M860 share the same LED optics but differ
in battery and solar panel size (the “solar engine”). The M850 lantern contains the 60X battery (60
watt-hour) while the M860 contains the larger 200BC battery (200 watt-hour) along with larger solar
panels resulting in a bigger solar engine. Depending on desired color, flash rhythm, and intensity, in
many cases the M860 will be able to operate in locations where the M850 cannot.
Every lantern has an inherent color (red, green, white, or yellow) but the flash rhythm and intensity
are programmable. The IR remote control programmers, which are not included with the lanterns,
are required for programming. The programmers can be purchased directly from Carmanah for a
nominal price (see page 24 and APPENDIX B). The color of the lantern is easily identified by the
color of the LED bracket embedded beneath the clear polycarbonate optic head assembly at the top
of the lantern.
Lanterns contain a revision number on the circular product label which is visible under the clear
polycarbonate optic head assembly. The current version is Rev A. If/when future revisions are
released, this instruction will be updated to reflect the new revision; and, the M800-series Sizing
Program (spreadsheet) will be updated to include the revised lanterns.
All manuals and user guides at all-guides.com

Carmanah M850 & M860 Self-Contained LED Lantern Instructions v1.1Jan 2016
3
Important Notes of Concern:
1. DO NOT store these self-contained LED lanterns in the box after delivery.
These lanterns contain expensive lead-acid batteries that must be kept charged or else sulfation
build-up on the lead plates will permanently damage the batteries and reduce their capacity. The
easiest way to keep the batteries charged is to program the lantern to the energy-saving oFF
mode and place them in a cool location exposed to a good dose of daily ambient
sunlight/daylight. Alternatively, the lanterns can be recharged using an optional battery charger
pack connected to either the optional external charge port in the lantern base or connected
directly to the battery board with the lantern opened up. See the Recharging section on page 16
for more-detailed guidance. If battery charging cannot be carried out immediately upon delivery
due to logistical or other unavoidable reasons, store the lanterns in a cool location (the cooler the
better) until the lanterns can be adequately recharged. This will help extend the life of the
batteries when the lanterns are not being used.
2. After delivery, the lantern should be set to either the on or oFF modes.
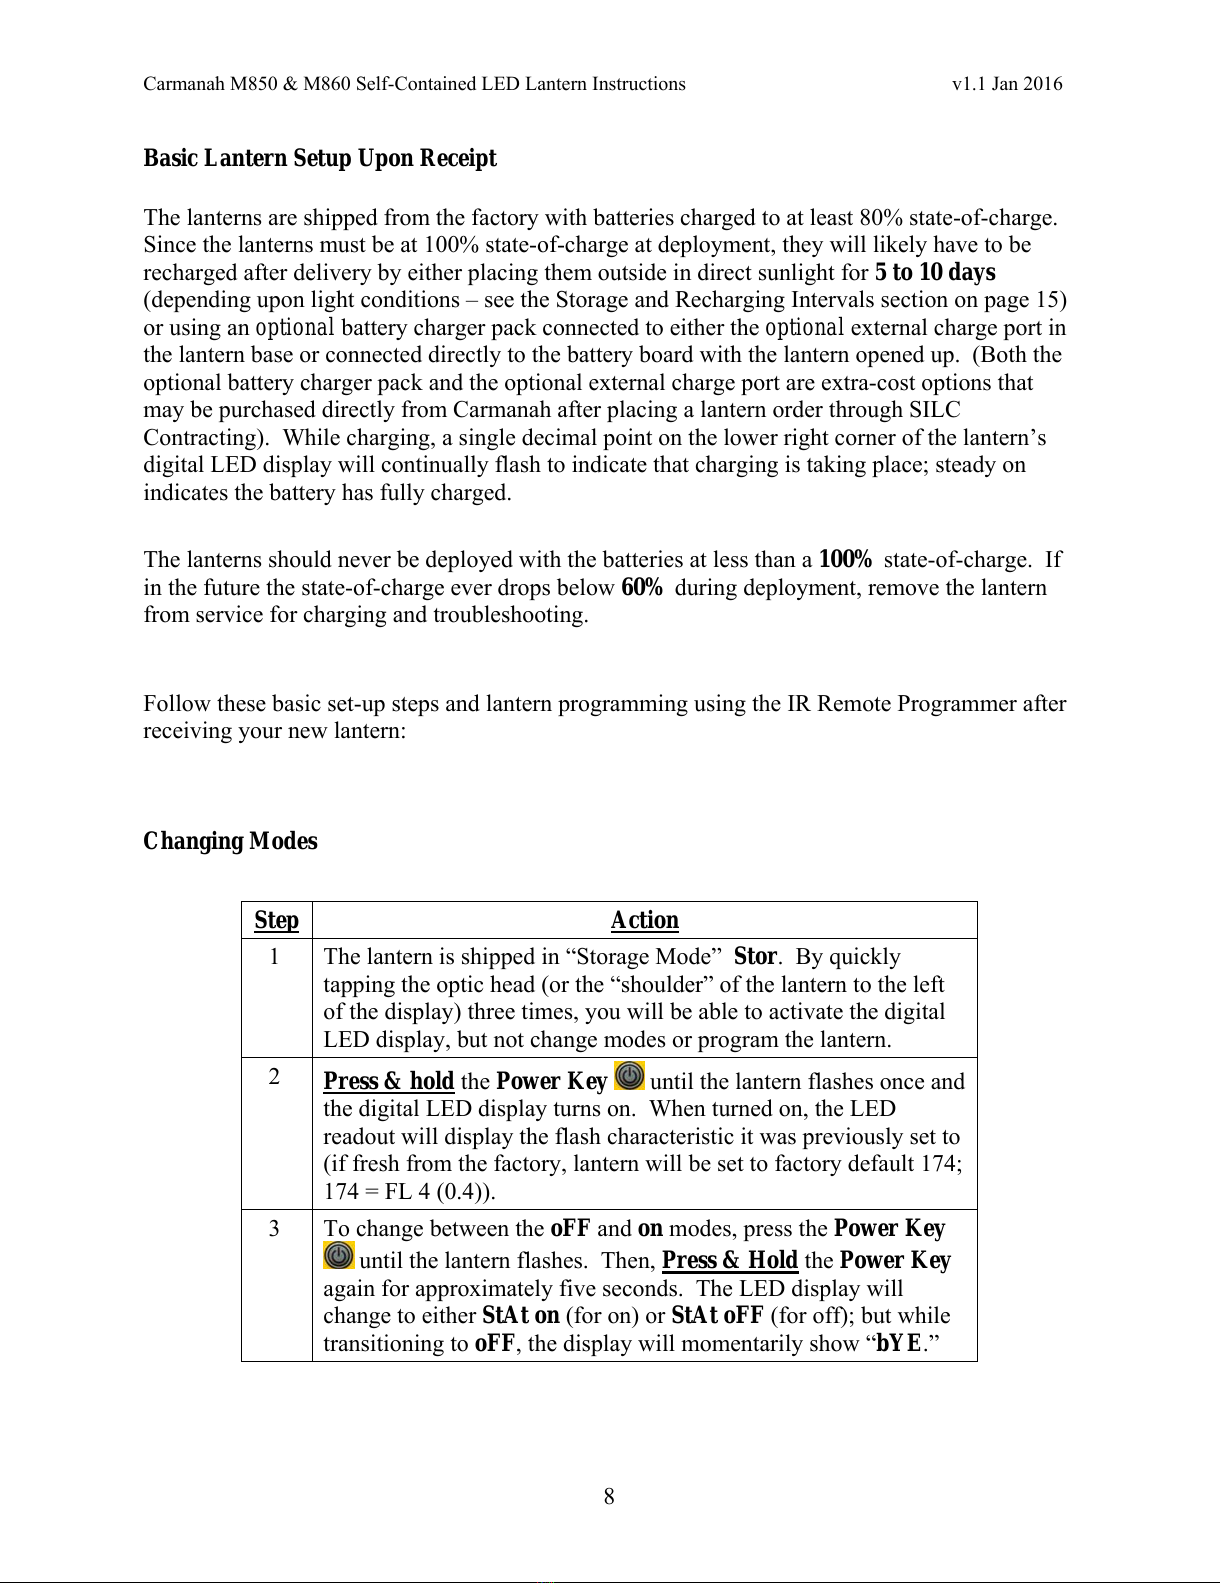
When the lantern arrives from the factory it will be in the energy-saving factory storage mode
(Stor). The lantern should then be turned on and programmed for operation if ready for
deployment or turned off if it will not be deployed right away. To establish a connection and get
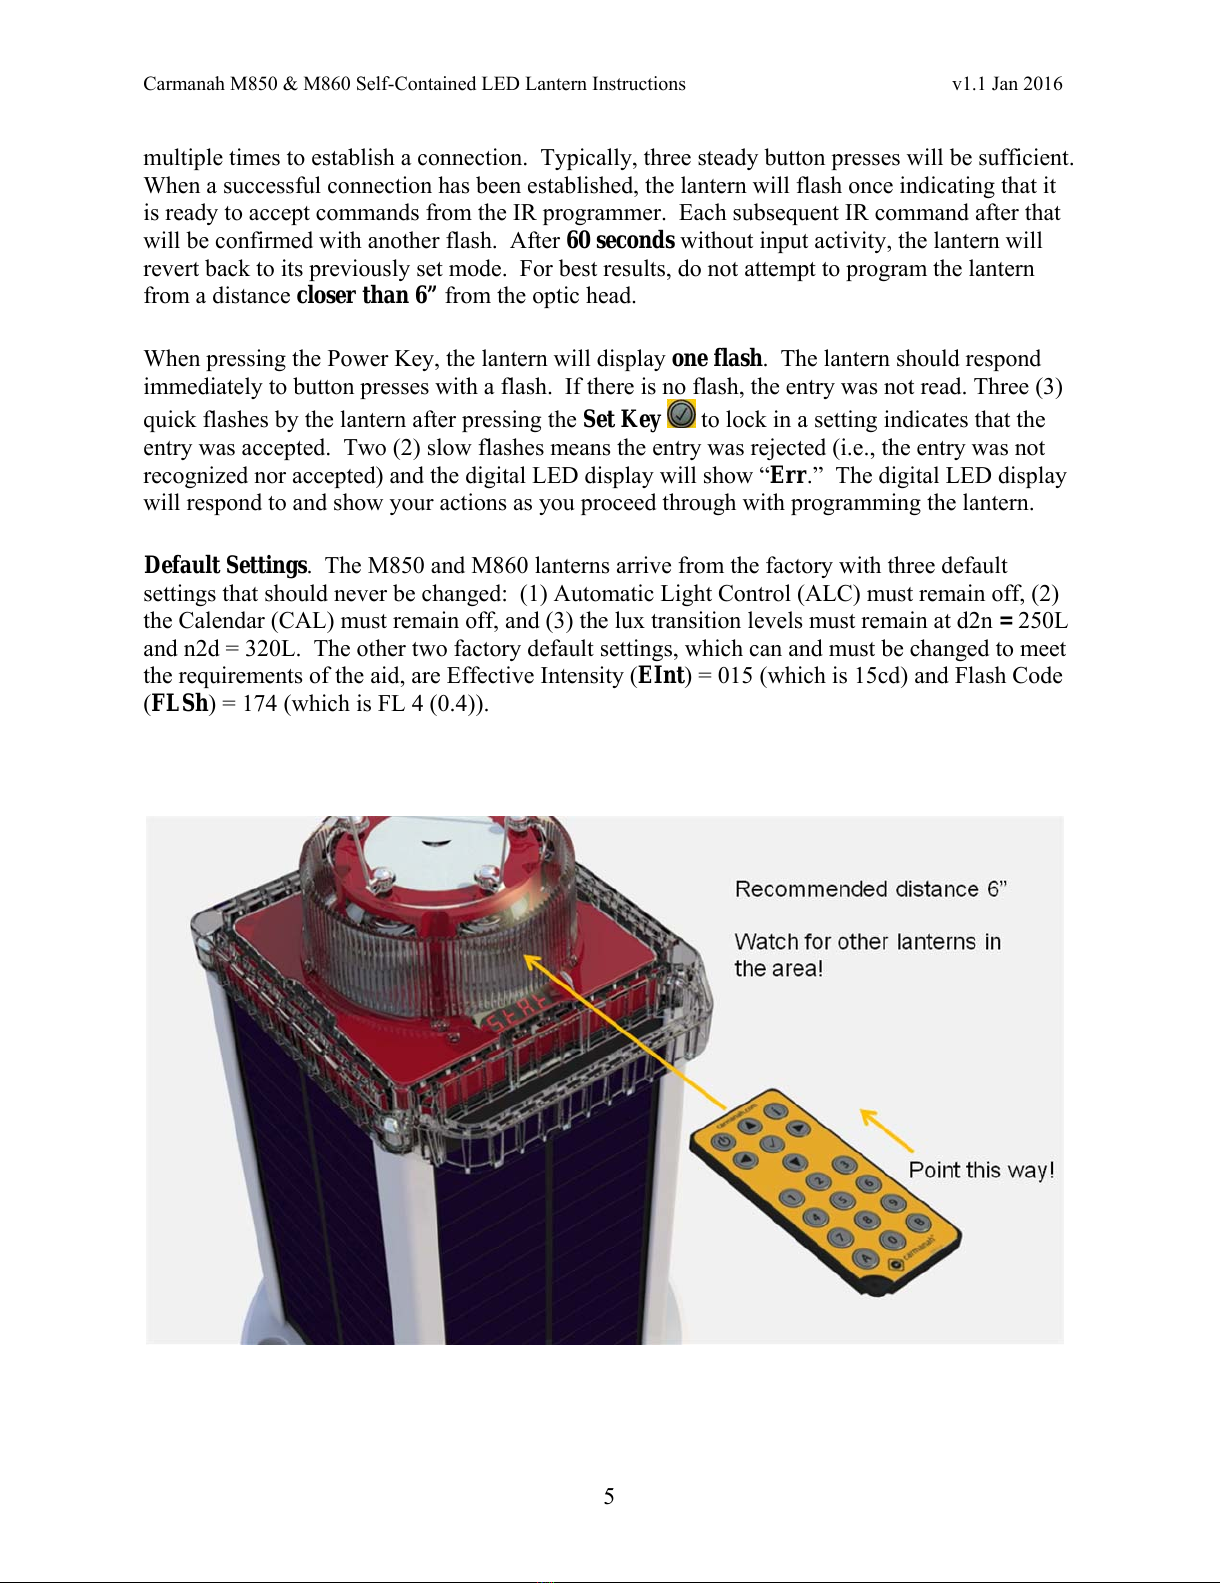
out of storage mode, point the programmer at the lens and press the Power Key on the IR
programmer repeatedly until the lantern flashes back once in response. Then press and hold the
Power Key for about 5 seconds. This will permanently take the lantern out of the storage mode.
The digital LED display will then change to show “StAt on” for on or “StAt oFF” for off.
Then, holding down the Power Key on the IR programmer again will toggle the lantern between
on and oFF modes. When placing the lantern in the oFF mode, the digital LED display will
show the word “bYE” before turning itself off. When not in use, the lantern should always be
placed in the oFF mode otherwise it will flash when dark, using up battery power unnecessarily.
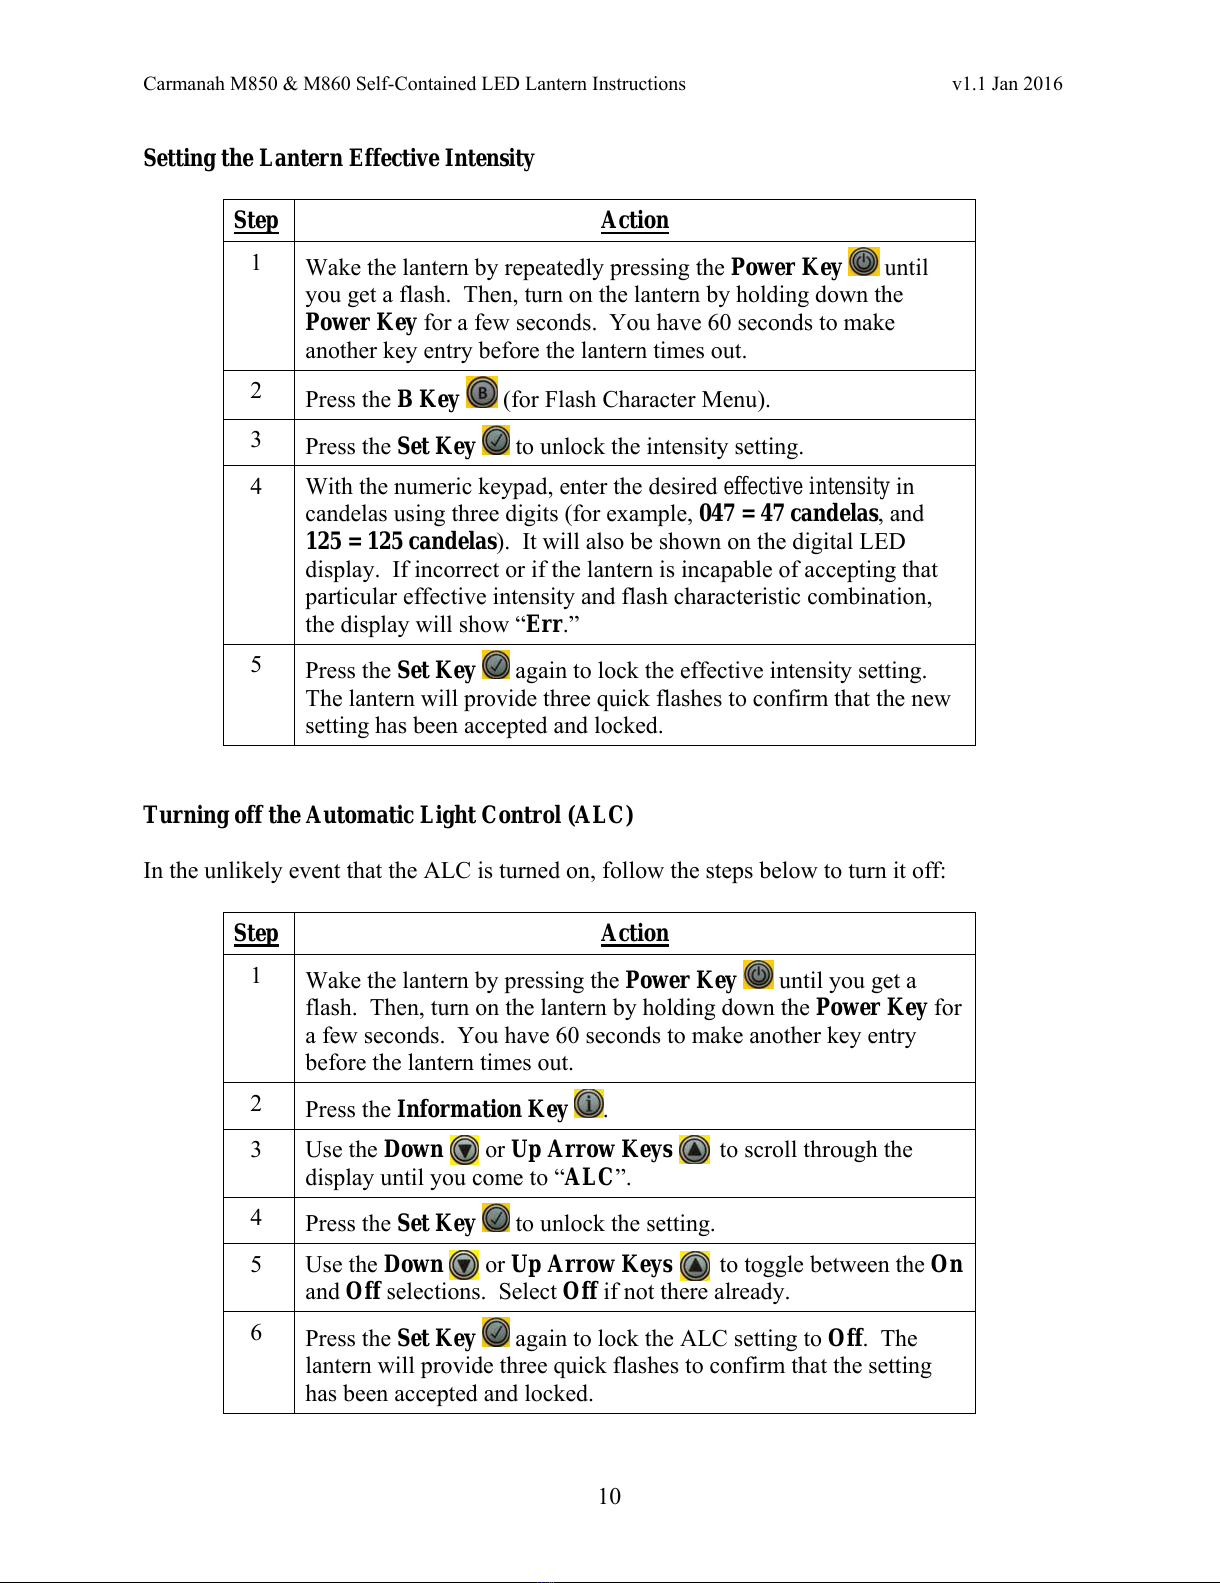
3. Confirm the ALC Automatic Light Control is turned OFF at all times. The
function of the ALC is to reduce the lantern’s intensity upon detection of excessively low battery
voltage in an attempt to save the battery. The USCG’s priority is to maintain the advertised light
intensity for as long as possible, even at the expense of the battery. Thus, the ALC must never
be turned on. The M800 lanterns are shipped from the factory with the ALC turned off; but
please confirm this to be so before deployment. Once confirmed, this setting should never be
changed.
4. Ensure the Day-to-Night and Night-to-Day Transition levels are set to
USCG standard Lux levels. The lux levels for USCG Day-to-Night (d2n) is 250L and the
Night-to-Day (n2d) is 320L. This is important because the solar sizing programs utilize these
critical switching levels; other lux levels could result in unreliable solar sizings. The M800
lanterns are shipped from the factory set to these transition levels; but please confirm this to be
so before deployment. Once confirmed, these settings should never be changed.
All manuals and user guides at all-guides.com

Carmanah M850 & M860 Self-Contained LED Lantern Instructions v1.1Jan 2016
4
SECTION 1 General Information
General. The Carmanah M800-series lanterns are 3 to 7 NM self-contained LED lanterns with
an extruded metal frame, polycarbonate base, clear polycarbonate optic head, and an LED
information display. Five metal bird deterrent wires (included) may be attached to the top lens
cover with screws. Please use them if there is any possibility for bird guano fouling. The handle
is sufficiently reinforced to act as an attachment point when transporting or hoisting the lantern.
There are no top-mounted solar panels. The optic head and battery packs are replaceable. The
M850 is approximately 9” tall, 9-¼” wide at the base, and weighs approximately 10 lbs. The
M860 is 13” tall, 9-¼” wide at the base, and weighs approximately 22 lbs.
Digital LED Display (Tap-to-Activate). The new top-mounted digital LED display provides
essential summary information about your lantern. To activate the LED display, quickly tap the
optic head (or the left “shoulder” of the lantern) three times. The display will show the primary
settings for the lantern in the following sequence: Lantern Status, Battery State-of-Charge &
Battery Voltage, Lantern Flash Rhythm, Lantern Effective Intensity, ALC on/off, and Calendar
on/off.
Alternatively, the Information Key on the IR remote control programmer can be used
instead to access and display this same important summary information without having to tap-to-
activate. The tap feature cannot be used to program the lantern - the IR remote programmer is
the only way to program the lantern and display all of the settings on the digital LED display.
Programming with the IR Remote Control Programmer. All programming and additional
menu options are available only while the lantern is in the on mode. The M800-series lanterns
do not need to be transitioned between day and night modes in order to program them (as
Carmanah’s older M700-series lanterns required). Programming works best in a bright room.
To conserve battery power, the lantern searches for a signal from the IR programmer on a
continual 0.5 second cycle. Press the Power Key on the IR remote control programmer
All manuals and user guides at all-guides.com

Carmanah M850 & M860 Self-Contained LED Lantern Instructions v1.1Jan 2016
5
multiple times to establish a connection. Typically, three steady button presses will be sufficient.
When a successful connection has been established, the lantern will flash once indicating that it
is ready to accept commands from the IR programmer. Each subsequent IR command after that
will be confirmed with another flash. After 60 seconds without input activity, the lantern will
revert back to its previously set mode. For best results, do not attempt to program the lantern
from a distance closer than 6” from the optic head.
When pressing the Power Key, the lantern will display one flash. The lantern should respond
immediately to button presses with a flash. If there is no flash, the entry was not read. Three (3)
quick flashes by the lantern after pressing the Set Key to lock in a setting indicates that the
entry was accepted. Two (2) slow flashes means the entry was rejected (i.e., the entry was not
recognized nor accepted) and the digital LED display will show “Err.” The digital LED display
will respond to and show your actions as you proceed through with programming the lantern.
Default Settings. The M850 and M860 lanterns arrive from the factory with three default
settings that should never be changed: (1) Automatic Light Control (ALC) must remain off, (2)
the Calendar (CAL) must remain off, and (3) the lux transition levels must remain at d2n = 250L
and n2d = 320L. The other two factory default settings, which can and must be changed to meet
the requirements of the aid, are Effective Intensity (EInt) = 015 (which is 15cd) and Flash Code
(FLSh) = 174 (which is FL 4 (0.4)).
All manuals and user guides at all-guides.com

Carmanah M850 & M860 Self-Contained LED Lantern Instructions v1.1Jan 2016
6
SECTION 2 Solar Sizing / Lantern Selection Program
Solar Sizing. A solar sizing program (or spreadsheet) for the M850 and M860 self-contained
LED lanterns is available to you from any web-connected computer. The following weblink will
take you directly to the program:
http://www.uscg.mil/hq/cg4/cg432/docs/software/Solar/M800SeriesSolarv1.xls. Once launched,
please don't forget to enable Macros in the EXCEL spreadsheet. You may download a copy to
your computer for future use but please be aware that future updated versions will be available
only from the website. The following is an example of a typical readout:
As you see, this new lantern sizing program has a simple user interface and is very easy to
navigate, especially for those already familiar with our other solar sizing programs. All guess
work has been eliminated at the user level. The inputs are all pull-down menu choices. Once
you enter the reference site, lantern color, and the flash characteristic, click on the "Solve Solar"
button to see the lanterns’ maximum capabilities – the program will display the maximum
effective intensities that the two lanterns can provide for the given inputs thereby giving the user
a quick indication as to which lantern can be safely used at a particular site; and the table to the
right will immediately populate and display the lanterns' yearly predicted performance. You will
then be able to select a lantern and effective intensity that will work for your aid. Always select
the M850 lantern over the M860 if it provides an acceptable solution as it’ll save you about $300
dollars per lantern.
The best way to access this program is from the Solar Sizing Programs Flowchart on the
following web address which, incidentally, also provides easy access to all our other solar sizing
programs:
http://www.uscg.mil/hq/cg4/cg432/docs/software/Solar/SolarSizingProgramsandTablesv2014_1
1_20.pdf.
All manuals and user guides at all-guides.com
all-guides.com

Carmanah M850 & M860 Self-Contained LED Lantern Instructions v1.1Jan 2016
7
SECTION 3 Lantern Quick Start Guide & Programming
IR Remote Programmer
Basic Digital LED Display Codes
These are the basic codes that will be displayed after tapping the lantern or when using the IR
remote programmer’s Information Key .
Key Definition
Power Key, used to establish a connection with the lantern, change
modes, and initiate programming.
Information Key, will bring up the lantern status display to confirm
basic settings.
“A” Key, to go directly to the Flash Character menu.
“B” Key,to go directly to the Effective Intensity (candela) menu.
Set Key, to select, lock, and unlock settings when making changes
(e.g., press this key before and after programming in a flash code).
Up & Down Arrow Keys,to scroll through main menu options.
Left & Right Arrow Keys, to scroll through sub menu items or
scroll between digits in a setting (not used much).
Code Definition
StAt Lantern Mode: on or oFF (displays bYE when turning off).
bAtt Battery Status: SoC (charge in percentage), voLt (in dc volts;
M850 = 6.3 volts nominal, M860 = 8.4 volts nominal)
FLSh Displays the three digit code for the flash characteristic.
EInt Displays the lantern’s Effective Intensity setting in candela (cd).
ALC Displays the Automatic Light Control (ALC) setting (on or oFF).
CAL Displays whether the calendar function is on or off (on or oFF).
All manuals and user guides at all-guides.com

Carmanah M850 & M860 Self-Contained LED Lantern Instructions v1.1Jan 2016
8
Basic Lantern Setup Upon Receipt
The lanterns are shipped from the factory with batteries charged to at least 80% state-of-charge.
Since the lanterns must be at 100% state-of-charge at deployment, they will likely have to be
recharged after delivery by either placing them outside in direct sunlight for 5 to 10 days
(depending upon light conditions – see the Storage and Recharging Intervals section on page 15)
or using an optional battery charger pack connected to either the optional external charge port in
the lantern base or connected directly to the battery board with the lantern opened up. (Both the
optional battery charger pack and the optional external charge port are extra-cost options that
may be purchased directly from Carmanah after placing a lantern order through SILC
Contracting). While charging, a single decimal point on the lower right corner of the lantern’s
digital LED display will continually flash to indicate that charging is taking place; steady on
indicates the battery has fully charged.
The lanterns should never be deployed with the batteries at less than a 100% state-of-charge. If
in the future the state-of-charge ever drops below 60% during deployment, remove the lantern
from service for charging and troubleshooting.
Follow these basic set-up steps and lantern programming using the IR Remote Programmer after
receiving your new lantern:
Changing Modes
Step Action
1The lantern is shipped in “Storage Mode” Stor. By quickly
tapping the optic head (or the “shoulder” of the lantern to the left
of the display) three times, you will be able to activate the digital
LED display, but not change modes or program the lantern.
2Press & hold the Power Key until the lantern flashes once and
the digital LED display turns on. When turned on, the LED
readout will display the flash characteristic it was previously set to
(if fresh from the factory, lantern will be set to factory default 174;
174 = FL 4 (0.4)).
3To change between the oFF and on modes, press the Power Key
until the lantern flashes. Then, Press & Hold the Power Key
again for approximately five seconds. The LED display will
change to either StAt on (for on) or StAt oFF (for off); but while
transitioning to oFF, the display will momentarily show “bYE.”
All manuals and user guides at all-guides.com

Carmanah M850 & M860 Self-Contained LED Lantern Instructions v1.1Jan 2016
9
Setting the Lantern Flash Characteristic
Note: The lanterns are shipped from the factory set to default flash characteristic FL 4 (0.4)
(code 174). The flash rhythm can easily be changed to a different setting using the following
procedure:
Step Action
1Wake the lantern by repeatedly pressing the Power Key until
you get a single flash. The lantern must be in the on mode to
program. After the flash, you have 60 seconds to make another key
entry. If you are entering all programming codes within 60 seconds
of each other, you do not need to press the Power Key each time.
2Press the A Key (for Flash Character Menu).
3Press the Set Key to unlock the flash characteristic setting.
4
Rhythm Code
Q (0.3s flash, 0.7s eclipse) 129
FL 2.5 (0.3) (0.3s fl, 2.2s ec) 049
FL 4 (0.4) (0.4s fl, 3.6s ec) 174
FL 5 (0.5) (0.5s fl, 4.5s ec) 069
FL 6 (0.6) (0.6s fl, 5.4s ec) 073
FL (2) 5 (0.4s fl, 0.6s ec, 0.4s fl, 3.6s ec) 175
FL (2+1) 6 (0.3s fl, 0.4s ec, 0.3s fl, 1.2s ec,
0.3s fl, 3.5s ec) 022
Iso 6 (3.0s fl, 3.0s ec) 081
Mo (A) (0.4s fl, 0.6s ec, 2.0s fl, 5.0s ec) 176
Occ 4 (3.0s fl, 1.0s ec) 118
Enter the selected three digit code for the characteristic with the
numeric key pad. The codes are same for all Carmanah lanterns.
The digital LED display will show the codes as you are entering
them, and the lantern will provide a single flash for each successful
key entry.
5Press the Set Key again to lock the characteristic setting. The
lantern will provide three quick flashes to confirm that the new
setting has been accepted and locked. If incorrect, the display will
show “Err.” Important: Anytime the flash code is changed, the
lantern will determine if the new flash characteristic can support
the preprogrammed effective intensity and will automatically lower
it if necessary. Always review the programmed effective intensity
setting after changing the flash code to ensure it’s still as desired.
All manuals and user guides at all-guides.com

Carmanah M850 & M860 Self-Contained LED Lantern Instructions v1.1Jan 2016
10
Setting the Lantern Effective Intensity
Step Action
1Wake the lantern by repeatedly pressing the Power Key until
you get a flash. Then, turn on the lantern by holding down the
Power Key for a few seconds. You have 60 seconds to make
another key entry before the lantern times out.
2Press the B Key (for Flash Character Menu).
3Press the Set Key to unlock the intensity setting.
4With the numeric keypad, enter the desired effective intensity in
candelas using three digits (for example, 047 = 47 candelas, and
125 = 125 candelas). It will also be shown on the digital LED
display. If incorrect or if the lantern is incapable of accepting that
particular effective intensity and flash characteristic combination,
the display will show “Err.”
5Press the Set Key again to lock the effective intensity setting.
The lantern will provide three quick flashes to confirm that the new
setting has been accepted and locked.
Turning off the Automatic Light Control (ALC)
In the unlikely event that the ALC is turned on, follow the steps below to turn it off:
Step Action
1Wake the lantern by pressing the Power Key until you get a
flash. Then, turn on the lantern by holding down the Power Key for
a few seconds. You have 60 seconds to make another key entry
before the lantern times out.
2Press the Information Key .
3Use the Down or Up Arrow Keys to scroll through the
display until you come to “ALC”.
4Press the Set Key to unlock the setting.
5Use the Down or Up Arrow Keys to toggle between the On
and Off selections. Select Off if not there already.
6Press the Set Key again to lock the ALC setting to Off. The
lantern will provide three quick flashes to confirm that the setting
has been accepted and locked.
All manuals and user guides at all-guides.com

Carmanah M850 & M860 Self-Contained LED Lantern Instructions v1.1Jan 2016
11
Checking Day-to-Night and Night-to-Day LUX Transition Levels
It’s unlikely ATON units will ever have to change the LUX (Ambient Light Levels) on their
M800 Carmanah lanterns. Ambient light levels are used to determine when the lantern will turn
on at night or turn off during the day, depending on the amount of ambient light detected by the
lantern’s internal daylight control sensor. Carmanah’s standard factory default settings match
the USCG’s requirements. But when troubleshooting, you may be asked to report on your
lantern’s LUX level settings. So, it helps to be able to quickly confirm those settings:
To read the Day-to-Night (d2n) and Night-to-Day (n2d) settings, do the following:
Step Action
1Press the Power Key until the lantern flashes and the LED
display turns on. Ensure the lantern is in the “On” mode or you will
not be able to scroll through the menu.
2Using the Down Key , scroll through the menu display until it
shows d2n. It should then display the number 250L. Press the
Down Key again and the display will show n2d. It should then
display the number 320L. d2n = 250L and n2d = 320L are the
correct USCG LUX transition level settings.
Turning Off the “Tap” Feature
For lanterns deployed in heavy weather conditions where vibrations and shocks may
inadvertently activate the Tap-to-Activate feature, it can be turned off by performing the
following steps:
Step Action
1Press the Power Key until the lantern flashes and the digital
LED display turns on. Ensure the lantern is in the “On” mode or it
will not allow you to scroll through the menu.
2Using the Down Key , scroll down through the menu display
until it shows tAP for the Tap Activated Feature.
3Press the Set Key to unlock the setting.
4Use the Down or Up Arrow Keys to toggle between the
On and Off selections and stop at Off.
5Press the Set Key again to lock the tAP setting to Off. The
lantern will provide three quick flashes to confirm that the setting
has been accepted and locked.
All manuals and user guides at all-guides.com
all-guides.com

Carmanah M850 & M860 Self-Contained LED Lantern Instructions v1.1Jan 2016
12
Deploying
After completing all the programming steps, the lanterns should be tested outside for 24 hours.
Then just prior to deployment, ensure one last time that the lanterns are fully charged to 100%
state-of-charge (recharge if necessary) and programmed to the correct flash rhythm and effective
intensity. Perform this final check by visually confirming the settings shown in the digital LED
display while scrolling through the summary information using either the tap-to-activate method
or the Information Key on the IR programmer.
Mounting procedures are the same for all Carmanah lanterns. If using the bird deterrant wires,
place a small drop of Lock-Tite thread lock adhesive in each screw hole to ensure the bird
deterrents stay in place.
General Servicing and Maintenance
While self-contained LED lanterns do not require the intensive servicing that legacy lanterns
require, there are still actions that need to be accomplished. When servicing or troubleshooting
the M850 or M860 LED lantern, clean any dirt or guano from the lantern, paying close attention
to the solar panels and the optic head/lens cover. Closely inspect the optic head and solar panels
checking for any damage, cracks, or discoloring. More detailed information on installation and
servicing is presented in SECTION 5. Take the steps below and record the following
information:
Step Action
1Tap the optic head to activate the digital LED display or press the
Information Key . The codes listed below will display in
sequence.
2Record the battery state-of-charge and voltage.
3Confirm that the flash characteristic and effective intensity settings
are correct.
4Confirm that the ALC and CAL are turned off.
All manuals and user guides at all-guides.com

Carmanah M850 & M860 Self-Contained LED Lantern Instructions v1.1Jan 2016
13
When sending correction messages or reporting lantern problems, ensure that the lantern serial
number (not battery tracking number) shown on the optic head is included in the message or
email. This information is vital for reporting issues/problems to Carmanah.
Codes Definitions
StAt Lantern Status (Mode): on, oFF
bAtt Battery Status: SoC (charge in percentage), VoLt (in dc volts)
FLSh Three digit code for the flash characteristic
EInt Effective Intensity setting for the lantern, in candela (cd)
ALC Automatic Light Control (ALC): on, oFF
CAL Calendar: on, oFF
All manuals and user guides at all-guides.com

Carmanah M850 & M860 Self-Contained LED Lantern Instructions v1.1Jan 2016
14
SECTION 4 Lantern Selection
Overview
The Carmanah M800 lanterns are authorized replacements for a 155mm, 250mm, and all
previous self-contained LED lanterns on either a buoy or a fixed aid if it provides an acceptable
effective intensity and if its solar engine is capable of providing the required minimum 15-days
of autonomy.
District Considerations -- Intensity
Both the M850 and M860 lanterns provide a wide range of intensities. However, the capabilities
of the M860 lantern in the lower intensity settings are duplicated by the M850 lantern. Because
of cost considerations, use the M860 only at aid locations where the required effective intensities
and/or autonomy cannot be met with an M850 lantern. Use the M800 lantern solar sizing
program to determine the capabilities of these two lanterns for your specific application(s) (see
SECTION 2).
To determine the intensity requirements for any aid, Districts shall use the standard procedures
for selecting an ATON light signal as prescribed in the ATON Technical Manual (Chapter 6,
Section 6.B, page 6-1) and the Visual Signal Design Manual (Chapter 3). These references
describe how operational range, luminous range, light color, light characteristic, background
lighting, and meteorological visibility are used to calculate intensity needs.
After the effective intensity is determined, use the following table to find Nominal Range.
Nominal Range Table
Effective
Intensity Nominal
Range
1 – 2 1
3 – 9 2
10 - 23 3
24 - 53 4
54 - 107 5
108 - 203 6
204 - 364 7
Under no circumstances should any lantern replace another lantern based solely on nominal
range. Instead, select an effective intensity equal to or slightly greater than that of the lantern
being replaced.
All manuals and user guides at all-guides.com

Carmanah M850 & M860 Self-Contained LED Lantern Instructions v1.1Jan 2016
15
SECTION 5
Receipt, Storage, Recharging, Installation, Servicing, and Troubleshooting
Receipt, Handling, and Warranty
As discussed before, the lantern is charged prior to shipping from the factory. It should arrive
with a state-of-charge of at least 80% and programmed to be in the storage mode (i.e., it will not
flash in a darkened room). If not needed right away, it should be checked for damage, placed in
the oFF mode, and kept exposed to ambient sunlight/daylight in a safe, cool location if possible
(the cooler, the better). Carmanah offers a three (3) year limited warranty: For the first year
after purchase, Carmanah will, at their discretion, repair, replace, or provide a credit for a faulty
lantern if failure is due to a defect in materials or workmanship. For the second and third year
after purchase, Carmanah will, at their discretion, repair, replace, or provide a credit for a faulty
lantern if failure is due to a defect in materials or workmanship with the exception of lantern
failure due to battery performance.
If a lantern is found to be defective even after troubleshooting and it’s still within the three-year
warranty period, contact Carmanah at the customer service address/phone number provided after
the troubleshooting section below to launch a warranty claim. You will need to provide
Carmanah with as much information about the defective lantern as possible, the most important
of which is the lantern’s serial number.
Storage and Recharging Intervals
Storage of self-contained lanterns is not encouraged but is sometimes unavoidable for logistical
or other compelling reasons. The batteries inside these self-contained lanterns are very
susceptible to self-discharge, especially if the lantern is left unused in a hot, dark location for a
long period of time. To avoid this unnecessary loss of charge and resulting battery damage, first
charge the lantern to 100% SoC and then store the lantern at temperatures no higher than 68° F if
at all possible (and, as mentioned before, the cooler the better but refrigeration temperatures are
best: 35° to 40°). Depending on the storage temperature, the lanterns must be taken out of
storage and charged as follows:
Storage Temperature
(°F)
Recharging Interval
(months)
68° or lower 6
69° – 77° 3
78° – 86° 2
87° – 103° 1
104° or higher Do not store at these temps
For example, an M860 lantern stored at 80° F will have to be taken out of storage and charged
outside exposed to natural sunlight for 5 to 10 days every 2 months in order to preserve the
battery.
All manuals and user guides at all-guides.com

Carmanah M850 & M860 Self-Contained LED Lantern Instructions v1.1Jan 2016
16
The lantern should always be brought up to 100% state-of-charge before storing it to reduce the
chance of battery damage. Upon checking the battery’s state-of-charge, if the displayed value is
not 100%, then recharge the lantern per instructions in the Recharging section below prior to
storage. Important: Don’t forget to place the lantern in the oFF mode prior to storage by
pressing and holding down the Power Key for approximately five seconds until “byE” is
displayed.
Recharging
There are several ways to recharge the lantern and bring the battery back to 100% state-of-
charge. The best and easiest way is to leave the lantern outside exposed to natural sunlight for 5
to 10 days. If this is not possible, you may use the optional power pack style battery charger
connected to either the optional charge port in the base or directly to the battery board after
opening up the lantern. However, opening up the lantern to access the battery board is not
encouraged because the environmental factory seal will be compromised. A flashing decimal
point in the digital LED display indicates that battery charging is taking place; steady on
indicates that the battery is fully charged.
Battery charging options are presented in the following order of precedence:
1. Using Sunlight. The easiest way to recharge the lantern to 100% state-of-charge is to
leave it outside exposed to natural sunlight for 5 to 10 days. Ensure that the lantern is turned
oFF so that it does not activate at night extending the recharging time.
2. Using Optional Charge Port. The battery charge port is a $95 option that, if desired,
must be purchased immediately after placing an order against the current requirements
contract through SILC Contracting by calling Carmanah and providing the order number and
the additional payment. If you purchase this option, a battery charge port will be added to
the bottom of the lantern’s base flange for charging the battery using an external 120VAC
power-pack style battery charger ($56 option, p/n: 69885). If lanterns are charged using this
method, the battery will fully charge within 24-hours and an intelligent charge controller
built into the lanterns’ circuitry will prevent overcharge if/when left connected for long
periods of time. Upon charge completion (confirmed when decimal point in digital LED
display is steady on), let the lantern rest for at least one (1) hour in the oFF mode (but
preferably 24-hours) before confirming settings and deploying the lantern.
All manuals and user guides at all-guides.com
all-guides.com

Carmanah M850 & M860 Self-Contained LED Lantern Instructions v1.1Jan 2016
17
3. Opening the Lantern. Use this method only as a last resort since it involves disturbing
the factory seal. Any Carmanah self-contained lantern, with or without a charge port, can
always be opened up and charged using the external 120VAC power-pack style battery
charger ($56 option, p/n: 69885) connected directly to the battery board. If lanterns are
charged using this method, the lantern head must remain electrically connected to the
battery board. The battery will fully charge after 24-hours and an intelligent charge
controller built into the lanterns’ circuitry in the lantern head will prevent overcharge if/
when left connected for longer periods of time. Upon charge completion (as indicated by
the decimal point in digital LED display being steady on), let the lantern rest for at least one
(1) hour in the oFF mode (but preferably 24-hours) before confirming settings and
deploying the lantern. However, this method requires the additional step of properly
reassembling the lantern after battery charging is completed. To retain a proper
environmental seal when reassembling the lantern, reconnect the four base plate screws and
tighten each screw down to 50 inch-lbs in a cross pattern using a calibrated torque wrench
as shown below (right).
All manuals and user guides at all-guides.com

Carmanah M850 & M860 Self-Contained LED Lantern Instructions v1.1Jan 2016
18
Installation
If District has determined that the Carmanah M850 or M860 satisfies effective intensity and
autonomy requirements, then the lantern may be installed on either a steel buoy, a 5 X 9 foam
buoy, or on a structure.
Program the lantern prior to installation on the buoy or structure according to the instructions
provided in SECTION 3. After programming, cover the lantern or move to a dark room to
simulate nighttime. Confirm that the lantern flashes under the correct flash characteristic.
“Time” the light with a stopwatch. Confirm that all five LEDs are operating (check the LEDs by
looking around the lantern just above the lantern’s focal plane but DO NOT look directly into the
lantern with your eye at the focal plane). Another method is to wrap a piece of white printer
paper around the lens and view the projected image of the LEDs on the paper. Then, verify one
last time that the correct effective intensity has been programmed in by tapping the lantern’s
optic head and checking the digital LED display readout. The effective intensity setting (EInt)
sequences immediately after the flash characteristic setting (FLSh). Test the lantern outside for
24 hours to ensure proper operation; and, finally, recharge the lantern back to 100% state-of-
charge before deployment.
Buoy Mount
Top of Radar
Reflector
1/2” Bolt
Flat Washer
Split Lock
Washer Nut
Mount the lantern on a buoy as shown in the figure above. The lantern must always be
mounted with 3 bolts, never 4. Note that stainless steel or nylon flat washers MUST BE
installed between the lantern and buoy’s mounting plate to prevent distortion of the lantern’s
base. Stainless steel washers should also be installed between the heads of the mounting
All manuals and user guides at all-guides.com

Carmanah M850 & M860 Self-Contained LED Lantern Instructions v1.1Jan 2016
19
bolts and the top of the lantern’s base, as shown in the above figure. The mounting bolts
should be torqued to 40 to 44 ft-lbs (4.5 to 5 N m).
Fixed-Aid Mount
½”-13 UNC All-Thread,
3 ea on a 7-7/8” bolt circle
Lantern
Jam Nut
Nut
Flat Washer
Platform
Nut
All-Thread
Or Bolt
Lock Nut
Washer
Washer
Mount the lantern on a fixed aid as shown in the figure above. The lantern should
ALWAYS be mounted with 3 bolts (or lengths of all-thread), never 4. The bolts will
shadow the solar panels if they extend too far above the lantern’s base. Therefore, after
securing the bolts (or all-thread) to the structure’s mounting plate as shown in the figure,
install three jam nuts and washers on the bolts so that only about 1” of thread is exposed
on top. Place the lantern on top of the jam nuts, then drop on the washers and position
the uppermost locknuts at the very upper end of the thread. Do not tighten these
uppermost nuts yet – they are positioned at this time to ensure that the lantern doesn’t fall
off. Level the lantern by adjusting the jam nuts (use a torpedo level on the base plate of
the lantern - use the “T” method described in the Short Range Aids to Navigation
Servicing Guide COMDTINST M16500.19A). When the lantern is level, tighten the
upper-most nuts to 40 to 44 ft-lbs (4.5 to 5 N m).
All manuals and user guides at all-guides.com

Carmanah M850 & M860 Self-Contained LED Lantern Instructions v1.1Jan 2016
20
Servicing
Servicing should be performed in accordance with the standard cycle established for the aid.
Ensure that the lens and solar panels are clean. Wipe with a cloth dampened with mild soap and
water, if necessary.
Using either the tap-to-activate digital LED display feature or the information key on the IR
remote programmer, check the battery state-of-charge: Look for battery state-of-charge reading
XXX (bAtt – SoC – XXX) in the digital LED display that will sequence immediately after
lantern status information. Battery state-of-charge must be at least 60%; if less than 60%, the
lantern must be removed from service for charging and troubleshooting. Since the two M800
lanterns use different battery configurations and voltages (M850/60X = 6.3 volts, M860/200BC
= 8.4 volts), we rely primarily on battery state-of-charge to determine the health and status of the
battery. However, battery voltage information can be useful when troubleshooting a discrepant
lantern and reporting back to customer service technicians at Carmanah for assistance.
Cover the lantern with a shroud, jacket, box, blanket, etc., to simulate darkness. The lantern
should flash on rhythm after a few seconds. While covered, confirm that all five LEDs are
operating (check the LEDs by looking around the lantern just above the lantern’s focal plane;
DO NOT look directly into the lantern with your eye at the focal plane).
Uncover the lantern. It should stop flashing.
Battery Service Life
The expected battery life is highly dependent on temperature: The higher the temperature, the
shorter the expected battery life. Battery recharge intervals (i.e., replacement intervals) range
from four years in hot climates to ten years in cold climates. Field units should recharge
(replace) batteries at intervals shown in the table on the next page.
A battery replacement kit can be ordered directly from Carmanah (see SECTION 6 below). The
battery kits contain a Cyclon battery pack, harness, battery hold-down plate, head/base gasket
and washers (lantern base not included). Detailed battery replacement instructions are included
with each kit. If the lantern fails due to a battery problem within the first year after purchase,
contact Carmanah’s customer service department at 1-877-722-8877 for an RMA number before
shipping the lantern back to them for repair or replacement.
60X
Battery
Pack
(6.3V)
200BC
Battery
Pack
(8.4V)
All manuals and user guides at all-guides.com
This manual suits for next models
1
Table of contents
Other Carmanah Lantern manuals
Popular Lantern manuals by other brands

One Stop Gardens
One Stop Gardens 92513 Assembly and operating instructions

WHITECROFT LIGHTING
WHITECROFT LIGHTING TEGAN SLIM 600SQ installation instructions

Hydrofarm
Hydrofarm Jump Start Modular T5 JSFS18T user manual

Beghelli
Beghelli OL2 instructions

Chalmit
Chalmit NexLED Installation, operation and maintenance instructions

Endon
Endon Drayton Bollard instruction manual