Avvio 938S User manual

User Manual
Avvio 938S/MEU TN101/Avvio 938W

1
PREFACE
WELCOME
Congratulations on the purchase of your Avvio 938S/MEU TN101/Avvio 938W
product!
Please retain your original dated sales receipt for your records.
For warranty service of your Avvio 938S/MEU TN101/Avvio 938W product, you will
need to provide a copy of your dated sales receipt to confirm warranty status.
Thank you for choosing Motorola product.
Please read important safety instructions before use.
Read and understand all instructions before use.
Please retain this guide for future reference.
The information contained in the Avvio 938S/MEU TN101/Avvio 938W user guide is
believed to be correct at the time of printing. We reserve the right to change or modify
any information, product specifications, features or functionality without notice. The
contents of the Avvio 938S/MEU TN101/Avvio 938W user guide are provided “as is.”
Certain features may not be activated by your service provider, and/or their network
settings may limit the feature’s functionality. Additionally, certain features may require
a subscription.
Contact your service provider for details.

2
Contents
AVISOS IMPORTANTES.............................................................................................4
Precaução / Medidas de Segurança......................................................................4
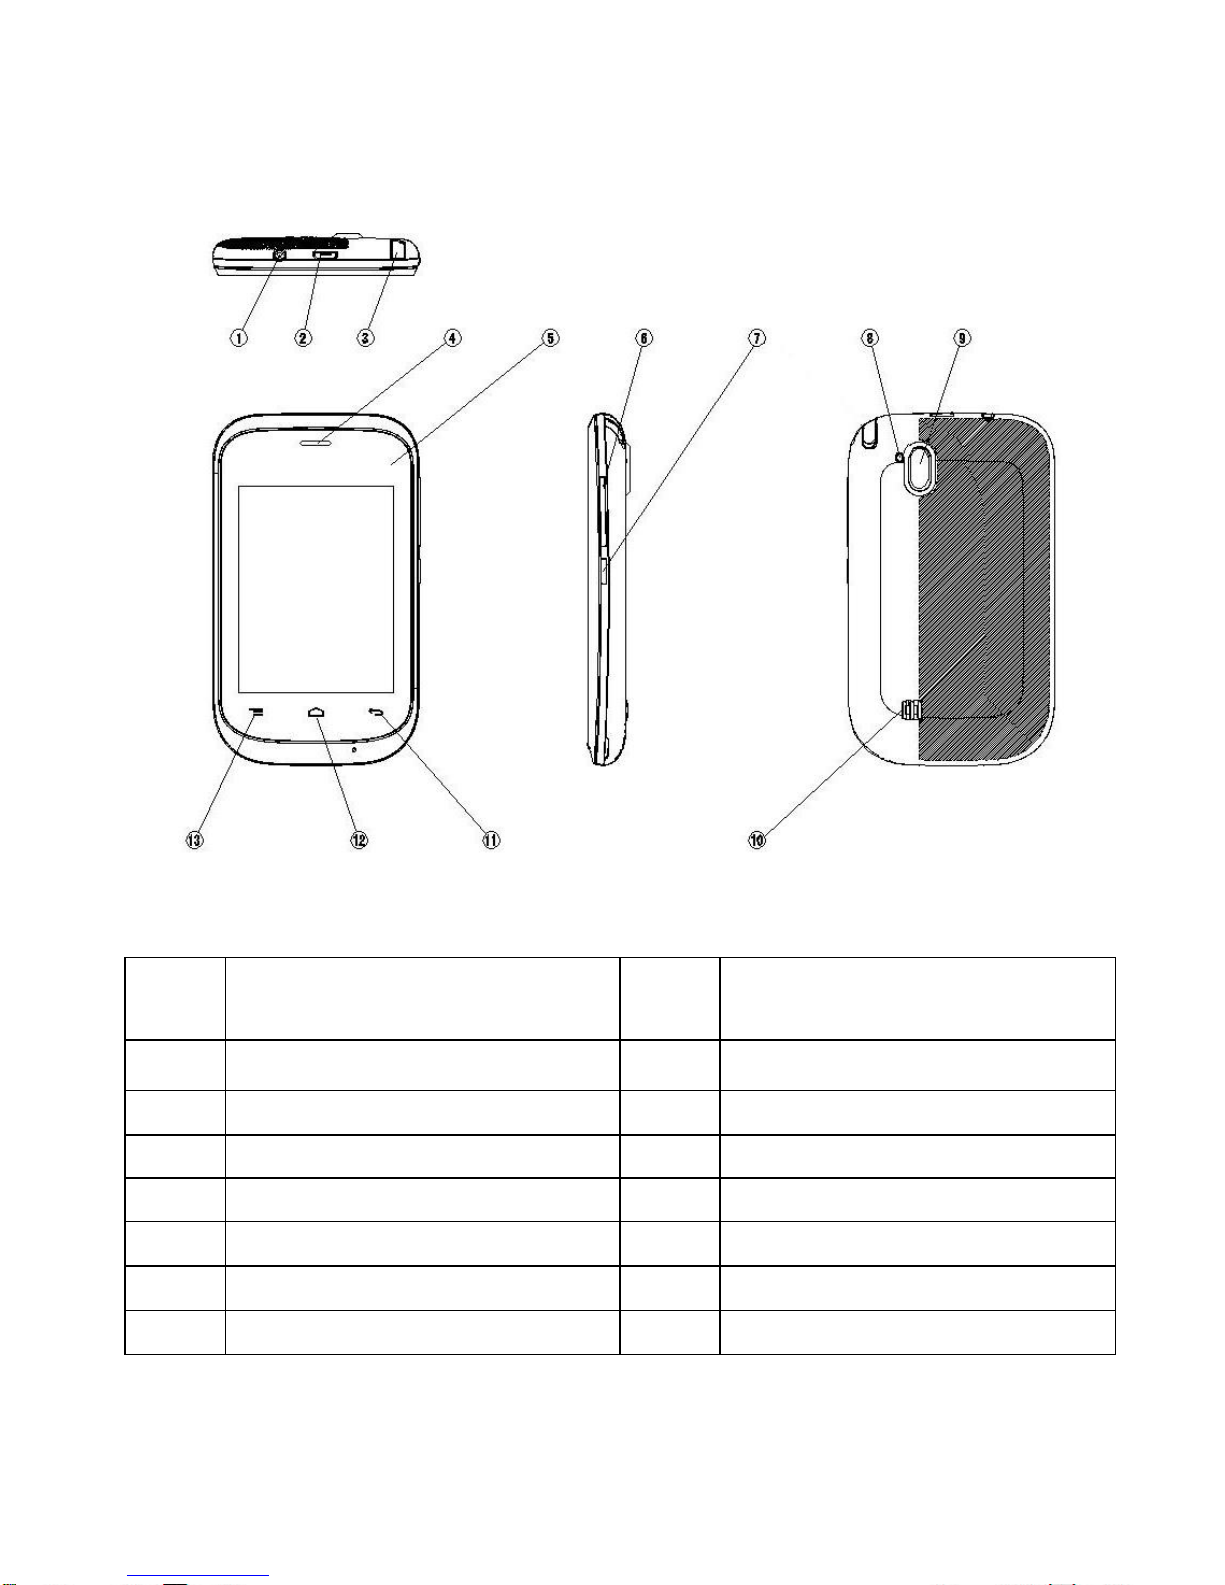
PHONE OVERVIEW....................................................................................................5
INSTALLATION............................................................................................................6
KEY FUNCTION..........................................................................................................7
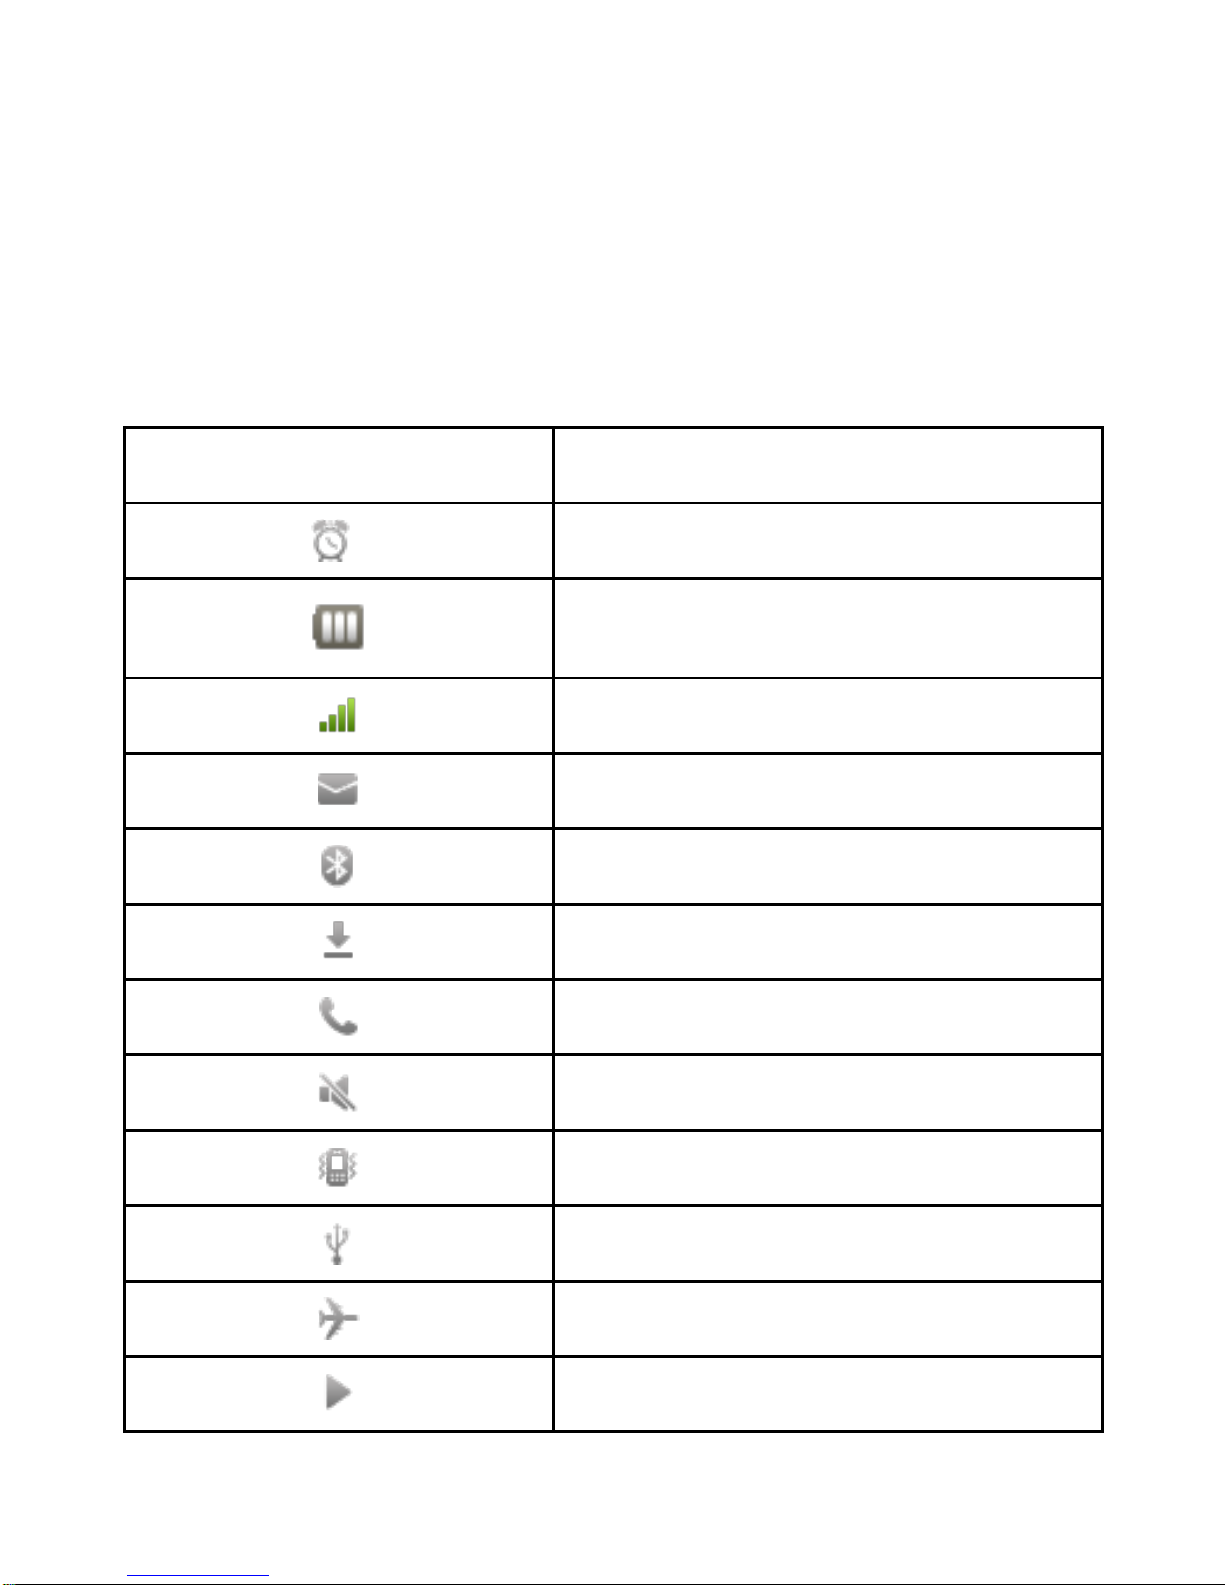
DISPLAY INDICATORS AND ICONS........................................................................8
BASIC OPERATION....................................................................................................9
[1] Switching the phone ON and OFF ..............................................................9
[2] Making a call.................................................................................................9
[3] Answering a call...........................................................................................9
[4] Reject a call.................................................................................................9
[5] Menus............................................................................................................9
[6] Scrolling through menus...........................................................................10
[7] Exiting menu levels....................................................................................10
PHONE MENUS ........................................................................................................11
[1] Dialer & Call log & Contacts......................................................................11
[2] Calendar......................................................................................................11
[3] Camera ........................................................................................................11
[4] Settings .......................................................................................................12
[5] Clock............................................................................................................13
[6] Browser.......................................................................................................14
[7] Downloads ..................................................................................................14
[9] Launchers ...................................................................................................14
[10] Messaging ...............................................................................................14

3
[11] Locks .......................................................................................................15
[12] witch FX ..................................................................................................15
[13] Calculator ................................................................................................15
[14] File manager...........................................................................................15
[16] Tasks........................................................................................................15
[17] FM radio..................................................................................................15
[18] SIM toolkit...............................................................................................16
[19] ATV...........................................................................................................16
[20] Ebook.......................................................................................................16
[21] Movie........................................................................................................16
[22] Music........................................................................................................17
[23] Opera Mini ..............................................................................................17
OVERVIEW OF MENU TREE..................................................................................18
SAFETY INFORMATION...........................................................................................21
GARANTÍA.................................................................................................................24
FCC REGULATIONS:................................................................................................27
RF EXPOSURE INFORMATION (SAR) ..................................................................27
REGULATORY...........................................................................................................29

4
AVISOS ImportantES
Precaução / Medidas de Segurança
Segurança ao dirigir
Utilizar o telefone celular enquanto se dirige é ilegal e deve ser evitado a todo
custo. Se você precisar fazer ou receber uma chamada urgente, encoste o se
u veículo na rua e espere o mesmo parar completamente antes de utilizar seu
telefone.
Desligue em ambientes potencialmente perigosos
Telefones sem fio podem interferir no funcionamento de aeronaves, bombas de
gasolina, equipamentos médicos em hospitais e próximo a locais propensos a e
xplosões. É extremamente importante que você não utilize telefone celular enqu
anto estiver em qualquer um dos locais listados acima.
Além disso, lembre-se de desativar qualquer alarme que tenha ligado antes de
desligar o MEU 406 antes da decolagem de uma aeronave.
Utilização da Bateria
A primeira carga deve ser feita utilizando o carregador comum e não utilizando
o cabo USB.
Durante as 3-4 primeiras sessões de carga, carregue a bateria até que ela sej
a totalmente carregada de acordo com o indicador de nível de bateria. Isso ass
egura um backup maior da bateria e prolonga a vida da mesma.
Evite carregar parcialmente. Espere a bateria descarregar totalmente antes de c
arregar novamente.
Carregar pelo Cabo USB deve ser reservado para uma emergência.
Utilize o aparelho no modo vibrar somente em ocasiões raras.

5
PHONE OVERVIEW
Avvio 938S/MEU TN101/Avvio 938W
No.
Description
No.
Description
1
Headset connector
8
Flash LED
2
Micro USB connector
9
Camera
3
ATV antenna
10
Speaker
4
Receiver
11
Back
5
Touch panel
12
Home
6.
Volume -/+
13
Menu
7.
Power on/off Key

6
INSTALLATION
Remove the battery door and Insert SIM card into the SIM slot in the right direction.
After this, please connect the rechargeable battery pack into the battery plug and
replace the battery door.
Note:
Be sure to carefully match the positive and negative terminals as shown on the
battery. When using the phone for the first time, charge it for over 6 hours to
ensure optimum battery charge.
Caution:
DO NOT bend or scratch your SIM card, and avoid exposing it to static
electricity, water, or dirt.

7
KEY FUNCTION
Keys
Functions
Home key
Press this key to go back the standby screen.
Back key
Press this key to go back to previous menu.
Menu key
Press this key to open the list of available options
on the current screen;
Power key
Press this key to power on/off; normally, press this
key to phone locked.
Volume key
Press volume key on the side of phone to increase
or turn down volume, when the video. the music or
sound recorder is playing interface.

8
DISPLAY INDICATORS AND ICONS
The display indicators and icons provide information about the operation of the phone.
The idol screen is displayed when the phone is turned ON. Several features can be
used only when the phone is at the start screen.
Icons
Descriptions
Alarm
Battery Status
Signal Strength
New message
Bluetooth
Downloading
Calling
Silent
Vibration
USB
Flight mode
Music playing

9
BASIC OPERATION
[1] Switching the phone ON and OFF
1) Press and hold the power key to switch on the mobile phone. The screen shows
the power on video.
2) After power on, if the SIM card inserted is valid, your mobile phone will
automatically search available network. If not, it will prompt “No valid SIM card” or
“Make emergent call”.
3) If the PIN code is activated, please input the code. The PIN code is provided by
the network operator.
4) Access standby interface.
5) Press and hold the power source key to switch off the mobile phone.
[2] Making a call
1) Enter area code and phone number and touch call key to dial out.
2) Touch delete menu to clear if there is wrong input.
Note: Obstacles give lots of effects on calling quality moving around in a small range
will improve signal strength effectively.
[3] Answering a call
1) Touch Accept icon to receive incoming call.
2) Press Reject icon to end a call.
[4] Reject a call
Press reject icon to reject an incoming call.
[5] Menus
A menu is a list of choices you can make. Each menu contains options that allow you
to use the message, make a call and other functions.
You can use menus and sub-menus by touch the icons that show the function you
want.

10
[6] Scrolling through menus
On the Standby screen, menu is showed, select the function by touching. Not all the
functions are showed on the standby screen, you can see more functions when you
scroll like turning pages.
And in standby screen, please drag down LCD screen from upper side, and then you
can check the status of new messages, Alarm, Missed call, Events and so on in the
sub menu of notifications and other played functions like music, FM radio, video and
others in the sub menu of Ongoing. And drag up, these notification and ongoing sub
menus will be hidden.
[7] Exiting menu levels
1) To return to the previous menu level, press Back key.
2) To return to the Standby screen, press Back key or Home key. No menu setting
changes will be saved.

11
PHONE MENUS
[1] Dialer & Call log & Contacts
Touch these icons, you can enter into below 3 sub-menus.
Dialer: After entered in this menu, enter area code and phone number to
make a call and touch call icon. And after touch call icon, there are some
pop-up menu displayed like New call, Hold, Record for call, Mute, Keypad,
Speaker mode, and Other menus ( BT for using BT earphone and so on )
Call log: It display the history of incoming / outgoing / missed call information.
By touch menu key, you can sort call information as All, Missed call and Clear
call logs.
And you can check the detailed information by touch specific call log.
Contacts: You can store contact information like name, phone number, email,
other information, Contact setting and edit / delete the contact information by
touch menu key.
If you touch a little long time on specific contact information, pop-up menu
displayed for call / message / edit contact / delete.
Contact information will be sorted by order of Alphabet.
[2] Calendar
You can always access to your calendar and events. You can view the calendar
respectively; and also can some events from calendar.
In this menu, you can choose day, week, month showing the way to check the
calendar. If the calendar is opened by weeks (month) view, it will be presented as
weeks (months), more convenient for you to check the schedule.
[3] Camera
Learn how to shoot and view photos and videos. Keep press the camera icon for
taking another picture. The pictures will store in the shootings. The lens is at the back
of the phone and could display the pictures on the screen.

12
Depending on the shooting scene or shooting conditions, the storage capacity may be
different.
Settings: set EV, Self-timer, White balance, Effects and Resolution
Video mode: Slide the scroll bar to switch to the video mode, Long time
recording is supported. File format is AVI.
[4] Settings
In this menu, you can set Network & connectivity, Personalization, System and
Applications
1) Network & connectivity: Enter this function to the Flight mode, WLAN, WLAN
settings, Bluetooth, Bluetooth setting, and several Cellular network settings and so on.
2) Personalization:
Theme settings: set Wallpaper, Color & Style and Screen lock.
Wallpaper: you can set Home screen wallpaper and Lock screen wallpaper
as your hobby.
Color & Style: to select the color and style of the theme.
Screen lock: to set screen lock.
Sound settings: Set Silent, Vibration and Ring volume for incoming calls
and notification, Notification sound for new events, New message and
incoming call ringtone and device sound.
Notification settings: Set messaging, call log, downloads
Security settings: set phone and SIM securities.
Phone lock: You can activate or deactivate phone lock. The phone lock is a
4-8 digit password (the default password: 0000), which you can change and
also you can change the phone lock password as yours .
SIM1/SIM2: you can activate or deactive SIM1/SIM2 PIN lock and change
SIM1/SIM2 PIN and PIN2.
Note: Please consult local phone supplier or network operator about SIM PIN or PIN2
3) System settings: Set display settings, date and time settings, language& input

13
and Advanced setting.
Display settings: Set the brightness, Screen auto-lock, Enhanced picture
quality.
Set brightness: You can touch display strip to set brightness.
Screen auto-lock: Adjust the delay before the screen automatically turns
off. You can choose 15secs, 30 secs, 1 min, 2 mins, 5min, 10 mins and
never.
Enhance picture quality: Enhance picture quality as your hobby.
Date&time settings: set the home city, current date and time. If you select
Network time auto-update, and then other menus will not be selected
Language & input: set language and input method settings.
Advanced settings: set to restore the phone as factory settings.
4) Applications: set Call settings, Contacts settings and Messaging settings
Call Settings: set Black list, white list, Auto redial, Call time reminder, Auto
quick end, Connect notice, Auto answer, and additional call setting like
Hide my caller ID, Call waiting & forwarding & barring and so on. Part
function should take in network operator supporting.
Contacts settings: set contacts storage, set speed dial list, backup
contacts, restore contacts, import contacts, export contacts and so on.
Messaging settings: in this menu, you can set Memory status, Text
message, Broadcast message and so on.
[5] Clock
Learn how to set and control the alarm. Press Clock icon and you can perform below
operations.
Set a new alarm : In standby mode, open clock icon and then, select alarm.
And then press menu key to enter the following options:
Add Alarm:After setting the alarm time by scroll “Hour, Minute and AM/PM”,
click on" Repetition " to set the alarm in specific day in week, click on"

14
Ringtone "to set the alarm tone, scroll on " vibration" to set on/off the
vibration mode and then click" Save" finally. Alarm function will be started.
Delete: you can select alarm to delete.
Settings: you can set Alarm Snooze and Volume.
[6] Browser
You can input the address or key word you want to search.
[7] Downloads
You can view the files that are downloading and the files that have completed
download. By touch menu, you can pause and resume for downloading files and
Remove all completed files.
[8] Gallery
Your phone provides high resolution display of picture and videos. Use Gallery to view,
capture and manage pictures and videos.
Note: You must have an optional memory card installed in your phone to take pictures
or capture video.
[9] Launchers
By touching Launchers, you can see Launchers, Locks, Home FX on the middle of
the screen. You can enter into dialer, call lag, contacts, home menu, Messaging by
touching the three icons on the bottom of the screen from left to right. On the top of
the screen, you can see the icons of WLAN, Blue tooth, Silence, flight mode, and
brightness, turn on/off the function by touching. By scroll the screen like turning pages
or touching the left & right bottom screen, you can see VIP contacts, tap to add songs,
FM radio, Calendar.
Note: If you want to back to the home menu screen originally showed on the phone,
you can touch the Launchers again.
[10] Messaging
Enter this menu, then touch menu key to enter “Settings, New message, Delete, SIM
message”. Maximum storage capacities are depending on the built-in system and

15
external SIM cards. You can check the memory status of the mobile phone and SIM
cards.
[11] Locks
To protect your phone privacy, this phone provides two selectable screen lock, so you
can select one as your hobby
[12] witch FX
Open this application, you can select ways: Ball, Space beam, Jump up, Wave, Tilt,
Roll and so on. And when you slide screen, the application icons according to the
selected way appears.
[13] Calculator
1) Open the application list and then select the "calculator".
2) Use the calculator shows the corresponding key. You can perform basic arithmetic.
Note: The precision of the calculator is limited and there are errors, especially when it
is indivisible.
[14] File manager
In this menu, you can view pre-defined and User defined folders in phone and
memory card. Select any folder and click the right icon of the folder, you can scan the
selected folder details. Press menu key to open storage status.
[15] Notes
In this function, you can add new notes. All note records Sorted by time, the latest
change at the top. In the list, you can see the first few letters of each record. Press
menu key to do add, delete and search operations:
[16] Tasks
Use tasks to keep track of things you need to do. Create a new task and perform
operations like Subject, Priority, Due to, Reminder and Note. If you have set alarm fort
hcoming task, the mobile phone rings and displays the task when the specified time
arrives.
[17] FM radio

16
Must to be plug in your headphones into the FM radio interface to listen FM radio
Auto Search Channel: Please click the icon button on the right of below
screen and then touch “auto search”button. it will automatically search for
channels. The search will automatically stop after channels are searched.
Favorite Channel: Touch “Favorite Channel”icon on the screen, you can
add your favorite FM channels for the convenient use in the next.
Record: Touch on the left icon of below screen to record the current FM
radio. Simultaneously touch the settings icon and you can set recording
quality.
[18] SIM toolkit
This function is supplied by the network suppliers. If the SIM card and network supplier
does not support the service, this function will not be used. For more information pleas
e contact with network providers.
[19] ATV
First time enters TV, may carry on the following operation:
Scan location: select area to enter the television in much national area
tabulation.
Scan channel: After select location, and then scan available channels by
touch menu button.
In watching TV mode, if you touch the screen, some menu icons are displayed in
upper side ( Scan location, Scan area, Capture ) and bottom side ( available channels
to be switched )
[20] Ebook
In this application, you can read Electronic book in external memory card. And you
can select some sub-menu ( share, move, copy, add folder, sort and others ) by
touch menu key.
[21] Movie
In this application, you can play videos stored on phone and memory card. it list by R

17
ecently played, All, Action & Adventure, Romance & Humor, TV-Series & Drama, Doc
umentary and Others and so on.
[22] Music
Audio player automatically scans the music in SD card:
Songs: Music files in SD card, arranged by song name, click on song name
to play.
Artists: Music files in SD card, arranged by the performers, such as click
"Eason" into songs this singer sang, click on the selected songs can be
played.
Album: Music files in SD card, arranged according to album, put the music
files on the same album together, click on an album, you can list all the songs
on the album, click on the selected songs can be played.
Play lists: You can add a play list; add the specified music files to the new
play list.
[23] Opera Mini
This function is supplied by the network suppliers. If the SIM card and network supplier
does not support the service, this function will not be used. For more information
please contact with network providers.

18
OVERVIEW OF MENU TREE
* For detail about menu tree and usage, please contact your service provider
1. Call log
1. Call log
2. Dialer
3. Contacts
2. Calendar
3. Camera
4. Setting
1. Network connectivity
2. Personalization
1). Theme settings
2). Sound settings
3). Notification settings
4). Security settings
3. System
1). Display settings
2). Date & time settings
3). Language & input
4). Advanced settings
4. Applications
1). Call settings
2). Contacts settings
3). Messaging settings
5. Clock
1. Alarm

19
2. World clock
3. Stop watch
4. Timer
6. Browser
7. Downloads
1.Downloading
2.Completed
8. Gallery
9. Launchers
1.Launchers
2. Locks
3. Home FX
4. VIP contacts
5. Tap to add songs
6. FM radio
7. Calendar
10. Dialer
1. Dialer
2. Call log
3. Contacts
11. Contacts
1. Contacts
2. Dialer
3. Call log
12. Messaging
13. Locks
1.Cosmos
This manual suits for next models
1
Table of contents
Other Avvio Cell Phone manuals