AWA MHDV2445-O3 User manual

MHDV2445-O3
24" 60cm FULL HD LED LCD Television
USER MANUAL
Thank you for purchasing this LCD TV. Before connection and operation of this
product please read the manual carefully and completely.
Please keep this manual for future reference.
N294
Version 1.0


Contents
-2-
INTRODUCTION..............................................................................1
SAFETY ANDWARNINGS.............................................................3-5
BASE STAND ......................................... 6
INSTALLATION......................................................................... 7 -10
REMOTE CONTROL.................................................................11-12
OPERATION.............................................................................13-17
TROUBLE SHOOTING...................................................................18
TECHNICAL SPECIFICATIONS.......................................................19
ASSEMBLY INSTRUCTION
WALL MOUNTING INSTALLATION GUIDELINES............................... 6

SAFETY AND WARNINGS
Important Safety Instructions
ŸWarning: To reduce the risk of electric shock, do not remove the coveror back. There
are no user-serviceableparts inside. Refer servicing to qualified personnel.
ŸWarning: To prevent fire or electric shock hazard, do notexpose the unitto rain or
moisture.
ŸDo not exposethe Adaptor and product to water (dripping or splashing) and no objects
filled with liquids,such as vases, should be placed on the unit.
ŸKeep the productaway from direct sunlight and heat source such as radiators or stoves.
ŸDo not blockthe ventilation openings. Slots and openings on the unit are provided for
ventilation. The openings should neverbe blocked byplacing your product on a cushion,
sofa or othersimilar surface.
ŸDo not placethe product on unstable cart, stand, tripod, bracket or table. The unit may
fall, resulting inpossible damage or injury.
ŸNever place heavyor sharp objects on the panel or frame.
ŸOnly use theAC adapter included with product. Using any other adapter will voidyour
warranty.
ŸUnplug the power from the outlet when the unit is not in use.
ŸAttention should bedrawn to the environmental aspects of battery disposal.
ŸWARNNING: Thebattery (battery or batteries or battery pack) shall not be exposed to
excessive heat suchas sunshine, fire or the like.
ŸWARNNING: Excessive sound pressure from earphones or headphonescan cause
hearing loss.
ŸWARNNING: Only use attachments/accessories specified provided by themanufacturer,
the product issupplied by AC adapter, the AC adapter is used as disconnect device,the
disconnect device shallremain readily operable.
-3-

-4-
High voltages are used in the operation of this
television receiver. Do not remove the cabinet
back from your set.
Refer servicing to qualified service personnel.
To prevent fire or electrical shock hazard, do not
expose the television receiver to rain or moisture.
Do not drop or push objects into the television
cabinet slots or openings. Never spill any kind
of liquid on the television receiver.
Do not block the ventilation holes in the back
cover.
Adequate ventilation is essential to prevent
failure of electrical components.
Do not trap the power supply cord under the
television receiver.
Never stand on, lean on, or suddenly push the
television or its stand. You should pay special
attention to children. Serious injury may result if it
falls.
Do not place your television on an unstable cart,
stand, shelf or table. Serious injury to an individual,
and damage to the television, may result if it falls.
When the televisionreceiver is notused for an
extended period of time, it is advisable to
disconnect theAC power cord from the AC outlet.
Avoid exposing the television receiver to direct sunlight
and other sources of heat. Do not stand the television
receiver directly on other products which give off heat,
e.g. video cassette players and audio amplifiers. Do not
place naked flame sources, such as lighted candles on
the television.
If the television is to be built into a compartment or similar
enclosure, the minimum distances must be maintained. Heat
build-up can reduce the service life of your television, and
can also be dangerous.
Dim:515*320mm(
SAFETY AND WARNINGS

-5-
SAFETY AND WARNINGS
CAUTION
Never tamper with any components inside the TV, or any other adjustment controls not mentioned in
this manual.
All LCD-TVs are high voltage instruments. When you clean up dust or water drops on the LCD
PANEL or CABINET, the power cord should be pulled out from the receptacle, then wipe the TV with
a dry soft cloth. During thunder and lightning, unplug the power cord and antenna cord to prevent
damage to your TV. All repairs to this TV should only be performed by qualified TV service
personnel.
Warning: Change or modifications to this unit not expressly by the part responsible for compliance
could void the user 's authority to operate the Equipment.
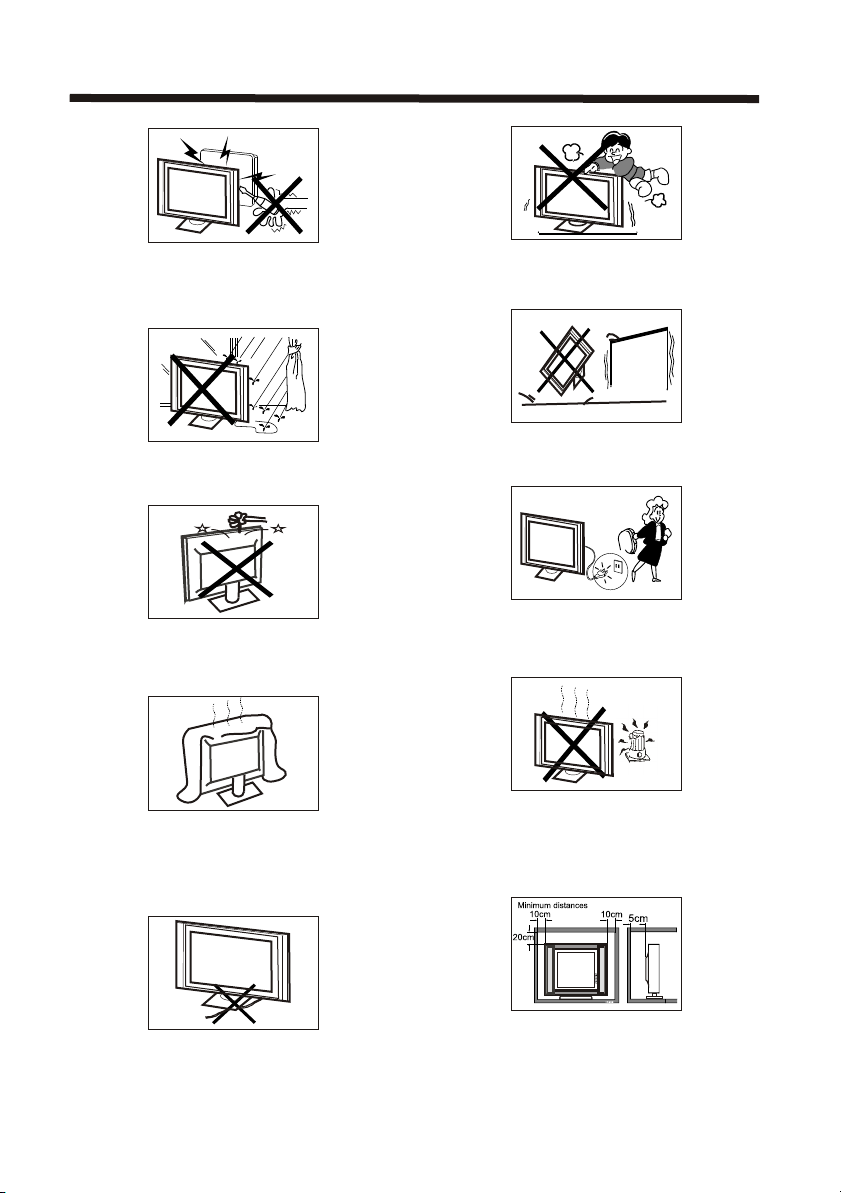
a. Do not expose to dripping or splashing.
b. No objects filled with liquids, such as vases, shall be placed on the apparatus.
c. The mains plug of this device is used as the disconnect device and shall remain readily accessible
and operable.
d. No naked flame sources, such as lighted candles, should be placed on the apparatus.
e. Allow suitable distances around the apparatus for sufficient ventilation. Ventilation should not be
impeded by covering ventilation openings with items such as newspapers, table cloths, curtains and
such like.
The display panel isa very sensitive andhigh technology product, giving you finely detailed
pictures. Occasionally,a few non-active pixelsmay appear on thescreen as a fixed point of
black, blue, green orred. Please note thatthis does not affect the performance ofyour product.
About After- Image
The extended use offixed image programme materialcan cause a permanent after - image on
the screen.
This background image isviewable on normal programsin the form of a stationary fixed image.
This type of irreversiblescreen deterioration can be limited by:
A. Reduce the brightness/contrastsetting to a minimum viewing level.
B. Do not displaythe fixed image forextended periods of time.
C. Turn the power off when not in actualuse.
Important Information Regarding Useof Video Games, Computers, Captions or OtherFixed
Image Displays.
Do not allow astill picture to bedisplayed for an extendedperiod, as this can cause a
permanent after-image to remainon the screen.
Examples of still picturesinclude logos, video games, computer images, teletext and images
displayed in 4:3 mode.
CAUTIONS:
The permanent after-image onthe screen resulting from fixed image use is not an operating
defect and as suchis not covered bythe warranty.
This product is notdesigned to display fixedimages for extended periods of time.

-6-
INSTALLATION
Base Stand Assembly Instruction
1. Place theTV with thedisplay side down
on a flatsurface.Use a cloth to protect.
Locate the bottomat the stand.
2. Fix thebottom with turning the screw
tightly on thestand.
WALL MOUNTING INSTALLATION GUIDELINES
For wall mountingwith the optional bracket, please read the following instructionand the bracket
instruction. Make surequalified service personnel perform the operation.
AWA bears no responsibility for improper mountingthat results in accident or injury.
This television canbe wall mounted as follows:
1.Place the LEDLCD Television onto a solid surface. Please place some soft material over the
front of thescreen to protect it from any damage.
2.Remove the screwsfrom the lower part of the television, where thebase joins to the
TV, and take away the stand (put the stand somewhere safe for future use).
3.Use the fourscrews provided to fix the TVonto a wall mounting bracket (notincluded) via the
four VESA standard holes on the back of the television.
100 mm
100 mm

INSTALLATION
-7-
Front panel
1: Remote control sensor.
2: Indicator LED:
BLUE POWER ON.
RED STAND BY.
3: Key board (on side of TV).
KEYBOARD
1 SOURCE
Display the input source menu.
CH+ or CH- to select items.
press VOL+ or VOL- to
STANDBY
Press this button to turn the unit ON from STANDBY mode.
Press it again to turn the set back to STANDBY.
2 MENU
Display main MENU.
3 CH+/CH-
In TV mode, press CH+ or CH- to change the channel up and down.
In MENU mode, press
4 VOL+/VOL-
Adjust sound level.
In MENU mode, adjust the item that you selected.
5.
SOURCE
MENU
CH+
CH-
VOL+
VOL-
STANDBY
30 30
1
3
2

INSTALLATION
-8-
STEPS:
PC
Be sure boththe TV and computer are
set to Poweroff.
1.Connect VGA and audio cable.
2.Connect the powercord.
3.Power on theTV,switch to PC mode.
4.Power on thePC.
This sequence isvery important.
ANTENNA
Note:
Aerial connections: IEC(female).
Input impedance: 75 unbalanced.
REAR AV Connections
All the terminals are(from left to right):
, Audio input, Power socket, YPbPr (component video) input,
HDMI2 input.
Note: 1. AV and YPbPr share one audio channel.
2. When the HDMI2 port receives a DVI signal, the audio signal is received from the
YPbPr/AV Audio channel.
AV composite video input
REAR AV Connections(SIDE)
All the terminals are(from left to right):
HDMI1 input, USB, PC Audio input, (composite video and audio) VGA input,
Note: When HDMI1 receives aDVI signal, the audio signal is received from the PC
Audio channel.
AV output ,
Antenna socket.
USB PC AUDIO VGA RF
HDMI1 AV LR
AV OUTPUT
USB PC AUDIO VGA RF
HDMI1 AV LR
AV OUTPUT
AV LRYPb Pr
HDMI2
POWER

PRESET MODE
PC
-9-
INSTALLATION
1
2
3
4
5
6
7
720*400
640*480
800*600
800*600
800*600
1024*768
1024*768
70
60
56
60
72
60
70
31.47
31.47
35.156
37.88
48.08
48.36
56.48
RESOLUTION V.Freq.(Hz) H.Freq.(KHz)
AV LRYPb Pr
HDMI2
POWER

INSTALLATION
-10-
You can use the input terminals on TV set rear as follows.
AV EQUIPMENT
Yellow (video)
White(audio L)
Red(audio R or Pr)
Y
W
R
W R
GBR
Blue(Pb)
Green(Y)
B
G
VIDEO EQUIPMENT with YPbPr (component) output
WR
GBR
WR
W R
It can be connected to the following appliances: VCR, multi disc player, DVD, camcorder, video
game or stereo system, etc.....
YPbPr can support these video formats: 480i,576i,480p,576p,720p,1080i.(component video)
HDMI
TO AUDIO OUTPUTS
VIDEO EQUIPMENT with Composite output
TO VIDEO
OUTPUTS
HDMI
W
R
WR
TO AUDIO INPUTS
VIDEO EQUIPMENT
TO VIDEO
INPUTS
USB PC AUDIO VGA RF
HDMI1 AV LR
AV OUTPUT
AV LRYPb Pr
HDMI2
POWER

-11-
REMOTE CONTROLREMOTE CONTROL
REMOTE CONTROL
1
2
3
4
5
6
7
8
9
10
11
13
12
14
15
16
17
18
19
20
21
22
23
24
25
26
27
1:POWER:Toset the TVto standby or power on.
2: :In USBmode, used as reverse key, in teletext
mode used assubpage key.
3: : InUSB mode, used as forword key, in teletext
mode used asreveal key.
4: : Pressthe Play Buttonin USB mode or time shiftmode to
begin or continueplayback.
5: : Pressthe pause button to pause play in time shift or USB mode
or pause recordingin record mode..
6:TEXT:Toenter or TELETEXT.
7: SUBTITLE: To turn on subtitles press the subtitle button
in DTV mode.
8 : :Displays the main on-screen menu.
9 :CURSOR:Tomove within themenu.
10:OK: Confirms selection.
11: EPG: To display informationabout the program being viewed
and what's onnext in DTV mode.
12:FAV: To access your favourite channels listin TV orDTV mode.
13:VOL+/- : To adjust soundlevel.
14:NUMERIC KEY: For directaccess to channels.
15:AUDIO: To select the available audio language of TV programs .
16:MUTE: To disable or enable the sound output.
17: : InUSB mode, used as next key, in teletext mode used as
list key.
18: : InUSB mode, used as previous key, in teletext mode used
as hold key.
19: :In teletextmode used as index.
20: : Press tostop play in USB mode.
21:INFO: To display the program information of the show you
are watching, pressthe info button.
22:FREEZE: Press to freezethe picture you are watching.
23: : Pressto display andselect the available video sources.
24:EXIT: To return to the previous menu or exit menu.
25:CH+/CH-: To access the next or previous channels.
26:REP: In USBmode,select Repeat mode.
27:RECALL: DTV Mode:RECALL:Jumpsto last channel
viewed.
VOL CH
REP
FREEZE

-12-
REMOTE CONTROL
TELETEXT
TEXT
SELECTING A PAGE
DIRECT ACCESS
TO THE ITEMS
INDEX
SUB PAGE
HOLD
REVEAL
Press: You will obtain:
LIST
Enter the numberof the page required using the 0 to 9 up/down.
Example: page 120,enter 120. The number is displayedtop left, the
counter turns andthen the page is displayed. Repeat this operation to
view another page.If the countercontinues to search, this means
that the pageis not transmitted.Select another number.
Coloured buttons correspondto the colours at the bottom of the
screen. The 4coloured keys are used to accessthe items or
corresponding pages. Thecoloured areas flash when the itemor the
page is notyet available.
This returns tothe contents page (usually page 100).
Certain pages containsub-pages which are automatically
displayed successively.This key isused to stop or resume sub-
page acquisition. Theindication appears top left.
To freeze the page.
To display or hide the concealed information (games solutions).
The user canset four favourite pages to be directly linked to the four
color keys. Whilelist mode is activated, it is not possibility to use TOP
or FLOF navigationwith the colourkeys. The favourite pagenumbers
should be storedand restored to/from nonvolatile memory for each
channel by thesystem software.
This is usedto call or exit teletext modes. The summary appearswith
a list ofitems that can be accessed. Each item has a corresponding
3 digit pagenumber. If the channel selecteddoes not broadcast
teletext, the indication100 will be displayed and the screen will
remain blank (inthis case, exit teletext and selectanother channel).
Teletext is an information system broadcast by certain channels whichcan be
consulted like anewspaper. Italso offers access to subtitlesfor viewers with hearing
problems or whoare not familiarwith the transmissionlanguage (cable networks,
satellite channels, etc.)

-13-
OPERATION
Installation Guide
Press to select country at first,then press the OK button to start auto tuning.
This screen only appears when the TV is turned on for the first time, or reset to factory settings.You can choose
language, country and auto tuning programs. After tuning, the screen will skip to the first DTV program.
1.CHANNEL MENU
The first item of the MENUis channel menu ( for TV or DTV source only).
You can search channels and edit programs here.
1).Auto tuning:
Search all the channels automatically (youcan select ATV and DTV)
ATV Manual Tuning
Programme Edit
Signal Information
< >< >
CHANNEL
Auto Tuning
DTV Manual Tuning
Software Update(USB)
Software Update(OAD)Off
Dansk
Deutsch
Hrvatski
Italiano
Please select an OSD Language
OK
Magyar
Nederlands
Norsk
PolskiEnglish
Cesky
E k
Espanol
~
Fran ais
Portugues
Pycck
Austria
Belgium
Country
OK
Australia
Croatia Finland Greece Luxembourg
Czech France Hungary Netherlands
Bulgaria Denmark Germany Italy
Tune Type DTV+ATV
MENU
Austria
Belgium
Australia
Croatia
Czech
Bulgaria
Finland
France
Denmark
NOTE:
All the channels including ATV, DTV and Radio can betuned at once, if the Tune Type is DTV+ATV.
Any previously storedchannels will be deleted after auto tuning is carried out.
After auto tuning, the receiver will skip to the first DTV channel.
Channel Tuning
TV : 0 Programme(s)
DTV : 0 Programme(s)
Radio : 0 Programme(s)
96% UHF CH 68 DTV

2).DTV Manual tuning:
You can select a DTV channel then find the program in this channel.
Press to select the channel, then press OK to search the programs .
OPERATION
NOTE:
The Bad Normal Good bar graph onthis screen shows signal intensity.
3). ATV Manual tuning :
You can change the sound system, search the analog TV channels and fine tune them, then store the
channels you selected.
ATV Manual Tuning
Storage To 1
System BG
Current CH 1
Search
Fine-Tune
Frequency 255.25 MHz
Save MENU
__++
DTV Manual Tuning
VHF CH 5
__++
Bad Nomal Good
Press OK to search
NOTE:
Press teletext red button to store the channels after manual tuning.
4). Program edit:
You can Delete, Rename, Move, Skip, or FAV any programs.
-14-
Rename:
You can only rename ATV programs.
Move the cursor to the program,press teletext green button to rename the program.
Press to choose the character. Press to move the cursor .
Press MENU button to exit edit,Press EXIT to exit the menu.
Note: ATV programs name only can be only 5 characters long, DTV programsname can be 25 characters.
Press to choose the program, pressteletext blue button to skip this program, the symbol will show
on the right side of theprogram .
Choose the skipped program, press blue button again, you can cancel the skip, the symbol will disappear.
Delete
Press teletext red button, the program in the cursor will delete.

-15-
OPERATION
Favourite
Press to choose the program, pressFAV button, it will show on theright side of the program. Choose
the FAV program, press FAV button again, you can cancel the FAV, will disappear .
Once your favorite group is created,you can press the FAV key to quickly access your favourite channel.
The second item of the MENUis PICTURE MENU.You can adjust picture effects here, such as contrast,
brightness, etc.
Press to move, press OK toadjust.
2. PICTURE MENU
Color Temperature
Aspect Ratio
Noise Reduction
Screen
Picture Mode Standard
< >< >
PICTURE
MENU
Picture Mode Standard
Contrast 82
Brightness 50
Color 50
Sharpness 50
Tint 50
Color Temperature Medium
Red 40
Green 31
Blue 50
MENU
NOTE:
1).Tint is available in NTSC system only.
2).There are four color temperature modes that can be selected: medium, warm, cool, user.
3).Screen is available in PC mode only, which can adjust Horizontal position, vertical position, size and phase.
3.SOUND MENU
The third item of the MENU is the SOUND MENU.
You can adjust the sound effect here such as treble, bass, balance etc.
Press to move, press OK toadjust.
< >< >
Balance
Auto Volume
Sound Mode Standard
SOUND
Note:
Auto volume: only available when theinput signal volume is too large or there is distortion.
4.TIME MENU
The fourth item of the menuis the TIME MENU You can adjust the clock, power on/off time, sleep time etc
Press to move, press OK toadjust.
NOTE:
If within 15 minutes there is no signal, the TV will auto sleep, if AutoSleep is set ON. The clock time can be
set from the DTV system.
Off Time
On Time
Sleep Timer
Auto Sleep
Time Zone
Clock -- -- -- --
TIME
< >< >

-16-
OPERATION
5.OPTION MENU
Toenter the Option Menu, press MENU button and thepress or buttonsto select the Option Menu.
Once in OptionMenu, press or buttons to selectthe settings you wish to adjust. Press MENU button
to return tothe Main Menu.
< >< >
OSD Language English
OPTION
Audio Languages
Subtitle Languages
Country Australia
Restore Factory Default
NOTE:
Restore factory defaultwill clear all the programs and password.
Press the OKbutton to enter the DMP Menu.
PHOTO MUSIC MOVIE TEXT
6.LOCK MENU
Toenter the LOCK Menu, press MENU button and thenpress or buttonsto select theLOCK Menu.
The default passwordis 6666.
Please set anew password so it is easy to remember.Follow the on screen steps to set.
Set Password
Lock System
LOCK
< >< >
Block Program
Parental Guidance Off
7. APPLICATIONS MENU
Toenter the Applications Menu, press MENU button andthen press or buttons to select the
Applications Menu. Thisis where youwill be able to view and play your USB files.
< >< >
APPLICATIONS
DMP
The supported formatsare as below:
Photo: JPEG, BMP, PNG
Music: MP3
Movie: AVI,MKV
Text:TXT

OPERATION
-17-
Schedule List 04:55 28th Apr Delete
Time Date Programme Title Channel Name
3.
Press the Blue Button to booka program for future viewing and add to the schedule list.
Remind
802 SZTVM03
08 Minute
05 Hour
Apr Month
28 Date
Once Mode
Reminder setting
BACK
OK
__++
8.EPG Menu (ElectronicProgram Guide).
The EPG Menuis used to look at what is being broadcasted in DTV or Radio modes. Press the EPG
Button to accessthe EPG Menu. You will receive detailed program information of the channel you
are currently watchingas well as the 7 DayProgram guide.
Sample1.ts
Resolution: 720x576
Subtitle: 1/1
Size: 30574 KBytes
Close
AudioTrack: 1/2 ½
28 Apr 04:39
800 SZTVM01 No Information
801 SZTVM02
802 SZTVM03
803 SZTVM04
804 Date
No Information
No Information
No Information
No Information
PROGRAMME GUIDE TIME
ScheduleINFO Remind
OK INDEX
2.
Press the teletext yellow key, It can list all the reminder schedule, press to choose the list, press
red key to delete the schedule list, Press EPG to return to EPG menu.
Schedule
DELETE
1.
Use to select a program andthen press the Green Button or INFO key on the Remote to display the
highlighted program's information.
INFO

-18-
TROUBLE SHOOTING
Picture Audio
Snow Noise antenna position, direction
or connection
Inspection Check
Interference Noise electronic equipment, car/
motorcycle, fluorescent light
Normal Picture Mute
Volume (checkif mute is
activated or ifthe audio system
connections are notcorrect)
No picture Mute
Power cord isnot inserted
Power switch isnot opened
Contrast and brightness/volume
setup
Press standby keyon the remote
control for inspecting
No colour Normal audio Colour control
Picture
breaking up
Normal audio
or weak
retune channel
No colour Noise TV system
Normal audio
antenna position, direction
or connection
Trouble phenomenon Symptom
Ghost
Mosaic Unnormal Antenna Loose

INTRODUCTION
-19-
Resolution
Aspect Ratio
Power supply
23.6"(60cm)
1920x1080
16:9
HDMI Input
Composite Video Input
USB Input
2
2
Composite Video Output
1
1
1
1
1
LCD :
Display colours
Brightness
Contrast ratio
Response time
View angle
16.2M
250 cd/m
1000:1
3.5 ms
170(H)/160(V)
TV:
DVB-T decode
DVB-T de-modulation
Terminals:
DC 12V, 3A (Power adaptor supplied)
Others:
TV system
Y PbPr (Component video) Input
2
2 X 3W
VGA Input
Audio Input
Digital TV: DVB-T
Analog TV: PAL/SECAM
Audio: MPEG2Audio Layer I&II
Video: MPEG2 Transport MP@HL
Demodulator : COFDM
OFDM Mod.: 2K,8K FFT, SFN and MFN
Packed Carriers: 2K/8K
Guard Interval: 1/4,1/8, 1/16, 1/32
Audio Output Power (THD 7%)
Viewing Picture Size (diagonal)
Table of contents
Other AWA LCD TV manuals

AWA
AWA MSDV3213-03-D0 User manual

AWA
AWA MHDV4211-O3 User manual

AWA
AWA TFTD51 User manual

AWA
AWA MSDV1903-F3 User manual

AWA
AWA JTM32K212A-TUser's Manu User manual

AWA
AWA JTM2792 User manual

AWA
AWA MSDV2203-F3-D0 User manual

AWA
AWA LTW-42D User manual

AWA
AWA JTM19F22-D User manual

AWA
AWA LC-46G58 User manual