Axis C8033 User manual

AXIS C8033 Network Audio Bridge
User Manual
Available from A1 Security Cameras

AXIS C8033 Network Audio Bridge
Safety information
Safety information
Hazard levels
DANGER
Indicates ahazardous situation which, if not avoided, will result in death or serious injury.
WARNING
Indicates ahazardous situation which, if not avoided, could result in death or serious injury.
CAUTION
Indicates ahazardous situation which, if not avoided, could result in minor or moderate injury.
NONO
NOTICETICE
TICE
Indicates asituation which, if not avoided, could result in damage to property.
Other message levels
Important
Indicates signicant information which is essential for the product to function correctly.
Note
Indicates useful information which helps in getting the most out of the product.
2
Available from A1 Security Cameras

AXIS C8033 Network Audio Bridge
Table of Contents
Safety information .......................................... 2
Hazard levels ................................................... 2
Other message levels ............................................. 2
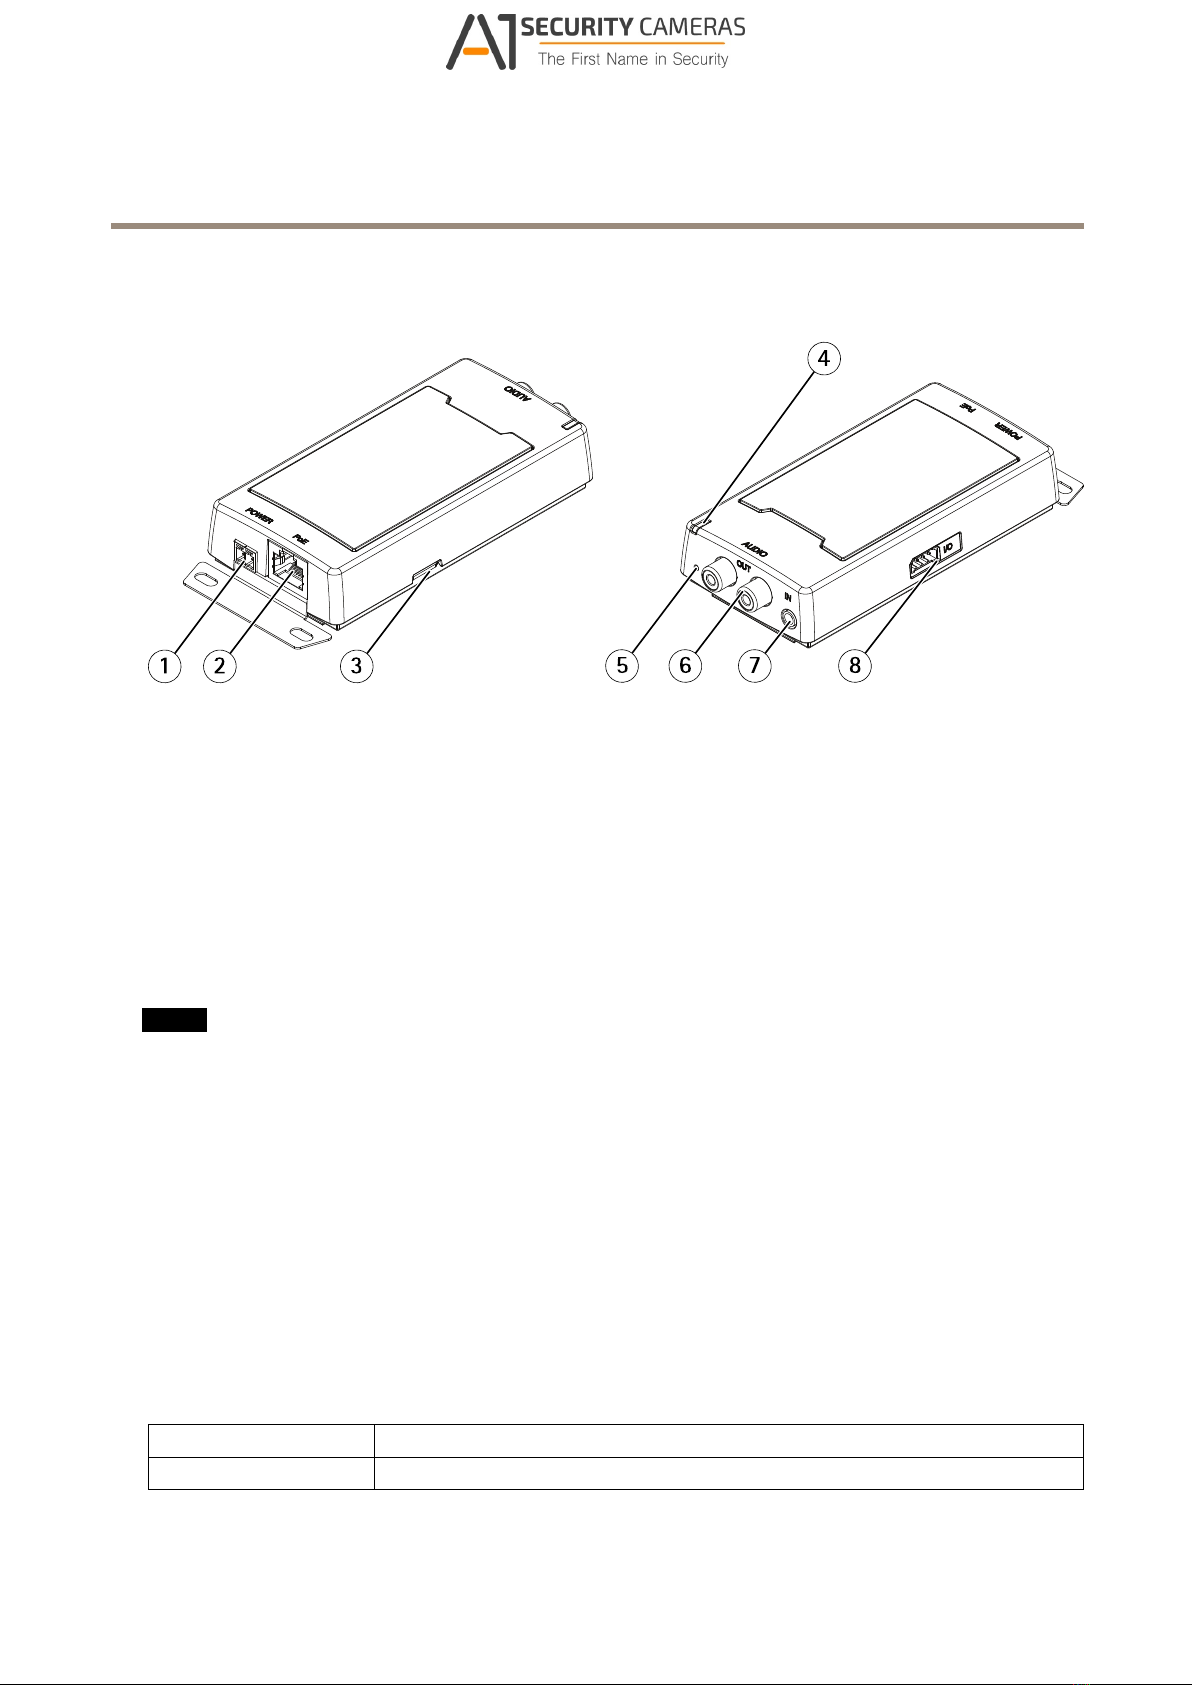
Product overview ........................................... 4
onnectors and Buttons .......................................... 4
LED Indicators .................................................. 4
How to acce the product .................................... 6
How to access the product from a browser ........................... 6
How to access the product from the internet ......................... 6
How to set the root password ..................................... 6
How to et up the product .................................... 7
How to perform a basic setup ..................................... 7
Audio ..................................................... 8
Overview ...................................................... 8
System settings ................................................. 9
................................................. 9 Device settings
lips .......................................................... 10
Detector .................................................. 12
Audio Alarm Level ............................................... 12
Activity ....................................................... 12
Voice over IP (VoIP) ......................................... 13
VoIP Overview Page .............................................. 13
ongure the SIP Settings ........................................ 13
The Account Settings Page ........................................ 15
About application .......................................... 19
About application licenses ........................................ 19
How to upload and start an application ............................. 19
Application onsiderations ........................................ 19
AXIS Audio Player ............................................... 20
About event ............................................... 21
How to set up action rules ........................................ 21
How to add recipients ............................................ 22
How to create schedules .......................................... 23
How to set up recurrences ........................................ 24
About language ............................................ 25
About y tem option ........................................ 26
Security ....................................................... 26
Date & Time .................................................... 27
Network ....................................................... 28
Storage ....................................................... 32
Ports & Devices ................................................. 32
Maintenance ................................................... 33
Support ....................................................... 33
Advanced ...................................................... 34
How to reset to factory default settings ............................. 34
Trouble hooting ............................................ 35
How to check the current rmware ................................. 35
How to upgrade the rmware ..................................... 35
Symptoms, possible causes and remedial actions ...................... 35
Specication .............................................. 37
3
Available from A1 Security Cameras

AXIS C8033 Network Audio Bridge
roduct overview
roduct overview
1Power connector (DC)
2Network connector
3SD memory card slot
4Status LED nd cator
5Control button
6RCA connector
7Aud o- n connector
8I/O connector
Conne tors and Buttons
Network onne tor
NONO
NOTICETICE
TICE
The product shall be connected using ashielded network cable (STP). All cables connecting the product to the network shall
be intended for their specic use. Make sure that the network devices are installed in accordance with the manufacturer’s
instructions. For information about regulatory requirements, see the Installation Guide at www.ax s.com.
Control button
For location of the control button, see Product overv ew on page 4.
The control button is used for:
• Resetting the product to factory default settings. See page 34.
• onnecting to an AXIS Video Hosting System service. See page 29.To connect, press and hold the button for about 3
seconds until the Status LED ashes green.
• onnecting to AXIS Internet Dynamic DNS Service. See page 29.To connect, press and hold the button for about 3seconds.
LED Indi ators
Statu LED Indication
Unlit Unlit for normal operation.
4
Available from A1 Security Cameras

AXIS C8033 Network Audio Bridge
roduct overview
Green Steady green for normal operation.
Amber Steady during startup and when restoring settings.
Red Slow ash for failed upgrade.
Red/Green Flashes fast between red/green when identifying an audio device is selected.
5
Available from A1 Security Cameras

AXIS C8033 Network Audio Bridge
How to access the product
To install the Axis product, see the Installation Guide supplied with the product.
How to a ess the produ t from abrowser
1. Start aweb browser.
2. Enter the IP address or host name of the Axis product in the browser’s address eld.
To access the product from aMac computer (OS X), go to Safari, click on Bonjour and select the product from the
drop-down list.
Note
To show Bonjour as abrowser bookmark, go to Safari >Preference .
3. Enter your username and password. If this is the rst time the product is accessed, the root password must rst be
congured.
How to a ess the produ t from the internet
Once connected, you can access the product on your local network (LAN).
To access the product from the internet you must congure your network router to allow incoming data trafc to the product. To do
this, enable the NAT-traversal feature, which will attempt to automatically congure the router to allow access to the product.
This is enabled from .
For more information, see NAT traversal (port mapp ng) for IPv4 on page 30.
For Technical notes on this and other topics, visit the Axis Support web at www.ax s.com/support
See also AXIS Internet Dynamic DNS Service at www.ax scam.net
How to set the root password
To access the Axis product, you must set the password for the default administrator user root.This is done in the Congure Root
Pa word dialog, which opens when the product is accessed for the rst time.
To prevent network eavesdropping, the root password can be set via an encrypted HTTPS connection, which requires an HTTPS
certicate. HTTPS (Hypertext Transfer Protocol over SSL) is aprotocol used to encrypt trafc between web browsers and servers. The
HTTPS certicate ensures encrypted exchange of information. See HTTPS on page 26.
The default administrator user name root is permanent and cannot be deleted. If the password for root is lost, the product must be
reset to the factory default settings. See How to reset to factory default sett ngs on page 34.
To set the password via astandard HTTP connection, enter it directly in the dialog.
To set the password via an encrypted HTTPS connection, follow these steps:
1. lick U e HTTPS.
Atemporary certicate (valid for one year) is created, enabling encryption of all trafc to and from the product, and the
password can now be set securely.
2. Enter apassword and then re-enter it to conrm the spelling.
3. lick OK.The password has now been congured.
6
Available from A1 Security Cameras

AXIS C8033 Network Audio Bridge
How to set up the product
.
How to set up the product
The Axis product can be congured by users with administrator rights. Go to Setup >Ba ic Setup >1U er to administer users.
•Admini trator have unrestricted access to all settings.
See also the online help
How to perform abasi setup
Basic Setup provides shortcuts to the settings that should be made before using the Axis product:
1. Users. See page 26.
2. T P/IP.See page 28.
3. Date &Time. See page 27.
4. VoIP Settings. See page 13.
7
Available from A1 Security Cameras

AXIS C8033 Network Audio Bridge
Audio
Audio
The audio settings can be used to adjust audio quality. You can congure the following:
• Overview. See Overv ew.
• System settings. See page 9.
• Device settings. See Dev ce sett ngs.
• lips. See Cl ps.
Overview
This page provides an overview of the leader audio device and the audio devices added to the zone.
onnect several audio devices into azone, and manage music playlists, streams, announcements, scheduling and volume settings
from asingle audio device.
Log in to the audio device that you want to set as the leader in the zone, and connect all the other audio devices as followers.
About announ ements
In the schedule it is possible to overlap your playlist with pre-recorded announcements. It is also possible to do live announcements
when playing aplaylist, see Vo ce over IP (VoIP).
In both cases the music will mute during the announcement.
About standalone mode
These settings are available in standalone mode (no audio devices are added into the zone).
Use the slider to increase or decrease the volume.
To identify the audio bridge, click on the tone and the LED on the audio bridge will ash fast between green and red.
How to set the volume for audio devi es in azone
Go to Audio >Overview.
These settings are available when the audio device is connected to at least one more audio device.
1. Use the slider Sy tem under Volume to set system volume for max announcement sound level
2. Set volume in Axis Audio Player for the background music sound level.
3. If needed use the sliders beside the followers to adjust the balance between speakers by decreasing the individual volume
for the louder speakers and repeat step 1and 2.
How to identify audio devi es in azone
Go to Audio >Audio Overview.
Identify all audio device in the zone -lick the upper tone and all speakers that are connected to the system will play asound in a
sequence. All type of audio devices will also ash its LED repeatedly in green and red.
Identify aingle audio device in the zone -lick the tone beside afollower. Aspeaker will make asound. All type of audio devices
will also ash its LED repeatedly in green and red.
8
Available from A1 Security Cameras

AXIS C8033 Network Audio Bridge
Audio
System settings
This page provides options to setup anetwork audio device system.
How to set up an audio devi e system (zone)
1. Log in to the audio device that you want to set as the leader in the zone.
2. Go to Audio >Sy tem Setting .
3. Rename your leader audio device:
- To edit the leader audio device, click the pencil
- Set audio device name and enter username and password.
- If the systems includes more than 50 audio devices, change to Multica t.
- Select Enable broadca t of analog audio input to enable the audio from aconnected analog audio source
to be played.
- lick Apply
4. Add audio devices to the zone:
- Under Available audio device ,click the plus sign to add aaudio device to the zone. If your device is not
listed, click Add device manually to add the device.
- For each audio device: Set audio device name and enter username and password.
- lick Apply.
Devi e settings
To set up the Axis product, go to Audio >Device Setting .
Audio Modes
The Axis product supports the following audio modes:
• Full duplex –Simultaneous two-way audio allowing the Axis product to transmit and receive audio at the same time.
There is no echo cancellation; if feedback loops appear, try moving the microphone or the speaker.
• Half-duplex –Audio can be transmitted to and from the Axis product but only in one direction at atime.
• Simplex –Speaker only -Audio is transmitted from aclient to the Axis product. This is the default audio mode.
• Simplex –Microphone only -Audio captured by the product microphone is transmitted from the Axis product to
one or more clients.
To set the audio mode, go to Audio >Device Setting and select the desired mode from the Audio mode drop-down list.
Audio Input
ongure the audio input settings under Audio>Device Setting .
Source:Select Microphone to use an external microphone or Line to use aLine in device, e.g. an audio mixer for multiple
microphones or amicrophone with abuilt-in amplier, as audio source.
Use the Input gain to control the volume (dB Full Scale) of the audio input. If the sound is too low, choose ahigher dB, to amplify
the sound. If the sound is too high, choose alower dB. The Level bar gives avisual representation of the audio signal level in dB
relative to the full-scale input level.
9
Available from A1 Security Cameras

AXIS C8033 Network Audio Bridge
Audio
.
• Green –the signal is at agood level.
• Yellow –the signal is becoming distorted.
•Red –the signal is distorted.
Use the Encoding option to select digital audio encoding format.
• AAC is used for encoding only in the Axis product. For decoding, no license is included in the Axis product.
• G711 is an unlicensed standard codec that is useful when integrating audio into aVoIP system
• G726 is an unlicensed speech codec that is most commonly used within the security industry.
The Sample rate denes the number of times per second the sound is sampled. Ahigher sample rate will provide better audio
quality, but also requires agreater bandwidth.
Set the required Bit rate depending on the selected encoding. Ahigher bit rate will give better audio quality. Alower bit rate
may have latency or delay, but will require less bandwidth.
For more information about these settings, please see the online help
Audio Output
ongure the audio output settings under Audio >Device Setting .
Output gain -Move the slider to adjust the volume of the audio output. To mute the sound, move the slider to the left end
of the slider.
Clips
Audio Clip List
Audio clips can be played when an event occurs. Audio clips are created by uploading asound le to the Axis product. To add, play,
download, modify or remove audio clips, go to Audio >Audio Clip .For more information see the online help .
• Add –To add an audio clip, click Add,select the Upload radio button and click Brow e.Navigate to the desired le
and click Upload to upload the audio clip.
- The following audio formats are supported: .au G.711 u-law, 8-bit, mono (8, 16 kHz) ,
.wav P M, 16-bit, mono (8, 16, 32 kHz) and MP3.
- The typical le size is 10MB.
• Play –To play an audio clip, select an audio clip in the Audio Clip Li t and click Play.Audio clips can only be played if the
audio device is not streaming audio or playing another clip.
• Stop –To stop an audio clip, select it and click Stop.
• Download –To download arecording to ahard drive or network disk, select it and click Download.
• Modify –To change the name of the audio clip, select it and click Modify.
• Remove –To remove an audio clip, select it and click Remove.
To congure the Axis product to play audio clips when an event occurs, an action rule must be set up. For more information,
see About events on page 21.
Congure Audio Clip Link
To create alink to acongured audio clip:
10
Available from A1 Security Cameras

AXIS C8033 Network Audio Bridge
Audio
1. Select an audio clip from the list.
2. If you want to play several clips with similar le names in an random order, replace parts of the le name in the audio
clip eld with an asterisk. For example: to play the audio clips sound01.mp3 and sound02.mp3 write sound* in
the audio clip eld.
3. Set the audio clip congurations.
4. Select the copy icon to copy the link.
11
Available from A1 Security Cameras

AXIS C8033 Network Audio Bridge
Detectors
Detectors
Audio Alarm Level
Event types in the Axis product can be set to use this level as atrigger. Each individual event type can be congured to trigger if the
sound level rises above, falls below or passes the set value.
The alarm level can be set in the range 0-100, where 0is the most sensitive and 100 the least sensitive.
When setting the alarm level use the Activity indicator as aguide. For best detection, place the level so that there is green below the
bar with asmall amount of red above the bar.
A tivity
Detected audio is indicated by colored peaks in the Activity indicator. An event is triggered when detected audio rises above, falls
below or passes the Audio Alarm Level specied, which is represented by the bar.
Note
Audio detection level must be set before creating an Action Rule that triggers on audio detection.
12
Available from A1 Security Cameras

AXIS C8033 Network Audio Bridge
Voice over I (VoI )
Voice over I (VoI )
Voice over IP (VoIP) is agroup of technologies that enables voice communication and multimedia sessions over IP networks. In the
Axis product, VoIP is enabled through the Session Initiation Protocol (SIP) and Dual-Tone Multi-Frequency (DTMF) signaling.
To open the product’s VoIP pages, go to Setup >VoIP.
The VoIP settings include the following pages:
• VoIP Overview.See VoIP Overv ew Page on page 13.
• SIP Setting .See Congure the SIP Sett ngs on page 13.
•Account Setting .See Create or Ed t Accounts on page 15.
The VoIP settings can be congured by users with administrator rights.
VoIP Overview Page
The VoIP Overview page shows basic information about the SIP,VoIP action rules, and Account Settings.
• SIP Setting –Shows the basic Session Initiation Protocol (SIP) settings, and indicates whether SIP is enabled and
allows incoming calls or not.
To change the settings, click Congure or go to VoIP >SIP Setting .For more information, see Congure the SIP Sett ngs
on page 13.
•Account Setting –Shows an overview of the SIP account settings. See also The Account Sett ngs Page on page 15.
To create anew account, test an account, or change the account settings, click Congure or go to VoIP >Account
Setting .For more information, see Create or Ed t Accounts.
Congure the SIP Settings
Session Initiation Protocol (SIP) is atext-based protocol, similar to HTTP and SMTP, for interactive communication sessions between
users. The sessions can include voice and video elements. See About SIP Addresses on page 18.
Before the Axis product can be used to make and receive calls, you need to congure the SIP settings. This includes enabling SIP,
conguring the ports, and setting the rules for Network Address Translation (NAT) traversal.
To congure the SIP settings:
1. Go to Setup >VoIP >SIP Setting .
2. lick Start to start the SIP Setup Assistant. For more information, see SIP Setup Ass stant on page 14.
Or:
1. Go to Setup >VoIP >SIP Setting .
2. Select Enable SIP.
3. To allow the Axis product to receive calls, select Allow incoming SIP call .
4. Enter the SIP port number and the SIP TLS port number. For more information, see Port Sett ngs on page 14.
5. Select the protocols you want to enable for NAT traversal. See Network Address Translat on (NAT) Traversal (port
forward ng) on page 14.
6. ongure the value for Regi tration interval and Max call duration if needed.
13
Available from A1 Security Cameras

AXIS C8033 Network Audio Bridge
Voice over I (VoI )
7. lick Save.
NONO
NOTICETICE
TICE
Allowing incoming calls enables the AXIS product to accept calls from any device connected to the network. It is
recommended to disable incoming calls for products that are accessible from public networks or the Internet.
Note
Even if you choose to not enable SIP,you can congure the SIP settings. But remember that when SIP is disabled, you
cannot make or receive calls.
SIP Setup Assistant
The SIP Setup Assistant helps you with the SIP conguration. After completing all the steps in the setup assistant, the product is
ready to perform basic VoIP actions, such as receiving acall. Each time you nish the SIP setup assistant, new action rules and
DTMF rules will be created.
Port Settings
• SIP port –Enter the port used for SIP sessions. The signalling trafc through this port will be non-encrypted. The default
port number is 5060.
• SIP TLS port –Enter the port used for SIPS sessions and TLS-secured SIP sessions. The signalling trafc through this port
will be encrypted using Transport Layer Security (TLS). The default port number is 5061.
• RTP tart port –Enter the port used for the rst RTP media stream in aSIP call. The default start port for media transport
is 4000. Some rewalls might block RTP trafc on certain port numbers. Aport number must be between 1024 and 65535.
Note
If the PBX changes the port used for SIP messages, it is possible to receive anotication regarding this. Go to VoIP >Account
Setting and click Modify.Select the Network-tab and select Allow port update me age through MWI.
Network Address Translation (NAT) Traversal (port forwarding)
Use NAT traversal when the Axis product is connected to the network behind aNAT router or rewall device.
Without SIP-specic port forwarding, users of clients within the same private network would be able to talk to each other but
users of clients in different networks would not.
The following NAT traversal settings are available:
• STUN –Session Traversal Utilities for NAT (STUN).
• TURN –Traversal Using Relays around NAT (TURN).
• ICE –Interactive onnectivity Establishment (I E).
Each NAT traversal protocol can be used separately or in different combinations depending on the network environment.
Note
For more information about the product’s general NAT traversal settings, see NAT traversal (port mapp ng) for IPv4 on page 30.
Intera tive Conne tivity Establishment (ICE)
Interactive onnectivity Establishment (I E) enables the product to send arequest that includes multiple addresses to the receiving
device. In its response, the receiving device also includes multiple addresses. Through aprocess of connectivity checks, also called
handshakes, the channel for communication is established.
I E increases the chances of nding the most efcient path to successful communication between peer devices. If you also enable
STUN and TURN, you improve the I E protocol’s chances of nding the most efcient path to successful communication.
14
Available from A1 Security Cameras

AXIS C8033 Network Audio Bridge
Voice over I (VoI )
Session Traversal Utilities for NAT (STUN)
Session Traversal Utilities for NAT (STUN) is aclient-server network protocol that enables the product to ask aSTUN server on the
Internet for amapped public IP address. The STUN server response includes this IP address and port so that the client can use them
in its SIP messages to other hosts and clients.
Like TURN, STUN can be used in full-cone, address-restricted cone, and port-restricted cone NAT setups. STUN is fast because it
is lightweight. However, STUN does not allow incoming messages from symmetric NATs, and it cannot communicate with apeer
behind the same NAT device.
Traversal Using Relays around NAT (TURN)
Traversal Using Relays around NAT (TURN) is aclient-server network protocol that enables the product to ask aTURN server for a
relayed IP address. The TURN server responds with its IP address and port so that the client can use them in its SIP messages.
TURN is primarily used in symmetric NAT setups. Like STUN, TURN can also be used in full-cone, address-restricted cone, and
port-restricted cone NAT setups. But because the IP address and port provided by the TURN server are those of the TURN server
itself, it works like arelay that forwards information to and from the client. This means that while TURN servers are reliable,
they sometimes cause abit of latency.
The A ount Settings Page
The Account Settings page allows you to set up and manage SIP accounts. See Create or Ed t Accounts on page 15.The SIP accounts
can be veried by using Te t SIP Call.See Make Test Calls on page 17.
The Account Settings page also includes an account list that shows an overview of the SIP account settings, including:
•Name. See also Account Informat on on page 16.
•SIP address. See also About SIP Addresses on page 18.
•Transport mode. See also Transport Sett ngs on page 17.
•Default. See also Account Informat on on page 16.
•Registration status. See Reg strat on Status on page 15.
Registration Status
The account status is indicated with dots in different colors. For more detailed information about an account’s status, hover the
mouse pointer over the status dot or select the account in the account list and click Modify.
SIP di abled –SIP is disabled.
Account not regi tered –The SIP account is not registered with aPBX, or the SIP account is apeer-to-peer account
which does not register itself.
Provi ional –The product is trying to register the account.
Redirection –The account or address needs to be redirected.
Succe ful –The account has successfully registered with the SIP registrar.
Failure –There is aproblem with the account, such as the account credentials are wrong.
Create or Edit A ounts
To set up aSIP account:
1. Go to Setup >VoIP >Account Setting .
2. lick Add.
15
Available from A1 Security Cameras

AXIS C8033 Network Audio Bridge
Voice over I (VoI )
3. Enter the account details.
Under the General tab:
- See Account Informat on on page 16.
- See Account Credent als on page 16.
- See SIP Server Sett ngs on page 16.
Under the Network tab:
- See Transport Sett ngs on page 17.
- See Proxy Sett ngs on page 17.
4. lick OK.
To edit an account, select the account in the account list and click Modify.
To remove an account, select the account in the account list and click Remove.
A ount Information
• Name –Enter adescriptive name. This can for example be arst and last name, arole, or alocation. The name is used as
an alias and is especially useful when several accounts have the same user ID.
• Default account –Select to make this the default account. Only one account can be the default account.
At startup, the rst time the product is accessed or after areset, apeer account is created automatically and set to be the
default account. This peer account can only be removed if at least one more account has been added to the list.
The default account will be used when making aVAPIX
®Application Programming Interface (API) call without specifying
which SIP account to call from. For more information, visit www.ax s.com/developer.
A ount Credentials
• U er ID –User ID is typically the extension or phone number assigned to the Axis product at the SIP server. It is also
possible to use aSIP URI as aUser ID if required by the SIP server.
• Authentication ID –Enter the Authenticaion ID used for authenticating against the SIP server. This is typically the
same as the User ID.
• Pa word –Enter the password associated with the SIP account for authenticating against the SIP server.
• Caller ID –The name that is presented to the recipient of calls from this Axis product.
To create an account that is registered with aPBX or aservice provider, enter the user ID, password, and the registrar address or
domain name. See SIP Server Settings below. If you only enter auser ID, the account will be used as apeer-to-peer account.
Note
Unless the devices are connected to NATs with SIP-specic port forwarding such as STUN or TURN, the account will only be
able to communicate with devices that are connected to the same private network. For more information, see Network
Address Translat on (NAT) Traversal (port forward ng) on page 14.
SIP Server Settings
• Domain name –If available, enter the public domain name. The domain name will be shown as part of the SIP address
when calling other accounts. For more information, see About SIP Addresses on page 18.
• Regi trar addre –Enter the SIP server’s registrar address. This is to point out the SIP registrar with which the account
should register itself. The SIP registrar is the part of the PBX that keeps track of all the extensions.
16
Available from A1 Security Cameras

AXIS C8033 Network Audio Bridge
Voice over I (VoI )
• Secondary SIP Server –The Axis product will try to register on the secondary SIP server if registration on the primary SIP
server fails.
Transport Settings
• Enable SIPS –Select to use Secure Session Initiation Protocol (SIPS). SIPS uses the TLS transport mode to encrypt trafc. If
you enable SIPS, you cannot select any other transport mode than TLS.
• Tran port mode –Select the SIP transport mode for the account: UDP, T P, or TLS. By default, TLS is used when media
encryption is activated.
• Media encryption –Encrypts media (audio and video) in SIP calls.
-SRTP Be t Effort –Supports both encrypted and unencrypted media. Encryption is always used if available.
Supported crypto suites are AES_ M_128_HMA _SHA1_80 and AES_ M_128_HMA _SHA1_32.
-SRTP Mandatory –Supports only encypted media, that is, SIP calls are only set up if the remote
party offers SRTP media encryption. Supported crypto suites are AES_ M_128_HMA _SHA1_80 and
AES_ M_128_HMA _SHA1_32.
Note
If more than one TLS peer-to-peer account is created and they are using different media encryption, the strictest value is
applied to all of them. Registered accounts are not affected.
• Allow port update me age through MWI –Message waiting indicator (MWI) noties the user of changes in the
port settings.
The difference between SIPS (Enable SIPS)and SIP over TLS (Tran port mode –TLS)is that SIPS ensures that each message transfer
is encrypted, while TLS only ensures encryption of the SIP trafc to the next node in the network.
SIP over UDP Tran port mode –UDP is generally faster as the message will be sent without the handshakes that SIPS, SIP over TLS,
and SIP over T P Tran port mode –TCP offer.
Proxy Settings
ASIP proxy manages registration and routing requests from calling devices. The SIP proxy communicates with the private branch
exchange (PBX) in order to nd aroute that acall has to take to reach adevice that is set in adifferent location or site.
Addre -Enter the SIP proxy server's address.
U ername -Enter auser name for the SIP proxy server if required.
Pa word -Enter apassword for the SIP proxy server if required.
Make Test Calls
To make sure that calls can be made from the Axis product, you can make atest call:
1. Go to VoIP >Account Setting .
2. From the list on the Account Settings page, select the account to make the test call from.
3. In the test call eld, enter avalid SIP address to the other device. Use the format sip:<extension>@<domain> or
sips:<extension>@<domain>.For more information and examples, see About SIP Addresses on page 18.
4. lick Te t call.For more information, see Transport Sett ngs on page 17.
The call status is displayed. For more information, see Call Status on page 18.
5. To end the call, click End call.
17
Available from A1 Security Cameras

AXIS C8033 Network Audio Bridge
Voice over I (VoI )
About SIP Addresses
SIP addresses are used to identify users within anetwork just like you would use aphone number or an email address to contact a
friend or colleague.
Like email addresses, SIP addresses are atype of uniform resource identier (URI) that include two user-specic parts, auser ID or
extension and adomain or IP address. Together with aprex and the @symbol, they make up aunique address. For example, if
aesar of ancient Rome had both an email address and aSIP address, they would be mailto:[email protected]
and sip:[email protected] respectively. For local peer-to-peer calls only the IP address is required. For more
examples and descriptions, see below.
SIP addresses are also known as SIP URIs or, in some cases, SIP numbers. For more information, see the PBX’s and service provider’s
instructions.
Example
sip:192.168.0.90
Description
sip: Prex that tells the system that aSIP session is being started.
sips: Prex that tells the system that aSIPS session is being started.
<extension> The user ID or extension of the recipient of the call.
Or, if it is apeer-to-peer call, the IP address of the receiving device.
@<domain> The domain name or registrar address (IPv4 address) of the receiving device.
Important
The Axis product’s VoIP functionality does not include support for IPv6.
For more information about SIP,SIPS, and TLS, see Port Sett ngs on page 14 and Transport Sett ngs on page 17.
For more information about registrar addresses and domains, see Account Credent als on page 16.
Call Status
The call status is indicated with dots in different colors. More information about the call status is shown next to the status dot.
Idle –No active calls.
Terminated –The call was denied or ended, there was no answer, or the connection failed.
Calling –alling and waiting for an answer.
Active –The call has been answered and is ongoing.
18
Available from A1 Security Cameras

AXIS C8033 Network Audio Bridge
About applications
About applications
AXIS amera Application Platform (A AP) is an open platform that enables third parties to develop analytics and other applications
for Axis products. To nd out more about available applications, downloads, trials and licenses, go to ax s.com/appl cat ons
To nd the user manuals for Axis applications, go to ax s.com
Note
•It is recommended to run one application at atime.
About appli ation li enses
Some applications need alicense to run. Licenses can be installed in two ways:
•Automatic installation —requires access to the Internet
•Manual installation —obtain the license key from the application vendor and upload the key to the Axis product
To request alicense, the Axis product serial number (S/N) is required. The serial number can be found on the product label and under
Sy tem Option >Support >Sy tem Overview.
How to upload and start an appli ation
To upload and start an application:
1. Under Upload Application,click Brow e.Locate the application le and click Upload Package.
2. Install the license (if applicable). For instructions, see the documentation provided by the application vendor.
3. Start the application. Go to Application ,select the application in the list of installed applications and click Start.
4. ongure the application. For instructions, see the documentation provided by the application vendor.
Note
•Applications can be uploaded by product administrators.
•Applications and licenses can be installed on multiple products at the same time using AXIS amera Management, version
3.10 and later.
To generate alog le for the application, go to Application .Select the application and click Log.
Appli ation Considerations
If an application is upgraded, application settings, including the license, will be removed. The license must be reinstalled and
the application recongured.
If the Axis product’s rmware is upgraded, uploaded applications and their settings will remain unchanged, although this is not
guaranteed by Axis ommunications. Note that the application must be supported by the new rmware. For information about
rmware upgrades, see How to upgrade the rmware on page 35.
If the Axis product is restarted, running applications will restart automatically.
If the Axis product is restored or reset to factory default, uploaded applications and their settings are removed. For information
about restoring the Axis product, see Ma ntenance on page 33.For information about factory default, see How to reset to factory
default sett ngs on page 34.
19
Available from A1 Security Cameras

AXIS C8033 Network Audio Bridge
About applications
AXIS Audio Player
The application AXIS Audio Player is included in this product. Use AXIS Audio Player to add, manage and schedule music playlists,
streams and prerecorded announcements.
How to add musi and announ ements in the library
Drag and drop or browse to add music in the library. The audio les will be stored on aSD card.
You can either play directly from the library or create playlists.
How to reate playlists in AXIS Audio Player
1. lick on the plus sign next to Playli t to add anew playlist.
2. Enter aname and click Save.
You can now drag and drop music les and announcements from the library to your playlist.
NONO
NOTICETICE
TICE
When deleting ale from the playlist it will still be In the library, but if you delete ale in the library it will be deleted
both in the library and the playlist.
How to add streams to AXIS Audio Player
1. lick on the plus sign next to Stream .
2. Write the name of the stream and the URL to your MP3 stream.
3. lick Save.
How to reate as hedule in AXIS Audio Player
1. Go to the Schedule tab.
2. lick and drag to create abox over the time slot you want to play aplaylist or stream. The time and date settings
on the local device are used for all scheduled activities.
3. In New Event:
- hoose to play either directly from the library or to play aplaylist or stream.
- lick on the time for start or end if you want to change the time.
4. lick Save.
How to s hedule announ ements
1. Go to the Schedule tab.
2. lick
3. hoose which announcement to play and the time to play it.
4. The announcement will be marked in the schedule with
.
.
20
Available from A1 Security Cameras
Other manuals for C8033
2
Table of contents
Other Axis Media Converter manuals