7
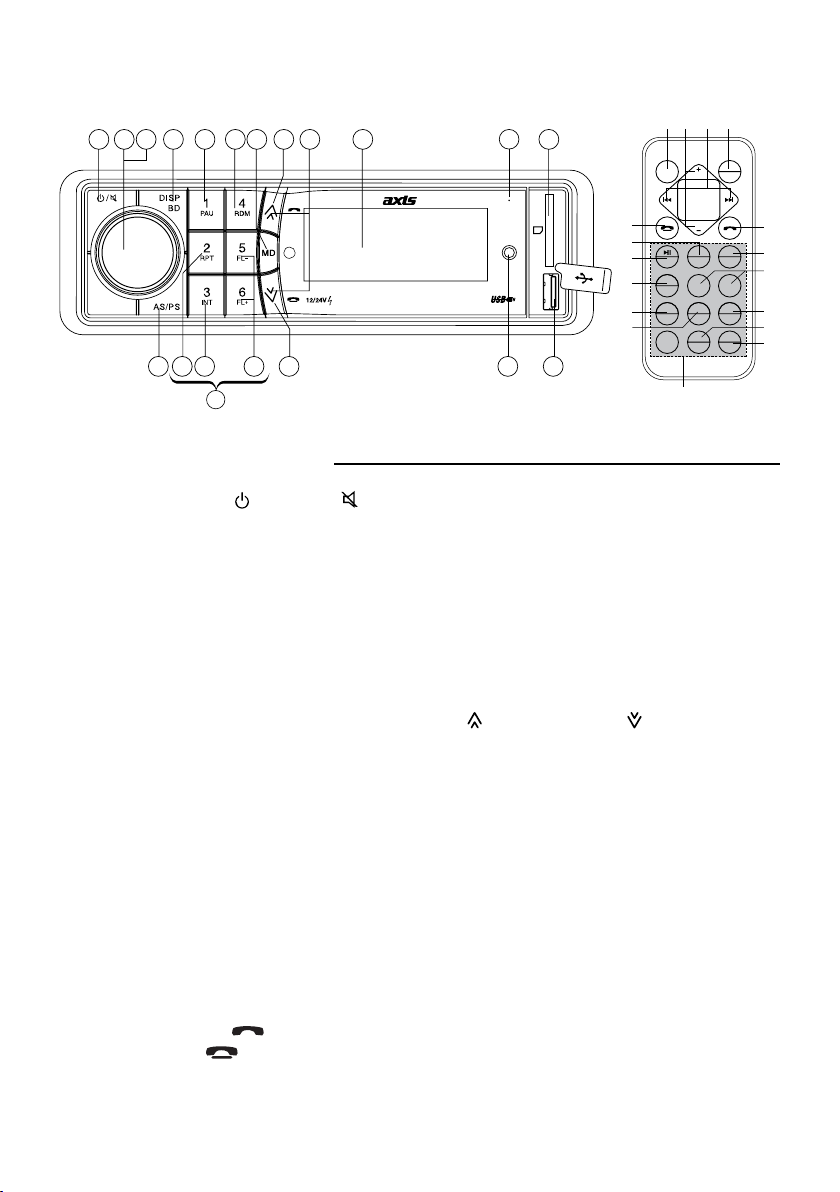
MP3/WMA CONTROL LOCATION OF PARTS
14. PAUSE BUTTON
During “PLAY”, press (14) ‘PAU’ button to “PAUSE”. Press gain to resume play.
Note: Press and hold PAU button to play rst title on the storage medium.
TRACK/SEARCH BUTTON (10)
FORWARD AND REVERSE TRACK SEARCH (or changing songs)
Press and release to advance to next track or to return to the beginning of the current track (track number will
be displayed.) Press and hold to or . Play will begin at the point where you release the button.
15. REPEAT BUTTON ‘RPT’
When this button is pressed, ‘RPT’ indication is displayed and play of the selected track will be continually
repeated.
RPT ONE - the current track is repeated.
RPT DIR - the current directory is repeated.
RPT ALL - all tracks are repeated.
16. INTRO BUTTON (Preview all Tracks)
When this button is pressed, ‘INT’ is displayed and the first few seconds of each track on the disc will
play. Press again to stop ‘intro’ and listen to track.
17. RANDOM BUTTON ‘RDM’
When this button is pressed, ‘RDM’ is displayed and each track is played in random instead of normal
sequence. To cancel RANDOM mode, press ‘RDM’ button again.
18. PREVIOUS/NEXTFOLDERSELECT:(IncaseofMP3/WMAf les)
M5: Previous Folder / M6: Next Folder
HOW TO SELECT MP3/WMA FILES
Searching by Track:
• Press “AS/PS”, then search track is activated.
• Turn “VOL” knob to left or right, select rst digit desired. (ex. 000->100->200....)
• Press “SEL” button to select second, third or fourth.... digit desired. (ex. 010->013->023...)
• Press “1 PAU”, the song selected will start.
Searching by Character:
• Press “AS/PS” twice, then character search mode is activated.
• Turn “VOL” knob to left or right, to select the desired letter. The songs with the same character
selected by / is displayed.
• Press “1 PAU”, the track selected will play.
Searching by Folder:
• Press “AS/PS” 3 times, then folder search is activated.
• Turn “VOL” knob to left or right, to select the desired folder.
• Press “1 PAU”, the song selected will start.
Connecting to Portable MP3 Player
19, 20. USB/ SD MEMORY CARD
The device is equipped with a USB interface and a memory card reader for SD cards. MP3 or WMA les
stored on these media can be played.
1. Plug your USB storage medium into the USB port.
2. If using a memory card, insert it into the memory card reader.
3. The player automatically switches to the input used and starts playback.
4. See the section on operations common for audio files on how to control USB or memory card playback.
5. Recommended USB/SD card size is between 4GB - 32GB. File system should be FAT32.
Note:
•Due to the great variety of devices with USB and SD/MMC card interfaces that sometimes have manufac-
turer-specic functions, we cannot guarantee that all media will be recognized and that all operational
7
MP3/WMA CONTROL LOCATION OF PARTS
14. PAUSE BUTTON
During “PLAY”, press (14) ‘PAU’ button to “PAUSE”. Press gain to resume play.
Note: Press and hold PAU button to play rst title on the storage medium.
TRACK/SEARCH BUTTON (10)
FORWARD AND REVERSE TRACK SEARCH (or changing songs)
Press and release to advance to next track or to return to the beginning of the current track (track number will
be displayed.) Press and hold to or . Play will begin at the point where you release the button.
15. REPEAT BUTTON ‘RPT’
When this button is pressed, ‘RPT’ indication is displayed and play of the selected track will be continually
repeated.
RPT ONE - the current track is repeated.
RPT DIR - the current directory is repeated.
RPT ALL - all tracks are repeated.
16. INTRO BUTTON (Preview all Tracks)
When this button is pressed, ‘INT’ is displayed and the first few seconds of each track on the disc will
play. Press again to stop ‘intro’ and listen to track.
17. RANDOM BUTTON ‘RDM’
When this button is pressed, ‘RDM’ is displayed and each track is played in random instead of normal
sequence. To cancel RANDOM mode, press ‘RDM’ button again.
18. PREVIOUS/NEXTFOLDERSELECT:(IncaseofMP3/WMAf les)
M5: Previous Folder / M6: Next Folder
HOW TO SELECT MP3/WMA FILES
Searching by Track:
• Press “AS/PS”, then search track is activated.
• Turn “VOL” knob to left or right, select rst digit desired. (ex. 000->100->200....)
• Press “SEL” button to select second, third or fourth.... digit desired. (ex. 010->013->023...)
• Press “1 PAU”, the song selected will start.
Searching by Character:
• Press “AS/PS” twice, then character search mode is activated.
• Turn “VOL” knob to left or right, to select the desired letter. The songs with the same character
selected by / is displayed.
• Press “1 PAU”, the track selected will play.
Searching by Folder:
• Press “AS/PS” 3 times, then folder search is activated.
• Turn “VOL” knob to left or right, to select the desired folder.
• Press “1 PAU”, the song selected will start.
Connecting to Portable MP3 Player
19, 20. USB/ SD MEMORY CARD
The device is equipped with a USB interface and a memory card reader for SD cards. MP3 or WMA les
stored on these media can be played.
1. Plug your USB storage medium into the USB port.
2. If using a memory card, insert it into the memory card reader.
3. The player automatically switches to the input used and starts playback.
4. See the section on operations common for audio files on how to control USB or memory card playback.
5. Recommended USB/SD card size is between 4GB - 32GB. File system should be FAT32.
Note:
•Due to the great variety of devices with USB and SD/MMC card interfaces that sometimes have manufac-
turer-specic functions, we cannot guarantee that all media will be recognized and that all operational