Azdome GS63H User manual


Product sepcification
Product Feature
HD Camera, Super HD Recording
LCD Size
2.4 inch LCD screen
Lens
170 Degree A+ HD ultra wide angle
Photo Resolution
VGA/1.3M/2MHD/3M/5M/8M/10M/12M
Video Resolution
400 M
Aperture
F=1.8
Color
Black
Language
English / 日本語 / Deutsch / Français / Español / Italiano / Русскии.etc
Video Code
H.264, MP4
Video Resolution
2880x2160 P24 1920x1080 P60 1920x1080 P30
1280x720 P120 1280x720 P60 1280x720 P30
FHD P30+VGA P30
G-sensor
Built-in
(saving the file if emergency, and can ‘t be deleted if the collision of
vehicles happen)
Loop Recording
Support seamless recording
Auto turn on/off
While vehicle power on/off
Support turn on while vehicle starts. And turn off while vehicle
shutdowns
Motion detection
Support
Year/Month/Day/Hour/Minute
Support
Photo Format
JPG
Memory card
Max support 128GB (TF card, Class 10 or above)
MIC
Support
Speaker
Support
GPS
Built in
USB port
1.Storage 2.Charging 3.Power on and recording
Power Interface
5V 1.5A
Battery
Built-in Li-ion Battery
Parking Mode
Support
Working temperature
-20°C to 60°C

Product Diagram
①Menu / Mode
2)Up
3) SOS / WIFI Switch
4)Down
5)OK / Confirm
6)Power
7)TF Slot
8)HDMI Port
9)USB Port
10)MIC
11) Reset
12)Speaker
13)Lens
14)Holder
15)AV/IN Port
16)LCD Screen

Keys and Functions
Key
Function
Instruction
Power
Turn On / Turn Off
1.Turn on:Short press Power to turn on and indicator will light up
2.Turn off:Long press Power to turn off and indicator off
Reset
Reset
When device crashes, shot press here to reboot
Menu/Mode(M)
Long-Press:
Photo/Playback/Recording Mode
Short Press:System Setting
1.After power on, press OK button to go into Video Mode
Long-press “M” button to switch Photo/Playback/Recording Mode.
2.On the Photo/Playback/Recording Mode, short-press to switch
corresponding Setting and System Setting
OK
Start/Stop Recording
Take Photo
Playback
Confirm Setting
1.On Recording Mode:short press to start/stop recording
2.On Photo Mode:short press to take photos
3.On Playback Mode:short press to playback
4.On System Setting:confirm setting
UP
UP
1.On System Setting:up
2.On Recording Mode long-press:Mic turns on/off
3.On Recording Mode short-press:zoom focal length
4.On Photo Mode:last picture
Down
Down
1.On System Setting:up
2.On Recording Mode long-press:Parking mode On/Off
3.On Recording Mode short-press:narrow focal length
4.On Photo Mode:next picture
TF Slot
TF Card Slot
The golden side of TF card face the lens side then insert
HDMI
HDMI Output
Connect HDMI to TV,to see video/photo
USB Port
Charging
USB Storage
PC Camera
1.With USB charging cable, you can use it to charging
2.With USB data cables (not included), you can connect it with
computer to check your video.
3.Connect dash cam with USB cables (not included) to computer,
select “PC Camera” mode
Emergency
Recording
Lock Video
WiFi On/Off
1.On Recording Mode, short press to save video
2.Long press to turn on WiFi

Using Your DashCam
As a driver, you have full responsibility to drive safely and adhere to all applicable traffic regulations.
Connecting To Power
①Connect the car charger and DashCam by using the charging cable.
②Plug the other end of the car charger to your vehicle's cigarette lighter socket.
③Once the car engine is started, DashCam will automatically power on and start recording. Once the car
engine is shutdown, DashCam automatically saves the recording and turns off within 5 seconds.
Manually turn on/off
①To manually turn on, press the power button.
②To manually turn off, press and hold the power button for at least 2 seconds.
3 Mode (/Recording/Photo/Playback) Setting
Video Setting
After power on enter the video mode, Long-press M button once to switch to the video setting
the video icon will be shown on the LCD top right corner
Resolution
2880x2160 P24 1920x1080 P60 1920x1080 P30
1280x720 P120 1280x720 P60 1280x720 P30
FHD P30+VGA P30
Loop recording
off/3 min/5 min/10 min
Time Lapse Video
Off/200ms/500ms/1second/2second
WDR
On/off
EV exposure
"+2.0","+1.7","+1.3","+1.0","+0.7","+0.3","0.0"
"-0.3","-0.7","-1.0","-1.3","-1.7","-2.0"(Default value 0.0)
Motion detection
on/off, default off
Parking Mode
on/off, default off
Record Audio
on/off ,default on
Date Stamp
on/off ,default on
GPS Stamp
on/off ,default on
G-sensor
Off/High/Medium/Low, default medium
Speed Unit
KMH/ MPH, default KM/H
Photo Setting
After power on enter the video mode, Long-press M button twice to switch to the video setting
the photo icon will be shown on the LCD top right corner
Capture Mode
Single/2s Timer/5s Timer /10s Timer, default Single

Resolution
VGA(640*480)/ 1.3M 1280*96
2M HD(1920*1080) 3M 2048*1536
5M 2592*1944 8M 3264*2448
10M 3648*2736 12M 4032*3024
Sequence
on/off , default off.
Quality
Fine/Normal/Commonly
Sharpness
Strong/Normal/soft
White Balance
Auto/Daylight/Cloudy/Tungsten/Fluorescent
Color
Color/Black & White/Sepia
ISO
Auto/100/200/400
Exposure
"+2.0","+1.7","+1.3","+1.0","+0.7","+0.3","0.0","-0.3","-0.7","-1.0","-1.3","-1.7","
-2.0" Totally 13 level.(Default value 0.0)
Anti-Shaking
on/off , default off.
Quick Review
off/2s/5s
Date Stamp
off/Date/Date and Time
Playback setting
After power on enter the video mode, Long-press M button third times to switch to the playback setting
the playback icon will be shown on the LCD top right corner
Delete
Delete Current/ Delete All, default Delete Current
Protect
Lock Current/Unlock Current/Lock All/Unlock All
Slide show
2s/5s/8s
System Setting
On Video/Photo/Playback mode, you can short-press “M” button to enter the system setting.
WiFi
on/off, default off
Date/Time
YY/MM/DD, Press M to save
Timezone Setting
UTC/GMT+1 to UTC/GMT+12
UTC/GMT-1 to UTC/GMT-12
Default GMT +8
Auto Power Off
off/3 min/5 min/10 min.
when stop recording and no operation, the camera will turn off automatically.
Backlight
off/1 mins/ 3 mins/ 5mins , Default 3min
Beep Sound
on/off, default on
Language
English and etc
License Plate
Car License Plate
Frequency
50HZ/60HZ, default :60Hz
Storage Space
Total/Rest/Lock file/Video file/Photo file
Format
Cancel or OK

Default Setting
Cancel or OK
Version
latest version
Install WiFi APP on phone
A.Android system mobile phone
Open the “Google Play Store” to search “AZDOME” or scan the QR barcode to download.
After the installation is completed, if you want "AZDOME" access to cell phone photos, please
click "OK" (Note: you must select "OK", otherwise you can’t preview the pictures download by
APP ).
Open the phone WiFi settings, search the WiFi Hotspot, search the dash cam’s WiFi, the name
GS63H....., enter the password: 12345678.
B.IOS system Apple phone.
Open the "Apple Store" to search "AZDOME" or scan the QR barcode to download.
After the installation is completed, if you want "LuckyCam" access to cell phone photos, please
click "OK" (Note: you must select "OK", otherwise you can not preview the pictures
download by APP ). Open the phone WiFi settings, search the WiFi Hot-spot,search the dash
cam’s WiFi, the name GS63H....., enter the password: 12345678.
NOTE:You can change the WiFi password in LuckyCam APP.
GPS Player Installation and Instruction
NOTE: when recording, dash cam screen don’t show the longitude and latitude data、speed.
If you want to see your longitude and latitude data、speed(MPH or KM/H), you can playback your
video in the dash cam(function of "GPS Stamp" is on ) or download the "Car DV Player" to play
video file:
1. Please go to the website http://www.azdome.hk/downloads.html, you can find the file in the
Page.
2. You can e-mail us to service@azdome.hk or you can also like our Facebook Page to get the
installation file.
Using the AZDOME GPS Player
1. Please open the Car DV Player and install it for the first use.
2. Click File –Open to choose the file which you want to play, click to start play.

If the Google Map can’t be normally loaded by GPS Player,please try the following operations:
1. Run GPS Player as the administrator (right click on the GPS Player, then choose running as the
Administrator)
2. Upgrade the Internet Explorer to IE 10 or above
3. If the GPS player still can’t work, please contact us at service@azdome.hk
FAQ
Q1:What should I do with the AZDOME dash cam firstly?
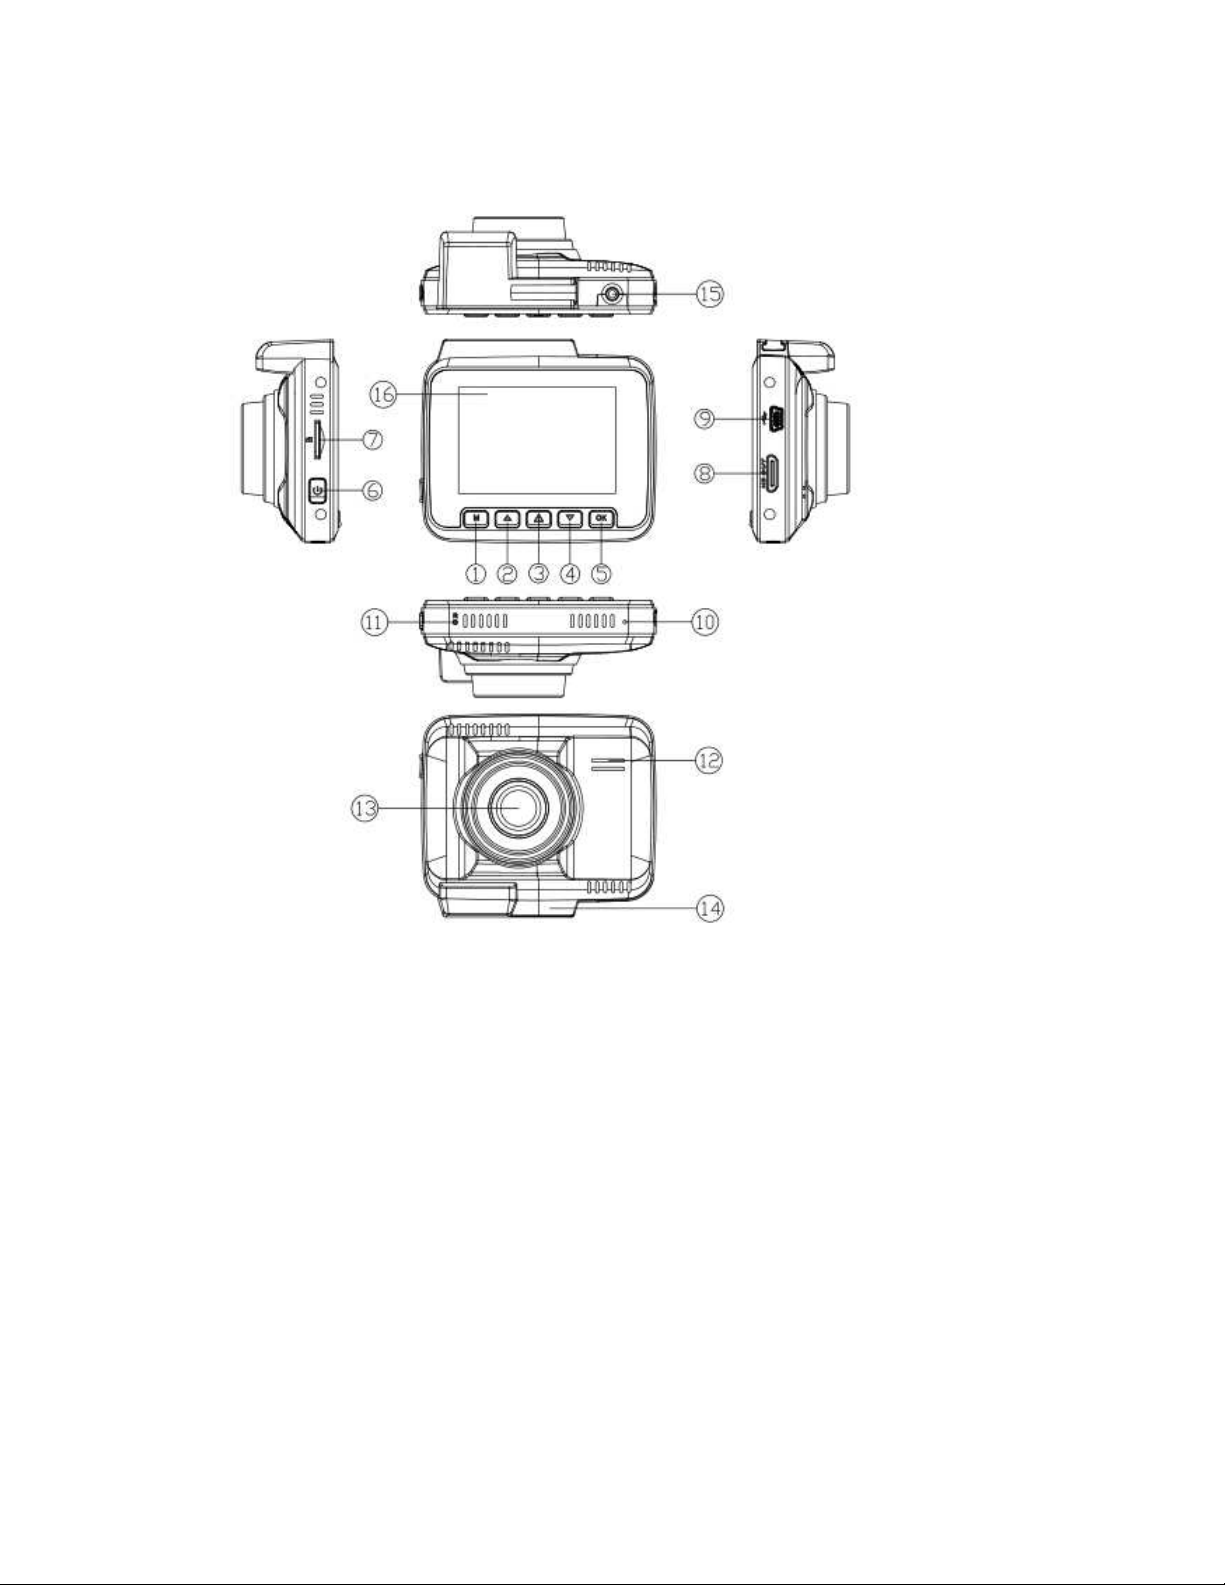
Please format your Micro SD/TF Card in dash cam:On the Video Mode,Please press button
"M" for twice;Then press button down "v" for 11 times and select "Format".Select "OK" and
press button "OK".
Q2: How to change the right Timezone and date?
Please go to camera's system settings > Time Zone Setting > Set your correct GMT value > Set
your time > OK to confirm
Please press button "M" for twice, select “Timezone Setting” press button“OK” and select your
Timezoon.And select “Date/Time”, change the right time.
Note:Don't forget press button "M" so that time and time zone can be set successfully.
Q3:Camera turns ON / OFF frequently automatically.
Please reset your camera. Please make sure that “Motion Detection” is set to OFF. Also Please
make sure “Auto Power Off”“Parking Mode” is also set to OFF.
Q4:My Video playback on PC is lagging.
You are viewing high-bit rate version of video files. General computer configuration may have
problem with faster data processing. Please record videos at lower resolution
and try again. Contact us if problem still persists.
Q5: Camera gets HOT
It is normal for your camera to run slightly hot. Due to the higher video resolution, the dash cam
may be hot during using. (no more than 140 ° F/60ºC).
Q6:Why it’s power off when I driving?
If no operation is detected after 3 minute(default setting), the dash cam will enter screen-saver
mode. Press any button will reactivate the screen. If you don't need this function, you can turn off
the back light.
Q7:How to interrupt the WiFi when connect with phone?
When it connects to your phone via WiFi, you will not be able to operate this device. If you want to
operate it, please long press "EMERGENCY BUTTON" to disconnect or restart the device.
Disclaimer
The videos/pictures taken by Car dash cam is only for a reference, we don’t take any responsibility due to
data-loss in the abnormal circumstances. Special version: The device will records files in normal recording
status. But in the following situation, it will lead to files to be damaged or lost;
1. If pulling out the TF card in the recording status, final video files will be damaged or lost.
2. If there is illegal blackout in the recording status, final video files will be damaged or lost.

3. If there is a destructive collision in the recording status, video and audio files will be damaged or lost.
4. If there is a destructive collision in the recording status leading to Memory card loose, video and audio files
will be damaged or lost.
Notice
This product complies with the radio interface requirements of the European Community.
This symbol means the product must not be discarded as household waste, and should be delivered to
an appropriate and recycling helps protect natural resources, human health and the environment. For more
information on disposal and recycling of this product, contact your local municipality, disposal service, or the
shop where you bought this product.
Changes or modifications not expressly approved by the party responsible for compliance could void
the user's authority to operate the equipment.
This equipment has been tested and found to comply with the limits for a Class B digital device, pursuant to
Part 15 of the FCC Rules. These limits are designed to provide reasonable protection against harmful
interference in a residential installation. This equipment generates, uses and can radiate radio frequency
energy and, if not installed and used in accordance with the instructions, may cause harmful interference to
radio communications. However, there is no guarantee that interference will not occur in a particular
installation.
If this equipment does cause harmful interference to radio or television reception, which can be determined
by turning the equipment off and on, the user is encouraged to try to correct the interference by one or more
of the following measures:
-- Reorient or relocate the receiving antenna.
-- Increase the separation between the equipment and receiver.
-- Connect the equipment into an outlet on a circuit different from that to which the receiver is connected.
-- Consult the dealer or an experienced radio/TV technician for help.
This device complies with Part 15 of the FCC Rules.
Operation is subject to the following two conditions: (1) this device may not cause harmful interference, and
(2) this device must accept any interference received, including interference that may cause undesired
operation.
This equipment complies with FCC radiation exposure limits set forth for an uncontrolled environment. This
equipment should be installed and operated with a minimum distance of 20cm between the radiator & your
body. This transmitter must not be co-located or operating in conjunction with any other antenna or
transmitter.

FCC Statement
1. This device complies with Part 15 of the FCC Rules. Operation is subject to the following two
conditions:
(1) This device may not cause harmful interference.
(2) This device must accept any interference received, including interference that may cause undesired
operation.
2. Changes or modifications not expressly approved by the party responsible for compliance could
void the user's authority to operate the equipment.
NOTE:
This equipment has been tested and found to comply with the limits for a Class B digital device,
pursuant to Part 15 of the FCC Rules. These limits are designed to provide reasonable protection
against harmful interference in a residential installation.
This equipment generates uses and can radiate radio frequency energy and, if not installed and used in
accordance with the instructions, may cause harmful interference to radio communications. However,
there is no guarantee that interference will not occur in a particular installation. If this equipment does
cause harmful interference to radio or television reception, which can be determined by turning the
equipment off and on, the user is encouraged to try to correct the interference by one or more of the
following measures:
Reorient or relocate the receiving antenna.
Increase the separation between the equipment and receiver.
Connect the equipment into an outlet on a circuit different from that to which the receiver is
connected.
Consult the dealer or an experienced radio/TV technician for help.
To comply with RF exposure requirements, a minimum separation distance of 20cm must be
maintained between the user's body and the device, including the antenna.
Other manuals for GS63H
2
Table of contents
Other Azdome Dashcam manuals