Azure Biosystems Cielo AIQ030 User manual

Azure Cielo™Real-Time PCR Systems
User Manual
Part Numbers AIQ030 and AIQ060

Azure Cielo Real-Time PCR Systems User Manual Page 2
Safety and Regulatory Compliance
Important Safety Information
Please read these instructions before operating the Azure Cielo system.
Electrical Safety Precautions
Be sure to take proper precautions when handling any electrical equipment. NEVER work on any live
circuit, xture, receptacle, or switch. Safety rules you should follow whenever working with any electrical
appliance include:
• Always shut off power at the main disconnect before changing a fuse.
• Always shut off power to the circuit before repairing or replacing a switch, receptacle, or xture.
• Always tape over the main switch, empty fuse socket, or circuit breaker on which you are working.
• Always check that the circuit is dead before beginning work. Using a circuit tester or voltmeter can
help determine this.
• Always unplug any appliance before attempting repair.
Protective ground terminal
The ground terminal is located on the inside of the back panel. It is intended to protect against
electric shock in case of a fault.
NOTE: This equipment has been tested and found to comply with the limits for a Class A digital device,
pursuant to Part 15 of the FCC Rules. These limits are designed to provide reasonable protection against
harmful interference when the equipment is operated in a commercial environment. This equipment
generates, uses, and can radiate radio frequency energy and, if not installed and used in accordance with the
instruction manual, may cause harmful interference to radio communications.
Operation of this equipment in a residential area is likely to cause harmful interference in which case the user
will be required to correct the interference at his own expense.
Changes or modications not expressly approved by the party responsible for compliance could void the
user’s authority to operate the equipment.
Hot surface warning
Under normal conditions, the temperature of plate is below 50°C and safe to touch. It is
possible that the glass surface temperature will exceed 80°C in rare instances. Please
exercise caution when contact with the plate surface is expected.
CAUTION: No user serviceable parts inside!
For Research Use Only
This instrument is suitable for research use only. It must be used, therefore, only by personnel who know the
health risks associated with the reagents that are normally used with this instrument.

Azure Cielo Real-Time PCR Systems User Manual Page 3
Warranty
The Azure Cielo products are warranted against defects in materials and workmanship for one year unless
otherwise outlined on your sales order or www.azurebiosystems.com/warranty.If any defect occurs in the
instrument during this warranty period, Azure Biosystems, Inc. will repair or replace the defective parts at its
discretion without charge. The following defects, however, are specically excluded:
• Defects caused by improper operation.
• Repair or modication done by anyone other than Azure Biosystems or the company’s
authorized agent.
• Use of spare parts supplied by anyone other than Azure Biosystems.
• Damage caused by accident or misuse.
• Damage caused by disaster.
• Corrosion caused by improper solvents or samples.
Voltage Setting Information
The Azure Cielo system has a power supply that automatically chooses the correct voltage for your country
or region.
CE Conformity
The following Cielo Model Systems, models: Cielo3 and Cielo6 are in conformity with the provisions of the
following EC Directives, including all amendments, and national legislation implementing these directives:
• EN61010-1: 2010
• EN61326-1: 2013
• EN61326-1:2013
• EN301489-1 v2.2.1:2019
• EN301489-17 v3.2.0:2017
• EN300238 v2.1.1:2016
Protection category: IP20 according to IEC 60529

Azure Cielo Real-Time PCR Systems User Manual Page 4
ENG
This symbol indicates that the waste of electrical and electronic equipment must not
be disposed as unsorted municipal waste and must be collected separately. Please
contact an authorized representative of the manufacturer for information concerning
the decommissioning of your equipment.
FRA
Ce symbole indique que les déchets relatifs à l’équipement électrique et électronique
ne doivent pas être jetés comme les ordures ménagères non-triées et doivent être
collectés séparément . Contactez un représentant agréé du fabricant pour obtenir des
informations sur la mise au rebut de votre équipement.
GER
Dieses Symbol kennzeichnet elektrische und elektronische Geräte, die nicht mit dem
gewöhnlichen, unsortierten Hausmüll entsorgt werden dürfen, sondern separat behandelt
werden müssen. Bitte nehmen Sie Kontakt mit einem autorisierten Beauftragten des
Herstellers auf, um Informationen hinsichtlich der Entsorgung Ihres Gerätes zu erhalten.
ITA
Questo simbolo indica che i riuti derivanti da apparecchiature elettriche ed elettroniche
non devono essere smaltiti come riuti municipali indifferenziati e devono invece essere
raccolti separatamente. Per informazioni relative alle modalità di smantellamento delle
apparecchiature fuori uso, contattare un rappresentante autorizzato del fabbricante.
SPA
Este símbolo indica que el equipo eléctrico y electrónico no debe tirarse con los
desechos domésticos y debe tratarse por separado. Contacte con el representante local
del fabricante para obtener más información sobre la forma de desechar el equipo.
SWE
Denna symbol anger att elektriska och elektroniska utrustningar inte får avyttras
som osorterat hushållsavfall och måste samlas in separat . Var god kontakta
en auktoriserad tillverkarrepresentant för information angående avyttring av
utrustningen.
Waste Electrical and Electronic Equipment (WEEE)
Contact
Azure Biosystems, Inc.
6747 Sierra Court, Suite A-B • Dublin, CA 94568 • USA
info@azurebiosystems.com • (925) 307-7127 • Fax (925) 905-1816

Azure Cielo Real-Time PCR Systems User Manual Page 5
Table of Contents
1. Introduction 6
1.1 Azure Cielo Specications 6
1.2 Plates and Tube Compatibility 7
1.3 Contacting Technical Support 9
2. Installation and Setup 10
2.1 System Placement 10
2.2 System Overview 10
2.3 Connect Azure Cielo Real-Time PCR system to Internet Network 11
2.2 Connect Azure Cielo Real-Time PCR system to PC via Azure Cielo
Manager software 11
3. Device Software Overview 14
3.1 The Home Screen 14
3.2 Experiment Setup 14
3.2.1 Protocol Manager 15
3.2.2 Change Protocol Properties 17
3.2.3 Well Selection Screen 19
3.2.4 Email Feature in Protocol Setting 19
3.2.5 Run Setup 20
3.2.6 Run Protocol 28
3.3 Data Manager 30
3.4 Device Settings 34
3.4.1 General 34
3.4.2 Network 35
3.4.3 Email Server Setup 35
3.4.4 Technical Support 37
4. Frequently Asked Questions 38

Azure Cielo Real-Time PCR Systems User Manual Page 6
1. Introduction
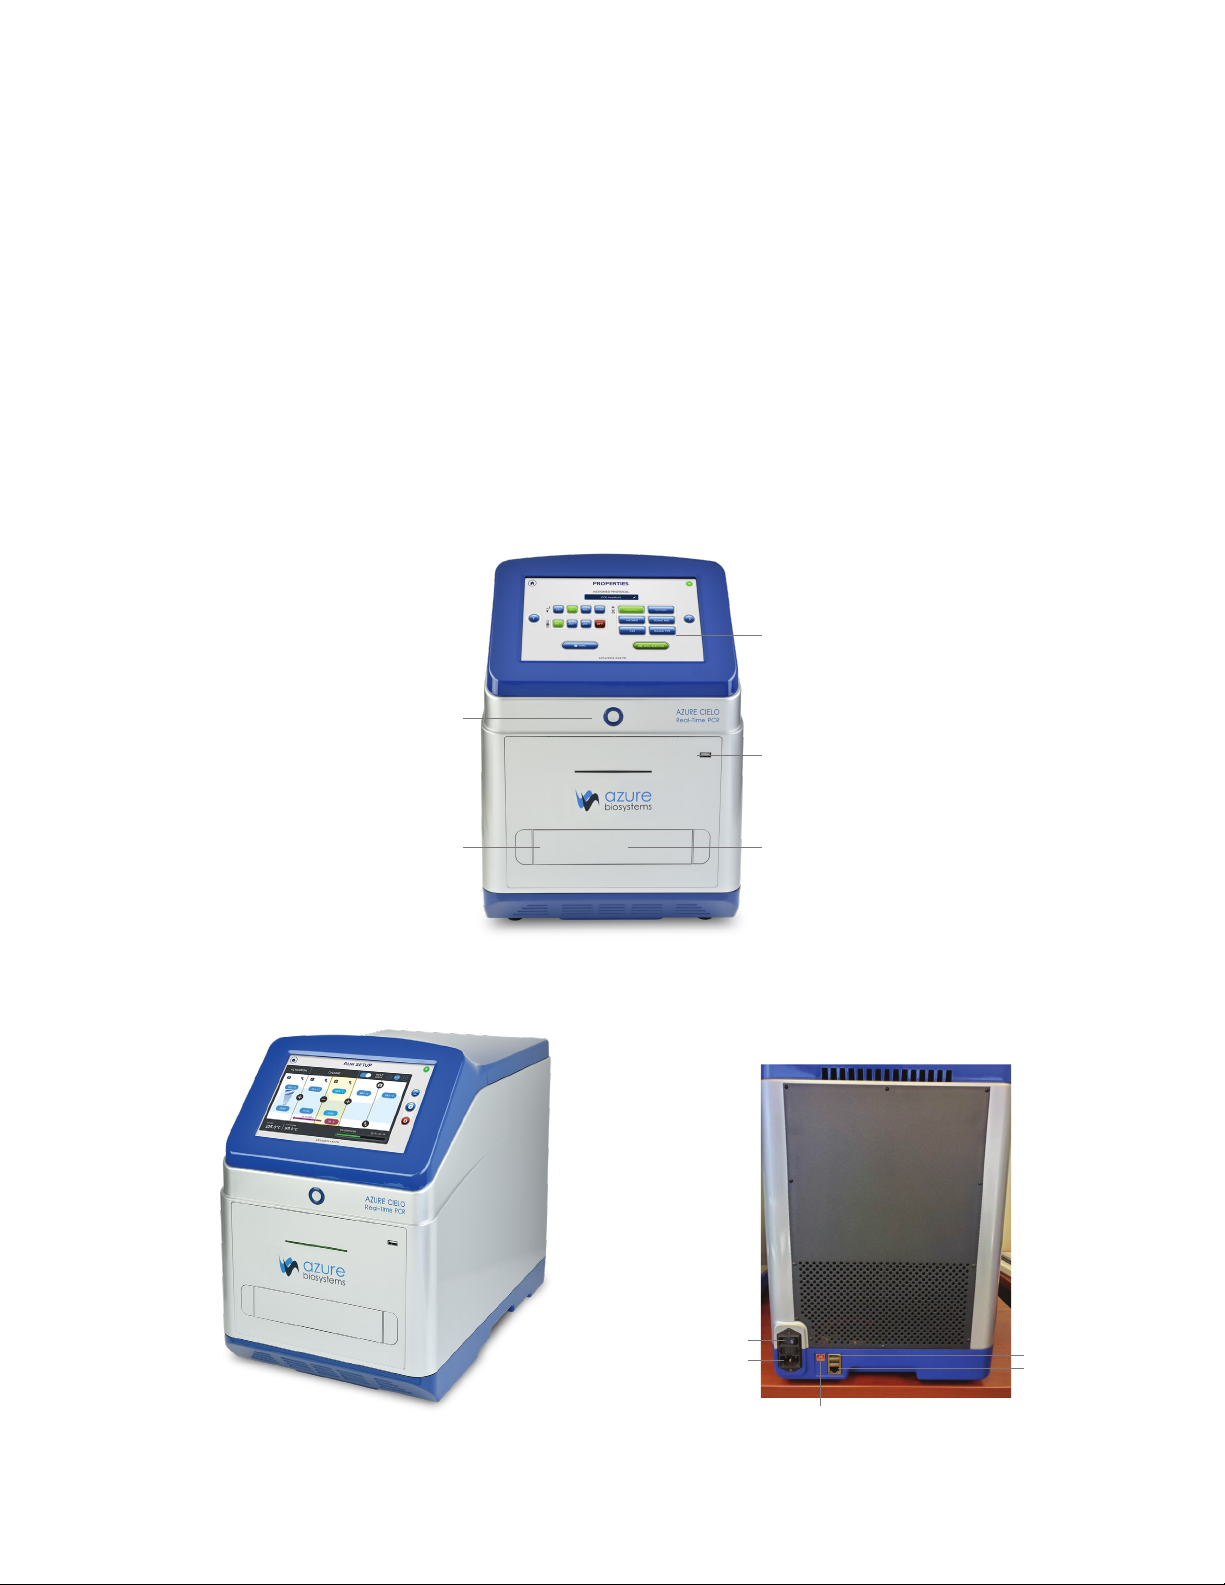
The Azure Cielo Real-Time PCR instrument is a high-performance tool compatible with a wide variety of
reagents for quantitative PCR. The family of instruments includes the Azure Cielo 3 and the Azure Cielo 6.
1.1—Azure Cielo Specications
The Azure Cielo instruments have the following specications.
Specications Azure Cielo 3
Real Time PCR System
Azure Cielo 6
Real Time PCR System
Part number AIQ030 AIQ060
Product description 96-well Real-Time PCR instrument
with 10.2” touchscreen interface,
3 dye channel lters
96-well Real-Time PCR instrument
with 10.2” touchscreen interface,
6 dye channel lters
Sample capacity (wells) 96 96
Reaction volume 5–150µL (10–50 µL recommended) 5–150µL (10–50 µL recommended)
Excitation source LED LED
Detection channels 3 6
Multiplexing Up to 3 targets Up to 6 targets
Thermal element Peltier Peltier
Max. block ramp rate 6°C/sec 6°C/sec
Avg. sample ramp rate 4°C/sec 4°C/sec
Temperature uniformity ±0.2°C ±0.2°C
Temperature accuracy ±0.1°C ±0.1°C
Dye compatibility SYBR Green, EvaGreen, FAM,
VIC, JOE, HEX, CAL Fluor 540,
CAL Fluor Orange 560, Cy5, LIZ,
Mustang Purple
SYBR Green, EvaGreen, FAM,
VIC, JOE, HEX, CAL Fluor 540,
CAL Fluor Orange 560, ROX,
TAMRA, TEX615, Quasar 670,
CAL Fluor Red 610, Cy5, LIZ, Mustang
Purple, Cy5.5, Quasar 705
Custom dye/chemistry üüüü
Chemistry capability Fast/Standard Fast/Standard
Detection sensitivity 1 copy 1 copy
Sensitivity Detect differences as small as 1.5-fold in
target quantities in single plex reactions
Detect differences as small as 1.5-fold in
target quantities in single plex reactions
Connectivity USB, Wi-Fi, Ethernet USB, Wi-Fi, Ethernet

Azure Cielo Real-Time PCR Systems User Manual Page 7
1.2—Plates and Tube Compatibility
Azure Cielo Real-Time PCR system is compatible with:
A. Low-prole 96-well Plates
• Low-prole plates have wells of approximate height 15.5 mm (depending on manufacturer).
These modern designs reduce condensate formation and allow for accurate light detection in
uorescence assays, low-volume reactions, and fast PCR.
• Non-skirted Plate: This plate lacks a surrounding panel. This format ts blocks of most thermal
cyclers and qPCR systems, but may not be suitable for robotic applications without stabilization.
• Semi-skirted Plate: This plate has a short panel around the edge of the plate, providing adequate
support during pipetting and mechanical strength for robotic handling.
*Azure Cielo Real-Time PCR Systems cannot accommodate a fully skirted 96-well plate.
Azure Cielo Systems are compatible with only a non-skirted or semi-skirted 96-well plate*
• Plate color can be White, Frosted or Clear. For assays requiring higher uorescent sensitivity and
accuracy, white or frosted plates would be recommended.
• Plates should be sealed with Optical Grade Seal Film. Detection of this system is from above and
through the top of each well in the plate. Signicant signal loss should be expected if not using
optically clear caps or seals.
• Plate rim (lip): The “rim” of a 96-well plate is a peripheral upper elevation around the plate.
Rimmed plates are NOT compatible with the Cielo system.
• Plate Notch: The notch is a modied corner of a 96-well plate. The Azure Cielo Systems are
versatile and can accommodate notching at any corner position. (A1,H1, A12 and H12)
*The Azure Cielo Systems are not compatible with any 384-well plate*

Azure Cielo Real-Time PCR Systems User Manual Page 8
B. Low-prole Tubes
• Tubes are an ideal choice for qPCR experiments of low to medium throughputs. Individual and
tube strips are two most common formats available. Tube strips are available in 8 or 12 well type.
Cielo systems are compatible with 0.1mL and 0.2mL tubes.
• Color of the tube(s) can be White, Frosted or Clear. For assays requiring higher uorescent
sensitivity and accuracy, white or frosted tubes would be recommended.
• The tubes should be sealed with Optical Grade Flat Caps or seals. Detection of this system is from
above and through the top of each tube. Signicant signal loss should be expected if not using
optically clear caps or seals.
• Recommended tube cap features should include a tight t in addition to optical clarity. Cap strips
are the most common way to seal tubes and plates. Azure Cielo Real-Time PCR systems are
compatible with at caps, that are optical clear or ultra-clear.
*The Azure Cielo Systems are not compatible with domed caps for tubes or plates*
C. Only a few samples
While the Cielo Real-time PCR system is designed for 96-well plates, many times researchers do not
need to run ninety-six samples. It is common to run only a few samples at a time, especially when
new assays or tests are being evaluated and optimized for best performance.
The lid and detection manifold are very well designed for even heating and detection over the 96-well
landscape. When only running a small number of samples, it is possible uneven pressure over these
few tubes due to the uneven settling of the lid manifold, might damage the strip or single tube
samples during the run.
The easy remedy to this is to evenly distribute samples or strip tubes to different sections of the
96-well plate area. Empty tubes can be used as placeholders at the edges of the 96-well plate area to
allow even pressure from the lid as the run progresses.
Figure 1. Orange circles represent samples to be run. Blue
circles represent empty tubes used as placeholders to ensure the
lid manifold applies even pressure over the entire 96-well area.

Azure Cielo Real-Time PCR Systems User Manual Page 9
1.3—Contacting Technical Support
For questions about installation, setup, or general use of the system, please contact
support@azurebiosystems.com or call (925) 307-7127, 9am–4pm Pacic time.
Figure 2. Filled orange circles show locations of samples across the 96-well format. There are a total of six
samples in tubes. Panel A shows an uneven distribution which may result in deformed or altered tubes at the
completion of the run. Panel B shows a more even and recommended distribution of the same six samples using
two blanks (blue lled circles).

Azure Cielo Real-Time PCR Systems User Manual Page 10
2.1—System Placement
WARNING: Excessive Weight Hazard –Please use two or more people to lift the system. Failure to do so
can result in system damage and personal injury.
As with all electrical instruments, the Azure Cielo should be located away from water, solvents, or corrosive
materials, on a at and stable surface with adequate clearance on all sides. The system must remain
stationary during operation.
The system should be placed away from interfering electrical signals and magnetic elds. If possible, a
dedicated electrical outlet should be used to eliminate electrical interference from other instrumentation in
your laboratory.
The Azure Cielo should be installed at no more than 3000 meters above sea level.
2.2—System Overview
2. Installation and Setup
Figure 4. Side view of the Azure Cielo Real-Time PCR systems.
Figure 3. Front view of the Azure Cielo Real-Time PCR systems.
Touch screen panel
USB Type A port
Door
Start button with indicator LED
Open button
Figure 5. Back view of the Azure Cielo Real-Time PCR systems.
Power Switch
Power Input USB Type A port
Ethernet port
USB Type B port

Azure Cielo Real-Time PCR Systems User Manual Page 11
2.3—Connect Azure Cielo Real-Time PCR system to Internet Network
A. Wi-Fi
1. Go to the DEVICE SETTINGS > NETWORK > WIFI on the left edge of the screen.
2. Make sure that the Wi-Fi is on with a strong, available signal.
3. Locate your network from the available networks.
4. Input your password and encryption type.
5. The system should now be connected to the Wi-Fi network.
B. Ethernet
1. Connect a LAN or ethernet cable to the Ethernet port at the rear of Azure Cielo Real-Time
PCR system.
2. Go to DEVICE SETTINGS > NETWORK > Ethernet to make sure connection is properly established.
Note: Depending on your institution’s network security settings, you may need to provide the Mac
Address shown on your Cielo 6 to your IT department to add it into the whitelist of your internet network.
You can nd the Mac Address from DEVICE SETTINGS > NETWORK > Wi-Fi > CONNECTION INFO.
2.4—Connect Azure Cielo Real-Time PCR system to PC via Azure Cielo Manager software
A. Internet connection
1. Please make sure both Azure Cielo Real-Time PCR system and the PC are connected to the same
internet network (please refer to Section 2.3).
2. Install Azure Cielo Manager software on the PC with administrative privileges.
3. Use the startup wizard and the SEARCH DEVICES button to locate available Azure Cielo
Real-Time PCR systems within the Wi-Fi network. Select the instrument to be used, and then
CONNECT. The designated instrument and the PC should now connect, enabling run monitoring
and data download at completion of the cycling.
4. If no system is listed to proceed with connection, verify the Azure Cielo Real Time PCR system and
the PC are connected to the same Wi-Fi network.
B. USB connection
1. Connect Azure Cielo Real-Time PCR system to a PC by using USB cable to the standard USB Port
on the back of the instrument.
2. Install Azure Cielo Manager software on the PC with administrative privileges.
3. On the startup wizard, click SEARCH DEVICES button to search available Azure Cielo Real-Time
PCR system, then click CONNECT to connect selected system to the PC.
2.5—Updating the Instrument Software
A. USB format requirements
Most USB drives available will already contain formatting compatible for the Cielo Instrument
Software Update. The USB should be formatted using FAT or FAT32 and if it is not formatted using
one of these le systems, it should be reformatted prior to attempting an update.
To determine the le system in use on the USB, simply plug it into a personal computer using some
version of Windows. Using File Explorer or This PC from the desktop, select the USB drive in question
by double-clicking. It is also possible to hover over the drive, and right click to get a list of menu items.

Azure Cielo Real-Time PCR Systems User Manual Page 12
The le system used has to do with the overall size of the USB drive. One gigabyte or smaller will
likely employ FAT, with larger drives using FAT32. If reformatting the drive, FAT32 should be selected
regardless of size.
WARNING: Please note, reformatting a USB drive will overwrite les already on the drive. If les on
the drive are important, it will be necessary to retain them elsewhere prior to initiating a reformatting.
All les and information will be lost during the reformatting process.
B. Cielo Instrument Software Update Procedure
• Once an appropriately formatted USB drive is available, transfer the Cielo update le to the drive
in the main directory. Do not place the le in a sub folder, nor should there be any other “.bin” les
on the USB.
• The Cielo update le will be named “update####.bin”, with the #### indicating a software version
number.
• Verify that the Cielo instrument has been turned off using the power button on the back.
• Plug in the USB drive containing the software update le into the front USB port.
• Switch on the instrument using the power switch on the back. Wait until the front power button
light shows green. Once green is visible on the front, press and hold the front power button for
eight seconds. Initially the system will beep one time but continue to hold the power button until
there is continuous beeping once per second.
• If you do not continuously hold the power button on the front long enough, it is possible that the
instrument will continue through the process that follows, but please note, that the software will
not load properly. The front power button must be held for the eight seconds to ensure the update
processes successfully.
• A screen on the instrument will display that an update is available, and that rmware has been
located. Select OK to continue with the update to the rmware.
Figure 6. By hovering over the ash drive from “This PC” screen
and right clicking, a menu box will appear, providing numerous
options. Selecting Properties will provide information on the type
of le system in place on the USB. Format will also provide that
information and allow reformatting to proceed if FAT or FAT32 is not
the le system in place.
Figure 7. The system will prompt the user that an
update le has been detected. Select OK to continue
with the update.

Azure Cielo Real-Time PCR Systems User Manual Page 13
• The Cielo instrument will now begin updating. Do not leave the instrument unattended during this
process, which will only take approximately one minute.
Figure 8. As the Instrument Software Update proceeds, updates to each module will show progress with a moving bar.
• Once the instrument indicates that the update is complete, the USB drive should immediately be
removed from the USB port on the front.
Figure 9. Once the instrument has successfully
updated the software, it will instruct the user to
remove the USB drive and select OK to reboot the
system.
• If the USB drive is not removed, the system will recognize a rmware update, and begin again the
already completed process. If this should happen, just select CANCEL, and remove the USB drive.
Switch the instrument off using the back power button, wait thirty seconds, and then switch back
on the power button.
• The system will automatically restart, with the new rmware in place.

Azure Cielo Real-Time PCR Systems User Manual Page 14
The Azure Cielo Icon based software allows you to program and run protocols with a simple user interface.
Protocols and run parameters may be entered using a PC connected via Wi-Fi, USB or ethernet. No PC is
required however, as the Home Screen on the instrument will allow the user this same ability.
3.1—The Home Screen
3. Device Software Overview
Figure 10. The Home Screen.
Button Button Name Function
Experiment Setup Set up a new run or running an existing protocol –
see Section 3.2
Data Manager Access run data – see Section 3.3
Device Settings Access device settings – see Section 3.4
Connection Bar Status and strength of internet connection
Table 1. Buttons in the home screen.
3.2—Experiment Setup
To run a quantitative PCR protocol:
1. ADD (create) a new user or protocol (see more details in the next section).
2. Select existing user and protocol in PROTOCOL MANAGER screen
• If changes for the selected protocol are needed, use the NEXT button to go to
the PROPERTIES screen to edit protocol properties.
• Using the NEXT button , select RUN SETUP to edit the run conditions.
• Select PLAY to begin the run. Information will be displayed in real time on the
screen as the run progresses.

Azure Cielo Real-Time PCR Systems User Manual Page 15
3.2.1—Protocol Manager
From the Protocol Manager screen, simply select a listed protocol. While selected, a preview of the
conditions set under that protocol will appear in a separate window to the right of the protocol
manager window.
Figure 11. PROTOCOL MANAGER screen under
Experiment Setup.
Button Button Name Function
Home Back to Home Screen
Connection Bar Status and strength of internet connection
Sort Sort in ascending or descending order
Add • Add User
• Add Protocol
Delete • Delete User
• Delete Protocol
Next Go to the PROPERTIES screen to edit the protocol properties
after selecting an existing or newly created protocol
Table 2. Icon buttons in the PROTOCOL MANAGER screen.
Figure 12. PREVIEW screen of a selected protocol in
PROTOCOL MANAGER.

Azure Cielo Real-Time PCR Systems User Manual Page 16
A. Use the UP button next to Users or Protocol and Date created to sort users and/or
experiments in ascending or descending order.
B. Add New User:
• Tap button to add a new user.
• Tap on ‘Add User’ to add a new user. Enter the new user name using the
system keyboard.
• You can see the new user added to the PROTOCOL MANAGER screen.
Figure 13. Add New User
process ow.
C. Add New Protocol:
• Tap symbol to add a new protocol.
• Tap on ‘Add Protocol’ to add a new user. Enter the name for the protoocol using the
system keyboard.
• You can see the new protocol added to the PROTOCOL MANAGER screen. The PREVIEW
screen of a new protocol displays the default experiment settings.
Figure 14. Add New
Protocol process ow.
Figure 15. The PREVIEW screen of a new
protocol displays the default experiment settings

Azure Cielo Real-Time PCR Systems User Manual Page 17
D. Delete existing user or protocol.
• Select the User or Protocol to be deleted.
• While the User or Protocol remains highlighted, use the trash icon to delete the
selected User or Protocol.
Note: Deleting user will delete all existing protocols and data stored under that user.
• The system will prompt you to conrm the deletion. Tap OK to delete or CANCEL to abort.
Figure 16. Delete exisiting user or
protocol in PROTOCOL MANAGER.
3.2.2—Change Protocol Properties
1. Using the PROTOCOL MANAGER, select the protocol to edit properties.
2. Tap NEXT icon to edit the selected protocol.
Figure 17. Select a protocol in PROTOCOL MANAGER.
Figure 18. PROPERTIES screen of a selected protocol.

Azure Cielo Real-Time PCR Systems User Manual Page 18
Button Button Name Function
Home Back to Home Screen
Connection Bar Status and strength of internet connection
Protocol Name Tap the rectangular text box to assign a name (or rename)
the selected protocol
Reaction Volume
• Select reaction volume
(default is 20 µL)
• Select OTHER* button to customize
reaction volume
Lid Temperature Select lid temperature (default setting is 105ºC)
Off lid heating Turn off lid heating
Light Source Select light source(s)
Back Back to PROTOCOL MANAGER screen
Next Go to RUN SETUP screen
Email Send run completed notication with result
(.AZD le) attached
Well Selection Go to WELL SELECTION screen to select wells from
a 96 well PCR plate
*Selected button will turn green from default blue color.
Table 3. Icons and buttons in PROPERTIES screen of a selected protocol.

Azure Cielo Real-Time PCR Systems User Manual Page 19
3.2.3—Well Selection Screen
• In the WELL SELECTION menu, a 96-well plate layout will be visible. The Azure Cielo
Real-Time PCR Instrument detects 16 wells or two columns at a time. The default setting
is to collect data from all wells across the entire plate which takes about 9 seconds. If the
experimental plate is not 96-wells, but only a few columns, the overall run time can be
reduced by opting out of detection for unused wells on the plate. The minimum selection
is two rows (or 16-wells). If opting to turn off columns to reduce run time, please ensure
detection remains on for any columns where samples will be placed. Wells that are
considered active for detection are shaded blue and will appear black or empty if turned off
(see images below).
• To deselect wells, tap on the well to clear selection. Wells are deselected in sets of two
columns. Press OK to save changes on to the plate and return to PROPERTIES screen.
Example: Deselected Column 1, 2 and 11, 12.
Note: 2 columns of wells are deselected per tap.
• There is also a CLEAR ALL which will turn off all wells. The user will then select the blocks of
two columns that will be required for detection. Press OK to save changes on the plate and
return to PROPERTIES screen.
• Tap NEXT to proceed to RUN SETUP screen.
Figure 19. WELL SELECTION screen. Figure 20. Deselected columns 1,2 and 11,12 in
WELL SELECTION screen.
Figure 21. Select only Column 11 and 12 after “CLEAR ALL” selection.
3.2.4—Email Feature in Protocol Setting
Important: Make sure that:
1. Cielo device is successfully connected to the Internet. To connect the Cielo Device to the
internet, please refer Section 2.3 (Connect Azure Cielo Real-Time PCR system to internet).

Azure Cielo Real-Time PCR Systems User Manual Page 20
Figure 22. Email ID pop-up screen.
2. Email server is successfully setup. To set up email server, please refer Section 3.4.3
(Email Server Setup)
• A pop-up screen with an empty box will appear and will allow user to input an
email address.
• Once the email address is entered, hit OK to continue.
• Proceed with Experiment Setup and run protocol.
• Email notication with results attached will be sent when the protocol run is
successfully completed.
3.2.5—Run Setup
Figure 23. RUN SETUP screen.
Button Button Name Function
Home Back to Home Screen
Connection Bar Status and strength of internet connection
Melt Curve On/Off
• Turn on Melt Curve by tapping the switch button, then
select the temperature resolution
• When BLUE, the Melt Curve is ON; When GRAY, the Melt
curve is OFF
Melt Curve
Advance Setting
Melt Curve Advance Settings: starting temperature, ending
temperature, resolution, and scan function
This manual suits for next models
1
Table of contents
Other Azure Biosystems Laboratory Equipment manuals