B medical systems MB 3000 G User manual

820 9505 61 - ed0821
Instructions for Use
MB 3000 G
ICE-LINED BLOOD STORAGE REFRIGERATOR

2

3
Ice-lined blood storage refrigerators in 220-240V 50/60Hz
are Class IIa medical devices according to the European
Medical Device Regulation (EU) 2017/745 and bear a
CE0123 marking.
This equipment is certified according to the safety standard IEC 60335-1.
This equipment is designed to be safe at least under the following condi-
tions (based on the IEC 60335-1):
Indoor use;•
Altitude up to 2000 m;•
Temperatures 10°C to 43°C;•
Maximum relative humidity 95%.•
Mains supply voltage fluctuations up to ±6% of the nominal voltage;•
Transient overvoltages up to the levels of overvoltage category II;•
Pollution degree 2.•
4

5
TABLE OF CONTENTS page
1 Model Overview ___________________________________________6
2 Important Information ______________________________________7
2.1 Warnings and Cautions ___________________________________________7
2.1.1 Warnings ________________________________________________8
2.1.2 Cautions ________________________________________________9
2.2 Labels and Symbols on the Packaging________________________________10
2.3 Unpacking and Inspection _________________________________________10
2.4 Intended Use ___________________________________________________11
2.4.1. Intended purpose ________________________________________11
2.4.2. Intended target population _________________________________11
2.4.3. Intended use environment _________________________________11
2.4.4. Indications ______________________________________________11
2.4.5. Contraindications _________________________________________12
3 Installation Procedure_______________________________________13
3.1 Location _______________________________________________________13
3.2 Final position ___________________________________________________14
3.3 Initial cleaning and disinfection _____________________________________14
3.4 Connection of remote alarm _______________________________________14
3.5 Electrical Connection _____________________________________________15
3.6 Ice-lining preparation _____________________________________________16
4 Use and Operation _________________________________________17
4.1 Switching on ____________________________________________________17
4.2 Opening and closing______________________________________________17
4.3 Important Advice for Storage_______________________________________18
4.4 Control Panel ____________________________________________________19
4.4.1 Overview ________________________________________________19
4.4.2 Display__________________________________________________19
4.5 Temperature Display______________________________________________19
5 Electronics setup ___________________________________________20
5.1 Button functions _________________________________________________20
5.2 Setting the language _____________________________________________20
5.3 The “SETTINGS”-Menu____________________________________________20
5.4 The “EXTRA” - Menu _____________________________________________21
5.5 Status- and Warning messages _____________________________________23
6 Alarms ___________________________________________________24
6.1 Alarm and error messages _________________________________________24
6.2 Alarm situations _________________________________________________25
6.3 Alarm History ___________________________________________________25
6.4 Alarm test ______________________________________________________25
7 Additional equipment _______________________________________26
7.1 Rechargeable battery _____________________________________________26
7.2 Remote contact__________________________________________________26
7.3 RS485 Interface _________________________________________________26
8 Maintenance and repair _____________________________________27
8.1 Cleaning _______________________________________________________27
8.2 Defrosting ______________________________________________________27
8.3 Periodic Maintenance _____________________________________________28
9 Disposal__________________________________________________29
10 Troubleshooting __________________________________________29
11 Technical Data____________________________________________30

6
1 Model Overview
Group Model name
Ice-lined Blood storage Refrigerators MB3000G

7
2 Important Information
•Before using the MB3000G, read these operating instructions carefully, including all the information on
operating safety, use and maintenance.
•B Medical Systems does not guarantee the safety of the stored products, if the appliance is used for any
purposes other than its intended use or if any procedures other than those mentioned in this operating
manual are used.
•Keep these operating instructions ready at hand and leave them with the unit, so that all users can find
out about the functions and safety regulations.
•Contact our sales representative or agent for any problems related to these operating instructions.
•Any serious incident that has occurred in relation to the device should be reported to the manufacturer
and the competent authority of the Member State in which the user is established.
•These operating instructions may not be reproduced in any form without the written permission of our
company.
•Our company guarantees the product under certain warranty conditions. We shall in no way be respon-
sible for any loss or damage of content.
•The sound intensity level produced by the appliance is lower than 70 dBA (measured at a distance of
1 meter).
•The MB3000G has a bank of frozen ice on all the four sides, inside the cabinet. The ice-lining consists
of icepacks with water freezing during its operation. During periods of power failure, the ice bank acts
as cold storage to protect the goods stored in the MB3000G. The unit keeps the temperature of the
goods below +8°C even if electricity is only available for 8 hours a day.
2.1 Warnings and Cautions
•It is of utmost importance that any user complies with these operating instructions as they contain
important safety advice.
•Items and procedures are described so that this unit can be used correctly and safely. Following the
advised precautions will prevent possible injury to the user and any other person.
•Precautions are illustrated in the following way:
CAUTION
WARNING
A WARNING is a statement that alerts to the possibility of injury,
death or other serious adverse reactions associated with the use
or misuse of the device.
A CAUTION is a statement that alerts to the possibility of a prob-
lem with the device associated with its use or misuse. Such prob-
lems include device malfunction, device failure, damage to the
device or damage to other property.
This mark is placed where electrical components are enclosed to prevent electric shock.
The cover should only be removed by a qualified engineer or a service personnel only.
This mark is placed where flammable components (refrigerants) are enclosed. Special
care has to be taken when working on these components.
This mark warns about low temperatures and freezing conditions inside the appliance.

8
2.1.1 Warnings
•Do not use the device outdoors. Current leakage or electric shock may result if the unit is exposed to
rain water.
•Before cleaning or carrying out maintenance work, always switch the device off and disconnect the
mains plug. Working on the connected appliance may cause electric shock or fire.
•During defrosting, water will leak from the unit. Collect this water so that it does not lead to a risk of
slipping for passing persons.
•Make sure that no water penetrates the ventilation slots of the unit.
•Before cleaning or carrying out maintenance work, the contents preserved in it will have to be removed
and temporarily stored in another working refrigerator.
•Make sure the condensation water is removed on a weekly basis. Increased condensation water inside
the device may lead to malfunctioning of the device.
•Inspect the unit on a regular basis for damaged parts. Only genuine spare parts may be used. Use of
any other parts may affect the performance or cause physical injury or damage to the equipment.
•The wall socket must be easily accessible.
•When disconnecting, always pull the plug and never the cable. Pulling the cord may result in electric
shock or fire by short circuit.
•These devices must only be used by adults. Do not allow children to play with the device or touch the
controls.
•Ensure that the unit is steady and perfectly straight and does not knock against anything next to it. If
the floor is not strong enough or the installation site is not adequate, this may result in injury from the
unit falling or tipping over.
•When transporting or moving the device, be aware of its weight. Do not try to move a fully loaded
device.
•Ensure that the connecting cable is not squeezed or bent when the unit is being installed or moved.
Deterioration of the insulation may cause current leakage or electric shock.
•Never install the device where acid or corrosive gases are present as current leakage or electric shock
may result due to corrosion.
•Before connecting, check whether the details on the nameplate correspond to local values.
Use of a voltage or frequency other than that on the nameplate may cause fire or electric
shock.
•Do not store flammable or explosive substances inside these appliances (e.g. aerosols with flammable
propellant). These may cause explosion or fire.
•Make sure that no sharp or pointed objects come into contact with the cooling system. The cooling sys-
tem contains flammable refrigerant. Both the appliance and the products stored inside can be severely
damaged if this system starts to leak.
•Do not insert metal objects such as a pin or a wire into any vent, gap or any outlet. This may cause
electric shock or injury by accidental contact with moving parts.
•Disconnect the power supply prior to any repair or maintenance in order to prevent electric shock or
injury.
•Do not touch any electrical parts (such as power supply plug) or operate switches with a wet hand. This
may cause electric shock.
•All installation work and adjustments to the refrigerator must be carried out by qualified personnel. Work
performed by persons with insufficient technical knowledge may adversely affect the performance or
cause physical injury or damage to the equipment.
•When the unit is in its final position it is important to immobilise the unit using the feet.
•It is of utmost importance that the icelining elements are adequately prepared. Make sure that all these
elements are in place before starting the unit.
•Make sure that the lid is securely closed by closing the latches.
•Note that the unit may be locked using a key. Always ensure that the key is available to the user.
•Before scrapping an old unit, remove the door so that children cannot lock themselves inside while play-
ing.
•Before scrapping the unit, remove the lead accumulator and dispose of it separately.
•When disposing of the unit, make sure that it does not get too hot, as combustible gas would cause the
insulating foam to froth up.
•The appliances contain environmentally friendly refrigerant. Before disposing of the appliance, the refrig-
eration circuit should be opened outside so that the refrigerant can escape.
Attention: The refrigerant is flammable!
•Make your contribution to saving the environment. Bear in mind that orderly and proper disposal is
required. Packaging materials and devices are always recyclable and should be taken for recycling.

9
•Only connect to a grounded socket. If the power supply outlet is not grounded, it will be necessary to
have a ground installed by qualified personnel.
•It is of utmost importance to set up a password during the first start up procedure. Make sure that the
password is available to the person responsible.
2.1.2 Cautions
•Ensure that there is sufficient room around the unit for air circulation. A good air circulation especially
around the compressor is essential for trouble-free operation. Keep the ventilation openings of the com-
pressor cover always free from any obstruction. Make sure that a minimum distance is provided between
the unit and any wall or other device located next to it.
•Do not locate the unit below a ceiling fan or right next to air-conditioning equipment.
•The sound intensity level produced by the appliance is lower than 70 dBA (measured at a distance of
1 meter).
•Check whether the appliance has been delivered undamaged. If you find that damage has occurred in
transit, immediately contact the delivery service or relevant sales outlet, submitting the delivery note or
proof of purchase.
•Do not operate a unit that has been damaged in transit! If you are unsure, contact your sales outlet and
ask them.
•The device must be transported in an upright position only (maximum inclination 45°).
•All connected devices/signalling equipment must provide reinforced or double insulation for protection
against electric shock.
•Upon the occurrence of an alarm situation, attempts must be made to discover the reason for the alarm
and resolve it as quickly as possible. If that is not successful the necessary measures must immediate-
ly be taken so that the stored goods are not damaged.
•Optimal function of the appliance is given at an ambient temperature indicated in the technical data (see
chapter 11) with a maximum relative humidity of 95%.
•The device must be set up in a dry well-ventilated place. Avoid direct sunlight or locating it close to a
heat source. The location must be protected against rain and dust.
•This device cannot be used/is not for use in facilities at altitudes of 2000m or higher.
•The use of hydrogen peroxide H2O2 (VHP) for the disinfection (sterilization) of the appliances is not suit-
able. This procedure may be applied exclusively with dedicated appliances.
•Other than the cleaing procedure described in this manual, follow the internal policy and procedures.
•Before using the refrigerator it should be cleaned inside and outside.
•For cleaning, use only gentle cleaning agents. Never use aggressive or caustic cleaning agents, scour-
ing powder, steel wool, abrasive sponges or chemical solvents. When cleaning, make sure that no flu-
ids of any kind run into the ventilation housing.
•For disinfecting, we recommend all the surface disinfecting agents commonly used by the customer, pro-
vided they are recommended by the national organizations. For disinfecting small areas, we recommend
using a concentrated alcoholic agent.
•Before being loaded, the unit must have reached the set point temperature.
•The load should only be stored in the provided baskets and should not exceed the storage areas. The
total amount of stored blood bags should be evenly distributed on the 5 baskets (max. 18 blood bags
per basket) (image 6). Do not overload the device.
•Different blood or plasma types should be sorted and stored in a manner for the User to identify these
with easy.
•The loading must never obstruct the air-inlet-openings.
•Do not store warm items in the devices. They are not designed for fast cooling of warm items.
•Avoid long and / or frequent lid openings to prevent that the inner temperature rises to high.
•Make sure that the lid is correctly closed by using the supplied latches and that the lid gasket seals cor-
rectly against the cabinet.
10
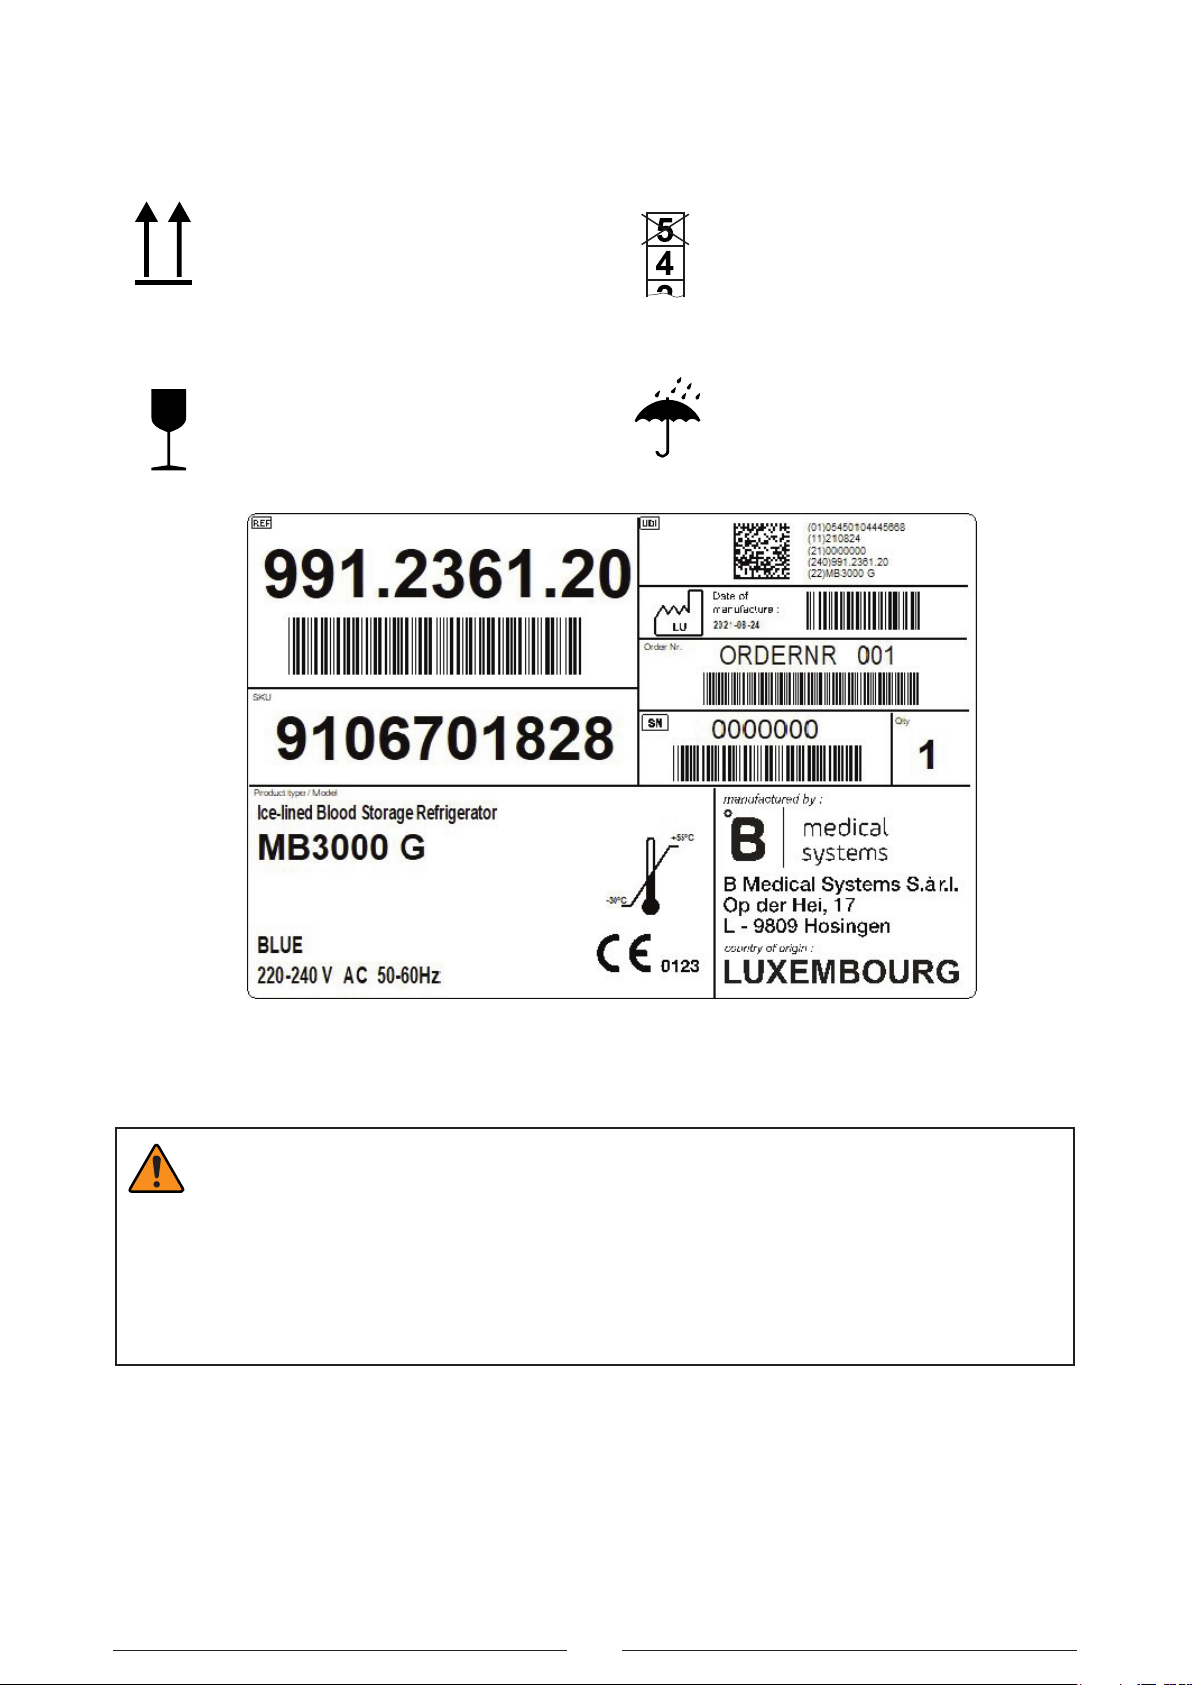
2.2 Labels and Symbols on the Packaging
•Follow the instructions for transport and storage of the product marked on the packaging:
2.3 Unpacking and Inspection
CAUTION
•Check whether the unit has been delivered undamaged. If you find that damage has occurred in tran-
sit, immediately contact the delivery service or relevant sales outlet, submitting the delivery note or
proof of purchase.
•Do not operate a unit that has been damaged in transit! If you are unsure, contact your sales outlet and
ask them.
•The unit must be transported in an upright position only (maximum allowable inclination 45°).
•Make your contribution to saving the environment. Bear in mind that orderly and proper disposal of
packing materials is required. Packaging materials and devices are always recyclable and should be
taken for recycling.
Handle with care Store in a dry place
This side up Stacking limitation

11
2.4 Intended Use
2.4.1. Intended purpose
Ice-lined blood storage refrigerators are devices intended to be used in the blood transfusion medicine
for the support on the diagnosis, prevention and treatment of diseases or injuries by keeping whole
blood or blood components at a protective and stable temperature between 2°C to 6°C until they are
ready for use. The devices comprise an icelined compression cooling system and an integrated alarm
system that warns against unexpected temperature excursions and power failures.
2.4.2. Intended target population
Pharmacists, doctors, laboratory staff or other staff that are trained and/or experienced in dealing with
whole blood and blood components.
The Ice-lined blood storage refrigerators must be operated by individuals in organizations that have the
knowledge of the relevant FDA, AABB, EU or any other applicable regulations on storage and distribu-
tion of blood and blood components. The organization must implement and validate procedures for the
storage and distribution of blood and blood components according to these regulations, including the
necessary storage temperature and the suitable storage period.
Service technicians with a recognized license or certificate as required by local authorities for installa-
tion, servicing and repair of refrigeration systems and equipment, and properly trained on the ice-lined
blood storage refrigerators.
Patients do not come into direct contact with the refrigerators.
2.4.3. Intended use environment
The Ice-lined blood storage refrigerators are stationary type devices and are intended to operate indoors
in hospitals, blood donation services, blood transfusion centers and clinical laboratories.
The devices are designed for an ambient temperature range from +10°C to +43°C under operation, and
from -30°C to +55°C during transport and storage. The ambient humidity range during transport, stor-
age and operation lies between 5% and 95%.
The devices must not be used outdoors.
2.4.4. Indications
The Ice-lined blood bank refrigerators are intended for the safe storage of whole blood and blood com-
ponents used in the clinical medicine for diagnosis, prevention and treatment of diseases or injuries.
Whole blood, red cells, and other blood components intended to be used for transfusion, like leucocyte-
depleted whole blood and red cells, must be kept at a controlled temperature between 2°C and 6°C dur-
ing storage and can be stored for a period of time of up to 35 days, depending on the
anticoagulant/preservative solution used.
Long storage of whole blood and blood components above 6°C increases the risk of bacterial contami-
nation (septicemia), which may progress to septic shock. Septic shock has a death rate as high as 50%,
depending on the type of organism involved, and therefore requires urgent medical intervention.
The storage of blood and blood components below 2°C increases the risk of rupture of the red cells
(haemolysis).
During a maximum transit time of 24 hours, the temperature of whole blood or other blood components
must at no time exceed +10°C. Temperature excursions above +10°C increases the risk of sepsis due
to bacterial contamination.
Blood components intended for intrauterine and exchanged transfusion (e.g. IUT, ET, PR/ET) must be
stored between 2°C and 6°C for no longer than five days prior to use. After concentration and irradia-
tion, the storage time must be no longer than 24 hours.

12
2.4.5. Contraindications
The devices are not intended to be used for quick cooling of blood or blood components.
The devices are not intended to be used for the cooling of foodstuffs or any other products not covered
in the intended purpose.
The devices are not intended to be operated outside the environmental and installation conditions doc-
umented in the operating instructions.
13
3 Installation Procedure
WARNING
•All installation work and adjustments to the refrigerator must be carried out by qualified personnel. Work
performed by persons with insufficient technical knowledge may adversely affect the performance or
cause physical injury or damage to the equipment.
•Ensure that the connecting cable is not squeezed or bent when the unit is being installed or moved.
Deterioration of the insulation may cause current leakage or electric shock.
•When transporting or moving the device, be aware of its weight. Do not try to move a fully loaded
device.
3.1 Location
•The following section provides information on how to install and place the device in your location. Please
note that all indicated distances are minimum distances.
WARNING
•Do not use the device outdoors. Current leakage or electric shock may result if the unit is exposed to
rain water.
•Ensure that the unit is steady and perfectly straight and does not knock against anything next to it. If
the floor is not strong enough or the installation site is not adequate, this may result in injury from the
unit falling or tipping over.
•Never install the unit where acid or corrosive gases are present as current leakage or electric shock may
result due to corrosion.
•The wall socket must be easily accessible.
•When the unit is in its final position it is important to immobilise the unit using the feet.
CAUTION
•Optimal function of the appliance is given at an ambient temperature indicated in the technical data (see
chapter 11) with a maximum relative humidity of 95%.
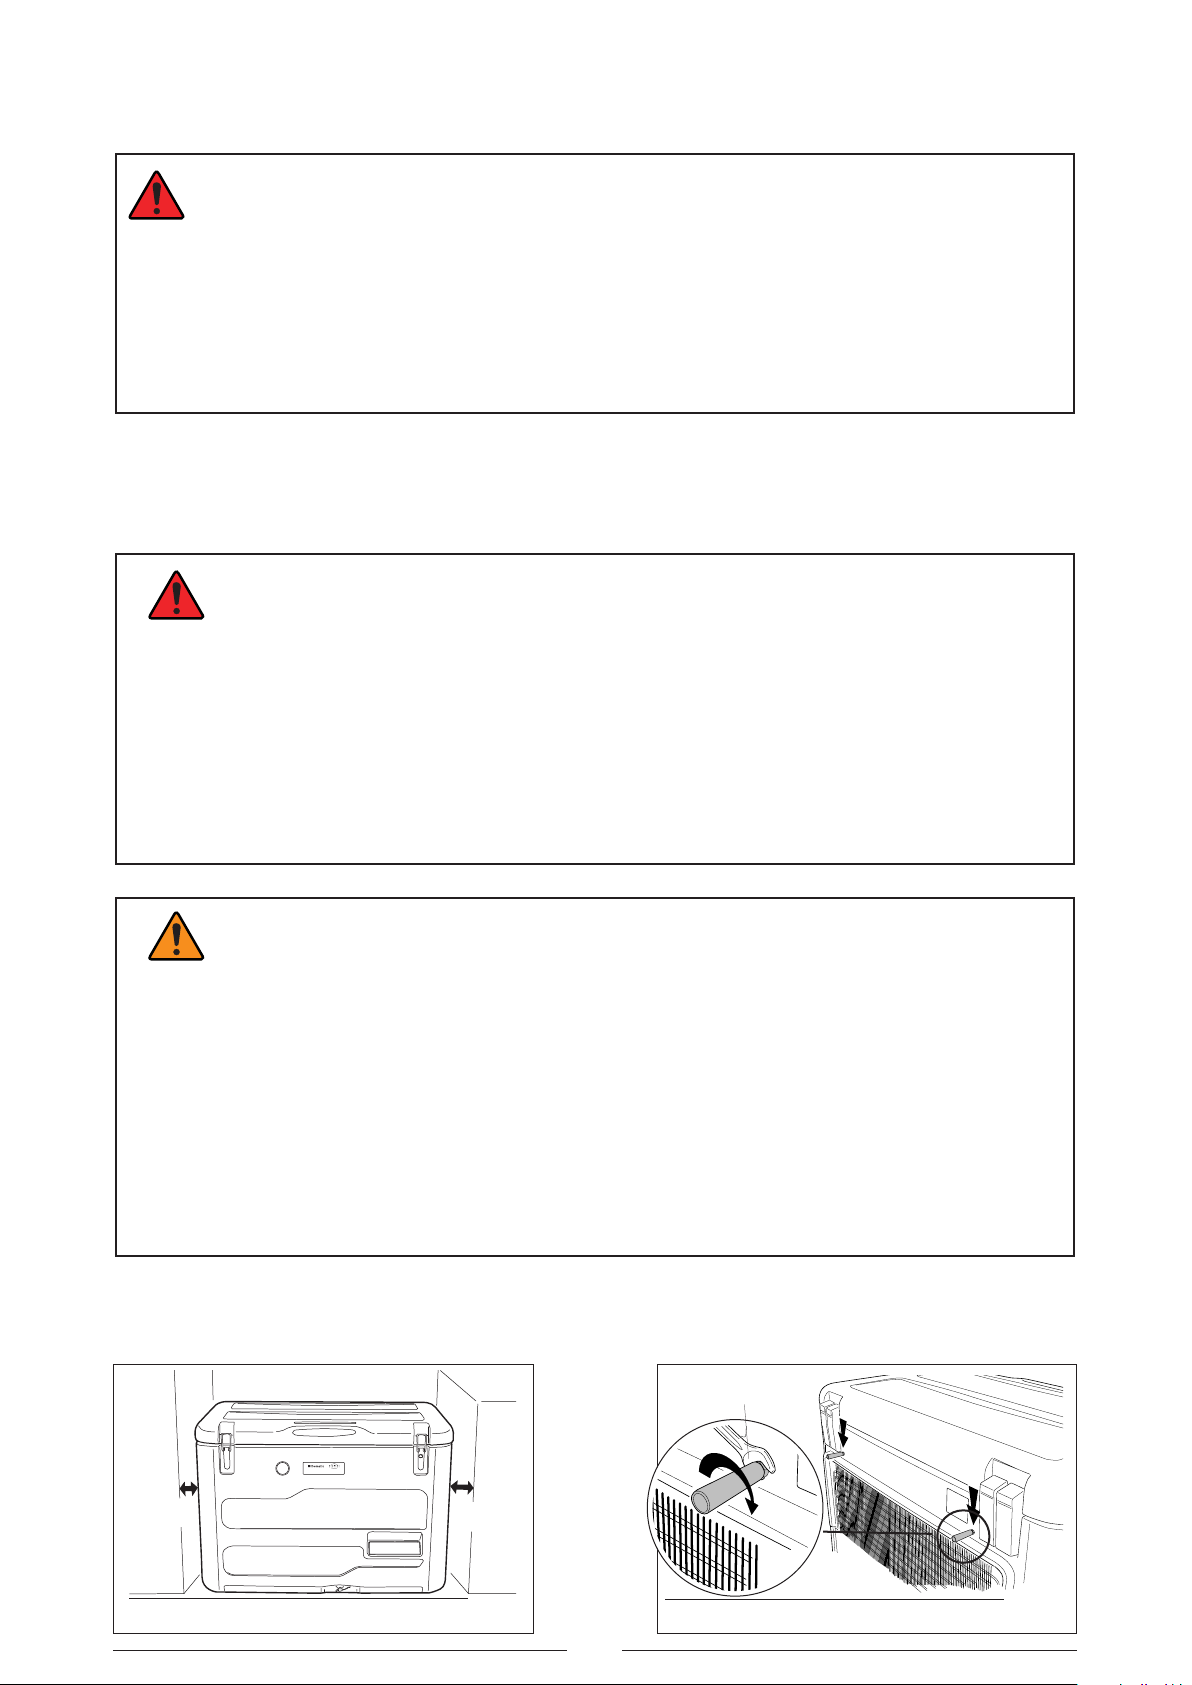
•Ensure that there is sufficient room around the unit for air circulation. Refer to images 1 and 2 for min-
imum distances to a wall or adjacent units. A good air circulation especially around the compressor is
essential for trouble-free operation. Keep the ventilation openings of the compressor cover always free
from any obstructions. Make sure that a minimum distance is provided between the unit and any wall
or other device located next to it.
•The device must be set up in a dry well-ventilated place. Avoid direct sunlight or locating it close to a
heat source. The area must be protected against rain and dust.
•Do not locate the unit below a ceiling fan or right next to air-conditioning equipment.
•This device cannot be used/is not for use in facilities at altitudes of 2000m or higher.
• Two spacers are included with the MB3000G. These must be attached to the rear of the unit as shown in
the figure, before positioning the unit against the wall.
min.
10 cm
min.
3 cm
MB 3000 G
spacer
image 1: minimum distance to wall or other devices image 2: spacer installation
14
3.2 Final position
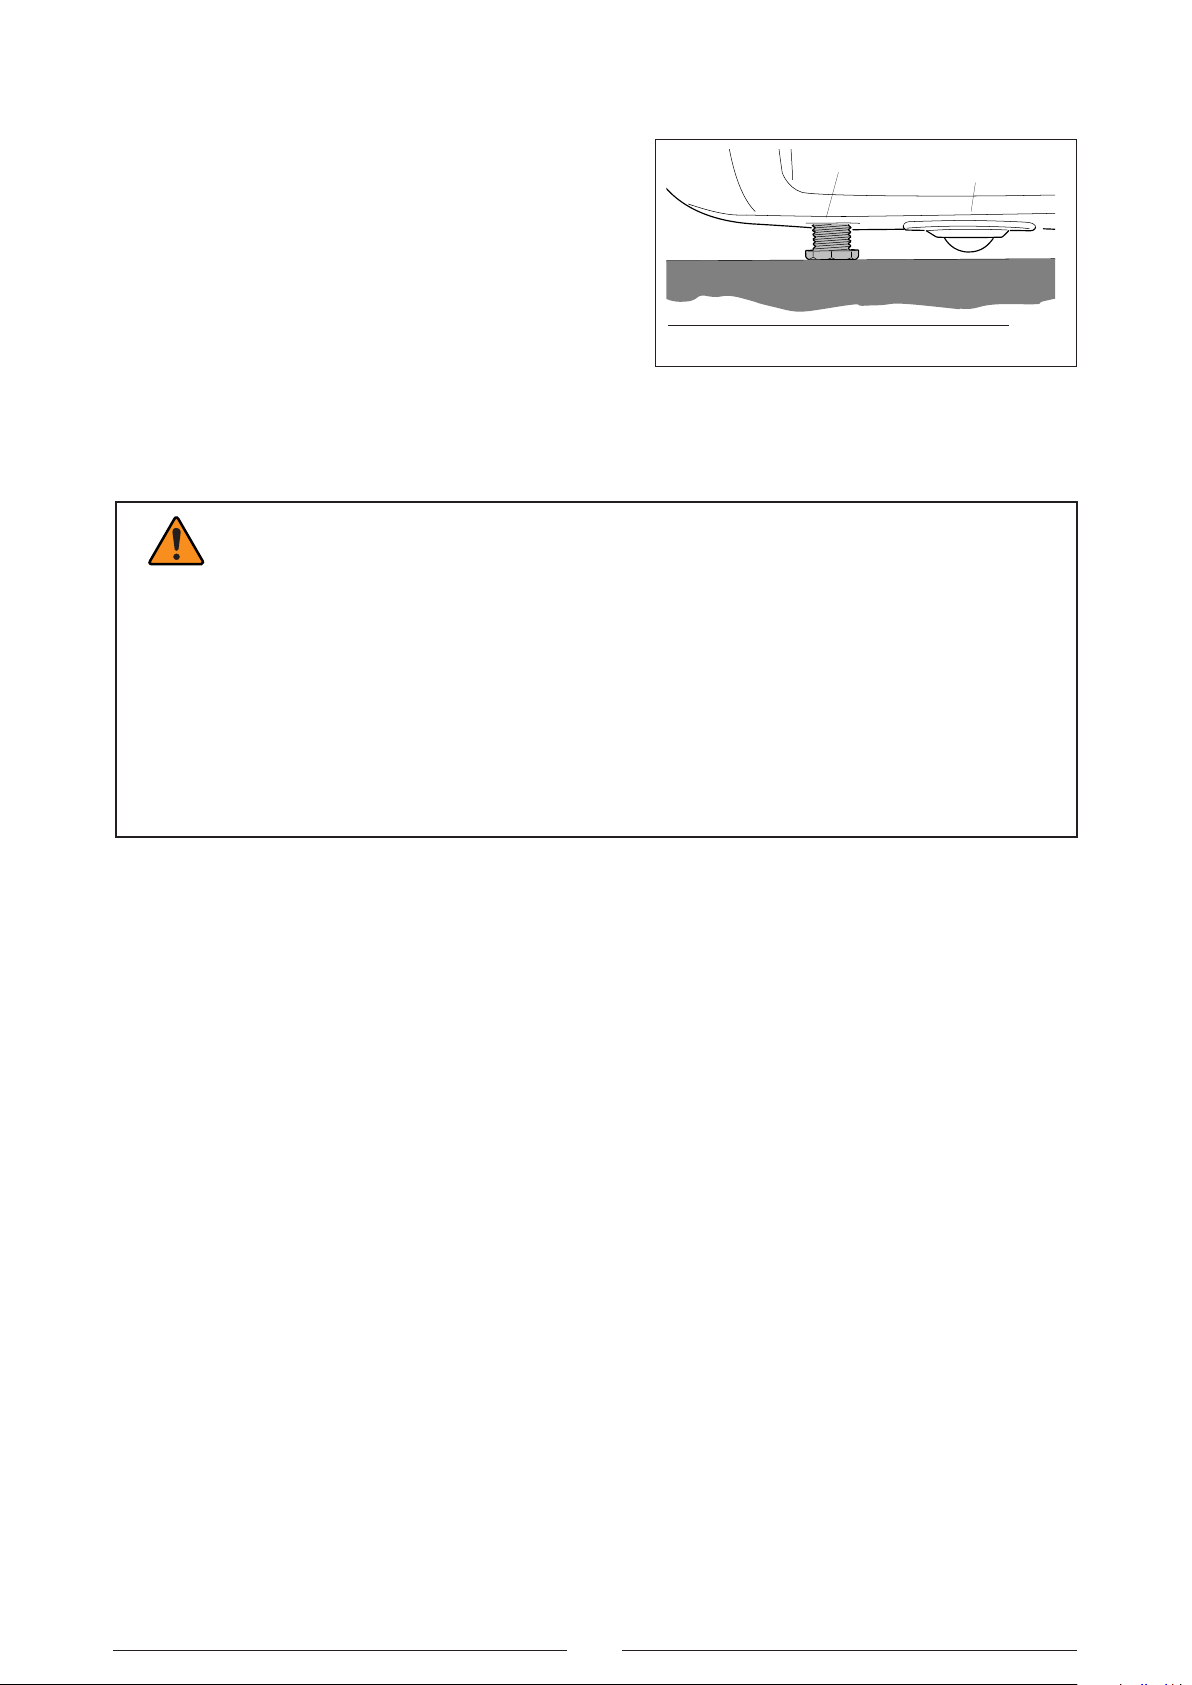
• The MB3000G is equipped with 4 bearing rolls.
Once it is in its final position, the feet must be
unscrewed to immobilise it and stop it rolling away
(image 3). Screw the feet with the provided key
until the rolls do not touch the floor anymore.
3.3 Initial cleaning and disinfection
CAUTION
•The use of hydrogen peroxide H2O2 (VHP) for the disinfection (sterilization) of the appliances is not suit-
able. This procedure may be applied exclusively with dedicated appliances.
•Other than the cleaing procedure described in this manual, follow the internal policy and procedures.
•Before using the refrigerator it should be cleaned inside and outside.
•For cleaning, use only gentle cleaning agents. Never use aggressive or caustic cleaning agents, scour-
ing powder, steel wool, abrasive sponges or chemical solvents. When cleaning, make sure that no fluids
of any kind run into the ventilation housing.
•For disinfecting, we recommend all the surface disinfecting agents commonly used by the customer, pro-
vided they are recommended by the national organizations. For disinfecting small areas, we recommend
using a concentrated alcoholic agent.
•Refer to section 8 for more information on cleaning.
3.4 Connection of remote alarm
•Connect the remote alarm located on the back of the unit to your surveillance system by respecting the
connecting diagram in section 7.2.
foot bearing roll
image 3: handling of the feet
15
3.5 Electrical Connection
WARNING
•Only connect to a grounded socket. If the power supply outlet is not grounded, it will be necessary to
have a ground installed by qualified personnel.
•Before connecting, check whether the details on the nameplate in the interior correspond to local val-
ues. Use of any other voltage or frequency other than that on the nameplate may cause fire or electric
shock.
•Disconnect the unit from power supply prior to any repair or maintenance in order to prevent electric
shock or injury.
•Do not touch any electrical parts (such as power supply plug) or operate switches with a wet hand. This
may cause electric shock.
•When disconnecting, always pull the plug and never the cable. Pulling the cord may result in electric
shock or fire by short circuit.
CAUTION
•Before connecting and switching the unit on for the first time, allow it to stand for 30 minutes.
•To prevent problems with other electrical equipment causing malfunction, the unit should be connected
to a separate circuit. Never connect it to a single socket with other electrical equipment by means of a
multi-socket.
•Make sure that the plug is easily accessible so that if needed it can be easily be disconnected without
having to move other equipment or furniture.
•All connected devices/signaling equipment must provide reinforced or double insulation for protection
against electric shock
•The normal operating voltage is 230 volts, 50Hz or 60Hz, A.C.

16
3.6 Ice-lining preparation
• Open the lid and remove the cabinet frame.
• Remove the icepack holders from the icepack-
compartment.
• Fill the provided 36 icepacks with cold clean water.
• Insert the icepacks into the icepack holder (6
icepacks per holder).
• Carefully introduce the filled icepack holders - the
icepacks turned to the outside of the cabinet - into
the lining compartment between the inner- and
outer cabinet. Watch out to introduce the holders
in the correct way and not to damage the evapo-
rator tubes!
• To ensure the best transport of the cold from the
evaporator into the icepacks, the icepack holders
must be pressed firmly against the evaporator
tubes and fixed with the provided latches.
• After all 6 icepack holders are inserted, replace
the cabinet frame and put the baskets in place.
cabinet
frame
icepack
holder
max.
icepacks
fixing
latch
evaporator
tube
ã
ã
ã
ã
ã
ã

17
4 Use and Operation
WARNING
•The devices must only be used by adults. Do not allow children to play with it or touch the controls.
•Do not store flammable or explosive substances inside these appliances (e.g. aerosols with flammable
propellant). These may cause explosion or fire.
•Make sure that no sharp or pointed objects come into contact with the cooling system. The
cooling system contains flammable refrigerant. Both the appliance and the products stored
inside can be severely damaged if the system starts to leak.
•Do not insert metal objects such as a pin or a wire into any vent, gap or any outlet. This may
cause electric shock or injury by accidental contact with moving parts.
•It is of utmost importance that the icelining elements are adequately prepared. Make sure that all these
elements are in place before starting the unit.
•Make sure that the lid is securely closed by using the latches (refer to 4.2).
•Note that the unit may be locked using a key. Always ensure that the key is available to the user.
•It is of utmost importance to set up a password during the first start up procedure. Make sure that the
password is available to the person responsible.
CAUTION
•The sound intensity level of the unit is lower than 70dBA (measured at a distance of 1 meter)
4.1 Switching on
•To switch the unit on, turn the key switch in horizontal position. The green power LED lights up.
•After the self-test, the temperature inside the refrigerator is displayed.
•The compressor will only switch on a certain time after the self-test.
• Make sure that during operation the drainage plug is closed properly.
4.2 Opening and closing
• The unit comes with two latches, one of which contains a key lock system.
• To open the unit, pull the clip up and remove the latch from the groove in the lid.
• To close the unit, pull the clip up, hook the latch in the groove of the lid and pull the clip down.
• Once the unit has been securely closed, the user may lock the unit using a common key lock system.
image 4: latch and lock mechanism
Open latch Closed latch and
key lock
18
4.3 Important Advice for Storage
CAUTION
•Before being loaded, the unit must have reached the set point temperature.
•The load should only be stored in the provided baskets and should not exceed the storage areas. The
total amount of stored blood bags should be evenly distributed on the 5 baskets (max. 20 blood bags
per basket) (image 6). Do not overload the unit.
•Different blood or plasma types should be sorted and stored in a manner for the User to identify these
with easy.
•The loading must never obstruct the air-inlet-openings.
•Do not store warm items in the devices. They are not designed for fast cooling of warm items.
•Avoid long and / or frequent lid openings to prevent that the inner temperature rises to high.
•Make sure that the lid is correctly closed by using the supplied latches and that the lid gasket seals cor-
rectly against the cabinet.
• The MB3000G is designed as storage unit for blood bags. It is not designed for cool down. The bags
should therefore be precooled at less than +6°C before storing them in the MB30000G.
• The maximum storage capacity of the MB3000G is 45 L of blood (100 blood bags of 500ml filled with
450ml each).
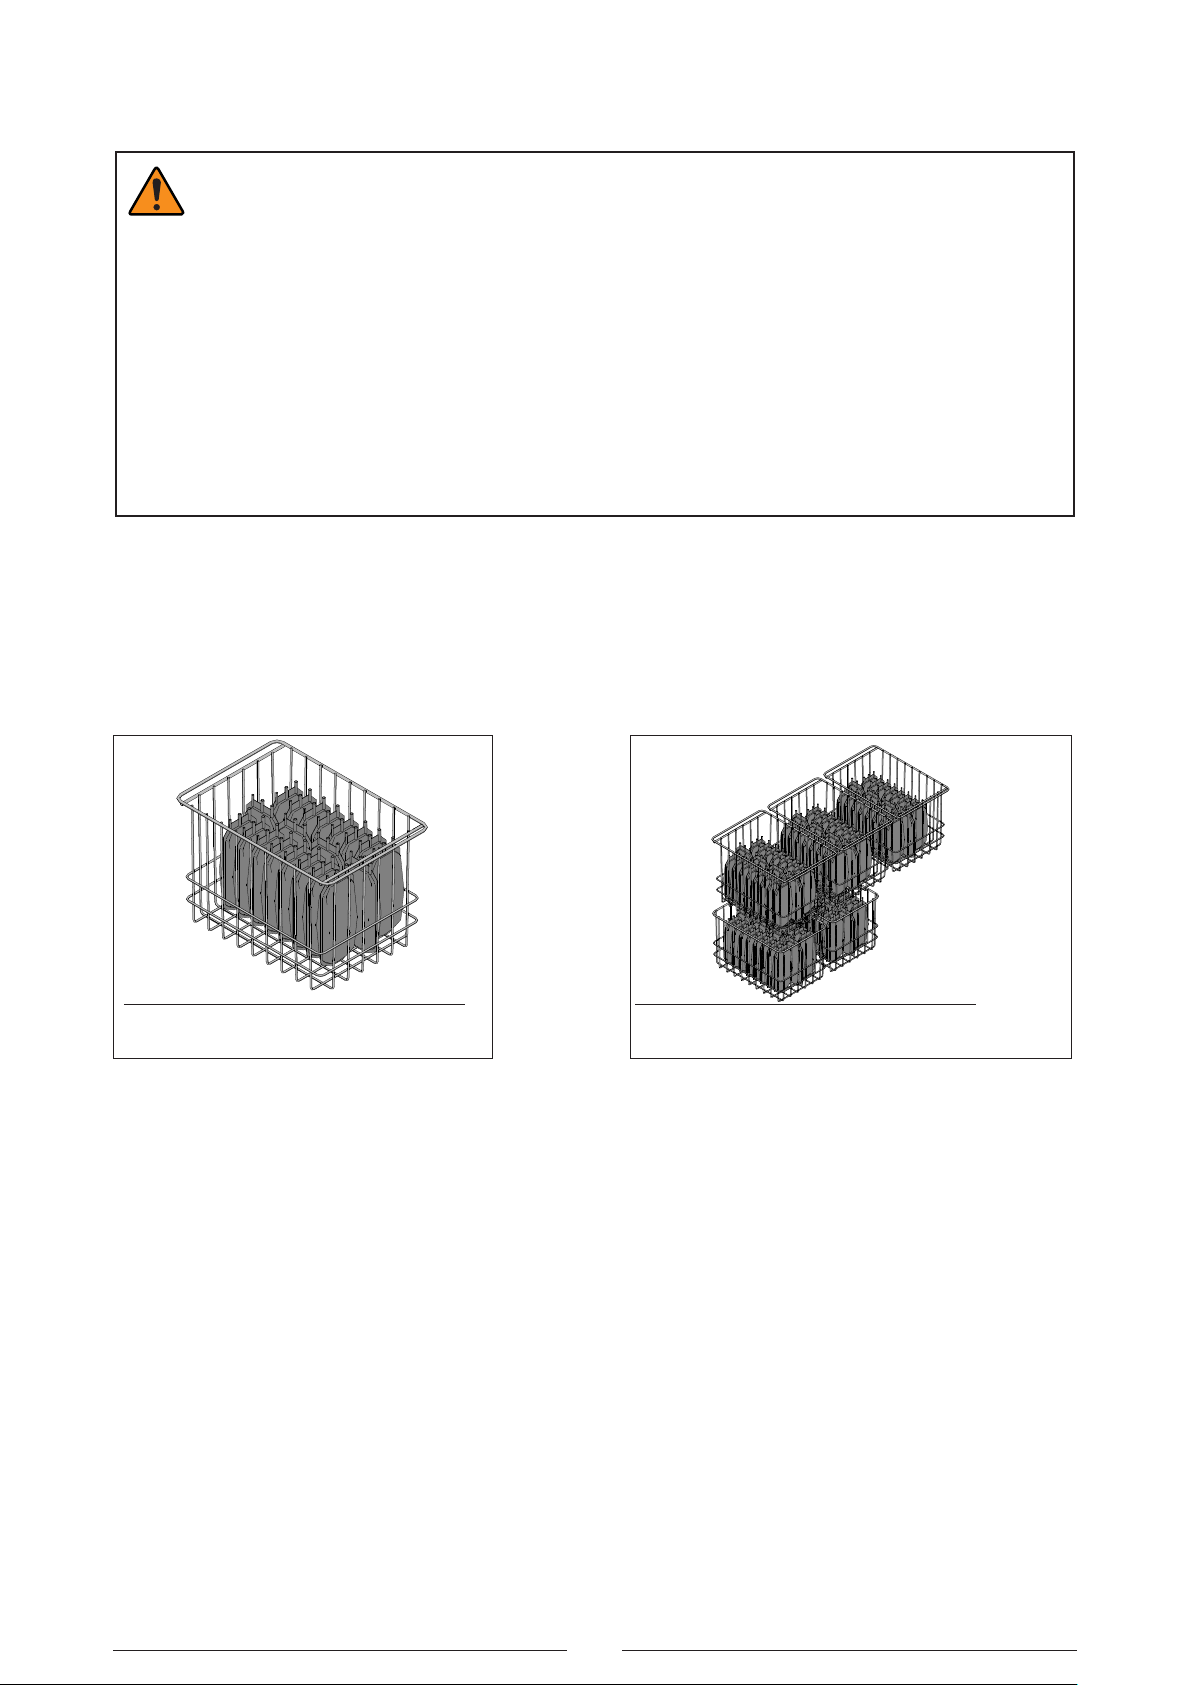
• Store the blood bags in upright position (image 5).
image 5: upright position of blood bags image 6: max. storage capacity
19
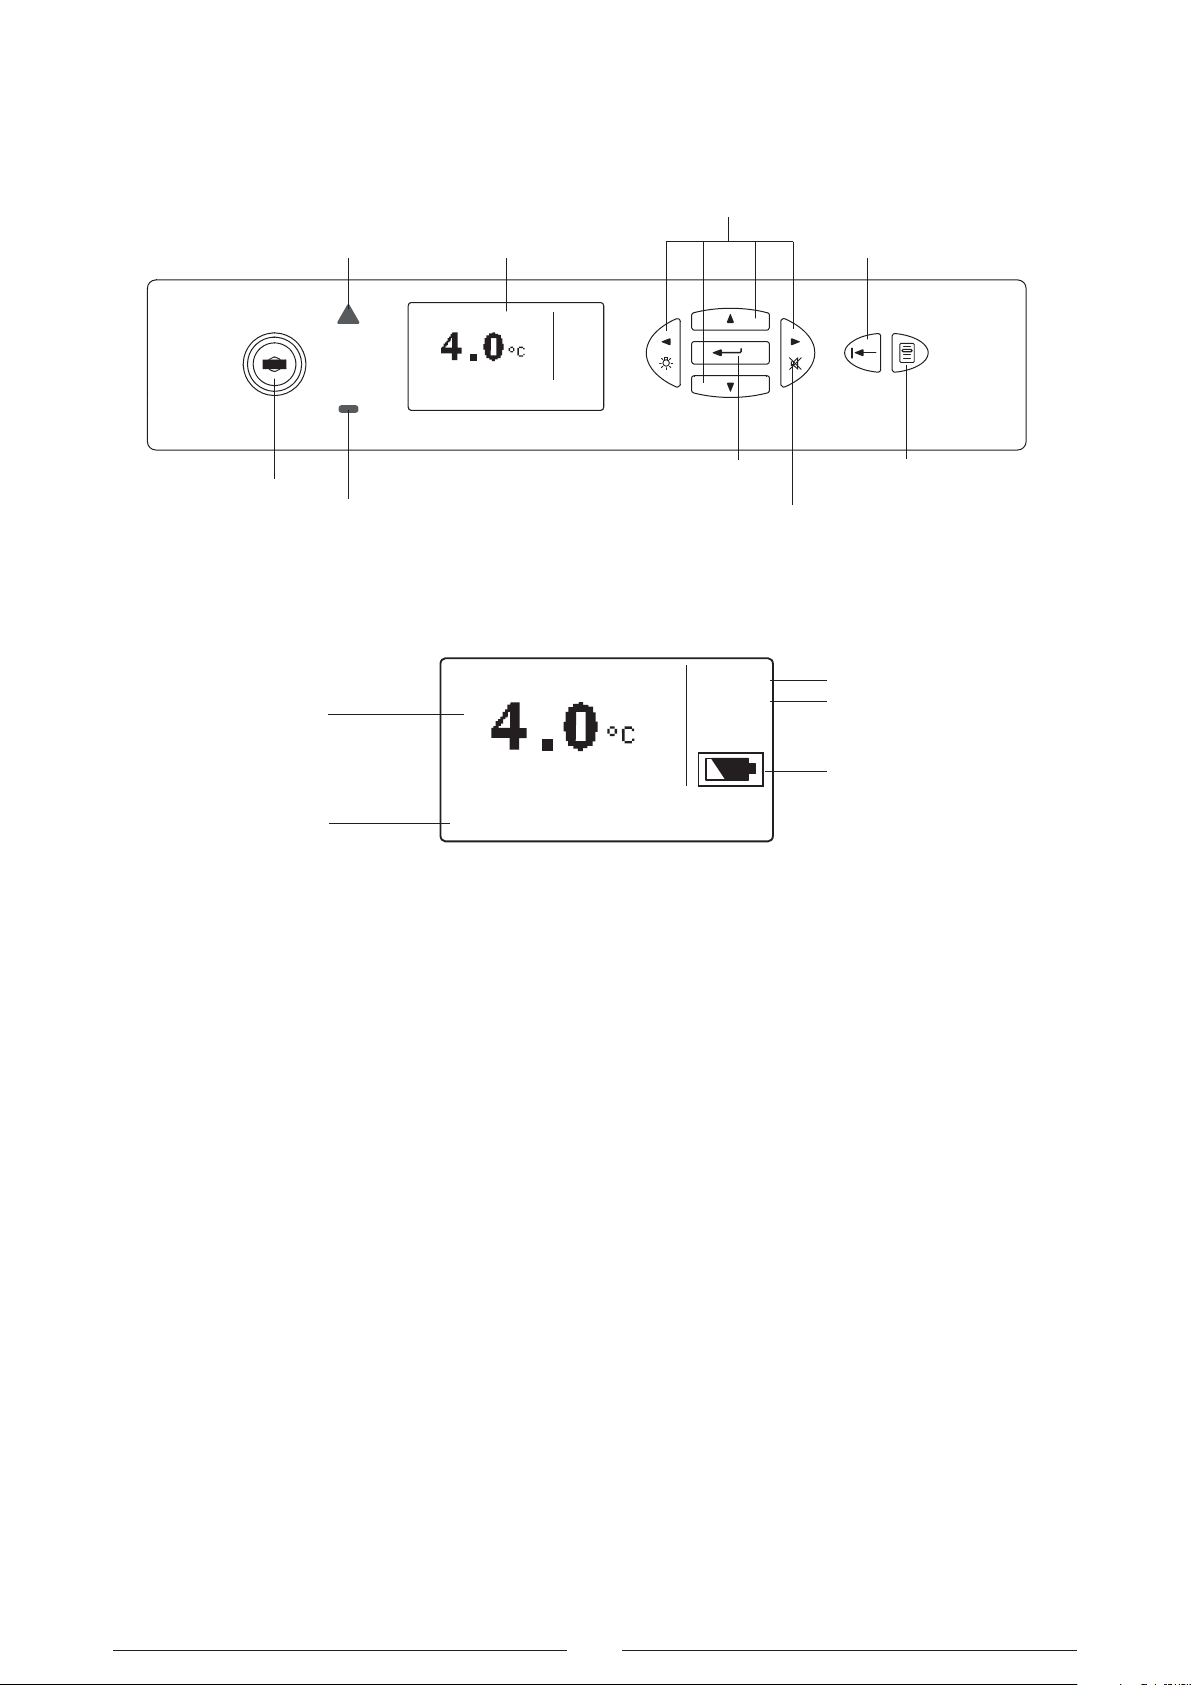
4.4 Control Panel
4.4.1 Overview
4.4.2 Display
•During normal operation and without a user logged in, the display shows the status of the unit on the
main screen.
•The main screen shall show the display temperature in large digits that dominate the screen. The tem-
perature is displayed in Celsius but can be changed to Fahrenheit via the settings menu.
•Additionally, the regulation, evaporator or heat-exchanger temperature can be displayed in the upper
left corner of the display. Displaying this temperature can be disabled through the settings.
•The temperature values are displayed with a resolution of 0.1°. Refer to chapter 6.4 for more informa-
tion.
4.5 Temperature Display
•During normal operation the display shows the internal temperature of the refrigerator. The temperature
unit is dependent on the setting “TEMP.UNIT” in the SETTINGS menu. (°C - Celsius or °F -Fahrenheit).
•The display is carried out in steps of 0.1° or 1° - depending on the setting “RESOLUTION” in the SET-
TINGS menu.
10:32
220V
red LED
(Alarm) Display BACK-button
MENU-button
LEFT, RIGHT, UP, DOWN
buttons
ENTER-button
Mute-button
green LED
(Power)
Key switch
DOOR OPEN
BATTERY FAIL
10:32
220V
temperature
status-, warning- and
alarm-messages
input voltage
current time
battery

20
5 Electronics setup
5.1 Button functions
•Pressing the MENU-button 3 gives you access to the menu area. Choose the respective menu using
the UP- and DOWN-keys. The selection is confirmed with the ENTER-button.
•Press the BACK-key ) to return to the previous screen or menu.
•Navigation within the menus and changing of the settings are done using the UP- p, DOWN- q, LEFT-
t und RIGHT ukeys.
•Use the ENTER-key 8to confirm the actual selection. This applies both for menu selection and for para-
meter value. The change of a parameter only becomes effective when confirmed with the ENTER-key.
•In the case of an alarm, the acoustic alarm can be switched off for a specified time with the “mute but-
ton”. In Menu-mode the “mute button” is out of function.
5.2 Setting the language
•The factory language setting of the electronics is ENGLISH. To convert to another language, proceed as
follows :
3press the MENU-key.
qselect EXTRA 8
qLANGUAGE 8
q
select your language
8
5.3 The “SETTINGS”-Menu
•The parameters contained in the “SETTINGS” menu partially intervene in the function of the appliance.
Access to the SETTINGS menu can therefore be protected by a password. It is recommended to use this
protection to limit access to the parameters.
3press the MENU-key
wselect “SETTINGS” 8
wUSER PASSWORD :
0XXX 8In the factory setting this password is set to the
value “0000” so that by pressing the 8- button you
get directly into the SETTINGS menu.
qSET POINT 8
wSET : X.X °C The temperature set point is the set temperature of
the refrigerator. The set point cannot be changed.
qDATE/TIME 8
wSET DATE/TIME 8
w
HH:MM
dd MMM yy 8Setting current time and date.
tSELECT 12h/24H 8
w12h DISPLAY pq 24h DISPLAY 8Changing between 12-hour and 24-hour display
qALARM TEST 8
wALARM TEST ACTIVATION 8
wALARM TEST 8This function is used for simulation a temperature
alarm situation. Pressing the ENTER-button will
launch the following alarm test cycle:
1. Phased increase of the internal temperature until
Table of contents
Other B medical systems Medical Equipment manuals


Popular Medical Equipment manuals by other brands


Getinge
Getinge Arjohuntleigh Nimbus 3 Professional Instructions for use

Mettler Electronics
Mettler Electronics Sonicator 730 Maintenance manual

Pressalit Care
Pressalit Care R1100 Mounting instruction

Denas MS
Denas MS DENAS-T operating manual

bort medical
bort medical ActiveColor quick guide

AccuVein
AccuVein AV400 user manual


