Baby Love BL7A/2010 User manual

Check that this child restraint will t in your car.
Product features and decoration may vary from images & illustrations.
Series No.: BL7A/2010
Convertible Child Restraint
Rearward Facing
For use with children
up to approximately 6 months.
Forward Facing
For use with children from approximately
6 months to approximately 4 years of age.
INSTRUCTION BOOK
IMPORTANT:
KEEP THIS BOOKLET IN THE PLACE PROVIDED ON THE CHILD RESTRAINT

INTRODUCTION
2
INDEX
3
INTRODUCTION
WARNINGS
SHOULDER HEIGHT MARKERS & A GROWING CHILD
SHOULDER HEIGHT MARKERS & THE NEXT STEP
REARWARD FACING - BABY USE
FEATURES: REARWARD FACING
SUITABLE FOR USE: REARWARD-FACING
HOW TO SET-UP
HOW TO INSTALL
HOW TO USE
FORWARD FACING- TODDLER USE
FEATURES: FORWARD FACING
SUITABLE FOR USE: FORWARD-FACING
HOW TO SET-UP
HOW TO INSTALL
HOW TO USE
GENERAL INSTRUCTIONS
CARE AND MAINTENANCE
ACCESSORIES & FEATURES
TRAVELLING TIPS
PRE INSTALLATION ANCHOR FITTING
IN CASE OF CRASH
PAGE
To be used only in a rearward-facing position for an infant until their shoulders reach the lower shoulder
height marker (approximately 6 months of age). Then to be used in a forward-facing position until their
shoulders reach the upper shoulder height marker (approximately 4 years of age).
Continue to use this child restraint until the child reaches this limit.
Do not use forward facing until child's shoulders are above the lower shoulder height marker.
Infants are at risk of serious injury if they face forward too early.
Children are at risk of serious injury if they move to booster seats too early.
Children that have outgrown this restraint are safest in a booster seat until their shoulders reach the upper
shoulder height marker of the booster seat.
CAREFULLY READ ALL THE INSTRUCTIONS FOR INSTALLATION. IN THE EVENT OF DOUBT ABOUT THE
METHOD OF INSTALLATION, CONSULT BABYLOVE OR AGENT OR A CHILD RESTRAINT FITTING STATION
AUTHORISED BY A RELEVANT TRANSPORT AUTHORITY OR, IN NEW ZEALAND, THE AGENT FOR THE
VEHICLE.
No child restraint can guarantee absolute protection from injury in every crash. However, to ensure
that your child gets all the protection designed into the restraint PLEASE READ AND FOLLOW THESE
INSTRUCTIONS EXACTLY and use only Babylove recommended parts and accessories.
THIS RESTRAINT MUST BE ATTACHED TO A CHILD RESTRAINT ANCHORAGE POINT IN THE CAR. REFER
TO CAR OWNER’S HANDBOOK FOR LOCATION OF ANCHORAGE POINTS. REFER TO A CHILD RESTRAINT
FITTING STATION IF NO ANCHORAGE POINTS ARE IN THE MOTOR CAR.
THIS RESTRAINT IS NOT SUITABLE FOR USE WHERE THE ANCHORAGE STRAP MAY FALL INTO A SPLIT
IN THE SEAT BACK (E.G. HATCHBACK OR WAGON).
Always store the instruction book in the pocket provided at the back of the cover.
4
6
7
9
11
16
12
22
26
28
29
33
38
41
47
44
48
52
3

45
• Use the restraint exactly as shown in the instructions.
• Fit the restraint rmly to the car seat.
• Fit the harness rmly to the child.
• A loose restraint or harness is dangerous.
• Supervision of children is needed because they may be able to undo buckles and adjusters.
• DO NOT LEAVE CHILDREN UNATTENDED IN THE CAR.
• Do not alter or modify this restraint.
• Repairs must only be done by the manufacturer or agent.
• Do not allow the restraint to come into contact with polishes, oils, bleach and other chemicals.
• Destroy the restraint if it has been in a severe crash, even if no damage is visible.
• Do not use this restraint without a cover.
• Regularly check the restraint components, straps & other tments for correct function and condition.
Seek prompt repair.
• To ensure baby’s back is evenly supported do not put more than one nappy on the baby and make
sure the nappy is not thickly folded at the back.
• DO NOT USE A REAR-FACING CHILD RESTRAINT WHERE AN AIRBAG IS FITTED IN THE FRONT OF
THE SEATING POSITION.
• If an airbag is tted in the desired seating position where the child restraint is to be tted, follow the
vehicle manufacturer's warnings and instructions.
• THIS RESTRAINT IS NOT SUITABLE FOR USE WHERE THE ANCHORAGE STRAP MAY FALL INTO A
SPLIT IN THE SEAT BACK (E.G. HATCHBACK OR WAGON).
• The restraint should not be purchased or sold as a second hand item. It is recommended not to use
child restraints older that 10 years as the protection in an accident may be reduced.
• The restraint is not intended to be a substitute baby cot or bed. It is only designed to enable safe
transportation of children in motor vehicles. Do not leave a baby in the restraint for long periods of
time.
• Upper anchorage straps and extension straps may be damaged by unsecured cargo in a collision.
Secure or remove hazardous cargo before using this strap. Hatchback or wagon: Do not use the
child restraint where the upper anchorage strap may fall into a split in the seat back.
• Protect all webbing from abrasion and cutting by sharp corners and edges.
• Do not store in areas that may get hot, like in car boots, roof space, beside shed walls which get hot
in summer. Do not place heavy items on top of the seat as this may distort the plastic.
DO NOT LEAVE CHILDREN UNATTENDED IN THE CAR.
:

SHOULDER HEIGHT MARKERS & A GROWING CHILD
67
Shoulder height markers are provided on this restraint for a visual indication that the child is safe to ride in
this restraint. Do not turn to forward-facing until the child's shoulder's reach the lower marker.
Do not continue to use the restraint if the child's shoulders are above the top marker.
When the child's shoulders reach the lower marker, the child restraint must be turned to face towards the
front of the vehicle or move the child to another Rearward or Forward Facing seat with in built harness.
Approximately 6 months of age.
LOWER SHOULDER HEIGHT MARKER : Label A
UPPER SHOULDER HEIGHT MARKER : Label B
When the child's shoulders reach this upper marker, the child is now too big for the child restraint. It is
now time to move too the next child restraint. Approximately 4 years of age.
IMPORTANT: FOLLOW THIS ADVICE.
SHOULDER HEIGHT MARKERS & THE NEXT STEP
NEWBORN (REARWARD FACING)
OLDER BABY (REARWARD FACING)
Turn to forward-facing when the child's
shoulders reach the lower shoulder height
marker.
Rearward Facing
Label A
Label A
Lower shoulder
height marker
Lower shoulder
height marker
TODDLER USE (FORWARD FACING)
Move to the next form of child restraint when the child's
shoulders reach the upper shoulder height marker.
Forward Facing
Upper shoulder height marker
Label A
Label B

SHOULDER HEIGHT MARKERS & THE NEXT STEP
BABY USE REARWARD FACING
To be used only in a rearward-facing position until the infant's shoulders reach the lower shoulder
height marker (approximately 6 months of age).
SPECIAL FEATURES: REARWARD-FACING
89
Front of Vehicle
1
2
3
4
5
7
8
10
9
For the next child restraint choose from:
These options are generally from approximately 4 years of age.
• Convertible Booster Seat ( Note: you can move to a convertible
booster seat once the child's shoulders reach the lower shoulder
height marker), this will be a little lower than the Lower Shoulder
Height Marker on the child restraint covered on previous pages.
OR
• Booster Seat and an accessory Child Harness
(A Child Harness must be used with a Booster Seat if the car is
tted with a lap only seat belt in the desired seating position),
OR
• Booster seat and lap-sash seat belt.
11 15 1613 1412
6

SPECIAL FEATURES: REARWARD-FACING SUITABLE FOR USE
Car's Anchor Fitting
Stabilising Bar (Shown in Baby Use mode - for rear facing)
Harness Adjustment Strap
Harness Adjustment Latch
Car's seat belt
Blue Rear Facing Seat belt markers (1 each side) for rear facing mode
Upper Anchorage Storage Band
Upper Anchorage Strap Adjuster
Slots for adjusting height of shoulder straps
Shoulder Height Markers
Padded cover for baby’s comfort (may vary in style)
Buckle Tongue Holders
Fully adjustable 6 point harness
Quick Release Buckle (Red button)
Adjustable Upper Anchorage Strap
Attachment Clip
1
2
3
4
5
6
7
8
9
10
11
12
13
14
15
16
TO BE USED WITH A LAP SASH OR LAP ONLY SEAT BELT IN
THE BACK OF MOST CARS WITH FORWARD-FACING SEATS.
To be used only in a rearward-facing position for an infant
until their shoulders reach the lower shoulder height marker
(approximately 6 months of age).
Continue to use this restraint until the child reaches this limit.
Do not use forward facing until child's shoulders are above the
lower shoulder height marker.
Infants are at risk of serious injury if they face forward too early.
A baby's neck muscles maybe unable to support their head thus the baby should remain in rear facing
until the neck muscles become stronger.
The purchaser should check the measurements between the front of the seat back of the rear seat and
all front seats in the car in which the child restraint is intended to be used, to ensure that the space is
sufcient. If you have the restraint check it ts in your car.
Regional Road Rules may prohibit the use of this restraint in the front seat until the child is 4 years of age.
Check your Regional Rules for exemptions.
DO NOT USE RESTRAINT IN REARWARD FACING MODE
WITHOUT STABILISING BAR FULLY EXTENDED.
Do not use the restraint without the Upper Anchorage Strap
correctly attached.
DO NOT USE A REAR FACING CHILD RESTRAINT WHERE AN
AIRBAG IS FITTED IN FRONT OF THE SEATING POSITION.
Do not use on any vehicle seat which faces sideways or
rearwards.
Never leave babies or toddlers in a stationary car in the sun because of the risk of heat exhaustion.
Ensure babies and toddlers have adequate ventilation and are shaded from direct sunlight through side
or rear windows.
Do not allow the front seat to alter
the installed position of the restraint.
It is permissible to allow the restraint
to touch the seat on front of it.
590mm
600mm
11
10
BABY USE REARWARD FACING BABY USE REARWARD FACING

Strap
Connector
Cross Bar
CHANGING SHOULDER STRAP SLOTS: FOR BABY USE REARWARD-FACING
A. If using the seat for the rst time, you may need to
use the second set of shoulder strap slots rather
than the lowest pair of slots. Place baby in the seat
and check which shoulder strap slots are best.
B. If tted in the car, remove the restraint from vehicle
as instructed on page 25.
C. To slacken Harness Straps, lift Harness Adjustment
Lever then grasp both shoulder harness straps and
pull outwards.
D. At the rear of the restraint, remove one of the
harness shoulder straps from metal Strap Connector
by slipping strap through open slot. It is better to
change one strap at a time.
C
ADJUSTING HARNESS STRAP HEIGHT: FOR BABY USE REARWARD-FACING
Correct tment of the harness is very
important as it restrains the baby in the
restraint. The harness must t rmly
around upper torso of the baby and be
positioned so as to leave the baby's arms
and legs free.
For babies in rear facing mode, the infants
shoulders must be below the lower
shoulder height marker. If your baby has
reached the lower shoulder height marker
then the restraint must be converted for
“Child Use”. (Refer to Forward Facing
section starting on page 26).
The shoulder straps must be in the slots
which are nearest to the child's shoulders,
but not lower than the child's shoulders
when in rear facing mode.
REARWARD-
FACING BELT
PATH;
shown as blue.
Shoulder straps
MUST be threaded
through appropriate
shoulder strap slots
then over the cross
bar at the rear of
restraint.
IMPORTANT:
Lift Harness
Adjustment Lever
Adjustment Lever
Harness
Shoulder slots
Harness
tongues and
buckle
Lap straps
Crotch straps
Harness
adjuster strap
Harness
shoulder straps
Shoulder
height
markers
HOW TO SET-UPHOW TO SET-UP
BABY USE REARWARD FACING BABY USE REARWARD FACING
13
12
Cross
Bar
Pull to
lengthen
Strap Connector
Cross bar
D

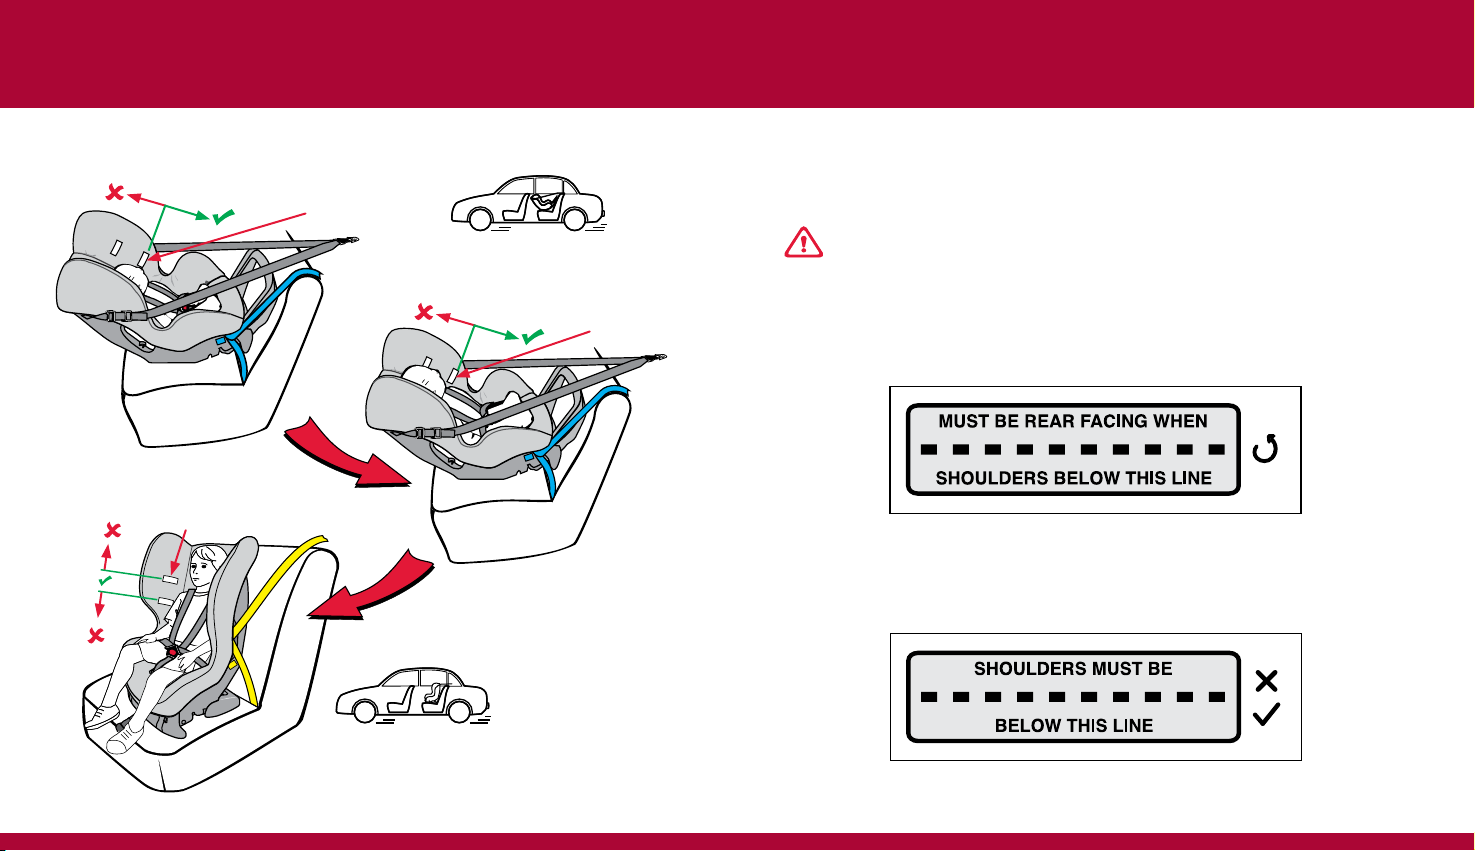
CAUTION: For Rearward facing, Ensure the
shoulder strap is threaded through the slot, then over
the top of the cross bar at the rear of restraint &
connected to the metal strap connector.
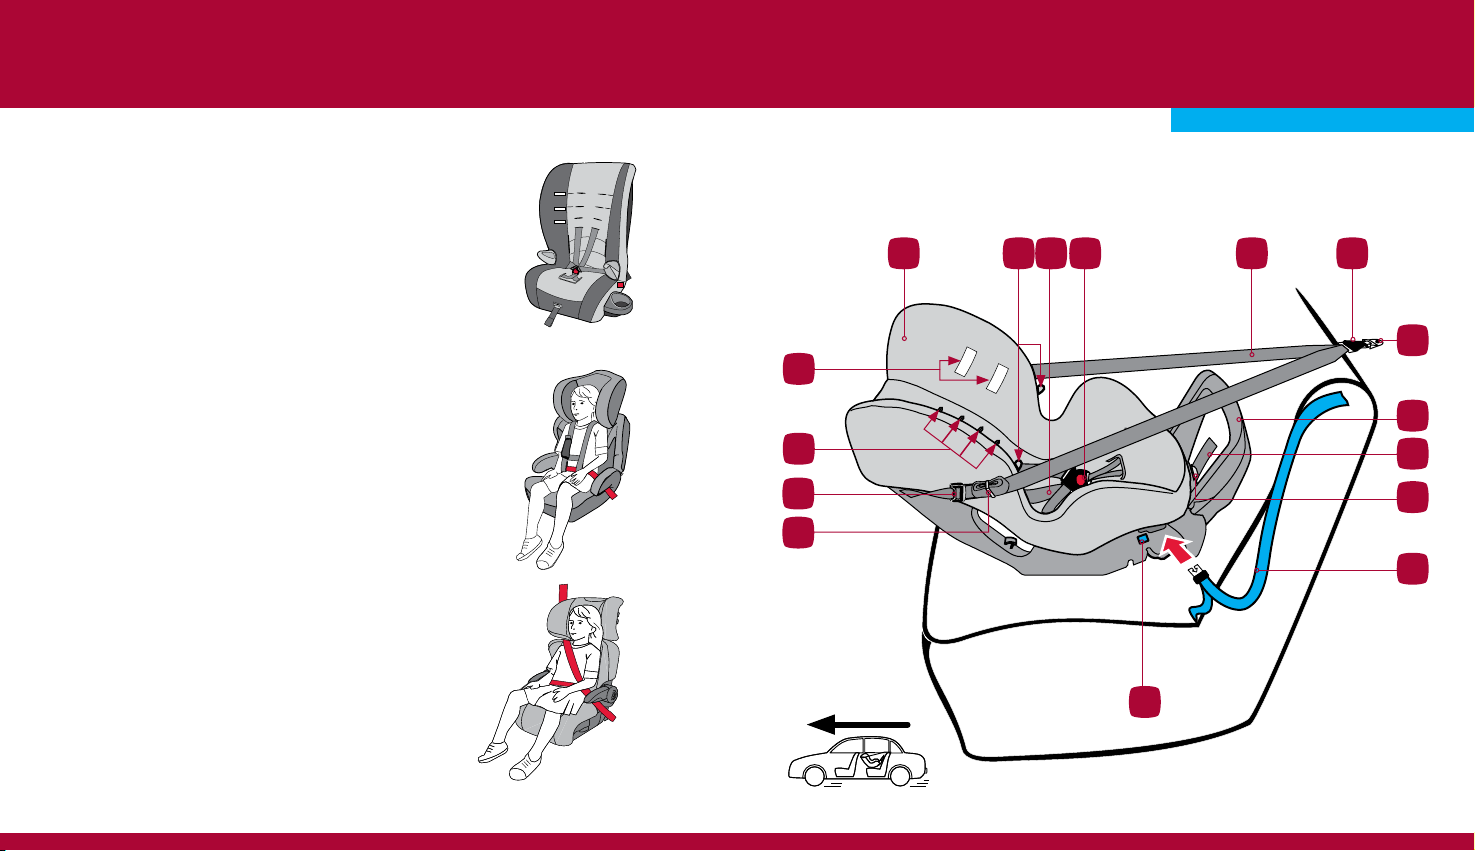
H. Reconnect the strap to the metal connector.
I. Repeat for other shoulder strap. It is better to
change one strap at a time so that the other strap
will be a guide for re-assembly.
CAUTION: Do not use the restraint with
harness shoulder straps set at different heights or fed
through mismatching slots. Ensure harness straps
are not twisted and that all straps are secure by
pulling each harness strap.
G. Ensure there are no twists in the shoulder strap
and the buckle tongues face the correct way.
E. Pull the shoulder strap out of the slot.
F. Insert shoulder strap through the selected slot
which will position shoulder strap level with or
above the child’s shoulder as shown right. Ensure
that the Shoulder strap passes through matching
slots in the cover and restraint body. E
Pull
F
H
Strap
Connector
Cross Bar
HOW TO SET-UPHOW TO SET-UP
BABY USE REARWARD FACING BABY USE REARWARD FACING
15
14
INSTALLING INTO VEHICLE (REARWARD FACING)
A. The car may be tted with a child restraint anchor tting behind the
desired seating position. Refer to the car owner's handbook. If not then
an anchor tting will need to be installed. Refer to pages 48 to 51.
B. The restraint is normally packaged in the fully upright Child Use
mode so you will need to convert it to Baby Use mode. Convert
the restraint to Baby Use mode as shown & explained.
C. If Upper Anchorage Strap is folded up for storage undo from
Storage Band then lengthen. Fully press Adjuster Button (1) while
pulling Upper Anchorage Strap (2) to lengthen.
Fully press Adjuster Button (1)
while pulling Upper Anchorage
Strap (2) to lengthen.
Pull Adjustment Strap
to remove slack
Storage
Band
2
1
CHILD RESTRAINT ANCHORAGE
To use this child restraint, the car will need a child restraint anchor tting in the seating position that you
intend to use. Refer to the car owner's handbook.
If no anchor tting is provided then you will need to install an anchor tting. Refer to pages 48 to 51.
The anchor tting is required for attaching the upper anchorage strap in both rear facing mode and forward
facing mode covered later in the these instructions.

17
16
HOW TO INSTALLHOW TO INSTALL
IMPORTANT:
DO NOT USE RESTRAINT IN REARWARD FACING MODE
WITHOUT STABILISING BAR LOCKED IN POSITION
Pull out
to unlock.
D
G. At the front of the seat unclip the plastic fasteners and pull back
the trim to expose the seat belt slots in the restraint.
H. Position the restraint in the car rearward facing
in the chosen seating position.
Note: Some vehicle seat fabrics (particularly
velours) may be damaged by a child restraint
used continuously. We recommend the use of
a messy mat or thick towel to keep the vehicle
seat in good condition.
I. Feed the seat belt through the seat belt slots on
each side of the restraint. The rear facing seat
belt path is identied by the blue- REARWARD
FACING BELT PATH marker (1 each side).
Blue marker to identify
REARWARD FACING
SEAT BELT PATH.
I
G
Unclip the plastic fasteners and pull
back seat cover.
I
BABY USE REARWARD FACING BABY USE REARWARD FACING
D. To convert the restraint from forward facing mode to rearward
facing mode for Baby Use, unlock the stabilising bar by pulling
the bar backwards.
E. Rotate the stabilising bar around so that it is in position at the
front of the restraint.
F. Push to lock the stabilising bar into position at the front of the
restraint. E
Rotate stabilising bar.
F
Push to lock.

19
18
N. Tighten adjustable upper anchorage
strap by pulling adjustment strap (3)
to remove slack, but do not over-
tighten causing the restraint base
to lift off the vehicle seat. This will
usually be done once the baby has
been harnessed into the seat.
ALWAYS roll up excess strap tightly
and neatly store away from child’s
reach using the storage band.
Fully press Adjuster Button (1)
while pulling Upper Anchorage
Strap (1) to lengthen.
Pull Adjustment Strap
to remove slack
Roll up tightly so
the webbing is thick
enough to be held in
the storage band.
Storage
Band
M. Hook the attachment clip to the car's anchor tting.
Remove as many twists as possible from the upper
anchorage strap. (This may be done after the baby is
tted in to the seat).
THIS TETHER STRAP MUST ALWAYS BE FITTED
WHEN THE CHILD RESTRAINT IS USED IN A VEHICLE.
J. Engage seat belt buckle and tongue.
K. Re-attach the cover by connecting the plastic
fasteners and align restraint centrally to the
chosen seating position.
L. Tighten the seatbelt. If installed with a lap-
sash seat belt tighten both the lap and sash
belts, then allow the sash-belt to feed into the
retractor.
HOW TO INSTALLHOW TO INSTALL
Attachment Clip (hook)
Car's Anchor
Fitting
J
2
1
3
Ensure Upper Anchorage
Strap is not slack,
attached to the car's
Anchor Fitting.
DO NOT USE RESTRAINT IN REARWARD FACING MODE WITHOUT STABILISING BAR
FULLY EXTENDED.
THE UPPER ANCHORAGE STRAP MUST ALWAYS BE FITTED WHEN THE CHILD
RESTRAINT IS USED IN A VEHICLE.
ALWAYS ATTACH THE HOOK AND REMOVE THE SLACK.
Pull sash portion
of seat belt to
remove slack.
Feed seat belt between
restraint cover and restraint
body (see page 17).
Blue marker to identify
REARWARD FACING
SEAT BELT PATH.
Do not use
this slot for
Baby Use
installation.
A single
twist is
required in
Baby Use.
Pull strap
to remove
the slack.
Attachment Clip
Car's Anchor Fitting
BABY USE REARWARD FACING BABY USE REARWARD FACING

HOW TO INSTALLHOW TO INSTALL
21
20
IMPORTANT:
If using an Extension Strap, positioning the Attachment Clip above the baby may lead to injury in an
accident therefore make sure that the Attachment Clip is not positioned in front of the vehicle seat.
ANGULAR ADJUSTMENT OF RESTRAINT
Some vehicle seats have more rearward slope than others. If the angle of the seat causes the baby to
be too upright for comfort, the angle may be altered by placing a rm packing between the seat and
the underside of the base. Packing can be a rmly rolled up towel or nappy.
Do not remove all of the rearward slope by over packing. Always leave a rearward slope angle of
approximately 10 to 15 degrees as shown below.
BABY USE REARWARD FACING BABY USE REARWARD FACING
Attachment Clip
Extension Strap
Attachment Clip should not
be in front of the vehicle
seat front.
Attachment Clip should be
behind the front of the vehicle
seat front.
10° to 15°

Adjuster
Strap
Harness
Adjustment Lever
1
2
22 23
HOW TO USE HOW TO USE
Upper Anchorage Strap
temporarily slackened
for easy access
Harness
shoulder
straps
Shoulder
height
markers
Adjuster for the Upper
Anchorage Strap Pull strap to
remove the slack.
BABY USE REARWARD FACING BABY USE REARWARD FACING
Buckle tongue holder on
both sides of the seat. Push
tongue inwards to engage.
PLACING BABY INTO RESTRAINT
A. Ensure the shoulder straps are adjusted to
the correct height for your child (see page
12).
B. Slacken the Upper Anchorage Strap and
allow the straps to fall to the sides of the
restraint for easy access to the baby.
C. To slacken Harness Straps, lift Harness
Adjustment Lever (1) then grasp both
shoulder harness straps and pull out (2) till
there is enough slack to place harness to
each side of restraint. Store tongues on the
Buckle tongue holders.
D. Lay baby on their back into restraint
and t harness with the shoulder
straps on the chest, and the waist
strap at the child's hips. Pull the
crotch strap and buckle between
the legs.
C
D
Crotch
strap and
buckle
E. Always make sure the baby is dressed to allow harness
buckle to be pulled up between baby’s legs e.g. a jump
suit. Make sure the baby’s arms and legs are free.
NOTE: Never wrap baby in a blanket before placing in
restraint. Place a blanket over the child after the harness
has been tightened if additional warmth is required.
Generally babies are warmer in the seat and may need to
wear less clothes so they don't get too hot.
E
F. Fit either harness tongue into the
harness buckle followed by the other
tongue until a click is heard. Should the
second tongue not insert, press the red
button and reinsert the tongues.
Ensure secure engagement by pulling
harness straps.
G. Remove slack from harness lap straps
by pulling shoulder straps upwards.
Harness
Lap Straps
Shoulder
Straps
Crotch
Straps
Pull to remove slack from
harness lap straps
Click
Tongue
Buckle

2524
HOW TO USE HOW TO USE
I. Retighten Adjustable Upper Anchorage Strap
by pulling Adjustment Strap (3) to remove
slack as shown.
ALWAYS roll up excess strap tightly and
neatly store away from child’s reach using
the storage band.
IMPORTANT: A recommended Baby Insert Pad may be used to snugly support a baby. Do not
use a baby insert pad that is not recommended for this child restraint by Babylove Products. Discontinue
use when Baby Insert Pad is a tight t or creates discomfort for larger babies or causes the baby's
shoulder to reach the Lower Shoulder Height Marker.
Pull Adjustment Strap
to remove slack
Press
Roll up tightly so
the webbing is thick
enough to be held in
the storage band.
H. Pull harness adjustment strap to take up the slack in the
harness adjusting to a comfortable but rm t. A loose
harness could result in serious injury in a crash.
Pull
Make sure that nothing is obstructing harness straps and that
baby’s arms and legs are free with the straps in the correct
location - as shown on the previous page. Do not use restraint
if straps do not tighten and contact Customer Service for repair
(telephone number at the back of this book).
CAUTION: A LOOSE HARNESS IS DANGEROUS.
REMOVING BABY FROM RESTRAINT
A. Press Upper Anchorage Strap Adjuster Button (1) while
pulling Upper Anchorage Straps (2) to slacken (as shown
below). Allow Upper Anchorage Straps (2) to fall to the
sides for easy access into restraint as shown right.
B. Lift Harness Adjustment Lever, while pulling each Shoulder
Harness Strap to slacken harness to the desired amount.
C. Press red button on Harness Buckle then both Harness
Tongues will be released. Move each shoulder strap to
baby's side then pick up baby.
D. Lift baby out of the seat.
TO REMOVE RESTRAINT FROM VEHICLE
A. Disengage seat belt tongue from buckle and remove
from restraint.
B. Release the stored strap and fully press Upper
Anchorage Strap Adjuster Button (1) while pulling Upper
Anchorage Strap (2) to slacken as shown right.
C. Disengage Attachment Clip from Anchor Fitting. The
child restraint is now disconnected.
Fully press Adjuster
Button (1) while pulling
Upper Anchorage Strap
(2) to lengthen.
Storage
Band
Storage
Band
BABY USE REARWARD FACING BABY USE REARWARD FACING
1
32
1
Attachment Clip
Car's Anchor
Fitting
Press to
disengage

27
26
SPECIAL FEATURES - Forward Facing SPECIAL FEATURES - Forward Facing
To be used only in a forward-facing position by children whose shoulder's have reached the lower
shoulder height marker (approximately 6 months of age) until the shoulders reach the upper shoulder
height marker (approximately 4 years of age.)
Front of Vehicle
3
2
4
5
6
7
8
9
12
11
10
13 14 15 16
Car's Anchor Fitting
Slots for adjusting height of shoulder straps.
Vehicle seat belt
Yellow Seat belt markers (1 each side) for forward facing
Padded Cover for comfort
Stabilising Bar (shown in Child Use mode)
Harness Adjustment Strap
Harness Adjustment Lever
Quick Release Harness Buckle (Red button)
Fully Adjustable 6 point harness
Buckle Tongue holders
Shoulder height markers
Upper Anchorage Strap Adjuster
Upper Anchorage Storage Band
Adjuster Upper Anchorage Strap
Attachment Clip
1
2
3
4
5
6
7
8
9
10
11
12
13
14
15
16
TODDLER USE FORWARD FACING
1
TODDLER USE FORWARD FACING

29
28
SUITABLE FOR USE - Forward Facing
TO BE USED WITH A LAP SASH OR LAP ONLY SEAT BELT IN THE BACK OF MOST CARS WITH
FORWARD-FACING SEATS.
Once the child's shoulders reach the lower shoulder height marker then the seat can be changed to the
forward-facing position and used until the child's shoulders reach the upper shoulder height marker
(approximately 4 years of age).
Continue to use this restraint in this forward-facing mode until the child's shoulders reaches the limit of
the upper shoulder height marker. The child should not sit forward-facing until the baby's neck muscles
are able to support their head. Do not move to a Booster Seat until the child has outgrown this child
restraint.
Regional Road Rules may prohibit the use of this restraint in the front seat of the vehicle until the child is
4 years of age. Check your Regional Rules for exemptions.
DO NOT USE RESTRAINT IN FORWARD- FACING MODE WITH THE STABILISING BAR EXTENDED OUT
THE FRONT OF THE RESTRAINT.
Do not use the restraint without the Upper Anchorage Strap correctly attached.
If your vehicle is not tted with an anchor point, please contact a Safety Restraint Fitting Station authorised
by the relevant State Government Body for correct tment of the restraint. In New Zealand contact the
agent for the vehicle. The upper anchorage strap must be attached to an anchorage point using an
extension strap if necessary.
Do not use on any vehicle seat which faces sideways or rearwards.
Do not use any Baby Inserts in Forward Facing ‘Child Use’ mode.
Do not use pillow unless recommended by Nursery Elegance Products Pty. Ltd.
If an airbag is tted in the desired seating position where the child restraint is tted, follow the vehicle
manufacturer's warnings and instructions.
Children are of risk of serious injury if they move to a booster seat too early.
HOW TO SET-UP
TODDLER USE FORWARD FACING TODDLER USE FORWARD FACING
ADJUSTING HARNESS STRAP HEIGHT: FOR CHILD USE FORWARD-FACING
Correct tment of the harness is very important as
it restrains the child in the restraint. The harness
must t rmly around the upper torso of the child
and be positioned so as to leave the child's arms
and legs free.
The shoulder straps must be in the slots which are
nearest to the child's shoulders, but not more than
25mm below the child's shoulders. If the child's
shoulders are above the upper shoulder height
marker then the child is too tall for the restraint and
the restraint should not be used; move to next type
of restraint (see page 8).
The shoulder straps must be in the slots which are
nearest to the child's shoulders, but not more than
25mm below the child's shoulders.
Shoulder straps
must be threaded
through appropriate
shoulder strap
slots, then under
the cross bar at the
rear of restraint.
25mm
Cross Bar
Adjustment Lever
Harness
Shoulder
slots
Harness
tongues and
buckle
Lap
straps
Crotch
straps
Harness adjuster
strap
Harness
shoulder
straps
Shoulder height markers
Cross Bar
Strap Connector
IMPORTANT:

CHANGING SHOULDER STRAP SLOTS: FOR CHILD USE FORWARD-FACING
A. Remove the restraint from vehicle as instructed on page 40.
B. Slacken Harness Straps by lifting Harness Adjuster, grasping
both shoulder harness straps and pulling out desired amount
of slack.
C. At the rear of the restraint, remove one of the harness
shoulder straps from metal Strap Connector by slipping
strap through open slot.
C
D. Pull the shoulder strap out of the slot.
E. Insert shoulder strap through restraint slot
which will position shoulder strap level with
or above the child’s shoulder as shown right.
Ensure that the Shoulder strap passes through
matching slots in cover and restraint body.
D
Pull
E
HOW TO SET-UPHOW TO SET-UP
TODDLER USE FORWARD FACING TODDLER USE FORWARD FACING
31
30
Lift Harness
Adjustment Lever
Pull to
lengthen

CAUTION: For Forward facing, ensure
the shoulder strap is threaded through the slot,
then under the bar at the rear of the restraint &
connected to the metal strap connector.
G. Reconnect the strap to the metal strap connector.
H. Repeat for other shoulder strap. It is better to
change one strap at a time so that the other strap
will be a guide for re-assembly.
CAUTION: Do not use the restraint with harness shoulder straps set at different heights or fed
through mismatching slots. Ensure harness straps are not twisted and that all straps are secure by pulling
each harness strap.
F. Ensure there are no twists in the shoulder strap
and the buckle tongues face the correct way.
Strap
Connector
Cross Bar
HOW TO SET-UP
TODDLER USE FORWARD FACING TODDLER USE FORWARD FACING
HOW TO INSTALL
INSTALLING INTO VEHICLE (FORWARD FACING)
(UPRIGHT OR RECLINED)
A. Remove the rear facing seat from the vehicle by disengaging
the seat belt and upper anchorage strap refer to page 25. If
not previously tted rearward facing, you will need to locate a
child restraint anchor tting. The car may be tted with a child
restraint anchor tting behind the desired seating position. Refer
to the car owner's handbook. If not, then an anchor tting will
need to be installed. Refer to pages 48 to 51.
CONVERT TO TODDLER USE MODE
Convert the restraint from Baby Use mode to Toddler Use mode as
shown & explained below.
B. Remove the baby insert pad as this is no longer required.
C. To convert the restraint from rearward facing mode to forward
facing mode for Toddler Use, unlock the stabilising bar.
D. Swing the stabilising bar around so that it is in position at the
bottom rear of the seat.
E. Determine whether an upright or reclined position is preferred
(see below) and adjust as described on the following page.
UPRIGHT CHILD
USE MODE
RECLINED CHILD
USE MODE
Pull out
to unlock
IMPORTANT: Do not use forward-facing with the
stabilising bar extended. Always store away.
33
32
IMPORTANT:
Ensure harness is correctly adjusted with the harness in the slots near the child's shoulders before retting
the seat to the car. (Refer to page 29)

F. Push to lock the stabilising bar into
upright forward facing position.
Refer to illustration for location of
Upright Slot.
Push to lock the stabilising bar into
reclined forward facing position.
Refer to illustration for location of
Recline Slot.
DO NOT USE RESTRAINT IN FORWARD-
FACING POSITION WITH THE STABILISING BAR
EXTENDED OUT THE FRONT OF THE RESTRAINT.
35
34
HOW TO INSTALL
NOTE: Seat belt extenders should not be used if the seat belt is
not long enough to secure the child restraint. If they are used
then the buckle tongue must not enter the seating zone.
Ensure lap
part of seat
belt is below
the hooks
Route Lap &
Sash portion
of seat belt
through the
Child Use seat
belt path
G. Position restraint in forward facing
mode and align restraint centrally to
the chosen seating position.
Some vehicle seat fabrics (particularly
velours) may be damaged by a child
restraint used continuously. We
recommend the use of a messy mat
or thick towel to keep the vehicle seat
in good condition.
H. Fully lengthen seat belt. Insert
seat belt into Child Use seat belt
path (identied by yellow marker),
ensuring that the seat belt is not
routed between the harness and
the back of the restraint, and that
the lap part of the seat belt is
below the hooks.
I. Engage seat belt buckle and tongue, ensure
to remove all slack from lap part of seat belt
by pulling sash belt. Adjust the seat belt to hold
the restraint rmly against the vehicle seat. For
inertia/retractable seat belts, allow excess belt to
feed back into retractor.
Sash Seat Belt
Lap Seat Belt
Hook
I
TODDLER USE FORWARD FACING TODDLER USE FORWARD FACING
HOW TO INSTALL
UPRIGHT MODE
OR RECLINED MODE
Upright Slot
Recline Slot
Push into RECLINE Slot to Lock
Push into UPRIGHT Slot to Lock

HOW TO INSTALL HOW TO INSTALL
37
36
K. Tighten Adjustable Upper Anchorage Strap by
pulling adjustment strap to remove slack as shown,
but do not over-tighten causing the restraint base to
lift off the vehicle seat.
L. ALWAYS roll up excess strap tightly and store
behind the seat away from child’s reach using the
storage band.
J. Hook the attachment clip to the car's anchor tting
as shown. Make sure to remove as many twists as
possible from the upper anchorage strap..
Always attach the hook and remove slack
IMPORTANT: Always roll up the excess Upper Anchorage Strap and store behind the seat,
otherwise it may hang outside of the car door or could strangle a child.
Attachment Clip (Hook)
Car's Anchor
Fitting
Pull Adjustment
Strap to remove
slack
Storage
Band
Press
Yellow Marker Identies
FORWARD-FACING BELT PATH
Car's Anchor
Fitting
Pull to remove
slack, then store
the strap as
shown on page 36
Storage Band
Upper Anchorage
Adjustment Strap
Upper Anchorage
Strap Attachment
Clip
Roll up tightly so
the webbing is thick
enough to be held
in the storage band.
Forward facing seatbelt path
Ensure lap part of seat
belt is below the hooks
Pull to
tighten belt
TODDLER USE FORWARD FACING TODDLER USE FORWARD FACING

HOW TO USE
PLACING TODDLER IN THE RESTRAINT
Click
Tongue
Buckle
A. Lengthen harness by lifting up Harness Adjuster
Lever while pulling on either shoulder strap until
the harness will accommodate the child. Store the
tongues on to the Buckle tongue holder on both sides
of the seat.
39
38
D. Ensure all slack is removed from harness lap
straps by pulling shoulder straps the pull harness
adjustment strap to adjust harness to a comfortable
but rm t. Check that the slack in straps is removed.
Shoulder Harness Straps must t rmly to the child.
A loose harness could result in serious injury in a
crash. Harness
Lap Straps
Shoulder
Straps
Crotch
Straps
Pull to remove slack from
harness lap straps
CAUTION: A LOOSE HARNESS IS DANGEROUS.
Do not use restraint if straps do not tighten and contact Customer
Service for repair (telephone number at the back of this book).
HOW TO USE
C. Fit either harness tongue into the harness
buckle followed by the other tongue until
a click is heard. Should the second tongue
not insert press the red button and reinsert
the tongues. Ensure secure engagement by
pulling harness straps.
B. Place child in the restraint and feed each arm through
shoulder straps. Pull harness buckle up between
child’s legs.
Pull to tighten
TODDLER USE FORWARD FACING TODDLER USE FORWARD FACING
Buckle tongue holder
on both sides of the
seat. Push tongue
inwards to engage.
B
A
Lift Harness
Adjustment Lever
Pull to
lengthen
Table of contents
Other Baby Love Car Seat manuals
Popular Car Seat manuals by other brands

Graco
Graco BeLogic owner's manual

osann
osann Four360 manual

mifold One
mifold One Grab-and-Go Booster MF06-US user manual

BabySafe
BabySafe Mastiff instruction manual

Peg-Perego
Peg-Perego Viaggio 2-3 Flex Surefix Instructions for use

Britax
Britax safe-n-sound BS0072E-i20133 Instructions for installation & use