Babyhug Joy Bundle User manual

Please read the instructions carefully before use and keep this manual for future reference.
Style Code : BGBC008
baby carrier
Carrying Capacity
Up To 12 Kg
Age Group
0 to 18 Months +
Babyhug Joy Bundle 4 in 1 Baby Carrier
4 in 1 Baby Carrier
Hardboard Reinforced Body
Wide Padded Shoulder Strap
Easy To Use
Made in PRC
Imported & Marketed By :
Brainbees Solutions Pvt. Ltd.
Corporate & Registered Office Address:
Rajashree Business Park, Plot No: 114,
Survey No. 338, Tadiwala Road,
Near Sohrab Hall, Pune 411 001
Customer Care :
020-30556310
customercare@brainbees.com
Taking the baby out :
Front Carrying Position:
In Facing-In And -Out Position:
To take the baby out while carrying in these positions, simply unbuckle the head
support from your shoulder strap and slide baby out.
Horizontal Feeding Position:
To take the baby out while carrying in this position unbuckle the straps and pass the
longer shoulder strap over your head to take the baby out of the carrier.
Back Carrying Position:
To take baby out in this position rst, get a second person to hold your baby at the
back. Then release the chest buckle and slide both shoulder straps. (Warning: Make
sure the second person is holding the baby and the carrier this time). Finally, put the
baby and the carrier on a soft surface and unfasten all the buckles to take the baby
out.

1 2
Safety Warnings:
• Use this carrier for children between 3.5 and 12 kgs
• Small children can fall through the leg opening. To avoid fall or strangulation always
adjust the leg openings to the smallest size suitable for infants.
• Do not use this carrier as a child restraint in a motor vehicle or as a car safety seat
• The carrier is not suitable for use while cooking, skiing, running or riding a vehicle
• While using this carrier do not participate in any strenuous sports activity
• If you have to stoop while using the carrier with the baby in it, bend at the knees
and not at the waist
• The product is subject to normal wear and tear. Check the carrier often and
discontinue using it if the seams are loose, torn or if the carrier is damaged
• Do not place sharp objects in the carrier pocket
Do not leave the child in the carrier if it is unattached to a caregiver.
• The carrier is not to be used by a person impaired by alcohol or drugs
• Avoid using this carrier if the user experiences back pain or any other physical
problems
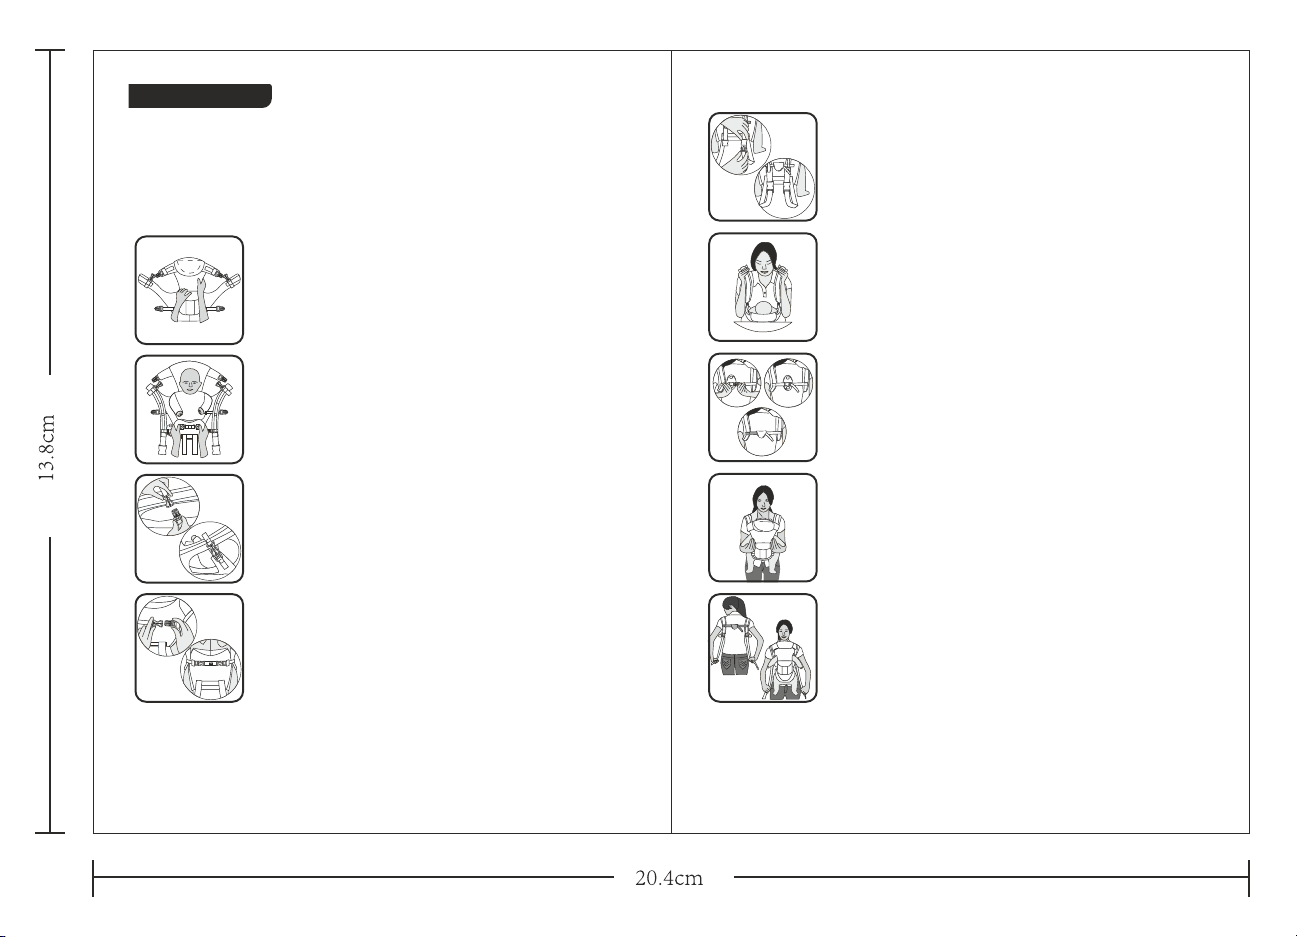
Tips for Child Safety :
• This baby carrier is designed for use by adults while walking only. Verify that all
buckles, toggles, straps and adjustments are secure before each use.
• Always make sure your baby's nose and mouth are clear and unobstructed by the
carrier or clothing so as to ensure easy breathing
• The baby must face towards you until he or she is able to hold his or her head
upright independently
• Hold on to your baby tightly until all buckles and latches are secured in place and
straps are pulled tight around the user's body. Sit down when placing and removing
the baby
• Make sure baby's body parts and skin are clear when locking buckles or snaps to
prevent from pinching
• Check often to ensure that the baby is not too hot, straps are snug but not too tight
and the baby is secure
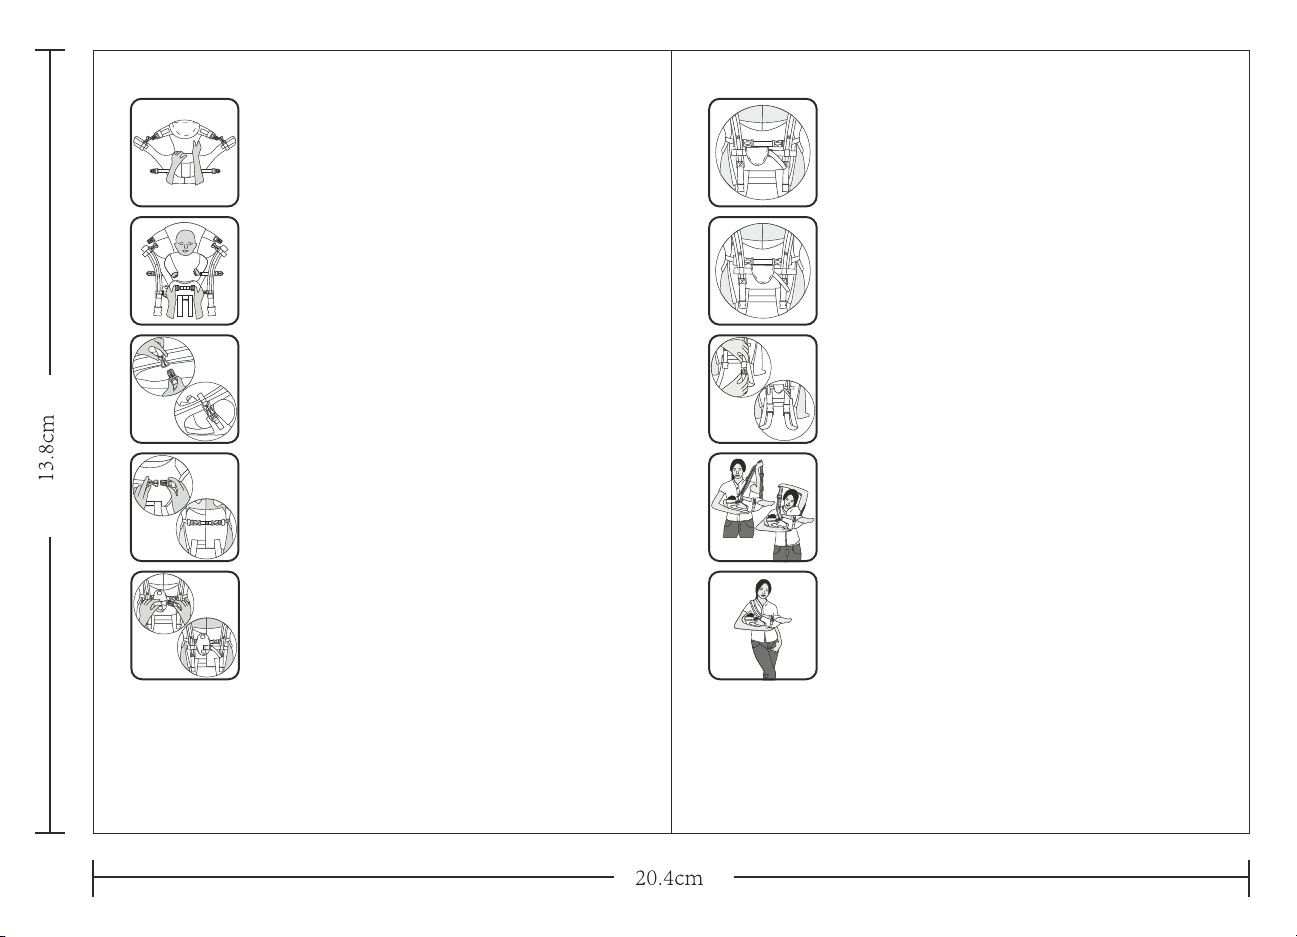
Helpful Tips:
• To minimize stress on the shoulders and back, spread out the straps on your
shoulders to evenly distribute the weight of the baby
• To nurse in privacy, sit down comfortably, loosen the straps and have your hands
supporting the baby and the baby carrier at all times. Make sure to tighten the
straps again before standing up
• When learning to place your baby in the baby carrier, do so over a bed or a soft
surface or with the help of another person
• If you feel that the baby carrier is too tight for your baby:
• Check if the size adjustment buckle is in the correct position for your baby's size
• Adjust the straps buckles so as to increase the length of the straps. This will give
more space to you and your baby.
Cleaning Instructions:
To keep baby carrier looking new for longer, we recommend that regular care be
limited to spot cleaning with a damp cloth. Machine wash only if necessary. Machine
wash separately in cold water, gentle cycle. Drip dry only. Do not bleach or use fabric
softener. Do not use a dryer. Do not iron.

43
Step 6:
Bend your body forward to put both the shoulder straps on your
shoulders. (At this stage the baby should remain on the safe
surface).
Step 7:
Bring both hands behind your back and reach the back strap
buckles and fasten the buckle behind your back. (Take help from
someone else for this step if you need).
Step 8:
Securely hug the baby (with his/her face towards you) close to
your chest and make sure the baby's bottom is in the center of
the carrier.
Step 9:
Adjust the length of the shoulder straps and tighten for comfort.
Step 1:
Insert the back hard supporter (PE board) into the hole of the
front piece and close the Velcro.
Step 2:
Put the baby carrier on a safe surface and lay the baby on it. Wrap
the front piece on the baby's tummy (like a wrap diaper).
Step 3:
Fasten the head support buckle. Make sure the baby's arms go
through the arm holes.
Step 4:
Connect both sides of waist buckle on the baby's tummy until
you hear a "click" sound which indicates the straps are securely
fastened. Tighten the straps for comfort. (The male buckle must
go through the elastic band. The band will hold the extra portion
of the strap).
Step 5:
Fasten the shoulder strap buckle.
Putting your baby in:
The Facing-In Position
The facing-in position is a perfect way to keep your baby cuddled against you and
provide the close contact and attention babies need. The wrap-around head support
cradles baby's head and neck. The facing in position helps in parent baby bonding as
you can play, talk and make eye-contact with the baby in this position.

65
Step 1:
Remove the back hard support (PE board) from the baby carrier
and fold over the front piece so that the baby's face is not
obstructed. Fasten the waist buckle on one side.
Step 2:
Sit down and release one side of the head support. Embrace the
baby securely and slide him/ her in to the baby carrier from the
open side with the face outward.
Step 3:
Make sure each of the baby's legs are in the leg openings.
Connect the buckle
Step 4:
Put the shoulder strap on your shoulder and adjust the size of the
strap.
Step 5:
Bring both hands behind your back and fasten the back strap
buckle. (Or ask someone else to do it). Before releasing your hold
on the baby and standing up, ensure that all the buckles are
securely fastened.
Carrying the baby on the back Facing-In
Step 1:
Insert the back hard supporter (PE board) into the hole of the
front piece and close the Velcro. Make sure that it does not slip.
Step 2:
Put the baby carrier on a safe surface and lay the baby on it. Wrap
the front piece on the baby's tummy (like a wrap diaper).
Step 3:
Fasten the head support buckle.
Step 5:
Have other people hold the baby at your back. Pass the shoulder
straps over the head and fasten the chest buckle. (Before
releasing your hands, make sure all the buckles are fastened.)
Step 4:
Connect both sides of waist buckle on the baby's tummy until
you hear a "click" sound which indicates the straps are securely
fastened. Tighten the straps for comfort. (The male buckle must
go through the elastic band. The band will hold the extra portion
of the strap).
Step 6:
Fasten the chest buckle close and check buckle holder.
The Facing-Out Position:
The facing-out position is perfect when your baby can support his/her own head and
is ready to explore. This position gives your baby the best of both worlds - the comfort
and security of being held by you and checking out the things in the world around.

Carrying the baby in the Horizontal Feeding Position
Step 1:
Insert the back hard supporter (PE board) into the hole of the
front piece and close the Velcro.
Step 2:
Put the baby carrier on a safe surface and lay the baby on it. Wrap
the front piece on the baby's tummy (like a wrap diaper).
Step 3:
Fasten the head support buckle. Make sure the baby's arms go
through the respective arm holes .
Step 4:
Connect both sides of waist buckle on the baby's tummy until
you hear a “click” sound which indicates the straps are securely
fastened. Tighten the straps for comfort. (The male buckle must
go through the elastic band. The band will hold the extra portion
of the strap).
Step 5:
Fasten the shoulder strap buckle.
Step 6:
Close the chest buckle holder.
Step 7:
Adjust the chest buckle holder strap to the smallest size.
Step 8:
Fasten both sides of the shoulder strap buckles.
Step 9:
Reach for the shoulder strap and hug your baby to your chest.
Place the straps on the shoulders.
Warning:
Double check all the buckles. Make sure every part is correctly
and fully fastened before releasing your hand.
7 8
This manual suits for next models
1
Other Babyhug Baby Carrier manuals
Popular Baby Carrier manuals by other brands

BabyBjorn
BabyBjorn Baby Carrier Active owner's manual

Aubert concept
Aubert concept Porte enfant souple Instructions for use

mothercare
mothercare Buggster Carrycot user guide

Coccolle
Coccolle Aries user manual

BabyBjorn
BabyBjorn BaByBjörn Baby Carrier Origina Manuel du propriétaire

lennylamb
lennylamb Woven Wrap user manual

William Kent 1733
William Kent 1733 PORTE BEBE DORSAL Instructions for use

Graco
Graco Car Seat owner's manual

Koala Babycare
Koala Babycare CUDDLE BAND instruction manual

Badger Basket
Badger Basket MOSES BASKET Series Safety & assembly instructions

Frog Orange
Frog Orange 001 manual

Bebecar
Bebecar hip-hop tech instructions