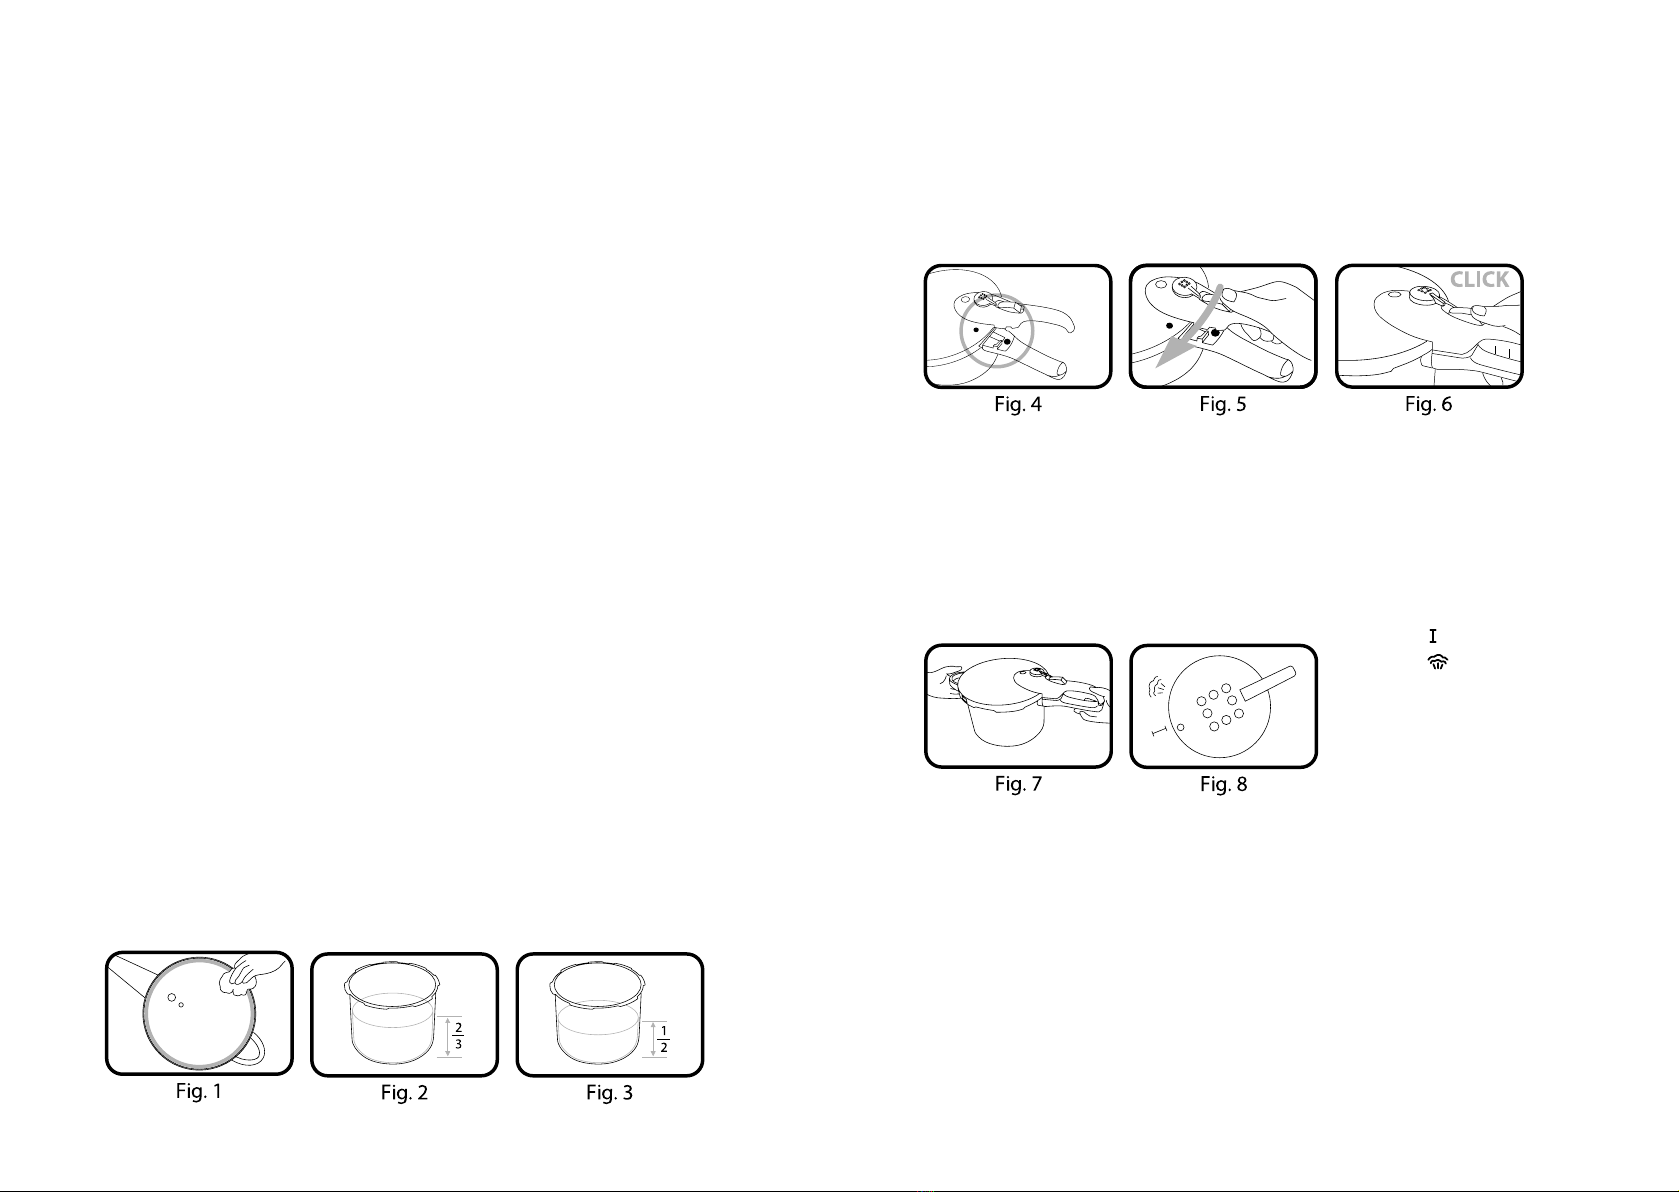
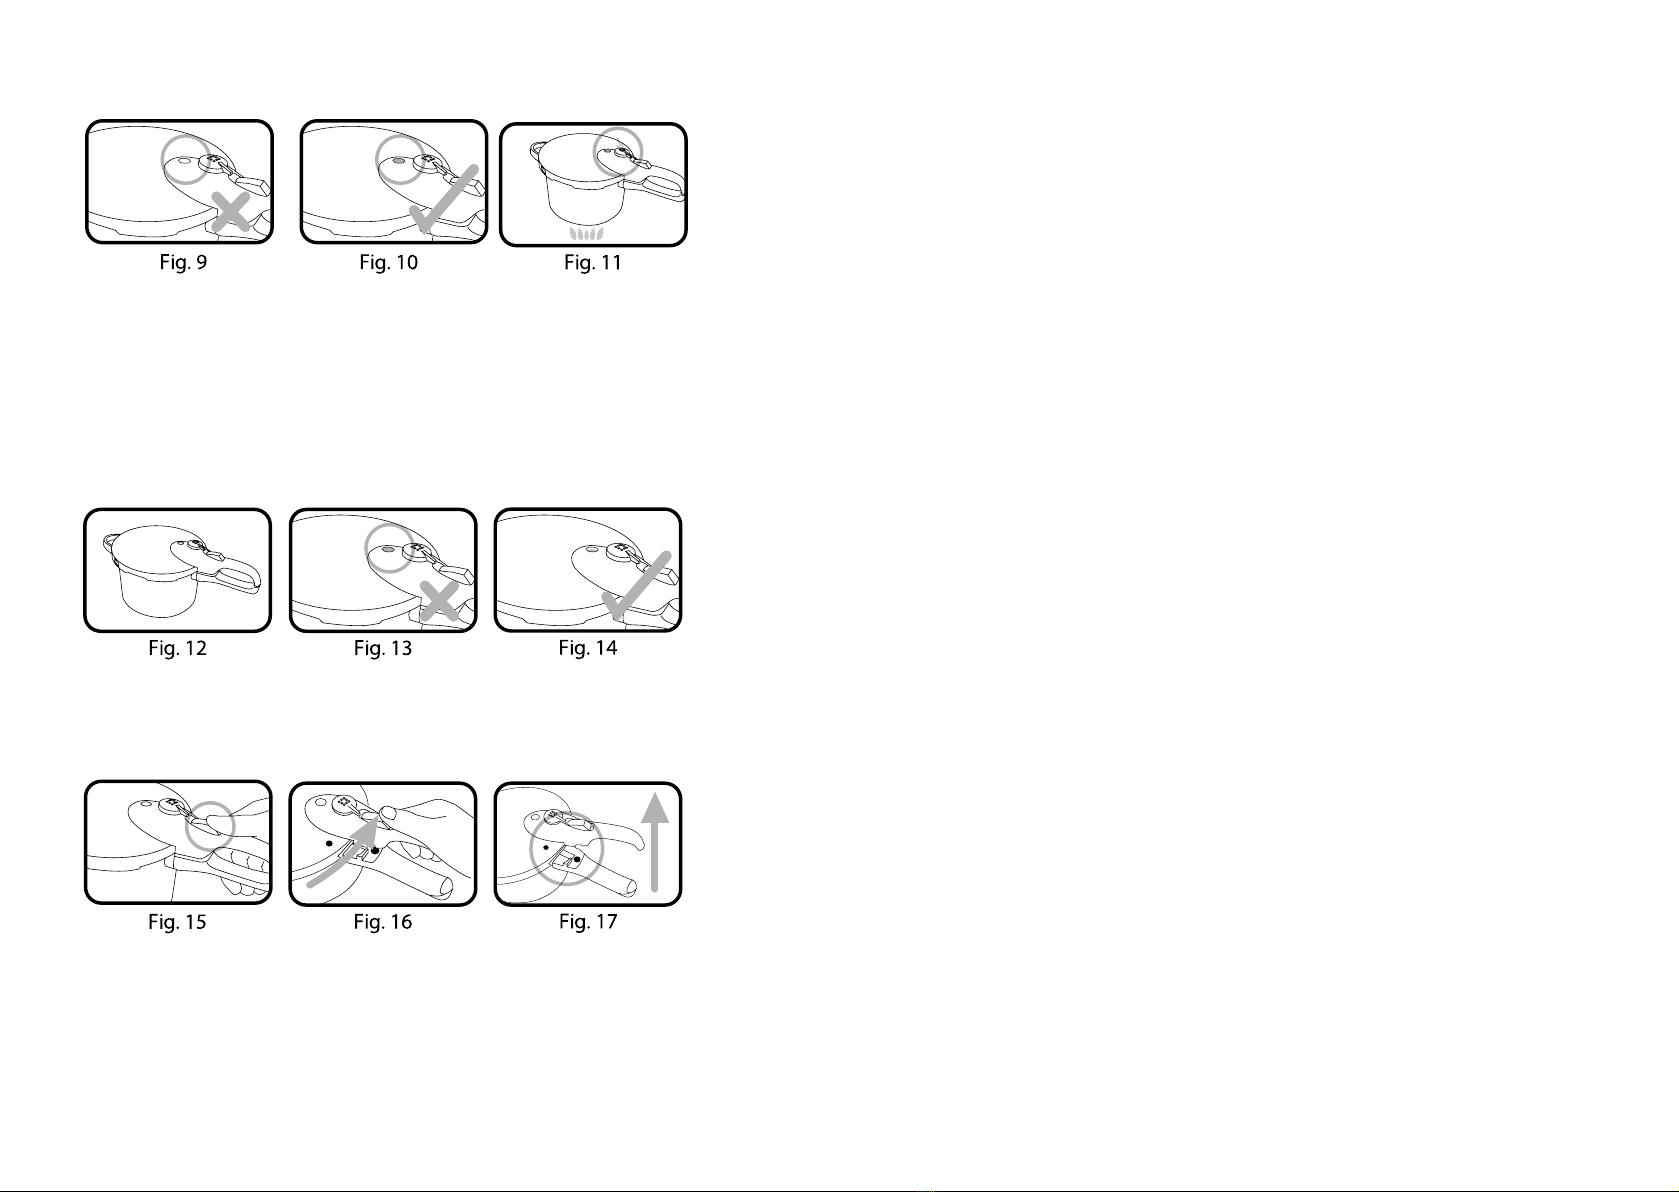
Baccarat GOURMET User manual


CONTENTS
Pressure cooking benets 2
Components & features 4
Important safeguards 6
Operating instructions 8
Trouble shooting 12
Tips for successful pressure cooking 14
Temperature pressure settings High/Low 16
Tips for pressure cooking meat and poultry 18
Cooking beans in your pressure cooker 17
Maintaining pressure in your pressure cooker 20
Cleaning and maintenance 20
Recipes 22
READ THESE INSTRUCTIONS CAREFULLY
BEFORE USING THE PRODUCT.
KEEP THEM HANDY FOR FUTURE REFERENCE.
CERAMIC DISH WASHER
GAS
ELECTRIC
HALOGEN
INDUCTIO N
1
Specications 6 Litre
Body internal diameter 22cm
Minimum volume 6 litre
Maximum food volume in the cooker 4 litre
Working pressure (KPA) 80
PRESSURE COOKER TECHINCAL DATA

Faster
On average, a pressure cooker prepares food in *1/3 of time compared to conventional
cooking methods. Meals that can take up to one hour with conventional cooking can
be ready in as little as 20 minutes with a pressure cooker.
Tastier
Food tastes better when it is prepared by a pressure cooker. The short cooking time
allows food to retain its full and natural avour. Less seasoning is required, up to half
of what you would normally use and very little avour is actually lost during cooking.
Healthier
More vitamins and minerals are retained in food prepared by a pressure cooker.
We all know that the longer food cooks, the more nutrients will be lost.
Pressure cookers help food retain more vitamins and nutrients compared
to conventional stove top cooking, by using less water.
Main features
The pressure cooker is manufactured with high-quality stainless steel for durability
and rust-proof ability. The pressure cooker has an impact bonded base.
The special structure design of heavy base and the thin wall of cooker is for maximum
fuel economy and quick even heat distribution. The pressure cooker is designed
with a number of safety devices to make cooking both safe and easy to operate.
This model features a dual high and low pressure setting regulator
for soft and hard foods.
2
PRESSURE COOKING BENEFITS
15

1
7
5
6
9
2
43
8
10
12
11
4
COMPONENTS & FEATURES COMPONENTS & FEATURES
1. Safety valve: A safety device opens and closes automatically to avoid excess
pressure within the cooker. It is visible in the up position to indicate there
is pressure in the cooker.
2. Pressure regulator: Pressure setting device
Low pressure level setting
Quick pressure release
2b. vent pipe
2c. vent pipe washer
2d. pressure regulator nut
3. Bakelite long handle upper.
4. Open button:
When the lid is closed properly, push the button down
to open the lid. It should only be opened when the pressure
has been completely released and safety value is down
5. Safety window: A safety device to release excess pressure by pushing
the sealing ring gasket out when the cooking pressure is too high.
6. Bakelite long handle lower.
7. Pressure cooker lid.
8. Pressure cooker body.
9. Helper handle: It functions as a helper handle when moving the cooker.
10. Sealing ring gasket: It keeps steam from escaping when the internal
pressure increases.
11. Steamer insert.
12. Steamer trivet.
5
2b
2c
2d

IMPORTANT SAFEGUARDS
• Do not open the pressure cooker until it is cooled and all internal
pressure has been released. If the handles are difcult to push apart,
this indicates that the cooker is still pressurised - never try to force the
pressure cooker open. Any pressure in the cooker can be hazardous.
• Never use your pressure cooker without adding liquids, as this could
result in damaging the pressure cooker by overheating. Adhere strictly
to the following content amounts:
Minimum: 1/4 litre (2 cups) of liquid
Maximum: 2/3 of the pressure cooker
• For foods which foam or rise (e.g. rice, legumes, broths, or dried vegetable),
do not ll the cooker more than half full. Over lling may cause a risk of
clogging the vent pipe and developing excess pressure.
• Be aware that certain foods, such as apple sauce, cranberries, pearl barley,
oatmeal or other cereals, split peas, macaroni, rhubarb, or spaghetti can foam,
froth and splutter, and may also clog the pressure release device (vent pipe).
CAUTION:
Ensure no loose small parts are lost when cleaning and all parts are in perfect
condition. Silicone ring may change colour over time which is normal.
As a guide the sealing ring should be replaced after one or two years use
according to usage. Silicone ring MUST BE CHANGED immediately if there
is any damage or shape change. Silicone rings are available as spare parts and can
be purchased from most Baccarat stockists. Never use substitute parts.
7
IMPORTANT SAFEGUARDS
When using pressure cookers, basic safety precautions should always be followed:
Read all instructions carefully before using your pressure cooker.
Don’t permit anyone who is not familiar with these instructions to use the cooker.
Keep children away from the pressure cooker when it is in operation.
Your pressure cooker is only suitable for use on the following heating sources:
induction, electric cooktops (solid burners or glass ceramic cooking surface),
gas and halogen cooktops. Do not use other heating sources.
Burns can occur from touching hot parts, hot water, or steam. During and immediately
after cooking, this product generates heat and escaping steam at a high temperature in
an area around the pressure regulator. To prevent the risk of burns or other personal
or property damage, do not come into contact with this area.
Do not block the pressure relief vent pipe. Take care when opening the cover.
This Product generates heat and steam at a high temperature which will escape
immediately if the lid is opened.
• Avoid touching hot surfaces, use Handles, Knobs and use protective gloves.
• Do not operate any Product which has been/or appears damaged in any manner
or after the Product malfunctions, or is dropped. Return the complete product
immediately to your retail dealer for inspection, and if necessary,
adjustment or repair.
• Always use/operate the Product in a well ventilated area.
• Always use/operate this Product well away from walls and curtains.
• Do not use the pressure cooker for other than intended use.
• Only use the pressure cooker described in these instructions,
for domestic use only.
• Do not use this pressure cooker for pressure frying oil.
• This appliance cooks under pressure. Improper use can lead to harm
or injury. Ensure the pressure cooker is closed properly prior to heating.
(See Operating Instructions for details).
6

OPERATING INSTRUCTIONS
Before the rst use:
1. Remove all packaging materials and accessories.
2. Before using your pressure cooker for the rst time, please consult
all the instructions, especially the ‘Important Safeguards’.
3. Wash the cooker and the lid thoroughly.
4. Season the sealing ring gasket with a little cooking oil, in order to make
opening and closing easier. (See Fig 1)
5. Fill the cooker approx. halfway with water and boil it for 10 minutes
after the pressure regulator begins to release steam.
6. Cool the pressure cooker to release the internal pressure.
Then open the lid and clean the cooker.
Safe operation:
To begin cooking
1. Adding food & liquid
To cook with the pressure cooker, it is important to ll with liquid that
is capable of releasing steam when boiled.
Either water, soup, stock or wine is acceptable in this case.
Never ll the pressure cooker more than 2/3 full with liquid and food no matter
which pressure cooker you use. (See Fig 2)
Fill only halfway when cooking foods that will either expand in size
and/or produce foam as they cook, such as dried vegetables, or grain. (See Fig 3)
2. Checking before locking
Before locking the cooker, always make sure that the vent pipe and the safety valve
are clean and in the correct position.
To check whether the safety valve is clean and correct, you can conclude from
the smooth turning of the ball inside the valve. Please also ensure there are
no obstructions in the vent pipe or safety valve, If there is a blockage you can clear
the obstruction with a needle.
(Please see details in cleaning and maintenance instructions)
OPERATING INSTRUCTIONS
Securing the lid
1. Align “ arrow ” on the lid with the mark “ O ” on the lower long handle. (See Fig 4)
2. Turn the lid clockwise as far as possible.
Make sure that the lid handle and the body handle align with each other. (See Fig 5)
3. After locking the cooker, there should be a (clicking) sound heard. (See Fig 6)
Cooking
1. Place the pressure cooker on the cooktop. (See Fig 7)
When using a gas cooktops, make sure that the ame does not go
beyond the edge of the pot base.
2. Pressure setting regulator:
There are 2 optional settings on the control module.
(See Fig 8)
3. Steam: Small amounts of steam may start to escape from the steam outlet.
When the safety vent moves up, pressure begins building. (See Fig 9 & 10)
When using a gas cooktop, make sure that the ame does not go
beyond the edge of the pot base.
4. Pressure cooking: Cooking starts when the steam escapes steadily
from the vent pipe and pressure regulator. Do not use high heat when cooking under
pressure. Lower the heat and set the cooking time as indicated
in cooking time reference or according to your own options. (See Fig 11)
5. When using on induction, ceramic and halogen cooktops, always lift item in an upward
direction to avoid damaging cooktop. Never drag or slide cookware when
removing from cooktop.
98
Position 1: For pressure cooking.
Position 2: Quick release setting.
Caution must be used to stay away
from hot steam.
Caution: Do not pull out control knob
when there is pressure inside.

Opening
1. After the heat has been turned off allow the pressure cooker to cool down naturally
before releasing the lid. (See Fig 12)
Use the quick pressure release button for quick pressure release
if in doubt. (See Fig 8) Note: Take care whilst steam
is being released during the cooking process to avoid scalding.
2. The lid can only be opened while the safety valve is in the down position,
indicating there is no pressure in the cooker. (See Fig 13 & 14)
3. Once safety value is down, push the push button down as shown in (See Fig 15).
4. Rotate the lid handle anti-clockwise. (See Fig 16)
5. When “ arrow ” on the lid and “O ” on the lower handle align
with each other, the lid can be opened. (See Fig 17)
Quick cooling
After the heat has been turned off, using oven gloves take the pressure cooker
to the sink and place level above the tap. Slowly allow water to ow over the
pressure cooker until the safety valve is in the down position.
Caution: Extreme caution is advised when quick cooling and moving the pressure
cooker when hot. Avoid water owing into the safety valve and pressure
regulator. Open the lid by following instruction - point 2.
CLEANING & MAINTENANCE
Simple cleaning
To extend the life of your pressure cooker be sure to empty contents in a timely
manner after each use. Wash clean and towel dry to avoid food residue from staining
the unit, especially acidic or alkaline foods. The cooker body and lid should be washed
with warm soapy water, use only a mild dishwashing detergent and a non-abrasive
cleaning pad. Special caution must be taken to avoid damage
to the rubber parts in the lid.
Complete cleaning
1. Pressure regulator cleaning
Remove the pressure regulator, by pulling knob in an upward position.
Completely detach each part of the assembly. Please use caution when removing
the lid and vent pipe to avoid loosing parts.
Rinse every part carefully in water and re-assemble them back to original position.
2. Vent pipe cleaning
The upper handle will need to be removed. Please unscrew handle and avoid
losing springs. Remove vent pipe by turning nut anti clockwise using a spanner,
rinse the vent pipe with warm water and ensure the vent pipe is not blocked.
If blocked, clear away with a needle. Ensure all parts are in good condition and
no food matter is evident. Once cleaned, place vent pipe and pressure regulator back to
the original position.
3. Safety valve
Always check whether the safety valve is clean after each use. Remove safety valve
by turning nut anti clockwise using a spanner and then dismantle for cleaning and
ensure the vent pipe is not blocked. If blocked, clear away with a needle.
Ensure all parts are in good condition and no food matter is evident.
Once cleaned place safety valve back to the original position.
4. Sealing ring gasket and lid
Remove sealing ring gasket from lid. Clean away food matter from the ring and lid
with warm water. Dry thoroughly after cleaning.
Replace sealing ring back into the lid and avoid twisting.
To ensure proper operation, insert the rubber
gasket after each use and replace when it:
• Becomes hard or less exible
• Discolours or begins to turn a yellow brown colour
• Expands or falls out of the lid
• Appears damaged in any way (eg: cut, torn or deformed)
If pressure cooker or accessories are deformed or damaged DO NOT
use pressure cooker.
OPERATING INSTRUCTIONS
1110

TROUBLE SHOOTING
Questions and answers
Q: Cooking meals?
A: Set the heat to high, Cooking starts when the steam escapes steadily from
the pressure regulator. Lower the heat and start the timing after setting the cooking
time as indicated in Cooking Time Reference or according to your own options.
If the heat is too high it will cause excessive evaporation which can cause
food to burn.
Q: Cooker not working correctly?
A: Check if heat is too high or too low.
Check if pressure regulator valve is in correct position.
Check that cooking time is correct .
Check volume of water or stock is at the correct level.
Check that there is steam escaping from the pressure regulator valve.
Q: What is heating time?
A: Heating time should commence from the time the steam starts to release
from the pressure regulator valve.
Q: Why does rice colour change to grey?
A: Cooking under high temperature and high pressure, the amino acid
and saccharine are decomposed by the heat. Thus the food containing rich protein
and carbohydrate may change its colour to grey. It is harmless and the taste will
not change.
Q: What to do if cooker is boiled dry?
A: Turn off heat immediately, take the pressure cooker away from the heat and let
it cool naturally. Do not pour water onto the cooker.
Q: Does different food need different heating time?
A: Please refer to cooking time reference for guide. Cooking times in the cooking
guide are approximate, due to the variations in tenderness of meats
and vegetables. Adjust to suit your own tastes. If steamer basket/rack is used,
add another 1/4 cup of liquid.
Minimum: 1/4 litre (2 cups) of liquid
Maximum: 2/3 of the pressure cooker.
For foods which foam or rise (e.g. rice, legumes, broths, or dried vegetable),
do not ll the cooker more than half full.
Over lling may cause a risk of clogging the vent pipe and developing excess pressure.
Be aware that certain foods, such as apple sauce, cranberries,
pearl barley, oatmeal or other cereals, split peas, macaroni, rhubarb,
or spaghetti can foam, froth and splutter, and may also clog the pressure
release device (vent pipe).
1312
TROUBLE SHOOTING

14
TIPS FOR SUCCESSFUL PRESSURE COOKING
Pressure cookers can save you time and money, helping you prepare delicious meals
that retain nutritional values often lost in other cooking methods.
Pressure cooking does require some adjustments, however.
Follow these tips for the best pressure-cooking results:
• Your pressure cooker pot acts as a traditional saucepan base and for best results
brown meat and foods like onions and spices. No point in dirtying another pan
to wash up - do it all in the pressure cooker. Add the food in small batches
and brown the food on all sides. Transfer the food to a bowl and set aside
and then combine again when completed.
• Don’t overdo the liquid. Because food cooks in a closed, sealed pot when cooking
under pressure, you have less evaporation and should therefore use less cooking
liquid than when cooking in a conventional pot. Regardless of what you’re cooking,
however, always use enough liquid. ( 2 cups ) An extra 1/4 cup if you are
using the trivet. However, check your recipe booklet to see exactly what the recipe
recommends. Never ll the pot more than halfway with liquid.
• Don’t ll a pressure cooker more than two-thirds full with food. Also, never pack
food tightly into a pressure cooker. If you don’t follow these basic rules for cooking
under pressure, the pressure cooker won’t operate efciently, affecting how the
food comes out. You may also cause the safety valves to activate, especially if there’s
too much food in the pot.
• Remember that even cut pieces mean evenly cooked food. Food should be cut into
uniform-sized pieces so that they cook in the same amount of time.
• Use stop-and-go cooking for perfect results. When making a recipe that contains
ingredients that cook at different times, begin by partially cooking slow-to-cook
foods, such as meat, rst. Then use a quick-release method to stop the pressure
cooker. Next, add the faster-cooking ingredients - such as vegetables - to the meat.
Bring the pot back up to pressure again and nish everything up
together at the same time.
• Start off on high heat and turn down to a simmer re heat source once
you hit pressure.
• Gas burners react quickly, but most electric burners don’t. If you have an electric
stove, use two burners: one on high heat to reach pressure and a second set on
a low setting to maintain pressure. Switch the pressure cooker over to the burner
with the low setting when you reach pressure.
15
• Set a timer. Have a kitchen timer handy so that after the pressure cooker reaches
and maintains pressure, you can set it for the cooking time specied in the recipe.
• The suggested cooking times in the following list or your recipe BEGIN when the
pressure cooker reaches high pressure. Always bring the pressure cooker up to high
pressure over high heat, then lower the heat source to stabilise the pressure
depending on the type of stove-top pressure cooker you’re using.
Always start with the shortest cooking time; you can always continue cooking
under pressure for an additional couple minutes until the desired texture is reached.
TEMPERATURE-PRESSURE SETTINGS
• If you are cooking from frozen – add approx 50% of the recommended
cooking time.
• We do not recommend cooking large pieces of meat from frozen.
The outside will become stringy and over cooked.
• Frozen items work best when items are in smaller pieces.
• Suggested Pressure-Cooker Cooking Times
The suggested cooking times in the following list BEGIN when the pressure cooker
reaches high pressure. Always bring the pressure cooker up to high pressure over
high heat, then lower the heat to stabilize the pressure depending on the type
of stove-top pressure cooker you’re using.
You can’t test foods for doneness while pressure cooking, so here’s a handy table
that shows how long to cooks foods in a pressure cooker.
The cooking times in the table begin when the pressure cooker reaches
high pressure.
Always start with the shortest cooking time; you can always continue cooking
under pressure for an additional couple minutes until the desired
texture is reached.
This list is a guide only. The cooking time will vary according to the size of the
pieces of vegetables or meat and your preference for taste and texture.

FOOD Cooking time (in minutes)
Poultry
Chicken, pieces 10 to 12
Chicken, whole 15 to 20
Meat
Beef, pork or lamb roast 40 to 60
Beef, pork, or lamb 1- inch cubes 15 to 20
Vegetables
Asparagus, whole 1 to 2
Barley, pearl 15 to 20
Beans, fresh green or wax, whole or pieces 2 to 3
Beans, lima, shelled 2 to 3
Beets, 1/4 - inch slices 3 to 4
Beets, whole, peeled 12 to 14
Broccoli, orets or spears 2 to 3
Brussels sprouts, whole 3 to 4
Cabbage, red or green, quartered 3 to 4
Carrots, 1/4 - inch slices 1 to 2
Cauliower, orets 2 to 3
Peas, shelled 1 to 1 1/2
Potatoes, pieces or sliced 5 to 7
Potatoes, whole, medium to large 10 to 12
Potatoes, whole, small or new / baby 5 to 7
Corn on the cob 3 to 4
Spinach, fresh, 2 to 3
Squash, fall, 1 - inch chunks 4 to 6
Squash, summer, sliced 1 to 2
Sweet potatoes, 1 1/2 - inch chunks 4 to 5
Parsnips sliced 2 to 3
Fruit
Apples, quartered 2
Grains
Quinoa 7
Rice, brown 15 to 20
Rice, white 5 to 7
Stock
Beef, chicken and Vegetable 30
16 17
TIPS FOR PRESSURE COOKING
MEAT AND POULTRY
Because many cuts of meat especially curries and slow pulled cuts generally take
so long to cook using conventional cooking methods, you’ll be delighted how quickly
they cook up in the pressure cooker. Follow these tips, and your pressure-cooked
meats and poultry will turn out tasty every time:
• Always pat meat and poultry dry before seasoning with salt and freshly
ground black pepper.
• Sear and brown in hot oil for the best avour and texture, unless otherwise
indicated in the recipe.
• Poultry can be prepared with or without the skin.
• Tougher, less-expensive cuts of meat are better suited for the pressure cooker
because cooking under pressure breaks the bers down for fork-tender results.
• Always let cooked roasts and whole poultry sit for 10 to 15 minutes before carving.

18 19
COOKING BEANS IN YOUR PRESSURE COOKER
Your pressure cooker is an ideal place to cook dried beans and legumes.
Always start with the shortest pressure cooker cooking time in this table for
a particular bean; you can always continue cooking beans under pressure
for an additional couple minutes until the desired texture is reached.
The bean cooking times in this table begin when the pressure cooker reaches high
pressure. With the exception of lentils and split peas, the cooking times given are
for cooking presoaked beans.
Recommended cooking times for dried beans and legumes
FOOD Cooking time (in minutes)
Azuki beans 9 to 13
Black beans 13 to 15
Black-eyed peas 9 to 11
Chickpeas (garbanzos) 20 to 25
Cranberry beans 15 to 20
Gandules (pigeon peas) 15 to 17
Great Northern beans 12 to 15
Kidney beans, red or white 12 to 15
Lentils, green, brown or red 8 to 10
Navy or pea beans 10 to 12
Peas, split green or yellow 8 to 10
Pinto beans 8 to 10
MAINTAINING PRESSURE IN YOUR
PRESSURE COOKER
When the pressure-release valve starts to make a hissing noise, you’ve exceeded the
pressure in your pressure cooker. Basically, the pressure cooker is telling you to lower
the burner heat to maintain a high - but not too high - pressure.
If you cook on a gas stove, a simple turn of the burner knob causes the heat to drop
almost instantaneously. If you have an electric range, turning the dial doesn’t elicit an
instant response from the element. To overcome this problem, you can cook on two
elements:
1. Set one stove element to high heat and one to a lower setting.
Set the lower-heat element to whatever setting keeps water boiling at a simmer.
2. Use the element set on high heat to bring the pressure cooker up to pressure.
You know its reached pressure when the release valve starts hissing.
3. After the pressure cooker reaches pressure, transfer it to the preheated
element that’s set on the lower setting.
Don’t forget to turn off the high heat element after the transfer!
CLEANING AND MAINTENANCE
Ensure no loose small parts are lost when cleaning and all parts are in perfect
condition. Silicone ring may change colour over time which is normal.
As a guide the sealing ring should be replaced after one or two years use
according to usage. Silicone ring MUST BE CHANGED immediately if there
is any damage or shape change. Silicone rings are available as spare parts and can
be purchased from most Baccarat stockists. Never use substitute parts.

Pressure Cooker Recipes
All recipe were made using the 6L Pressure cooker.
If you are using the larger 10L Pressure cooker and wish for larger quantities
please add additional cooking time and ingredients accordingly.
Note: follow the directions and regardless of size do not ll
the cooker more than 2/3rds full.

19
21
22
Once you
hit pressure
reduce the heat
source from
high to low.

24
Once you
hit pressure
reduce the heat
source from
high to low.

26
Once you
hit pressure
reduce the heat
source from
high to low.

28
Once you
hit pressure
reduce the heat
source from
high to low.

30
Once you
hit pressure
reduce the heat
source from
high to low.

32
Once you
hit pressure
reduce the heat
source from
high to low.

34
Once you
hit pressure
reduce the heat
source from
high to low.

36
Once you
hit pressure
reduce the heat
source from
high to low.
Table of contents