manuals.online logo
Brands
  1. Home
  2. •
  3. Brands
  4. •
  5. Baja Designs
  6. •
  7. Automobile Accessories
  8. •
  9. Baja Designs 448024 User manual

Baja Designs 448024 User manual

185 Bosstick boulevard
san Marcos, ca 92069
phone 760-560-2252
fax 760-560-0383
[email protected]
www.bajadesigns.com
2019 RAM
Select Models
Fog pocket installation
3
45
5
4
8mm
DRIVER SIDE
1
2
1
2
3
8mm
Remove the five (5), 8mm inner fender liner screws as shown and remove the
lower portion of the wheel well. Screws located in positions and must be
used in this location when reassembling.
1. 45
2.
Use a 10mm wrench to remove the
indicated nut in region . Use a 10mm
socket and ratchet to remove the
indicated screw in region . Unplug the
fog light.
7
8
Please be patient as this is a tedious step.
Use a T27 Torx or 5mm Hex bit in a 1/4”
short socket & short ratchet to remove the
top 2 screws indicated in region . Hand
space will be limited.
3.
6
TOP OF BUMPER
BEHIND BUMPER VIEW DS
78
10mm
6
78
10mm
Side View
9.8
Top View
6
T27
5mm Hex
Use a 7mm socket with an extension to remove the OEM fog
light from the plastic bracket. Hold onto the OEM hardware and
plastic bracket.
4.
FOG LIGHT ASSEMBLY (DS)
7mm
9
10
11
12
Mount the S2’s with hardware as shown below. The S2 closest to the engine should
be mounted ~35/64” away from the nearest edge of the bracket. The other S2
should be mounted ~53/64” away from the nearest edge. Using the 7mm socket,
with extension, and the OEM hardware attach the Baja Designs bracket to the OEM
plastic bracket in all available mounting
locations.
5.
Take this moment to make sure the S2 resists
rotational and up down movement. The S2
should still be able to be adjusted with force.
Refer back to Step 4, 3, & 2 to install the Assembly.
FOG POCKET FRONT VIEW
13 14
H11 Connector
Enlarged for detail
Pin the H11 Splitter with the polarity shown below. Plug the Baja Designs Splitter
into the pair of lights. Then, plug the H11 connector on the end of the splitter into
original fog light plug (H11). Tug on the connection. Test that the lights turn on.
Refer to Step 1 and re-assemble the inner fender liner. Repeat on the passenger
side.
6.
2 Pin Wiring Polarity
POS (RED)
NEG (BLK)
PIN B
PIN A
In select trims, the fog light will turn on when rotating the steering wheel past a
certain point in non off-road environments. Aim the lights downward to avoid
blinding drivers.
7.
Thank you for choosing
BD Coozie :)
3.
12
Grab a cold
one. You
deserve it!
Behind the grille kit!
Your Car
REMOVE THESE BOLTS
Position yourself under the truck. Remove the
bumper bolts on the back side of the bumper in
the arrowed positions below.
1.
16
18
17
1/4”-20 x 1.375” Bolt
16
1/4”-20 x 0.25” Bolt
17
1/4” Washer
18
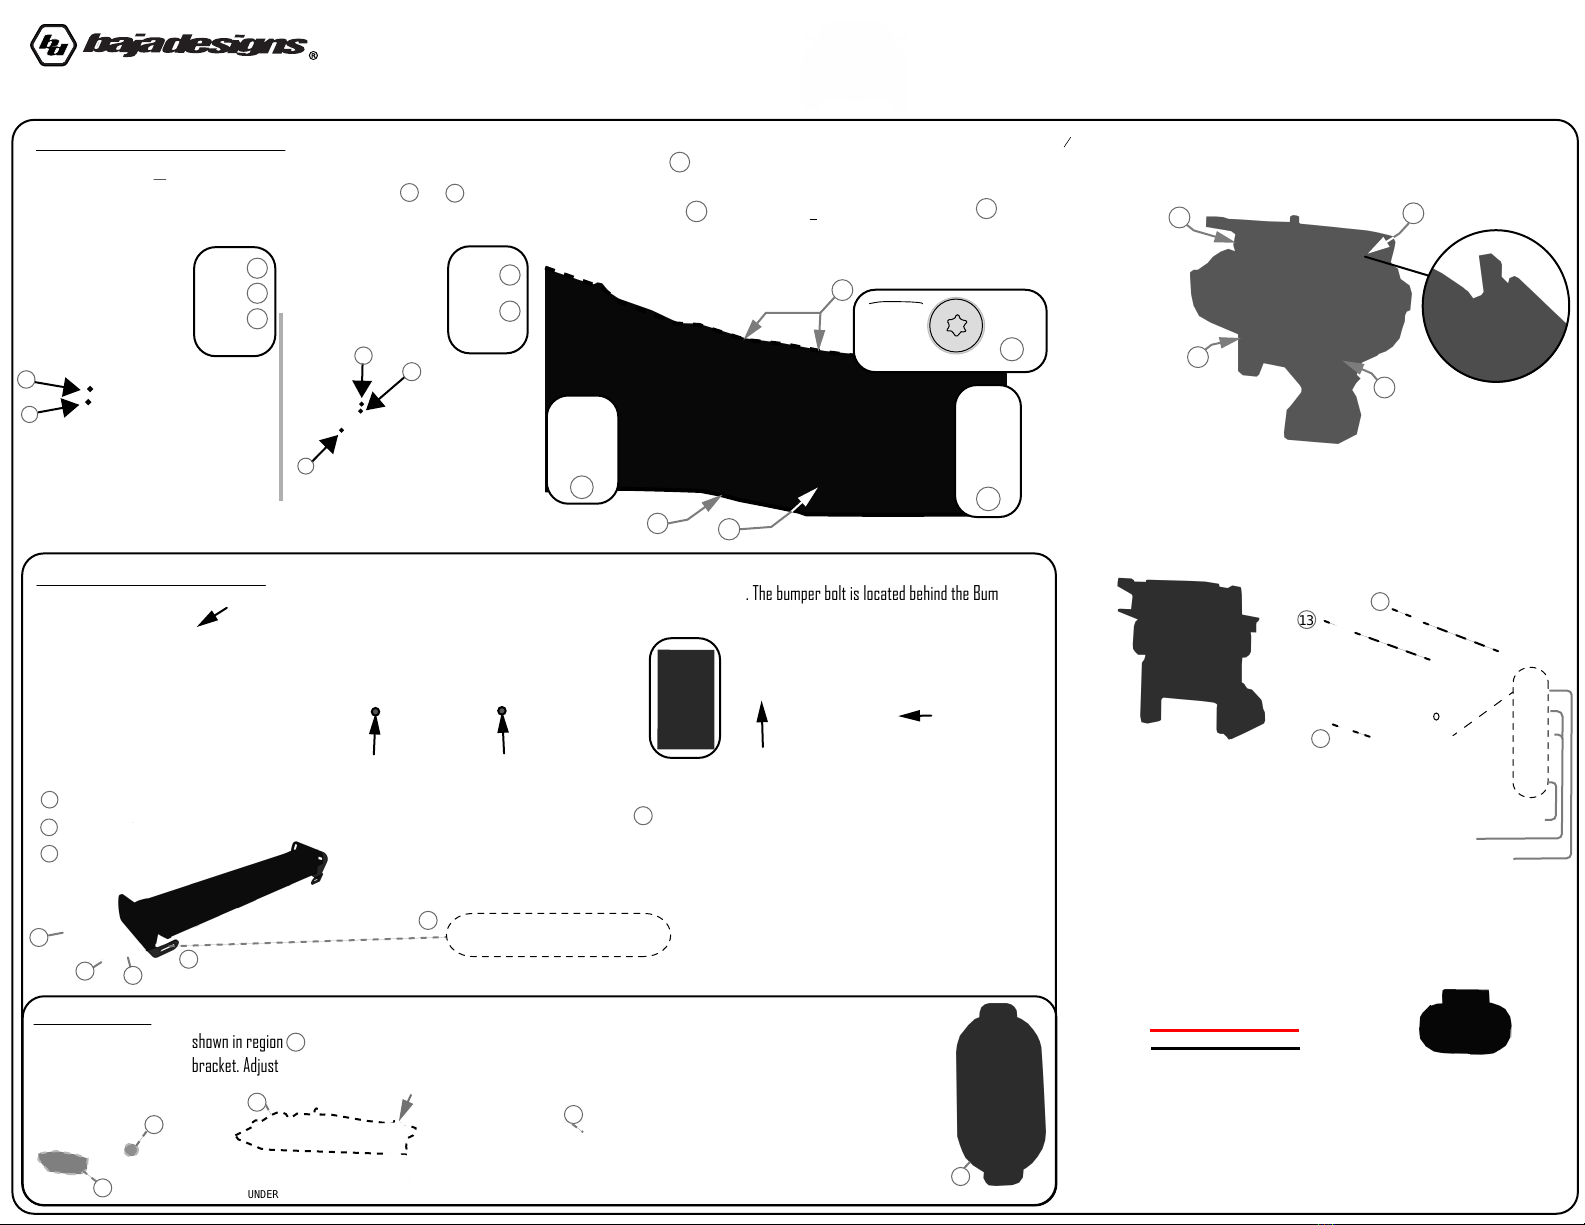
Locate this region when behind the bumper. Landmarks are indicated
on the image below. The bumper bolt is located behind the Bumper
Support Strut.
2.
Driver Side
Tow Hook
Bumper Support
Strut
Driver Side
Attach the bracket to light bar as shown to the left. Then, replace the OEM
bumper bolts with the hardware shown in region . Finally, adjust the bar so
that the center of the lightbar is centered between the bumper parking sensors.
3. 19
1/4” Nylock Nut
1/4” Washer
1/4” Washer
1/4-20 x 1.75 Bolt
19
Adjust the lightbar forward and slightly
downward. Tighten all hardware to fix
in place. Place respective leads of relay
harness onto battery terminals, add
the extension harness, and finally plug
into the lightbar. Remove button switch.
Locate the rubber boot on the Driver
Side, make incision and feed the switch
through the firewall. Re-attach switch.
Enjoy the lumens!
4.
Reverse Kit
Exhaust
UNDER REAR BUMPER VIEW (DS)
The Light Goes Here!
1/4”-20 x 5/8” Bolt
6mm Washer
1/4” Nylock Nut
Remove the OEM screw at the arrowed location. Orient the bracket as
shown in region . Assemble the light with the S2 hardware to the
bracket. Adjust the bracket away from the exhaust tip as desired.
1.
Repeat on the passenger side. Plug in the 2 pin
splitter to both lights. Then, plug in the wire tap
harness. Pull or cut back sheathing on the
Trailer Socket behind the bumper. Use the wire
tap on the Center Wire. There is a diagram on
the Trailer Socket cover shown on the right.
Ground the wire tap harness to truck frame.
2.
20
21
22
22
20
Trailer Socket
21
19
15
LIMITED LIFETIME WARRANTY
Baja Designs proudly offers a LIFETIME WARRANTY against manufacturer’s defect on all
of the products that we manufacture.
These are comprehensive warranties; other than the exclusions below – you’re cov-
ered. If your LED or HID bulb burns out, you’re covered. Additionally, cutting off
our connector or changing your lenses does not automatically void your warranty.
Exclusions:
Installation errors, abuse, misuse or crash damage. You must be the original owner
of the product and can supply proof of purchase.
Baja Designs manufactures its own products as well as resells products manufactured
by others. Baja Designs makes no express or implied warranties on products not manu-
factured by Baja Designs including without limitation any warranties or merchantabi-
lity and fitness for a particular purpose. We will however, pass on all warranties
made by the manufacturer, who has sole responsibility for performing such warran-
ties.
Baja Designs will pay the freight if your product is less than 90 days old, other-
wise defective products must be returned to Baja Designs, Inc., freight prepaid. At
our option, we will repair or replace items in question and return them at no
charge. If the identical product is no longer available, we will replace with a
similar product of equal value. Baja Designs Inc. will not be responsible for any
indirect or consequential damages in connection with defective merchandise.
Items purchased through a Baja Designs authorized dealer must be returned through
the dealer. Only available on LED auxiliary lights and product must be in sellable
condition at MSRP. Product that has been damaged in any way after the original
purchase date will be excluded from this guarantee
Indemnification:
Buyer hereby acknowledges off-roading, racing and driving at night are dangerous
activities and that the products and/or supplies purchased from Baja Designs are
used in an inherently dangerous activity that may endanger life and limb; and in no
event shall the seller, or seller's heirs and assigns, be held liable for consequen-
tial damages, nor shall seller's liability on any claim for damages arising out of
or connected with the sale, delivery, or use of purchased products and/or supplies
exceed the purchase price of the products and/or supplies.

This manual suits for next models

2

Other Baja Designs Automobile Accessories manuals

Baja Designs 45-7500 User manual

Baja Designs

Baja Designs 45-7500 User manual

Baja Designs 44-7807 User manual

Baja Designs

Baja Designs 44-7807 User manual

Baja Designs 447575 User manual

Baja Designs

Baja Designs 447575 User manual

Baja Designs 44-7534 User manual

Baja Designs

Baja Designs 44-7534 User manual

Baja Designs S8 User manual

Baja Designs

Baja Designs S8 User manual

Baja Designs S1 Guide

Baja Designs

Baja Designs S1 Guide

Baja Designs S2 Pro User manual

Baja Designs

Baja Designs S2 Pro User manual

Baja Designs Squadron User manual

Baja Designs

Baja Designs Squadron User manual

Popular Automobile Accessories manuals by other brands

Soundoff Signal mpower Fascia 4 quick start guide

Soundoff Signal

Soundoff Signal mpower Fascia 4 quick start guide

Whelen Engineering Company SA315 installation guide

Whelen Engineering Company

Whelen Engineering Company SA315 installation guide

Diode Dynamics DD0438 installation guide

Diode Dynamics

Diode Dynamics DD0438 installation guide

Yakima HighLite 2&3 instructions

Yakima

Yakima HighLite 2&3 instructions

GearMo GM-UCPDCARB product manual

GearMo

GearMo GM-UCPDCARB product manual

Curt Manufacturing 12113 installation instructions

Curt Manufacturing

Curt Manufacturing 12113 installation instructions

Jaeger 21010508J Fitting instructions

Jaeger

Jaeger 21010508J Fitting instructions

Westin 30-0020 instructions

Westin

Westin 30-0020 instructions

BURY UNI Take&Talk Installation and operating manual

BURY

BURY UNI Take&Talk Installation and operating manual

Rexing V1 FHD quick start guide

Rexing

Rexing V1 FHD quick start guide

Thule 1008 Fitting instructions

Thule

Thule 1008 Fitting instructions

AIV 100613 Mounting Guidelines

AIV

AIV 100613 Mounting Guidelines

National Cycle Quantum Wash'n'Wipe N30208 Assembly instructions and owner's manual

National Cycle

National Cycle Quantum Wash'n'Wipe N30208 Assembly instructions and owner's manual

Adventure Kings AKLL-9ODLPM 01 user manual

Adventure Kings

Adventure Kings AKLL-9ODLPM 01 user manual

Thule Kit 1415 instructions

Thule

Thule Kit 1415 instructions

GTS race chip user manual

GTS

GTS race chip user manual

Whelen Engineering Company 9M Towman’s Edge installation guide

Whelen Engineering Company

Whelen Engineering Company 9M Towman’s Edge installation guide

Atera SIGNO 044 304 manual

Atera

Atera SIGNO 044 304 manual

manuals.online logo
manuals.online logoBrands
  • About & Mission
  • Contact us
  • Privacy Policy
  • Terms and Conditions

Copyright 2025 Manuals.Online. All Rights Reserved.