manuals.online logo
Brands
  1. Home
  2. •
  3. Brands
  4. •
  5. Baja Designs
  6. •
  7. Automobile Accessories
  8. •
  9. Baja Designs S1 Guide

Baja Designs S1 Guide

185 Bosstick boulevard
san Marcos, ca 92069
phone 760-560-2252
fax 760-560-0383
[email protected]
www.bajadesigns.com
SquadronS2S1
            
Use this template, where this text is inside for
Squadron. Cut out the template and hold it on
the desired flat mounting surface. Trace the
template on the mounting surface before
cutting out the material. Make sure the light
slides in the newly cut opening.
1)
Hold the light flush to the opening. Mark the four
outer holes, remove the light, and drill with a
11/64” drillbit.
2)
Remount the light using the supplied
hardware and connect the light to the
harness.
3
            
Use this template, where this text is inside for S2. Cut out the
template and hold it on the desired flat mounting surface. Trace
the template on the mounting surface before cutting out the
material. Make sure the light slides in the newly cut opening.
1)
Hold the light flush to the opening. Mark the four outer holes,
remove the light, and drill with a 11/64” drillbit.
2)
Remount the light using the supplied hardware and connect the
light to the harness.
3
                  
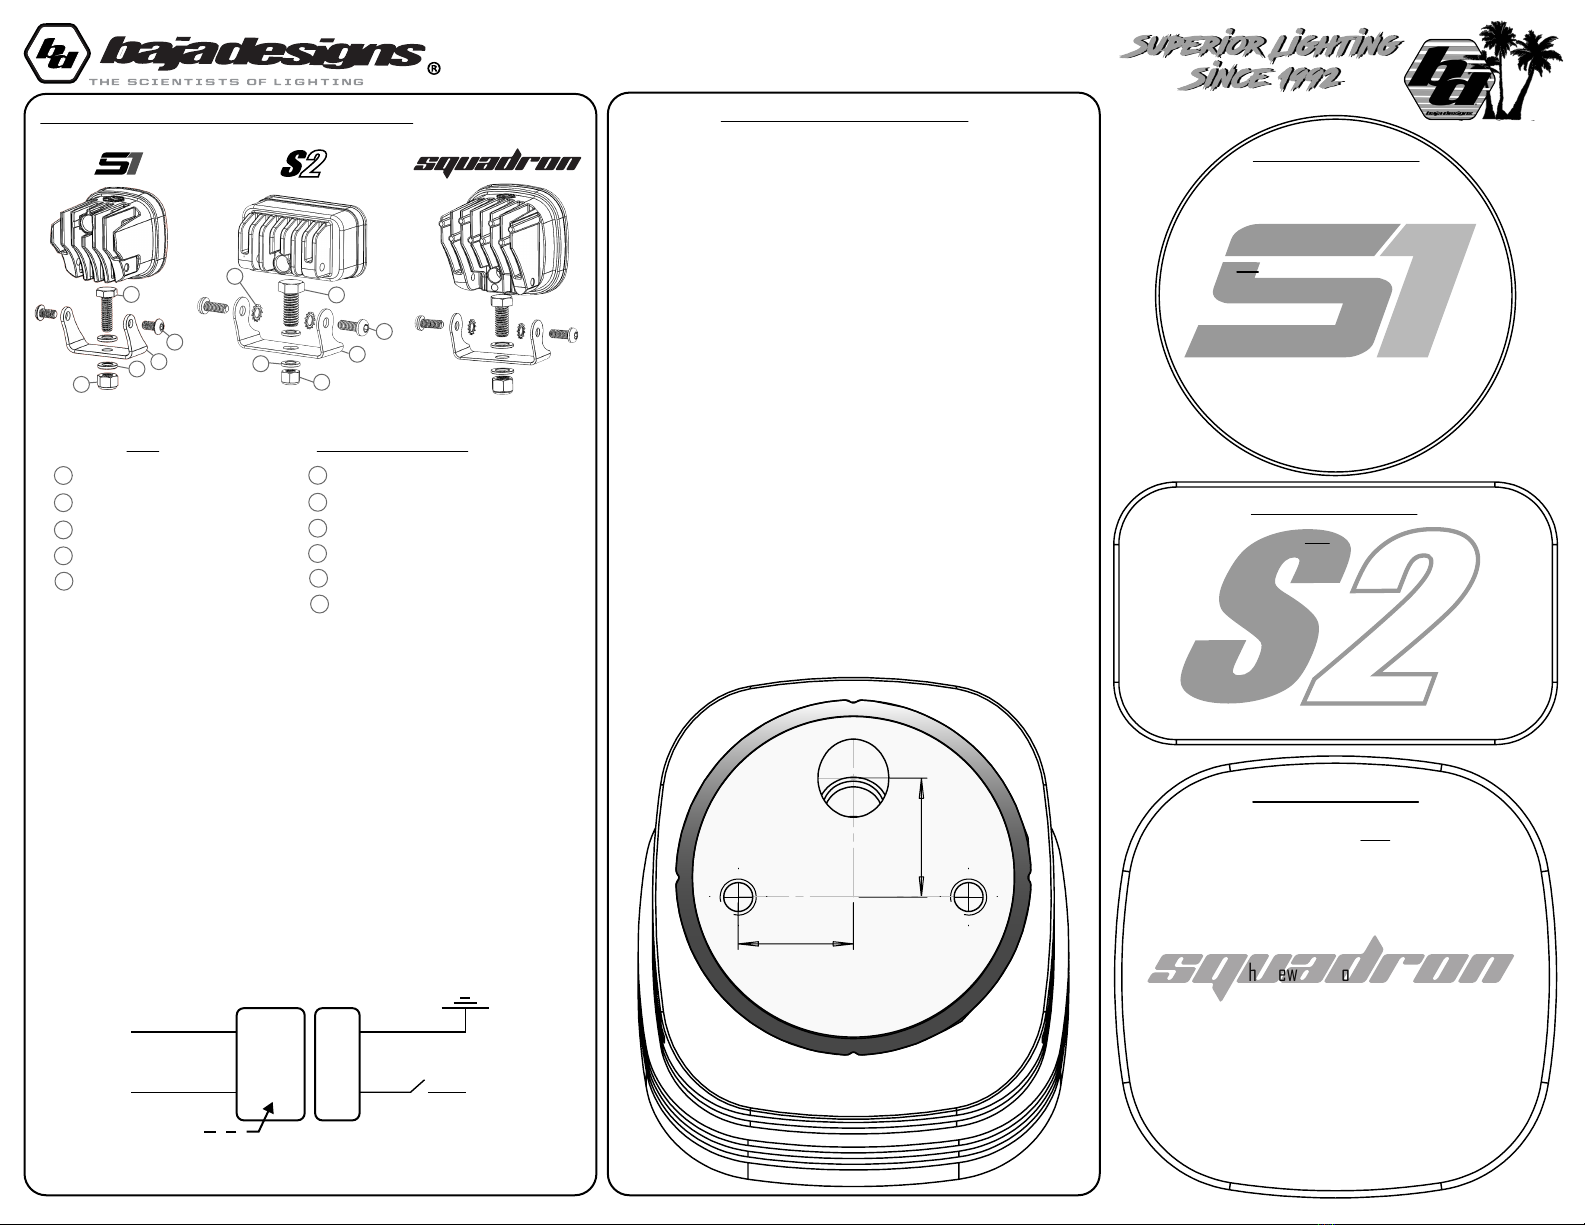
Use the template below. Cut out the template and hold it on
the desired flat mounting surface. Use a 3/8” drill for the
single vertical hole and a 1/4” drillbit for the two horizontal
holes. Deburr all edges.
)
(The following instructions are only for the Angled Squadron Product)
Install the provided O-Ring on the back of the light in the
shaded groove. *This will help prevent water from entering
behind the light, but is not guaranteed*.
)
Feed the light’s cord through the larger, 3/8 hole and use the
supplied connector to attach it to the light. Refer to the
electrical diagram on the bottom left of this page.

Use the provided 1/4”-20 bolts and associated hardware to
fasten the light to the mounting surface. Use Loctite when
installing the hardware to ensure they remain securely
fastened.
)
Due to inconsistencies of mounting surfaces, please ensure even pressure is applied all
around the O-Ring. Use additional silicone or water proofing material if needed.
                              
A
B
Black (-)
White (+)
S1/S2/Squadron
Light Connector
A
B
Ground
12-30
VDC+
On/Off
Switch
As with any electrical accessory, Baja Designs lights must have ciruit protection (fuse or circuit breaker)
0.80
0.83
1:1 TO SCALE
1)
Begin by removing the light and bracket from the box and assemble
using referenced image.
2
Locate the hardware bag(s) included in the box. For the S1, place the
1/4-20 x 0.875” bolt through the S1 Bracket with associated washers
and lock nut as shown. For the S2 and Squadron, place the 3/8” bolt
through the bottom of the bracket with associated washers. Do not fully
tighten the lower mounting bracket hardware until the light has been
aligned.
3
Mount the bracket to the light using the remaining 5mm (S1) or 6mm
(S2 & Squadron) hardware and associated washers, as shown in the
picture.
            
Grab a tape measure to make sure the hole will be
no larger than 2 and 5/8”! Or, use this template,
where this text is inside for S1. Cut out the template and
hold it on the desired flat mounting surface. Trace first
before cutting out the material. Make sure the light
slides in the newly cut opening. Use your new coaster.
1)
Remount the light using the
supplied hardware and connect the
light to the harness.
3
Hold the light flush to the opening. Mark the four outer
holes, remove the light, and drill with a 11/64” drillbit.
2)
To Proceed, Buy a 2.5” Hole Saw
Or Grab A Cold One, Both Will Work!
1
2
4
5
6
8
11
10
7
3/8” Bolt
6
7
Serrated Washer
M6 Bolt
8
S2/Squadron Bracket
9
3/8” Washer
10
3/8” Nylock Nut
11
3
S1:
1/4”-20 x 0.875”
S1 Bracket
1
2
3
M5 x 12mm
1/4” Washer
4
1/4” Nylock Nut
5
9
S2 & Squadron:
3/8”
1/4” 1/4”
LIMITED LIFETIME WARRANTY
Baja Designs proudly offers a LIFETIME WARRANTY against manufacturer’s defect on all
of the products that we manufacture.
These are comprehensive warranties; other than the exclusions below – you’re cov-
ered. If your LED or HID bulb burns out, you’re covered. Additionally, cutting off
our connector or changing your lenses does not automatically void your warranty.
Exclusions:
Installation errors, abuse, misuse or crash damage. You must be the original owner
of the product and can supply proof of purchase.
Baja Designs manufactures its own products as well as resells products manufactured
by others. Baja Designs makes no express or implied warranties on products not manu-
factured by Baja Designs including without limitation any warranties or merchantabi-
lity and fitness for a particular purpose. We will however, pass on all warranties
made by the manufacturer, who has sole responsibility for performing such warran-
ties.
Baja Designs will pay the freight if your product is less than 90 days old, other-
wise defective products must be returned to Baja Designs, Inc., freight prepaid. At
our option, we will repair or replace items in question and return them at no
charge. If the identical product is no longer available, we will replace with a
similar product of equal value. Baja Designs Inc. will not be responsible for any
indirect or consequential damages in connection with defective merchandise.
Items purchased through a Baja Designs authorized dealer must be returned through
the dealer. Only available on LED auxiliary lights and product must be in sellable
condition at MSRP. Product that has been damaged in any way after the original
purchase date will be excluded from this guarantee
Indemnification:
Buyer hereby acknowledges off-roading, racing and driving at night are dangerous
activities and that the products and/or supplies purchased from Baja Designs are
used in an inherently dangerous activity that may endanger life and limb; and in no
event shall the seller, or seller's heirs and assigns, be held liable for consequen-
tial damages, nor shall seller's liability on any claim for damages arising out of
or connected with the sale, delivery, or use of purchased products and/or supplies
exceed the purchase price of the products and/or supplies.

This manual suits for next models

3

Other Baja Designs Automobile Accessories manuals

Baja Designs 44-7807 User manual

Baja Designs

Baja Designs 44-7807 User manual

Baja Designs 45-7500 User manual

Baja Designs

Baja Designs 45-7500 User manual

Baja Designs 44-7534 User manual

Baja Designs

Baja Designs 44-7534 User manual

Baja Designs S8 User manual

Baja Designs

Baja Designs S8 User manual

Baja Designs 447575 User manual

Baja Designs

Baja Designs 447575 User manual

Baja Designs S2 Pro User manual

Baja Designs

Baja Designs S2 Pro User manual

Baja Designs 448024 User manual

Baja Designs

Baja Designs 448024 User manual

Baja Designs Squadron User manual

Baja Designs

Baja Designs Squadron User manual

Popular Automobile Accessories manuals by other brands

Anycom HCC-250 Specification sheet

Anycom

Anycom HCC-250 Specification sheet

ARB RD116 installation guide

ARB

ARB RD116 installation guide

Nokia CK-600 Installation guidelines

Nokia

Nokia CK-600 Installation guidelines

Thule 755 Fitting instructions

Thule

Thule 755 Fitting instructions

Jaeger 21040535 Fitting instructions

Jaeger

Jaeger 21040535 Fitting instructions

Atera Signo User information

Atera

Atera Signo User information

Westin 65-62058 installation instructions

Westin

Westin 65-62058 installation instructions

Orlaco 0226010 installation manual

Orlaco

Orlaco 0226010 installation manual

STO N SHO SNS 100 Installation procedures

STO N SHO

STO N SHO SNS 100 Installation procedures

Atera STRADA 022610 quick start guide

Atera

Atera STRADA 022610 quick start guide

WALMEC 40061 AL quick start guide

WALMEC

WALMEC 40061 AL quick start guide

Conrad Electronic Renkforce 1581258 operating instructions

Conrad Electronic

Conrad Electronic Renkforce 1581258 operating instructions

Deltran HYPERION 041-1002-HY-WH instruction manual

Deltran

Deltran HYPERION 041-1002-HY-WH instruction manual

PUTCO 470210 installation instructions

PUTCO

PUTCO 470210 installation instructions

Audi AIH-RNS installation guide

Audi

Audi AIH-RNS installation guide

eSolutions eProWallbox user manual

eSolutions

eSolutions eProWallbox user manual

Metra Electronics 99-5838CH installation instructions

Metra Electronics

Metra Electronics 99-5838CH installation instructions

Cruz Alu-Rack L 13-120 Assembly instructions

Cruz

Cruz Alu-Rack L 13-120 Assembly instructions

manuals.online logo
manuals.online logoBrands
  • About & Mission
  • Contact us
  • Privacy Policy
  • Terms and Conditions

Copyright 2025 Manuals.Online. All Rights Reserved.