Balcrank 3331-031 Operating manual

1
R. 07/22 SB3115
Balcrank™ Corporation · Weaverville, NC 28787 · 800-747-5300 · 800-763 0840 Fax · www.balcrank.com
Part No. / Cód.
3331-031 - Preset Rigid
3331-032 - Preset Flex 90
3331-033 - Preset Bare
PRESELECTION GUN BASIC
PISTOLA DE PRESELECCIÓN BASIC
EN
ES
Parts and technical service guide
Guía de servicio técnico y recambio
®

2SB3115 R. 07/22
Balcrank™ Corporation · Weaverville, NC 28787 · 800-747-5300 · 800-763 0840 Fax · www.balcrank.com
ENEN
- Only use the unit for the purposes for which it is intended.
- This unit has not been approved for use in commercial
transactions.
- Do not alter or modify the unit.
- It is mandatory to respect the polarity of batteries and follow
its order of placement as indicated in the batteries cover.
- If a leakage is detected in the batteries protect your eyes
and skin. Cover the batteries housing with a cloth before
WARNING: This unit is intented for professional use.
Reada all the instructions in this manual prior to use.
Tighten the nozzle nut (1a) firmly to prevent leakage. If using
a rigid nozzle, first tighten the nut (1b), place in proper
position the nozzle tuve (2) and then tighten the nut (3) to
secure it.
INTRODUCTION
!
opening it to avoid that acid get sprayed onto your skin
or eyes. If acid should spray into your eyes, rinse
immediately with clear water for several minutes.
Consult a doctor immediately afterwards
- Do not mix different battery brands.
- Do not mix new batteries with old ones.
INSTALLATION
Before connecting the hose to the gun, you must assemble
the swivel cover (4) into the hose (5). This cover is compatible
with ½” hoses. Depending on the type of hose end (6) it may
be necessary to open the groove at the end of the swivel
cover to allow it to enter through the hose fitting.
To connect the hose, hold the hose end (6) stationary while
turning the swivel end (7) of the swivel until the desired
tightness is achieved.
a
b

3
R. 07/22 SB3115
Balcrank™ Corporation · Weaverville, NC 28787 · 800-747-5300 · 800-763 0840 Fax · www.balcrank.com
ENEN
BATTERIES INSTALLATION AND REPLACEMENT
This equipment employs 4 AA 1.5 V alkaline batteries for its
operation. The gun is supplied without these batteries
installed, follow the procedure described below for
installation or replacement:
1. Remove the rubber cover (1) and then loosen the
screws (2) and remove the battery housing cover (3).
2. Install the supplied batteries (4) or equivalent batteries
(see technical specifications) according to the polarity
indicated in the battery compartment (5).
3. Place again the cover (3) and tighten the screws (2).
4. Finally, mount the rubber protector (1).
The control gun turns off automatically after 30 seconds of
inactivity to save energy. To switch on again the display
press the ON button (4).
The display shows the partial counter (1.1) on the top row
and by pressing the power button (4) the total counter or
the trip counter (resettable totalizer) is shown alternately on
the bottom line.
To reset the trip counter, press and hold the ON/RESET
button until it resets to zero.
OVERVIEW
.
.
.
.
.
.
1Display
1.1 Partial counter
1.2 Total/trip counter
1.3 History mode of transactions activated (H)
1.4 Battery level indicator
1.5 Partial counter unit
1.6 Totalizer unit
2Buttons for setting preset quantity
3Preset mode button
4ON/RESET button
5Select button
(adittional functions depending on menu)

4SB3115 R. 07/22
Balcrank™ Corporation · Weaverville, NC 28787 · 800-747-5300 · 800-763 0840 Fax · www.balcrank.com
ENEN
OPERATION
NOTE: By default and for your safety, dispensing is disabled,
you must activate the AUTO mode as detailed below to be
able to dispense fluid.
NOTA: Before activating the preset mode, make sure the
trigger is not pulled.
To begin dispensing fluid follow the procedure below:
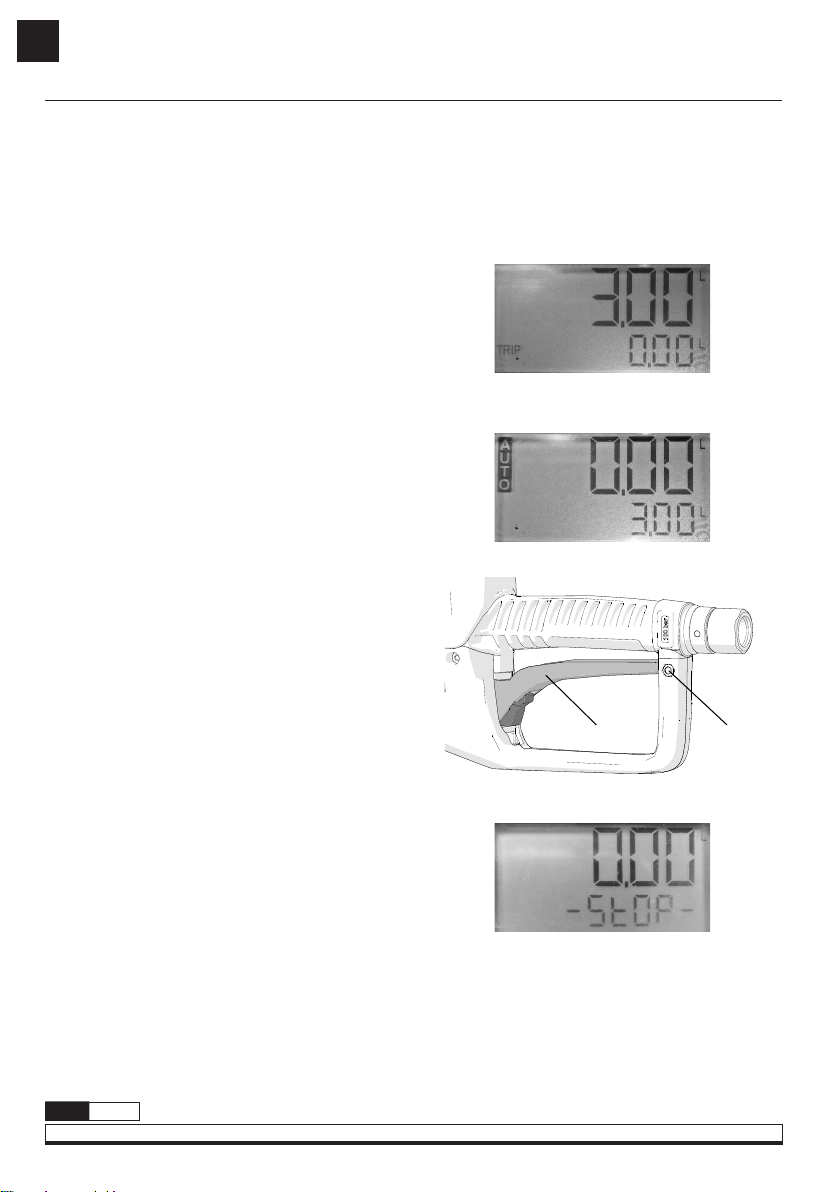
1. By means of the quantity set buttons (“10”, “1”, “0.1” buttons)
set the quantity you wish to dispense in the top row (fig. 1).
Each press of the button increases the preset quantity by
10, 1 or 0.1 units. If you press and hold one of these buttons,
the corresponding digit is reset to zero in each case.
If you do not know the amount you want to dispense and
you want to manually control the dispensing, preselect a
safely larger amount than the volume you want to dispense.
When you finish dispensing, the amount you actually
dispensed will be stored.
2. Once the quantity has been set, and making sure that
the trigger is not pressed, press the “AUTO” button. The
“AUTO” indicator lights up on the display, the partial
counter is reset to zero and the preset quantity is shown
on the bottom line (fig. 2). The gun is already prepared
to start dispensing.
3. During dispensing mode the trigger (1) may be manually
operated or you can leave the trigger fixed in open valve
position by means of the locking button (2). In both
cases, the valve will automatically closed when the
preset amount is reached.
To lock the trigger in the open position: pull the trigger,
move the locking button forward with your index finger
and, holding it in this position, let the trigger down. Once
the trigger is locked, you can stop pushing the button.
4. If you want to stop dispensing before the preset amount
is reached, press the AUTO button. The display will
show “-stop-” on the bottom line (fig 3) and the amount
dispensed up to that point is stored.
5. If dispensing is not interrupted, when the preset value is
reached the valve closes automatically and “finish” is
displayed on the bottom display line.
6. Finally, release the trigger if it was manually operated or
press it upwards and then let it return to its rest position
if you had used the locking button.
Fig. 1
Fig. 2
Fig. 3

5
R. 07/22 SB3115
Balcrank™ Corporation · Weaverville, NC 28787 · 800-747-5300 · 800-763 0840 Fax · www.balcrank.com
ENEN
OPERATION
USING THE MEMORIZED PRESETS
CONFIGURATION MENU
This gun allows the following settings::
- Set predefined values of most used presets.
- Setting of valve closing anticipation
- Setting of units of measurement
- AUTORESET mode: if set to “YES”, once a preset is finished,
the counter is reset after a few minutes.
The gun has up to 10 user memorized presets that can be
reused for quicker access to the most commonly used
presets. These presets are numbered from 0 to 9.
To select these predefined presets follow the process
below:
NOTE: Before activating the preset mode, make sure the
trigger is not pulled.
1. Press the SELECT button. The display shows the preset
number 1 (fig 4).
2. Press SELECT again if you want to select another one
of the preset positions. The display will show the stored
values from PR1 to PR5. After displaying the preset
PR-5, the display returns to the initial mode.
3. Once the desired preset position is displayed press the
AUTO button. From this point on, the operation will be
identical to that described at the beginning of
“Operation” section.
Refer to the “Setting up memorized presets” section of the
configuration menu for help on saving presets.
Fig. 4

6SB3115 R. 07/22
Balcrank™ Corporation · Weaverville, NC 28787 · 800-747-5300 · 800-763 0840 Fax · www.balcrank.com
ENEN
CONFIGURATION MENU
NAVIGATION MENU
Press the ON/RESET and “SELECT” buttons
simultaneously until the setup menu is displayed on the
screen after about 3 seconds. Pressing the “SELECT”
button allows navigation through the various menu
functions.
Main dispensing screen.
ON+SELECT PRESS
Memorized presets configuration.
Calibration.
Also allows valve closure anticipation calibration.
Manual introduction of calibration factor.
Manual set of valve closure anticipation.
Units setup.
To exit the menu, press the ON button from any screen.
A long press on the “SELECT” button enters the selected
menu.

7
R. 07/22 SB3115
Balcrank™ Corporation · Weaverville, NC 28787 · 800-747-5300 · 800-763 0840 Fax · www.balcrank.com
ENEN
To set these values follow the procedure:
1. Simultaneously press the “ON” and “SELECT” buttons
until the setup menu is displayed. The “Presets” menu is
displayed on the screen.
CONFIGURATION MENU
SETTING UP MEMORIZED PRESETS
You can store up to 10 presets, numbered from “0” to “9”.
When configuring each of them keep in mind that only the
presets that have a non-zero value stored will be visible, so
you can manage the presets needed. The preset pr-0 is the
only one that cannot be set to zero, so it will always be
visible.
2. Press and hold SELECT until the following screen is
displayed:
3. Press SELECT successively until the preset you wish to
set is displayed.
4. Use the quantity selection buttons (10, 1, 0.1) to set the
desired value. A long press of these buttons resets the
corresponding digit to zero. If you wish to set more
presets, repeat the process from step 3.
5. Confirm the selection by pressing the “ON” button, the
display returns to the main menu. Pressing the “ON”
button again exits the configuration menu.
Fig. 5 Fig. 6
Fig. 7

8SB3115 R. 07/22
Balcrank™ Corporation · Weaverville, NC 28787 · 800-747-5300 · 800-763 0840 Fax · www.balcrank.com
ENEN
CONFIGURATION MENU
3. Press and hold “SELECT” until “press auto” is shown on
the display.
AUTOMATIC CALIBRATION WITH CONTAINER AND CALIBRATION OF VALVE ANTICIPATION
4. Press the AUTO button and the screen shown (fig. 11)
will be displayed. At this step, you can start dispensing
into the vessel.
5. Once you have reached the calibrated amount in your
vessel, press AUTO again and “Adjust” will flash on the
display. Press the “0.1” button to increase the amount and
the “10” button to decrease the amount until the value
matches the volume of the calibrated vessel.
7. You will then be asked if you want to calibrate the
anticipation (fig. 13):
Press SELECT for “yes” and “ON” for “no”. Remember
that it will not be necessary to perform this process in
normal operating conditions, only if you work with very
high flow rates and you detect that after reaching the
preset value the dispensed quantity exceeds the
allowed accuracy above the preset value.
Press ON to not calibrate the anticipation, you will
6. Press SELECT to confirm. The display will show “done”
along with the new calibration factor.
This menu allows you to calibrate the gun when a
calibrated container is available. At the end of the
calibration process you will also be asked if you want to
calibrate the valve closing anticipation automatically. In
most cases you will not need to calibrate the anticipation,
2. Press “SELECT” alternately until the “Calibr” menu is
displayed.
only calibrate this parameter in the case of dispensing with
very high flow rates and detecting that after performing
the calibration process the dispensed quantity exceeds
the preset quantity beyond the accuracy range.
To perform the calibration follow the procedure below:
1. Simultaneously press the “ON” and “SELECT” buttons
until the setup menu is displayed.
return to the main menu and the new calibration factor
will be saved.
If you wish to calibrate the anticipation, press SELECT
and proceed to the next step.
Fig. 8
Fig. 10
Fig. 12
Fig. 13
Fig. 11
Fig. 9

9
R. 07/22 SB3115
Balcrank™ Corporation · Weaverville, NC 28787 · 800-747-5300 · 800-763 0840 Fax · www.balcrank.com
ENEN
CONFIGURATION MENU
8. The calibration of valve anticipation factor is performed by
dispensing 0.26 gal (1 liter) at the working flow rate. This
preset configuration will already appear on the display:
9. Press AUTO and then start dispensing. When the preset
0-26 gal (1 liter) is reached, the gun will automatically
calibrate the anticipation by displaying the new value on
the screen. The display shows “done” and automatically
returns to the main menu.
MANUAL SET OF CALIBRATION FACTOR
5. Confirm the selection by pressing the “ON” button, the
display returns to the main menu. Pressing the “ON”
button again exits the configuration menu.
Manual calculation of calibration factor can be
made with following equation:
1. Simultaneously press the “ON” and “SELECT” buttons
until the setup menu is displayed..
3. Press and hold “SELECT” until “Cfactr” flashes in
second line and the current calibration factor is
displayed.
2. Press “SELECT” until the next menu is displayed.
4. Set the value of the new calibration factor. Pressing the
“0.1” quantity button increments the units and the “10”
button decrements the units.
Calibration factor calculation
Factor = quantity shown on tdisplay x 1000
actual quantity dispensed
Fig. 14
Fig. 15 Fig. 16
Fig. 17

10 SB3115 R. 07/22
Balcrank™ Corporation · Weaverville, NC 28787 · 800-747-5300 · 800-763 0840 Fax · www.balcrank.com
ENEN
CONFIGURATION MENU
VALVE CLOSING ANTICIPATION MANUAL SETUP
WARNING: Under normal operating conditions, do
not change this value. Only at very high flow rates
!
1. Simultaneously press the “ON” and “SELECT” buttons
until the setup menu is displayed.
Remember that you can automatically calibrate this factor
within the calibration menu or manually by following the
procedure below:
3. Press and hold “SELECT” until “FCLOSE” flashes on
second line and the current factor is displayed.
5. Press ON to save the new value and return to the
main menu.
2. Press “SELECT” until the following screen is displayed:
4. The default value displayed is zero. Set the value of the
new calibration factor. Pressing the quantity button “0.1”
increases the units and the button “10” decreases the
units.
Set an aproximate value according to the following table:
6. Repeat the measurement and readjust if necessary.
MEASUREMENT
DESVIATION
(qt. gal)
FCLOSE VALUE
0,01 1
0,02 2
0,03 3
0,04 4
0,05 5
0,06 6
0,07 7
you may notice that the dispensed value slightly exceeds
the preset value due to the valve closing delay time.
Fig. 18 Fig. 19
Fig. 20

11
R. 07/22 SB3115
Balcrank™ Corporation · Weaverville, NC 28787 · 800-747-5300 · 800-763 0840 Fax · www.balcrank.com
ENEN
Last 5 transactions can be displayed following the
procedure below:
PARCIAL TOTAL
L L
P G
Q G
G G
UNITS SETUP
HISTORY TRANSATIONS MENU
1. Simultaneously press the “ON” and “SELECT” buttons
until the setup menu is displayed.
3. Press and hold “SELECT” until “Units” flashes on the
second line and the current units are displayed.
5. Confirm the selection by pressing the “ON” button, the
display returns to the main menu. Pressing the “ON”
button again exits the configuration menu.
1. Press and hold SELECT until the following screen
is displayed:
2. The last transaction performed is displayed. The partial
counter shows the amount dispensed.
3. Press SELECT to navigate through the last 5
transactions performed.
4. To return to the home screen press the ON button.
2. Press “SELECT” alternately until the “UNITS” menu
is displayed.
4. Press “SELECT” alternately until the desired units are
displayed. The available settings are:
Fig. 21
Fig. 22
Fig. 23

12 SB3115 R. 07/22
Balcrank™ Corporation · Weaverville, NC 28787 · 800-747-5300 · 800-763 0840 Fax · www.balcrank.com
ENEN
STRAINER MAINTENANCE
TECHNICAL SPECIFICATIONS
WARNING: Release all pressure within the system
and disconnect the air supply to the pump prior to
performing strainer replacement. Discharge pressure
operating the gun into an appropiate container and
open any bleeder-type air valves and fluid drain
valver in the system if necessary.
The gun can be provided with a strainer (optional). To
inspect strainer or make replacement read the
following procedure:
• Remove the cover (1) of the swivel and loosen the nut (2)
of the hose.
• Remove the o-ring (3), (4) and then the filter.
• Check the filter clean or replace as necessary.
• Place again the filter with the o-ring and install the hose
with the swivel cover.
!
Thread port ½” NPT
Moist parts materials Acetal, stainless steel, NBR, aluminum, brass, zinc plated steel
Meter type Oval gear
Flow rate 0.25 - 7.5 US gal/min (1-30 l/min)
Maximum pressure 1450 psi (100 bar)
Temperature range 14 a 122 ºF (-10 a 50 ºC)
Accuracy (oil) ±0,5 %
Accuracy (coolant solutions) ±1 %
Viscosity range Up to 2000 mPa.s
Display LCD with double row digits
Units Litres, galons, quarts, pints
Batteries 4 x AA 1.5V
Weight (with nozzle and batteries) 4.6 lb (2.1 kg)
Dimensions (without nozzle tube) 11.7” x 3.5” x 6.1” (297 x 89 x 155 mm) (length x width x height)

13
R. 07/22 SB3115
Balcrank™ Corporation · Weaverville, NC 28787 · 800-747-5300 · 800-763 0840 Fax · www.balcrank.com
ENEN
SPARE PARTS
Pos. Code Description
1833925 Electronic module
2833924 Oval gears kit
3833926 Valve sealing kit
43332-092 Flexible 90º outlet with quarter turn opening non-drip tip
53332-091 Rigid outlet with quarter turn opening non-drip tip
TROUBLESHOOTING GUIDE
Problem Posible cause Solution
Screen does not turn on
Discharged batteries Replace batteries
Stand-by mode Press ON button
Loose batteries cover Tighten battery cover screws
Fluid not being dispensed AUTO mode not activated Press AUTO mode
The gun does not supply fluid and
the AUTO mode is activated.
AUTO mode activated with trigger
pulled
Release trigger, desactivate AUTO mode
and re-activate it making sure that the
trigger is not depressed
Accuracy error
Very high or low flowrates used Calibrate
Very high or low (water based fluid)
fluid viscosity Calibrate
Low flow rate Strainer damaged or dirty Replace or clean strainer
Low pump pressure Increase pump air pressure
Dispensed quantity excedes
preset value Very high flowrate Adjust valve anticipation closing factor
DISPOSAL INFORMATION
The symbol above means that according to local laws and regulations your product and/or its battery
must be disposed of separately from household waste. When this product reaches its end of life, take
it to a collection point designated by local authorities. The separate collection and recycling of your
product and/or its battery at the time of disposal will help conserve natural resources and ensure
that it is recycled in a manner that protects human health and the environment.

14 SB3115 R. 07/22
Balcrank™ Corporation · Weaverville, NC 28787 · 800-747-5300 · 800-763 0840 Fax · www.balcrank.com
ESES
- Use el equipo sólo para los fines a los que está
destinado.
- No altere o modifique el equipo.
- Es obligatorio respetar la polaridad de las baterías y
seguir el orden de colocación indicado en el alojamiento.
- Si se produce una fuga en las pilas, protéjase los ojos.
Abra el compartimento de las pilas después de haberla
cubierto con un paño para evitar cualquier salpicadura.
ADVERTENCIA: Este equipo está destinado a uso
profesional. Lea todas las instrucciones de este
manual antes de su uso.
Apriete firmemente la tuerca (1a) de la extensión para
evitar fugas. En caso de emplear una extensión rígida,
apriete en primer lugar la tuerca (1b), oriente correctamente
el tubo de la extensión (2) y a continuación apriete la
tuerca (3) para dejarla fija.
INTRODUCCIÓN
!
En caso de contacto con el líquido liberado por la pila,
enjuague inmediatamente con agua limpia y consulte a
un médico urgentemente.
- No mezcle pilas de marcas diferentes.
- No mezcle pilas nuevas con pilas utilizadas.
- Use el equipo sólo con fluidos compatibles y en el rango
de funcionamiento especificado (consultar apartado de
especificaciones técnicas).
INSTALACIÓN
Antes de conectar la manguera a la pistola debe introducir
el protector de rótula (4) en la manguera (5). Este protector
es compatible con mangueras de ½”. En función del tipo de
terminal (6) de la manguera puede ser necesario abrir la
ranura del extremo del protector para permitir su entrada
por el racor (7) de la misma.
Para conectar la manguera mantenga fijo el terminal de la
manguera (6) mientras hace girar el extremo giratorio (7)
de la rótula hasta lograr el apriete deseado.
a
b

15
R. 07/22 SB3115
Balcrank™ Corporation · Weaverville, NC 28787 · 800-747-5300 · 800-763 0840 Fax · www.balcrank.com
ENEN
ESES
MONTAJE Y SUSTITUCIÓN DE LAS BATERÍAS
Este equipo emplea para su funcionamiento 4 pilas alcalinas
tamaño AA de 1.5 V. La pistola se suministra sin las pilas
montadas, siga el siguiente procedimiento para su
instalación o sustitución:
1. Retire el protector de goma (1) y a continuación afloje
los tornillos (2) y retire la tapa del compartimento de
baterías (3).
2. Instale las pilas suministradas (4) o unas equivalentes
(ver especificaciones técnicas) respetando la polaridad
indicada en el compartimento de pilas (5).
3. Vuelva a poner la tapa (3) y apriete los tornillos (2).
4. Por último, monte el protector de goma (1).
La pistola se apaga automáticamente trascurridos 30
segundos de inactividad para ahorrar energía. Para
encender la pantalla pulse el botón de encendido (4).
La pantalla muestra el contador parcial (1.1) en la fila
superior y mediante la pulsación del botón de encendido
(4) se muestra alternativamente en la línea inferior el
contador total o el trip (totalizador reseteable).
Para resetear el contador trip, mantenga pulsado el botón
de encendido hasta que se ponga a cero.
VISIÓN GENERAL
1Pantalla
1.1 Contador parcial
1.2 Contador total/trip/flow (opcional)
1.3 Modo histórico de transacciones activo (H)
1.4 Indicador de nivel de batería
1.5 Unidades de contador parcial
1.6 Unidades de contador total
2Botones de selección de cantidad a
preseleccionar
3Botón de activación/desactivación de modo
preselección
4Botón de encendido/RESET
5Botón select
Varias funciones en función de la pantalla
.
.
.
.
.
.

16 SB3115 R. 07/22
Balcrank™ Corporation · Weaverville, NC 28787 · 800-747-5300 · 800-763 0840 Fax · www.balcrank.com
ESES
COMENZAR A DISPENSAR
NOTA: Por defecto y para su seguridad, el dispensado está
desactivado, debe activar el modo AUTO según se detalla a
continuación para poder dispensar fluido.
NOTA: Antes de activar la preselección, asegúrese de que
el gatillo no está accionado.
1. Por medio de los botones de ajuste de cantidad (botones
“10”, “1”, “0.1”) ajuste la cantidad que desea dispensar en la
fila superior (Fig. 1). Cada pulsación del botón incrementa
en 10, 1 o 0.1 unidades la cantidad preseleccionada. Si
mantiene pulsado uno de esos botones, se pone a cero el
dígito correspondiente en cada caso.
Si desconoce la cantidad que quiere dispensar y usted
desea controlar manualmente el dispensado,
preseleccione una cantidad con seguridad mayor que la
que quiere dispensar. Cuando finalice el dispensado se
almacenará la cantidad que realmente dispensó.
2. Una vez ajustada la cantidad, y asegurando que el
gatillo no está pulsado, pulse el botón “AUTO”. En la
pantalla se ilumina el indicador “AUTO”, el contador
parcial se pone a cero y en la línea inferior se muestra
la cantidad preseleccionada (Fig. 2). La pistola queda a
la espera de iniciar el dispensado.
3. Durante el dispensado, puede accionar manualmente el
gatillo (1) o puede dejar el gatillo fijo mediante el botón
de bloqueo (2). En ambos casos, la válvula cortará
automáticamente el suministro cuando se alcance la
cantidad preseleccionada.
Para bloquear el gatillo en posición abierta: acciona el
gatillo, desplazar el botón de bloqueo con su dedo
índice hacia adelante y manteniéndolo en esa posición
deje descender el gatillo. Una vez que el gatillo queda
fijo puede dejar de empujar el botón.
4. Si desea detener el dispensado antes de que alcance la
cantidad preseleccionada, pulse el botón AUTO. La
pantalla mostrará “-stop-“ en la línea inferior (Fig. 3) y se
almacena la cantidad dispensada hasta ese momento.
5. Si no se interrumpe el dispensado, cuando se alcanza la
preselección la válvula cierra automáticamente y se
muestra “finish” en la línea inferior de pantalla.
6. Finalmente, suelte el gatillo si lo estaba accionado de
manera manual o presiónelo hacia arriba y después
déjelo volver a su posición de reposo si había empleado
el botón de bloqueo.
Fig. 1
Fig. 2
Fig. 3

17
R. 07/22 SB3115
Balcrank™ Corporation · Weaverville, NC 28787 · 800-747-5300 · 800-763 0840 Fax · www.balcrank.com
ENEN
ESES
COMENZAR A DISPENSAR
DISPENSADO MEDIANTE PRESELECCIONES PREDEFINIDAS
MENÚ DE CONFIGURACIÓN
Esta pistola permite las siguientes configuraciones:
- Establecer valores predefinidos de preselecciones
más usadas.
- Ajuste de anticipación de cierre de válvula.
- Configuración de unidades de medida.
- Modo AUTORESET: si se configura en “YES”, una vez
finalizada una preselección, el contador se resetea
transcurridos unos minutos.
La pistola dispone de hasta 10 preselecciones memorizadas
por el usuario que puede emplear para acceder más
rápidamente a las preselecciones más usadas
habitualmente. Estas preselecciones se numeran de la 0 a
la 9. Para seleccionar estas preselecciones predefinidas
siga el siguiente proceso:
NOTA: Antes de activar la preselección, asegúrese de que
el gatillo no está accionado.
1. Pulse el botón SELECT. La pantalla muestra la
preselección predefinida número 1 (Fig. 4).
2. Pulse nuevamente SELECT si desea seleccionar otro de
los valores predefinidos. La pantalla mostrará los
distintos valores almacenados desde PR1 hasta PR5.
Después de visualizar el predefinido PR-5, la pantalla
vuelve a mostrar el modo inicial.
3. Una vez mostrada la preselección deseada pulse el
botón AUTO. A partir de aquí el funcionamiento será
idéntico al descrito en el apartado “Comenzar
a dispensar”.
Consulte el apartado “Configurar preselecciones de
rápido acceso” del menú configuración para ayuda sobre
su guardado.
Fig. 4

18 SB3115 R. 07/22
Balcrank™ Corporation · Weaverville, NC 28787 · 800-747-5300 · 800-763 0840 Fax · www.balcrank.com
ESES
MENÚ DE CONFIGURACIÓN
NAVEGACIÓN POR EL MENÚ
Presione simultáneamente los botones de encendido y
“SELECT” hasta que transcurridos unos 3 segundos se
muestra por pantalla el menú de configuración. La
pulsación del botón “SELECT” permite la navegación por
las distintas funciones del menú.
Pantalla inicial de dispensado
PULSACIÓN SIMULTÁNEA ON+SELECT
Menú de ajuste de preselecciones más usadas.
Calibración mediante recipiente.
También permite calibrar la anticipación de cierre de válvula.
Introducción directa del factor de calibración.
Ajuste de anticipación de cierre de válvula.
Configuración de unidades.
Para salir del menú, desde cualquier pantalla pulse el
botón ON.
Una pulsación prolongada del botón “SELECT” accede al
menú seleccionado.

19
R. 07/22 SB3115
Balcrank™ Corporation · Weaverville, NC 28787 · 800-747-5300 · 800-763 0840 Fax · www.balcrank.com
ENEN
ESES
Para establecer estos valores siga el procedimiento:
1. Presione simultáneamente los botones “ON” y
“SELECT” hasta que se muestre el menú de
configuración. El menú “Presets” ya aparece en pantalla.
MENÚ DE CONFIGURACIÓN
AJUSTAR PRESELECCIONES PREDEFINIDAS
Puede memorizar hasta 10 preselecciones, numeradas de
la “0” a la “9”. Cuando configure cada una de ellas tenga en
cuenta que sólo serán visibles las preselecciones que
tengan almacenado algún valor distinto de cero, de esta
manera puede controlar el número que desea emplear.
La preselección pr-0 es la única que no se puede poner a
cero por lo que siempre estará visible.
2. Mantenga pulsado SELECT hasta que se muestra la
siguiente pantalla:
3. Pulse SELECT sucesivamente hasta visualizar el
predefinido que desea establecer.
4. Mediante los botones de selección de cantidad (10, 1,
0.1) fije el valor deseado. Una pulsación prolongada de
estos botones pone a cero el dígito correspondiente. Si
desea fijar más predefinidos repita el proceso desde el
punto 3.
5. Confirme la selección pulsando el botón “ON”, la pantalla
vuelve al menú principal. Una nueva pulsación del botón
“ON” sale del menú de configuración.
Fig. 5 Fig. 6
Fig. 7

20 SB3115 R. 07/22
Balcrank™ Corporation · Weaverville, NC 28787 · 800-747-5300 · 800-763 0840 Fax · www.balcrank.com
ESES
MENÚ DE CONFIGURACIÓN
3. Mantener presionado “SELECT” hasta que “press auto”
se muestra en pantalla”.
CALIBRACIÓN AUTOMÁTICA CON RECIPIENTE Y CALIBRACIÓN DE ANTICIPACIÓN
4. Pulse el botón AUTO y se mostrará la pantalla de la
imagen (Fig. 11). En este momento puede comenzar a
dispensar en el recipiente.
5. Una vez alcanzada la cantidad calibrada en su recipiente,
pulse nuevamente AUTO y en pantalla parpadeará “Adjust”.
Pulse el botón “0.1” para incrementar la cantidad y el
botón “10” para disminuirla hasta ajustar el valor con el
volumen del recipiente calibrado.
7. A continuación se le solicitará si desea calibrar la
anticipación (Fig. 13):
Pulse SELECT para “sí” y “ON” para “no”. Recuerde que
no será necesario realizar este proceso en condiciones
normales de operación, sólo si trabaja con caudales
muy elevados y detecta que tras alcanzar el valor
preseleccionado la cantidad dispensada excede por
encima del error permitido dicho valor.
Pulse ON para no calibrar la anticipación, regresará al
6. Pulse SELECT para confirmar. La pantalla mostrará
“done” junto con el nuevo factor de calibración.
Este menú permite calibrar la pistola cuando dispone de
un recipiente calibrado. Al finalizar el proceso de
calibración también se le preguntará si desea calibrar la
anticipación de cierre de válvula automáticamente. En la
mayoría de los casos no necesitará calibrar la anticipación,
2. Presionar “SELECT” alternativamente hasta que se
muestra el menú “Calibr”.
sólo lo calibre este parámetro en el caso de trabajar con
caudales muy elevados y detectar que tras realizar el
proceso de calibración la cantidad dispensada excede la
preseleccionada más allá del rango de precisión.
Para realizar la calibración siga el siguiente procedimiento:
1. Presione simultáneamente los botones “ON” y
“SELECT” hasta que se muestre el menú de
configuración.
menú principal quedando guardado el nuevo factor de
calibración.
Si desea calibrar la anticipación, pulse SELECT y
continúe al siguiente paso.
Fig. 8
Fig. 10
Fig. 12
Fig. 13
Fig. 11
Fig. 9
This manual suits for next models
2
Table of contents
Languages:
Other Balcrank Power Tools manuals