Balluff BIS U-870 Parts list manual

english
Handheld Programmer BIS U-870
Technical Description, User's Guide

www.balluff.com

www.balluff.com
Handheld Programmer
BIS U-870
3
6
5
4
3
2
1User instructions 4
1.1 CE Declaration of Conformity and user safety 4
1.2 Scope of delivery 4
1.3 About this manual 4
1.4 Structure of the manual 4
1.5 Typographical conventions 5
1.6 Symbols 5
1.7 Abbreviations 5
Safety 6
2.1 Intended use 6
2.2 General safety notes 6
2.3 Notes on using and returning rechargeable batteries 6
2.4 Meaning of the warning notes 6
2.5 Safety distance between transmitter antenna and persons 7
2.6 Impairment of transmission power 7
Getting started 8
3.1 Battery operation 8
3.2 Overview of WORKABOUT PRO 9
3.3 COLD RESET or battery replacement 9
3.4 Turning the Handheld Programmer (Workabout Pro 3 ) on/off 9
3.5 Turning the Handheld Programmer (Workabout Pro G2) on/off 10
3.6 Keyboard, display, and operating concept 10
3.7 Creating your own operating interface 10
3.8 Starting the RFID application 11
3.9 Operating menu overview 11
Basic knowledge 18
4.1 Function principle of Identification Systems 18
4.2 Product description 18
4.3 Control function 18
4.4 Files 18
4.5 Data carrier types 19
Operation 20
5.1 Keyboard, display, and operating concept 20
5.2 Reading data carriers 20
5.3 Writing data 21
5.4 Working with files 22
5.5 Connecting the Handheld Programmer to a PC/laptop 23
Technical data 24
Appendix 25
Index 28

Handheld Programmer
BIS U-870
4
User instructions
1
1.1 CE Declaration of
Conformity and
user safety
1.2 Scope of delivery
1.3 About this
manual
1.4 Structure of the
manual
Declaration of Conformity
This product was developed and produced in compliance with applicable European
standards and directives.
Note
You can request a Declaration of Conformity separately.
For additional safety instructions, refer to Section „Safety“ on page 6.
Included in the scope of delivery:
Handheld Programmer BIS U-870–
BIS Software-CD–
AC adapter–
Operating instructions in printed form (GER/ENG)–
This manual describes operation of the BIS U-870 Identification System together with the
„Workabout Pro“ handheld computer made by PSION Teklogix GmbH.
This manual does not describe:
Startup, operation, and care of the „Workabout Pro“ handheld computer,–
Installation and operation of accessories and expansion devices,–
Docking station and device interfaces.–
Refer to the manuals from PSION Teklogix GmbH on the enclosed CD for this information.
You can find the current documentation on the Internet at http://www.psion-teklogix.com/.
The manual is organized so that the sections build on each other.
Section 2: Basic safety information.
Section 3: First steps (starting the software).
Section 4: Processing data carriers and using files.
Section 5: Connecting the Handheld Programmer to the PC.
Section 6: Technical data for the Identification System.

www.balluff.com
Handheld Programmer
BIS U-870
5
1.5 Typographical
conventions
Enumerations
Actions
Cross-references
Buttons
Menu commands
Keys
1.6 Symbols
1.7 Abbreviations
The following conventions are used in this manual.
Enumerations are shown as a list with an en-dash.
Entry 1,–
Entry 2.–
Action instructions are indicated by a preceding triangle. The result of an action is indicated by
an arrow.
Action instruction 1.►
Action result.⇒
Action instruction 2.►
Cross-references indicate where additional information on the topic can be found (see „Technical
Data“ starting page 24).
Buttons are set in square brackets, e.g. [Write].
Menu commands are joined with a greater-than symbol, e.g. „Start > Programs“ stands for the
menu command <Programs> from the start menu.
Keys are set in angle brackets, e.g. confirm by pressing <Enter>.
Attention!
This symbol indicates a safety instruction that absolutely must be followed.
Note, tip
This symbol indicates general notes.
BIS Balluff Identification System
EEPROM Electrically Erasable Programmable Read Only Memory
EMC Electromagnetic Compatibility
EPC Electronic Product Code
PC Personal Computer
RFID Radio Frequency Identification
PLC Programmable Logic Controller
TID Tag Identifier
User instructions
1

Handheld Programmer
BIS U-870
6
2.1 Intended use
2.2 General safety
notes
2.3 Notes on using
and returning
rechargeable
batteries
2.4 Meaning of the
warning notes
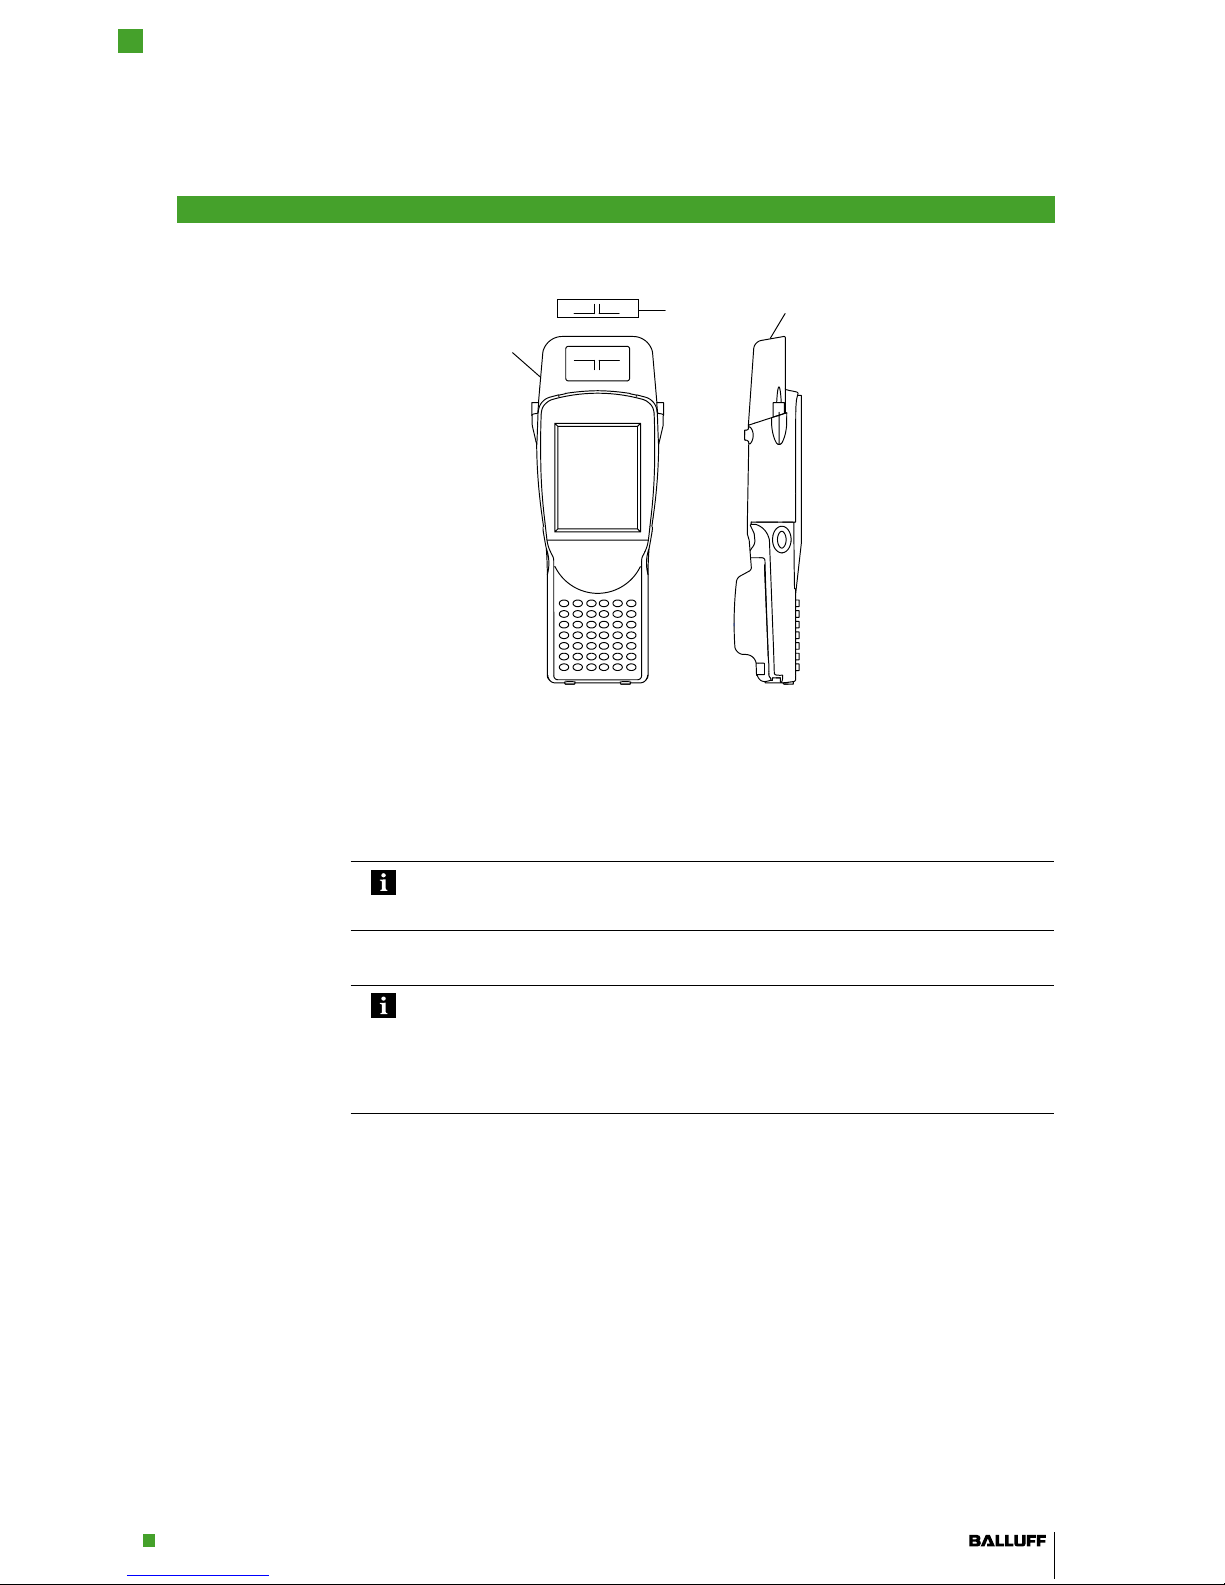
The BIS U-870 Handheld Programmer is a component of the BIS U Identification System. Within
the Identification System it checks, corrects, or initializes data carriers.
The Handheld Programmer may only be used for this purpose in an industrial environment
corresponding to Class A of the EMC Law.
This description is valid for Handheld Programmers of series BIS U-870-1-008-…
Startup
Startup is only to be performed by trained specialists. Any damage resulting from unauthorized
manipulation or improper use voids the manufacturer's guarantee and warranty.
When starting up, observe the instructions in the manuals from PSION Teklogix GmbH.
The Handheld Programmer is only to be operated using the power supply approved for the
device (see „Technical data“ on page 24 ).
Operation and testing
The operator is responsible for ensuring that locally applicable safety regulations are observed.
In the event of defects and non-correctable faults in the Identification System, take the system
out of service and secure it from unauthorized use.
Attention!
Improper use, charging, disposal, or replacement of the rechargeable battery may
result in an explosion! Replace the rechargeable batteries only with the same type or a
type recommended by the manufacturer.
Note
Every user is legally obligated by the German Battery Ordinance to return all regular or
rechargeable batteries that have been used or spent. Disposal with household waste
is prohibited. Old batteries and rechargeable batteries can be returned without charge
at your municipal collection point and anywhere that batteries and rechargeable batte-
ries of the type in question are sold. You can also return the included batteries to the
following address (with sufficient postage) after using them:
Balluff GmbH, Schurwaldstraße 9, 73765 Neuhausen a.d.F., Germany
Attention!
Use only Balluff-approved power supplies.
Attention!
The pictogram used with the word „Attention“ warns of a situation that could harm
someone's health or damage equipment. Failure to observe these warning notes
may result in injury or damage to equipment.
Always take the described measures to prevent hazardous situations.►
Safety
2

www.balluff.com
Handheld Programmer
BIS U-870
7
Note
The International Commission of Radiological Protection (ICRP) has specified limit
values for the exposure of humans to RF fields. These limit values are also recommen-
ded by the ICNIRP (International Commission of Non Ionizing Radiological Protection).
Acc. to IEC 62369 „Evaluation of human exposure to electromagnetic fields from short
range devices (SRDS) in various applications over the frequency range 0 GHz to 300
GHz“, the following limit values apply for UHF systems in the frequency range
860-930 MHz:
Electric field strength: E = 41.25 V/m–
Magnetic field strength: H = 0.111 A/m–
RF power density: E x H = 4.57 W/m– 2
For the maximum permissible radiated power acc. to ETSI, the safety distance should
be maintained. This means that persons should not remain closer than 26 cm to the
transmitter antenna for longer periods of time (several hours without interruption). Brief
periods near the antenna (distance < 0.26 m), even if repeated, pose no cause for
concern according to current knowledge. Reducing the transmission power also
reduces the required safety distance. With this device, a transmission power of 0.5 W
is possible and the minimum safety distance that is to be maintained is d = 0.13 m.
Note
To avoid negatively impacting the transmission power, please make certain that there
are no objects between the Handheld Programmer and the data carrier.
2.5 Safety distance
between
transmitter
antenna and
persons
2.6 Impairment of
transmission
power
Safety
2

Handheld Programmer
BIS U-870
8
3.1 Battery operation
Changing
rechargeable
batteries and
operating life
Charging
rechargeable
batteries
Note
The system components of the Handheld Programmer are powered by a 3.7 V
rechargeable battery pack (Li-Ion).
Please charge rechargeable batteries provided by Balluff before using them for the►
first time!
Fig. 1: Connecting the power supply – Charging the battery pack
A high-capacity rechargeable battery has a battery life of up to 48 hours after a full charge.
Prerequisite: 200 read/write operations, after 3 minutes without being used, the device enters
Suspend Mode. Data in the Handheld Programmer are retained for at least 10 to 15 minutes
while the battery is being replaced.
Note
User data are saved by default in a RAM-based folder. The data in this RAM folder are
lost if the main battery pack and backup battery pack are completely drained or if the
device is restarted cold (see also „Cold Reset“, Section 3.3 on page 9). The safest
place to store the data is an SD or MMC memory card (flash disk).
Attention!
Components can be damaged by using an incorrect charging current.
Use the docking station or the Balluff-recommended charger/power supply for►
charging the battery pack.
Insert the device into the docking station or connect the power supply►
Note
When using a docking station, an uncharged battery pack may be inserted. Then
simply dock the unit and turn it on.
Getting Started
3

www.balluff.com
Handheld Programmer
BIS U-870
9
3.2 Overview of
WORKABOUT
PRO
BIS U-870
3.3 COLD RESET or
battery
replacement
Saving your own
profile with „Total
Recall“
3.4 Turning the
Handheld
Programmer
(Workabout Pro
3 ) on/off
Figure 2: BIS U-870-1-008-X-000 Handheld Programmer
1Read/write head for BIS U data carrier
2Active surface
3BIS U data carrier
Note
Hold elongated data carriers to the antenna of the Handheld Programmer sideways
so that they can be detected by the Handheld Programmer .
Note
Removing the battery pack or performing a cold reset will delete data, drivers, and
settings from the unit's RAM!
The „Total Recall“ program can be used to save the personal profile so that it is
automatically loaded after a cold reset.
The „Total Recall“ program is located in the „Control Panel“ of the Workabout Pro.
To open the Control Panel: <Windows Start> - <Settings> - <Control Panel>.–
Double-click on the <Total Recall> program–
(or select it and in the upper left corner select <File> and <open>).
A new window opens; click <Create Profile>; the following window opens:–
Change <Type> to <AutoRestore>.–
Keep <Profile Location> (should be set to <\Flash Disk> ).–
Click on <Next>.–
A new window opens. Select <Default Backup>. Press <Create Profile>.–
Requirements:
Supply voltage is present (battery pack inserted and charged, device is in the docking station–
or power supply is connected).
Getting started
3

Handheld Programmer
BIS U-870
10
Getting started
3
Turning on
Turning off
3.5 Turning the
Handheld
Programmer
(Workabout Pro
G2) on/off
Turning on
Turning off
3.6 Keyboard,
display, and
operating
concept
3.7 Creating your
own operating
interface
Attention!
This is a Class A product. When using this product indoors, the device may cause RF
interference, requiring the user to take appropriate measures.
Hold down►<Power> for at least 1 second.
As soon as the LED flashes green, release the <Power> button again.
The start screen <Today> is displayed.⇒
Note
If the device was used previously, it may be in Suspend mode; press <Power> to
reactivate the unit. The screen in which you were working before the computer
switched to Suspend mode is displayed again.
– Suspend mode –
Press the►<Power> button to turn off the WORKABOUT PRO 3
or
Select►„Shutdown > Suspend“ from the Start menu.
Requirements:
Supply voltage is present (battery pack inserted and charged, device is in the docking station–
or power supply is connected).
–
Attention!
This is a Class A product. When using this product indoors, the device may cause RF
interference, requiring the user to take appropriate measures.
Hold down►<Enter> for at least 1 second.
As soon as the LED flashes green, release the <ENTER> key again.
The start screen <Today> is displayed.⇒
Note
If the device was used previously, it may be in Suspend mode; press <ENTER> to
reactivate the unit. The screen in which you were working before the computer
switched to Suspend mode is displayed again.
– Suspend mode –
Press►<FN> (blue) and then <ENTER> to shut off the WORKABOUT PRO G2
or
Select►„Shutdown > Suspend“ from the Start menu.
Familiarize yourself with the operating concept and characteristics of the WORKABOUT PRO.
The operating manual can be found on the included CD or on the Internet at: http://www.psion-
teklogix.com/
Note
The UHF CAEN Reader software development kit can be used to create a custom
user interface. The software development kit can be downloaded from http://www.
psion-teklogix.com/.

www.balluff.com
Handheld Programmer
BIS U-870
11
3.8 Starting the RFID
application
3.9 Operating menu
overview
„Configuration“
tab
On the Windows CE desktop, tap on
„Start > Programs > BALLUFF RFID > BIS U RFID“
(depending on the Windows CE® version, tap on the four-color Windows® logo instead of
„Start“). (See Fig. 3) or,
Tap the►„BIS U RFID“ shortcut on the desktop.
The⇒„BIS U RFID“ application starts.
The start screen is displayed.⇒
Fig. 3: Windows CE desktop Fig. 4: Balluff application start screen
After the start screen, the „Configuration“ tab is displayed.
Figure 5: „Configuration“ tab, „Reader“ submenu
Getting started
3

Handheld Programmer
BIS U-870
12
Getting started
3
„Reader“
submenu
This tab is divided into three submenus: „Reader“,„Read ID“ and „R/W“.
The following settings can be made under the „Reader“ menu:
Protocol
EPC C1G2 is set by default.
RF Regulation
Select the RF regulation applicable in the given region. Select either „ETSI_302208“ or „FCC_
US“.
BitRate
DSB_ASK_M2_TX40RX160 is preset as the default BitRate.
Power
Power defines the power made available by the reader. Select a power from 10 mW to 500 mW.
Q-Value
Q-Value defines the minimum value of Q. This is the number of time windows per round during
the anti-collision phase. The number of time windows is 2Q. The value „3“ is preset as the default.
Session
Each of the four indicators refers to an identification session. After the data carrier (tag) has been
identified, this changes the status of the indicator of the session in which it was just identified.
„S0“ is preset as the default value.
Information window
Click icon Ato call up the current program version.
Click icon Bto call up details about the reader, such as the FW version.
Figure 6: „Configuration“ tab, „Reader“ submenu

www.balluff.com
Handheld Programmer
BIS U-870
13
Getting started
3
„Read ID“
submenu
Figure 7: „Configuration“ tab, „Read ID“ submenu
Display
Select the display mode. The display in the Read ID window can be either ASCII or hexadecimal.
Read ID Options
The following settings are possible:
Continuous
Reading:
Continuous reading. If this option is enabled, read requests are carried out
automatically at the set interval.
Beep: Output an audio signal. If „Beep“ is activated, one of the following options
can be selected:
Detection:– If „Detection“ is activated, a signal sound is output following
each successful read.
Different Tag:– If „Different Tag“ is activated, a signal sound is output
following the first successful read.
Chrono
If this option is activated, the time for reading a defined number of different data carriers is output
(stopwatch function).
EPC Filter
If this option is selected and the [SET] button is clicked, the EPC filter in the Read-ID window is
used. The individual input fields have the following functions:
Mask: Field of bytes in hexadecimal form
Mask Length: Mask length in bits (not bytes)
Position: Position at which the mask begins with its defined length
Example: EPC = „FF3804714277360000093188“, if the EPC filter with mask F380 is activated,
the mask length is 16 (16 bits = 2 bytes) and the position is 4 (1/2 byte), the Read ID operation
returns all data carriers with the following EPC code: „xF380xxxxxxxxxxxxxxxxxxx“.

Handheld Programmer
BIS U-870
14
Getting started
3
Figure 8: „Configuration“ tab, „R/W“submenu
R/W (Read/Write) Options
Select the display mode The display in the R/W window can be either ASCII or hexadecimal.
Bank memory
Defines for the R/W window which memory bank of the data carrier is to be read and written.
Select from the following memory banks: RESERVED, EPC, TID, USER.
RESERVED Contains the destruction and/or access passwords. This memory bank is read-
only.
EPC EPC is the ID of the data carrier. Depending on the setting of the second selec-
tion list, you can read and write 96, 240 or 512 bits.
Note: Only available for EPC C1 G2 Air Protocol Version 1.2.
TID Memory bank for the manufacturer information of the data carrier. You can read
32 or 64 bits (read-only).
USER Memory bank for reading and writing user data with 96 or 512 bits.
Use access password
You can protect the EPC memory bank of the data carrier with a password. To do this, activate
the check box to the left of „Use access password“ and define an access password for writing a
new EPC.
„R/W (Read/
Write)“ submenu

www.balluff.com
Handheld Programmer
BIS U-870
15
Getting started
3
„Read ID“ tab You can read the ID of a data carrier on the „Read ID“ tab.
Figure 9: „Read ID“ tab
[Read]
The [Read] button can be used to start the read operation.
[Clear]
Use this button to delete the data that were read from the information window.
Information window
The data that were read are displayed here. The number combination shown in the „EPC“
column is the electronic product code (EPC - Electronic Product Code) of the data carrier. The
number in the „#“ column shows the total number of successful read operations.
Sum of Tags
Shows how many different data carriers were read.
Sum of Reads
Shows the total number of successful read operations.

Handheld Programmer
BIS U-870
16
Getting started
3
„R/W“ tab On the „R/W“ tab, you can read information from the memory of a data carrier or write informa-
tion to the memory.
Figure 10: „R/W“ tab
Operate
Status indicator. As soon as reading or writing begins, the status indicator flashes yellow.
[Read]
This button can be used to start a read operation. Once started, the label of this button changes
to [Abort] (abort read operation). If the read operation was successful, „Reading succeeded“
appears in red text to the right of the [Read] button and the result is displayed under the
[Read] button.
[Copy]
This button can be used to copy the read data in order to use them during the write operation.
[Write]
Start a write operation. Once the write operation is started, the label of this button changes to
[Abort] (abort write operation). If the write operation was successful, „Writing succeeded“
appears in red text to the right of the [Write] button and the result is displayed under the
[Write] button.
[Clear]
Clears the data read so far from the information window and the input window.
Getting started
3

www.balluff.com
Handheld Programmer
BIS U-870
17
Getting started
3
„File Browser“
and „About“ tabs
On the „File Browser“ tab, you can save the read data, load existing data or export Read-ID
data.
On the „About“ tab, information on the software version and the manufacturer details are displa-
yed.
Figure 11: „File Browser“ tab Figure 12: „About“ tab
[Open]
Opens the „Open file…“ dialog. You can select and open a saved file. The loaded data are
displayed on the „R/W“ tab below the [Write] button.
[Save]
Opens the „Save file as…“ dialog. The data (from the information window below the [Read]
button in the „R/W“) tab can be saved in a file.
[Export]
Opens the „Save file as…“ dialog. The read ID Data from the information window in the „Read
ID“ tab can be saved in a file.

Handheld Programmer
BIS U-870
18
4.1 Function
principle of
Identification
Systems
4.2 Product
description
Creating your
own user
interface
4.3 Control function
4.4 Files
The portable BIS U Identification System is classified as a non-contacting system with read and
write function. This allows it to transport not only programmed information that is fixed in the
data carrier, but also to collect and pass on current information.
The main components of the portable BIS U Identification System are:
Handheld Programmer,–
data carriers.–
The main areas of application are:
In production for controlling material flow (e.g. in model-specific processes, in workpiece–
transport with conveying systems, for acquiring safety-relevant data),
In tool coding and monitoring,–
In process equipment organization,–
In warehousing for monitoring stock movement and levels,–
In transporting and conveying,–
In waste disposal for quantity-based fee assessment.–
Handheld Programmer BIS U-870:
Plastic housing,–
Reading/writing using built-in antenna,–
Power for system components provided by 3.7 V lithium-ion battery pack,–
Editor function for editing data to be read or written,–
Saving/loading files.–
Note
The UHF CAEN Reader software development kit can be used to create a custom
user interface. The software development kit can be downloaded from http://www.
psion-teklogix.com/.
The Handheld Programmer is the link between data carrier and controlling system. The
Handheld Programmer can be used to check, correct or initialize data carriers.
The data read on the equipment can be stored in the Handheld Programmer and sent at a later
time to the host system.
Host systems may be the following:
A control computer (e.g. industrial PC),–
A PLC.–
Data read from a data carrier can be saved under a file name or saved files can be loaded.
Note
User data are saved by default in a RAM-based folder. The data in this RAM folder are
lost if the main battery pack and backup battery pack are fully drained or if the device
is restarted cold. The safest place to store the data is an SD or MMC memory card
(flash disk).
Basic knowledge
4

www.balluff.com
Handheld Programmer
BIS U-870
19
File format
Type of memory bank
(0x00=RESERVED, 0x01=EPC, 0x02=TID, 0x03=USER)
No. of bytes Data carrier data
1 byte 2 bytes n bytes
Example: Data carrier file from the USER memory bank with 12 bytes of data.
Data: ABCDEFGHIJKL
Contents of the data carrier file in HEX format:
03 0C 00 41 42 43 44 45 46 47 48 49 4A 4B 4C
Only data carriers that satisfy standard EPC C1G2 can be used with the BIS U-870. You can
obtain more detailed information upon request.
4.5 Data carrier
types
Basic knowledge
4

Handheld Programmer
BIS U-870
20
5.1 Keyboard, display
and operating
concept
5.2 Reading data
carriers
Read „Read ID“
Familiarize yourself with the operating concept and characteristics of the WORKABOUT PRO.
The operating manual can be found on the included CD or on the Internet at: http://www.psion-
teklogix.com/
Start Balluff RFID Reader.►
Make the desired settings on the►"Configu-
ration" tab in the "Reader", "Read ID"
and "R/W" submenus (for information, see
Section „Getting started“ beginning on page
8).
Figure 13: „Configuration“ tab and the submenus
Switch to the►„Read ID“ tab.
Click the►[Read] button.
Hold the sensing surface of the Handheld►
Programmer to the data carrier you wish to
read.
The data that are read are displayed in⇒
the information window in columns
„EPC“ and „#“.
„EPC“ ⇒is the electronic product code
(EPC - Electronic Product Code) of the
data carrier. The number in the „#“
column shows the total number of read
data carriers.
„Sum of Tags“⇒shows how many
different data carriers were read.
„⇒Sum of Reads“ shows the total
number of all data carriers that were
read.
Figure 14: Start read operation
Operation
5
Table of contents