B&G electronics MPA-30A User manual

PLEASE READ THIS MANUAL BEFORE USING THE EQUIPMENT
EN 1.4
SIREN PROFESSIONAL SYSTEM FOR MOTORCYCLES
INSTALLATION AND OPERATION MANUAL
English
MPA-30 OFFICIAL
SIREN
LIGHTS
M.WAIL
HORN

2 3
MPA-30A MPA-30A
2
MPA-30
COMPONENTS AND INSTALLATION
Switchbox (1)
Attach it to the left handle
bar using the mirror
screws to fasten it.
Make sure to place it
within the driver’s reach.
MPA-30
Loudspeaker + Electronic
Module (1)
Install it onto the slide bars
using either clamps
and/or screws (not
included), or welding it.
SIREN
LIGHTS
M.WAIL
HORN
Front lights (2)
(optional)
Fasten the lights to the bumper.
Rear light (1)
(optional)
Fasten to the trunk.
CONNECTION DIAGRAM
White
+12V
GND
LIGHTS (optional)
Yellow*
(wire to select
the flash pattern)
4P
4P
4P
4P
4P
4P
MTL-FBT MTL-FBT MTL-R
6P
SWITCHBOX
LOUDSPEAKER +
ELECTRONIC MODULE
BATTERY
+12V
+-
6P
SIREN
LIGHTS
M.WAIL
HORN
Black
Red
FUSE
10A
* The optional lights include 10 flash patterns. To select one, take the yellow wire coming from the harness and
connect it momentarily to the power source (12V); the pattern will switch every time the cable makes contact with
the source. Once the flash pattern has been selected, make sure to isolate the yellow wire.
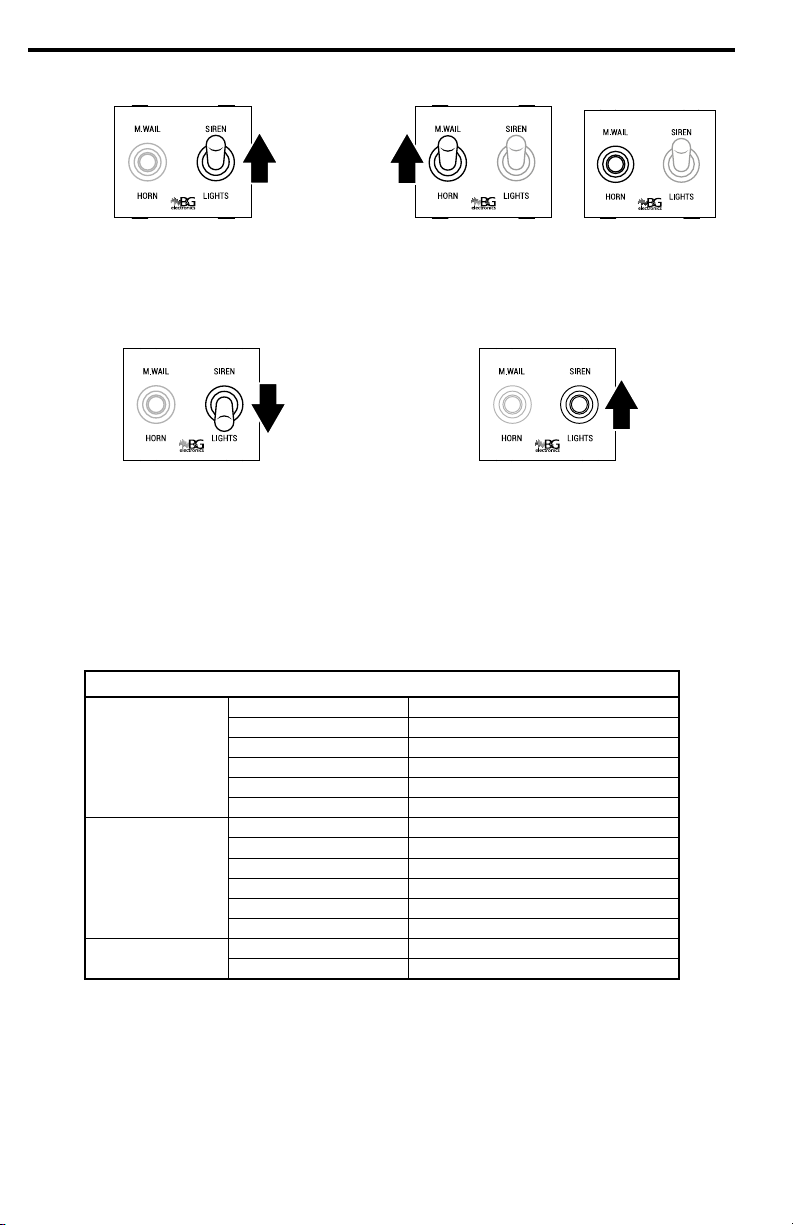
OPERATION OF SIREN SOUNDS
Reproduction of the M.WAIL sound
1. To turn on, press and hold M.WAIL.
2. To turn off release the switch; M.WAIL will stay on for as
long as the switch is pressed.
3
MPA-30
Reproduction of the HORN sound
1. To turn on, press and hold HORN.
2. To turn off release the switch; HORN will stay on for as long
as the switch is pressed.
NOTE: The activation of HORN overrides other functions. Once HORN is released, the
equipment returns to the function which was executing when HORN went on.
Reproduction of the SIREN sound
1. To turn on, pull up SIREN.
2. To turn off, pull down the switch to its central position.
NOTE: If there are lights connected to the system, when SIREN is activated the lights will
go on automatically.
CHANGING BETWEEN MODES FOR SIREN TONE SELECTION
The equipment offers two modes for changing the SIREN tone (modes are explained
further ahead). To select the mode of your preference, follow the steps below.
1. Press and hold M.WAIL. 2. While M.WAIL is held down, pull up SIREN.
• If it beeps once: The equipment is in Mode 1.
• If it beeps twice: The equipment is in Mode 2.
3. Press and release M.WAIL to switch between
modes.
4. Once the preferred mode is selected, pull down SIREN to
its central position.
MODE 1: Setting up the SIREN tone
1. Press and hold HORN. 2. While HORN is held down, pull up SIREN. HORN will stop,
indicating that you have entered confi guration mode.
3. Release HORN, the current SIREN tone will start. 4. Press and release HORN to switch among the available
SIREN tones (PHASER, WAIL, Hi-Lo & YELP). Once the tone
is selected, pull down SIREN to its central position.

4
MPA-30A
4
MPA-30
MODE 2: Setting up the SIREN tone
1. Press and release SIREN. 2. While SIREN is active, press and release M.WAIL to switch
among the available tones (PHASER, WAIL, Hi-Lo & YELP).
OPERATION OF THE LIGHTS
The activation and deactivation of the lights is controlled by the right switch.
1. To turn on the lights, pull down LIGHTS. 2. To turn off the lights, pull up LIGHTS to its central position.
Energy Saving Mode
The equipment continuously tracks the incoming voltage status, if the voltage drops
below 11V the equipment enters energy saving mode. While on this mode, upon pressing
the switch the functions will not execute and the equipment will beep 2 times.
Once the incoming voltage is over 11V, the equipment returns to normal operation.
TECHNICAL SPECIFICATIONS
LOUDSPEAKER +
ELECTRONIC MODULE
OUTPUT POWER RMS 30 W
INPUT VOLTAGE 11 - 15 V DC
TEMPERATURE RANGE 0 - 60 ºC
CURRENT CONSUMPTION 3 A (max)
DIMENSIONS 116 x 120 x 117 mm | 4.5” x 4.7” x 4.6”
WEIGHT 1.27 kg
SOUNDS
WAIL 800 - 1670 Hz
PHASER 1100 - 2450 Hz
YELP 1030 - 1650 Hz
HI-LO 820 - 1150 Hz
HORN 580 - 1550 Hz
MANUAL WAIL 800 - 1670 Hz
SWITCHBOX SWITCHES (2) MOM/OFF/MOM (2)
DIMENSIONS 26 x 92 x 46 mm | 1” x 3.6” x 1.8”
B&G ELECTRÓNICA | ONE YEAR LIMITED WARRANTY
BYG Electrónica S.A.S. guarantees that this product leaves the factory free from defects related to materials and manufacturing.
If a failure related to materials and manufacturing were to occur during the period of one year after the date of purchase, BYG
Electrónica S.A.S. would repair or replace the failing equipment free of charge.
This warranty shall be voided if the product is modifi ed, tampered with, misused, or subjected to abnormal working conditions. This
warranty does not cover physical damage to the product surface. This warranty does not apply when the malfunction results from
the use of this product in conjunction with accessories, other products, or peripheral equipment not designed by BYG Electrónica. FAVOR LEER ESTE MANUAL ANTES DE USAR EL EQUIPO
ES 1.4
SISTEMA PROFESIONAL DE SIRENAS PARA MOTOCICLETA
MANUAL DE INSTALACIÓN Y OPERACIÓN
Español
MPA-30 OFICIAL
SIREN
LIGHTS
M.WAIL
HORN

6 7
MPA-30A MPA-30A
2
MPA-30
COMPONENTES E INSTALACIÓN
Caja de Control (1)
Sujete al manubrio usando
los tornillos del espejo.
Asegúrese de ubicarla al
alcance de la mano del
conductor.
MPA-30
Bocina + Módulo
Electrónico (1)
Fijar a la defensa de la
motocicleta, ya sea
mediante abrazaderas y/o
tornillos (no incluidos), o
soldando directamente a
los tubos.
SIREN
LIGHTS
M.WAIL
HORN
Luces delanteras (2)
(opcionales)
Fije las luces a la defensa.
Luz trasera (1)
(opcional)
Instale sobre el baúl.
DIAGRAMA DE CONEXIONES
Blanco
+12V
GND
LUCES (opcionales)
Amarillo*
(cable para elegir
secuencia de luz)
4P
4P
4P
4P
4P
4P
MTL-FBT MTL-FBT MTL-R
6P
CAJA DE
CONTROL
BOCINA + MÓDULO
ELECTRÓNICO
BATERÍA
+12V
+-
6P
SIREN
LIGHTS
M.WAIL
HORN
Negro
Rojo
FUSIBLE
10A
* Las luces opcionales cuentan con 10 secuencias de luz. Para elegir una, tome el cable amarillo proveniente del
arnés y conéctelo momentáneamente a la fuente de poder (12V); la secuencia cambia cada vez que el cable hace
contacto con la fuente. Una vez haya seleccionado la secuencia, asegúrese de aislar el cable amarillo.
FUNCIONAMIENTO DE LOS SONIDOS DE SIRENA
Reproducción del tono M.WAIL
1. Para encender presione y sostenga M.WAIL.
2. Para apagar suelte el switch; M.WAIL solo estará encendido
mientras se mantenga presionado.
3
MPA-30
Reproducción del tono HORN
1. Para encender presione y sostenga HORN.
2. Para apagar suelte el switch; HORN sólo estará encendido
mientras se mantenga presionado.
NOTA: La reproducción de HORN se antepone a todas las funciones. Al soltar HORN el
equipo retornará a la función que se estaba ejecutando anteriormente.
Reproducción del tono SIREN
1. Para encender suba SIREN. Se reproducirá el sonido elegido
para SIREN.
2. Para apagar baje el switch a su posición central.
NOTA: Si tiene luces conectadas, cada vez que active SIREN el sistema de luces se
encenderá automáticamente.
CAMBIAR EL MODO DE SELECCIÓN DEL TONO SIREN
El equipo cuenta con dos modos para seleccionar el tono SIREN (los modos se explican
más adelante). Para cambiar al modo de su preferencia, siga los pasos a continuación.
1. Presione y sostenga M.WAIL. 2. Sin soltar M.WAIL, suba SIREN.
• Si suena 1 beep: El equipo está en Modo 1.
• Si suenan 2 beeps: El equipo está en Modo 2.
3. Presione y suelte M.WAIL para cambiar entre los
dos modos.
4. Una vez haya seleccionado el modo de su preferencia, baje
SIREN a su posición central.
MODO 1: Selección del tono SIREN
1. Presione y sostenga HORN. 2. Sin soltar HORN, suba SIREN.
HORN dejará de sonar, indicando que entró al modo de
confi guración del tono SIREN.
3. Suelte HORN, comenzará a sonar el tono SIREN
actual.
4. Presione y suelte HORN para cambiar entre los tonos
disponibles (PHASER, WAIL, Hi-Lo y YELP). Una vez
seleccionado el tono, baje SIREN a su posición central.
8
MPA-30A
4
MPA-30
MODO 2: Selección del tono SIREN
1. Suba SIREN. 2. Mientras está sonando SIREN, presione M.WAIL
repetidamente para cambiar entre los tonos disponibles
(PHASER, WAIL, Hi-Lo y YELP).
FUNCIONAMIENTO DE LAS LUCES
La activación y desactivación de la luces es controlada por el switch derecho.
1. Para encender las luces baje LIGHTS. 1. Para apagar las luces, baje el switch a su posición central.
Modo Ahorro de Energía
El equipo monitorea continuamente el estado del voltaje de alimentación, si el voltaje
cae debajo de 11V el equipo entra en modo ahorro de energía. Estando en modo ahorro
de energía, al pulsar el switch la función solicitada no se activará y sonarán 2 beeps.
Una vez el equipo detecte que el voltaje está sobre 11V, retornará a su operación normal.
ESPECIFICACIONES TÉCNICAS
BOCINA + MÓDULO
ELECTRÓNICO
POTENCIA DE SALIDA RMS 30 W
VOLTAJE DE ENTRADA 11 - 15 V DC
RANGO DE TEMPERATURA 0 - 60 ºC
CONSUMO CORRIENTE 3 A (max)
DIMENSIONES 116 x 120 x 117 mm | 4.5” x 4.7” x 4.6”
PESO 1.27 kg
SONIDOS
WAIL 800 - 1670 Hz
PHASER 1100 - 2450 Hz
YELP 1030 - 1650 Hz
HI-LO 820 - 1150 Hz
HORN 580 - 1550 Hz
MANUAL WAIL 800 - 1670 Hz
CAJA DE CONTROL SWITCHES (2) MOM/OFF/MOM (1) | ON/OFF/ON (1)
DIMENSIONES 26 x 92 x 46 mm | 1” x 3.6” x 1.8”
B&G ELECTRÓNICA | GARANTÍA LIMITADA DE UN AÑO
BYG Electrónica S.A.S. garantiza que este producto sale de fábrica libre de defectos de materiales y manufactura.
Si por algún motivo presentara fallas por materiales o manufactura durante el periodo de un año después de la
compra, BYG Electrónica S.A.S. reparará o cambiará la parte dañada libre de costo adicional.
Esta garantía no cubre daños ocasionados por mal manejo, mala operación o mala instalación. Esta garantía no
cubre daños físicos a la superfi cie del producto, o daños ocasionados por el uso del producto en conjunto con otros
productos o accesorios no diseñados por BYG Electrónica S.A.S.
Table of contents
Languages:
Other B&G electronics Motorcycle Accessories manuals


