manuals.online logo
Brands
  1. Home
  2. •
  3. Brands
  4. •
  5. B&Q
  6. •
  7. Indoor Furnishing
  8. •
  9. B&Q CSS1351 User manual

B&Q CSS1351 User manual

6 x
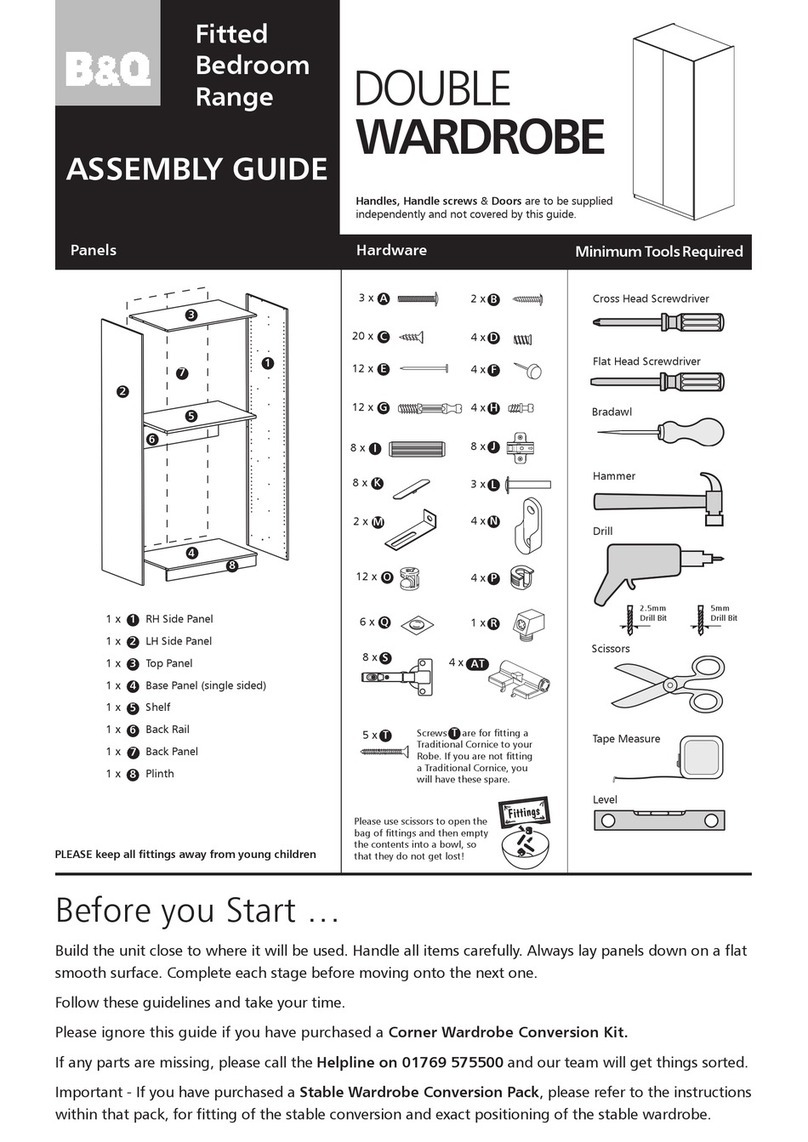
Before you Start …
Build the unit close to where it will be used. Handle all items carefully. Always lay panels
down on a flat smooth surface. Complete each stage before moving onto the next one.
Follow these guidelines and take your time.
If any parts are missing, please call the Helpline on 01769 575500 and our team will get
things sorted.
Cross Head Screwdriver
Drill
Level
2.5mm
Drill Bit
5mm
Drill Bit
1 x Conversion Side Panel
1 x Conversion Back Panel
1 x Top Panel
1 x Base Panel
(single sided)
1 x Shelf Unit Top Panel
1 x Shelf Unit LH Side Panel
1 x Shelf Unit RH Side Panel
1 x Plinth
3 x Shelf Unit Shelf
9
10
11
12
13
14
Panels Hardware
ASSEMBLY GUIDE
Minimum Tools required
Hammer
CORNER
36 x C
15
Fitted
Bedroom
Range
9
18 x G
6 x H
6 x I
Flat Head Screwdriver
Please use scissors to open the
bag of fittings and then empty
the contents into a bowl so
that they do not get lost!
18 x O6 x V
3 x Q1 x R
8 x W
Handles, Handle screws & Doors are to be supplied
independently and not covered by this guide.
T
16
PLEASE keep all fittings away from young children
Bradawl
Scissors
Tape Measure
CONVERSION KIT
17
3 x F
8 x U
Remaining components will be in the
Double Wardrobe Hardare pack
1
3
1 x RH Side Panel
1 x LH Side Panel
1 x Top Panel
1 x Base Panel
(single sided)
1 x Shelf
1 x Back Rail
1 x Back Panel
1 x Plinth
1
3
4
5
6
7
8
8
10
5
6
7
4
Corner Conversion PackDouble Wardrobe
11
12
13
14 15
16
17
2
2
17
17
4 x AV
F551
Tight
against
panel
F139
Tight
against
panel
1
3
2
1
3
4
6
8
Carefully fit parts , , and to side panel , as shown. C
1
3
4
6
8
9
NOTE: Fixing block should be fitted
to panel , as shown, before panel
is fitted to panel .
IMPORTANT: To assemble this unit you will need a ceiling height of at least 2200mm
F551
Tight
against
panel
F139
Tight
against
panel
G
H
G
G
GG
D
I
I
N
H
G
G H I N
1
1
Plain Chipboard Surface
8
88
R
R
1
8
4
R
5Now fit the back panel , as detailed in construction stage 4
of the Double Wardrobe Assembly Guide.
7
Fit panels , , and
to panel .
3 4 6
1
Then fit Cams as
shown, ensuring that
the arrow is pointing
towards panel , and
tighten clockwise.
O
1
Use two people to fit panel to panels , ,
and .
Insert the Cams as above, but with the arrows
pointing towards panel , and tighten clockwise.
36
8
9
9
4
H
4
8
G
Carefully fit parts , ,
and to side
panel , as shown. I
G H
IN
9
9
G
G
G
G
H
H
G G
I
C D
N
J
Fit hinge plates as shown, ensuring the arrow is pointing towards the front edge of the panel
J J J
J
J
CSS1351 02/10**
!!HAVE YOU BOUGHT
A COMBI PACK
OR LINEN PRESS?
You are now finished with
these instructions.
DO NOT complete steps
14 to 19.
Please now refer to the
instructions packed
with the Combi Pack
or Linen Press.
!!HAVE YOU BOUGHT
A DOUBLE INTERIOR
STORAGE CHEST
OR CUBE
STORAGE?
Please now refer to the
instructions packed with
the Interior Storage Chest or
Cube Storage.
When instructed to do so you
will need to come back and
complete stages 14 to 19.
7
Fitting of Wardrobe Shelf
!!HAVE YOU BOUGHT
A COMBI PACK
OR LINEN PRESS?
You are now finished with
these instructions.
DO NOT complete steps
14 to 19.
Please now refer to the
instructions packed
with the Combi Pack
or Linen Press.
!!HAVE YOU BOUGHT
A DOUBLE INTERIOR
STORAGE CHEST
OR CUBE
STORAGE?
Please now refer to the
instructions packed with
the Interior Storage Chest or
Cube Storage.
When instructed to do so you
will need to come back and
complete stages 14 to 19.
P
P
P P
PLower the shelf on to the protruding Cam Legs in
the Wardrobe side.
Gently ‘push’ down until the panel ‘clicks’ into place.
Now fit hanging rail
6
5
NOTE: Cam does not have a screw
P
Carefully fit parts and
to side panel , as shown.
G H
2
2
G G
H H H H
J J J J
8
11
I
O
V
C
U
V
9
U
C
V
V
I
O
12
10
R
16 I
2
11
12
12
12
11
Building the corner conversion
Fix Brackets using Screws
16
Fit Panels , and
to panel .
UCFix Brackets using Screws
UC
O
Then fit Cams as shown, ensuring
that the arrow is pointing towards
panel , and tighten clockwise.
2
11 12 16
2
16
R
10
HH
V V V V
U U U
V
10
CC
Carefully fit parts ,
and to panel ,
as shown.
H
U V 10
Fit hinge plates as shown,
ensuring the arrow is
pointing towards the front
edge of the panel
JJ
Fit , and to panel , as shown.
I O V 11 Fit , and to panel , as shown.
I O V 12
NOTE: Fixing block should be
fitted to panel , as shown, before
panel is fitted to panel .
R
2
16
16
Tap into the front edge of the Wardrobe Shelf, 410mm from
Side as shown, to act as a Door Stop for the Left Door.
Push the Corner Conversion Shelf Unit to the Back of the Corner
Conversion and up against the Side. There are 2 holes in the Shelf
Side, screw through these using screws , into the Wardrobe Side.
Once the units are
lined up, secure using
screws through the 7
brackets, circled.
B&Q plc, Chandlers Ford, Hampshire, SO53 3YX.
Visit us at www.diy.com
That’s the Corner Wardrobe Conversion completed. Take care of your unit by using a damp cloth to clean it.
Fit the Hinge Covers F306
over the Hinges.
Recycling – the packaging materials for this
product may be recycled through your local
recycling centre. When you want to dispose of
the product itself, please consider donating it
to a local charitable organisation, otherwise
recycle it through your local recycling centre.
F676
Recycling – the packaging materials for this product may be recycled through your local recycling centre. When you want to dispose
of the product itself, please consider donating it to a local charitable organisation, otherwise recycle it through your local recycling centre.
For guidance on the Joining Units, Securing to wall and General
Door Hinges* please refer to the Double Wardrobe guide CSS1350.
* Please ensure that you use hinge instead of hinge .
14 Building the Shelf Unit
13
CC
C
12
Lower the Back with the
Cam fixing on the underside
surface of the panel on to the
protruding Cam Legs in the Left side.
Make sure that the protruding cam pins
in the Back fit into the cams in the Corner Robe
Conversion Top and Base.
Once the Back is in the position, using a Screwdriver,
turn the screws in as far as they will go.
14
1514
13
V
V
V
F
F
Using 2 people hold the Corner
Conversion up until it is fixed in place.
These 2
Panels must
be flush.
10
O
O
G G G
G G G
I
W S
T
F
F
CC
Carefully fit , and to panel . Repeat for panel .
Fit 3 x panel to panel . Fit cams to panels , ensuring the arrow is pointing towards
panel , and tighten clockwise. Now repeat to fit panel to panels .
Carefully fit and to panel . Fit panel to panels and and tighten cams.
13
C
C
GG
G
G
13
U
G I O 14 15
17 15 O17
15 14 17
GU13 13 14 15
15 Fitting the Shelf Unit
16 Notes
Handle holes must only be drilled in the right hand door
When fitting the soft close mechanisms, please refer to the instructions supplied with the mechanism.
CSS1351 02/10**

Other B&Q Indoor Furnishing manuals

B&Q CSS1354 User manual

B&Q

B&Q CSS1354 User manual

B&Q 5397007212969 User manual

B&Q

B&Q 5397007212969 User manual

B&Q CSS1350 User manual

B&Q

B&Q CSS1350 User manual

B&Q form DARWIN User manual

B&Q

B&Q form DARWIN User manual

B&Q CSS1359 User manual

B&Q

B&Q CSS1359 User manual

B&Q WALL User manual

B&Q

B&Q WALL User manual

Popular Indoor Furnishing manuals by other brands

Songmics LJB81 Assembly instructions

Songmics

Songmics LJB81 Assembly instructions

TEMPUR ERGO PROSMART owner's manual

TEMPUR

TEMPUR ERGO PROSMART owner's manual

ofinto Active 3D user manual

ofinto

ofinto Active 3D user manual

kd frames Studio Bifold Full 4722-BI-F instructions

kd frames

kd frames Studio Bifold Full 4722-BI-F instructions

DAYCO DM0906 quick start guide

DAYCO

DAYCO DM0906 quick start guide

Jorgenson Lockers Gladiator Assembling instructions

Jorgenson Lockers

Jorgenson Lockers Gladiator Assembling instructions

Glas Italia PRISM Assembling and use instruction

Glas Italia

Glas Italia PRISM Assembling and use instruction

Next 569714 Assembly instructions

Next

Next 569714 Assembly instructions

Niche Flip Flop FF2822 Series Assembly instructions

Niche

Niche Flip Flop FF2822 Series Assembly instructions

7th Haven 7HOT0032 Assembly instructions

7th Haven

7th Haven 7HOT0032 Assembly instructions

Dongsuh SH004 Instructions for assembly

Dongsuh

Dongsuh SH004 Instructions for assembly

Next FARRINGDON BEDSIDE Assembly instructions

Next

Next FARRINGDON BEDSIDE Assembly instructions

Habitat Jasper 819983 manual

Habitat

Habitat Jasper 819983 manual

Argos Tolga 414/5758 Assembly instructions

Argos

Argos Tolga 414/5758 Assembly instructions

Suncast MBR3420 owner's manual

Suncast

Suncast MBR3420 owner's manual

ApexDesk Elite Series Assembly guide

ApexDesk

ApexDesk Elite Series Assembly guide

TEMPLE & WEBSTER Ruben SBSRDONT Assembly instructions

TEMPLE & WEBSTER

TEMPLE & WEBSTER Ruben SBSRDONT Assembly instructions

Grace Company Quilter's Evolution Elite ASSEMBLY & USE

Grace Company

Grace Company Quilter's Evolution Elite ASSEMBLY & USE

manuals.online logo
manuals.online logoBrands
  • About & Mission
  • Contact us
  • Privacy Policy
  • Terms and Conditions

Copyright 2025 Manuals.Online. All Rights Reserved.