2.1 The Hose Float is already fitted on one of the hoses. Connect
this length of hose to the Flow Regulator Valve and twist until it
locks into place.
2.2 Connect your cleaner to this length of hose, by pushing the
Flow Regulator Valve onto the cleaner swivel. When you hear a
click, it is securely connected. Now submerge your cleaner by
filling it with water, thereby ensuring all trapped air has escaped.
Before connecting to the weir, ensure that all the hoses are filled
with water and all the air has been expelled.
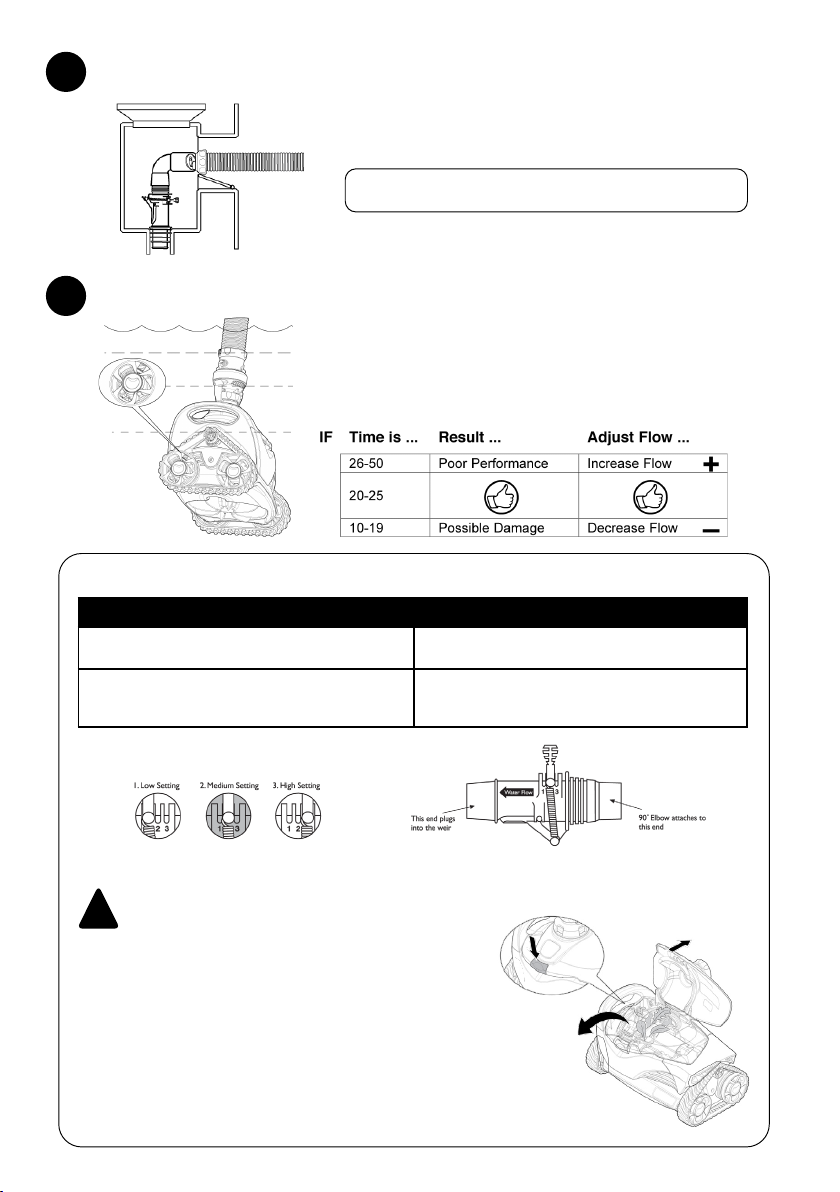
The filtration system must be operating at its maximum water flow before you install your Tracker,
otherwise you will have to read just it after cleaning the pool filter.
Installation is easy if you follow these simple preliminary steps:
1.1 Empty the weir basket
1.2 Clean the pump basket
1.3 Backwash the filter until the sight glass is clear
1.4 Adjust all return jets (whether your pool has one, two or more) to point downwards and towards each
other so that you DO NOT see a circular water flow or ripples on the surface of your pool
PREPARING YOUR POOL AND FILTRATION SYSTEM
1
!
ASSEMBLING YOUR TRACKER
2
3.1 Always insert the male hose cu into the female cu and twist until hose locks together. Hoses must
connect fairly tightly. Setting 1 or 2 is recommended on the Twist Lock Ratchet System. The ideal length of
hose is from the weir to the farthest point of the pool plus one extra section of hose. If the weir is
opposite the steps, use lowest step as furthest point (see Diagram 3). To ensure the best performance
from your Tracker, please ensure that only genuine Long-Life Twist Lock Hoses are used.
3.2 Fit the hose float to the first hose section +/- 20 cm from the Tracker head.
ASSEMBLING YOUR HOSES
3
3.3 Bleed all the air from the hose by placing one end over the return jet – thus filling the hose length
with water.
3.4 Keeping the hose-ends underwater, move the hose from the return line to the weir and connect the
male cu directly to the Auto Weir Valve 90° Elbow.
3.5 Ensure that the Auto Weir Valve is firmly attached to the weir vacuum lid.
CONNECTING TO WEIR
5
5.1 Connect the male cu of the hose to the 90° Twist Lock
Elbow. The elbow and Auto Weir Valve connect to the weir as
illustrated in the drawing.
TROUBLESHOOTING
PROBLEM SOLUTION
Your BARACUDA Pool Cleaner is performing too
fast and/or climbing above the level of the water.
Reduce Auto Weir Valve to medium (2) or low
(1) setting.
Your BARACUDA Pool Cleaner is performing
slowly and/or not climbing the pool
walls.
Increase Auto Weir Valve to medium (2) or high
(3) setting.
AUTO WEIR VALVE ADJUSTMENT SETTINGS
ADDING HOSE PROTECTOR
4
4.1 Add your hose protector to the hose which connects to your WEIR ( not the pool cleaner).
Place the hose in one half of the hose protector. Place other half over hose ensuring male clips line up
with the female clips. Apply pressure to both until they lock together.
CHECK CLEANER FLOW
6
6.1 When holding the Tracker™ head under water, watch the yellow
wheel marker, use a stopwatch to time 10 wheel rotations.
6.2 Tracker: Wait for wheels to change direction, then begin
counting. If the wheel reverses during timing, start over.
1 Push the yellow release button on the top of the cleaner.
2 Lift the top cover back until it clicks into an upward position.
3 Look at enige compartment and remove debris that is present.
4 If needed, slowly push engine paddles forward and/or backwards to
move stuck debris to an accessible position and then remove it. When
moving the engine paddles, make sure the cleaner tracks are allowed to
move freely as they will turn as the engine paddles rotate.
5 Close top cover and ensure it clicks into place.
To avoid serious injury, make sure that the cleaner is disconnected from the hose and the
suction pump is turned o prior to starting this operation.
REMOVING DEBRIS FROM ENGINE
Turn the filtration pump on and watch as your
pool cleaner begins cleaning.
!
Baracuda Tracker Owners Manual 6301394.indd 2Baracuda Tracker Owners Manual 6301394.indd 2 2022/11/09 11:30:292022/11/09 11:30:29