baridi DH115 User manual

Baridi 6L Beer Keg Dispenser Tap with
Integrated Cooling
Model No. DH115
Thank you for purchasing a Baridi product from the Dellonda range. Manufactured to a high standard,
this product will, if used according to these instructions, and properly maintained, give you years of
trouble free performance.
DH115.V1 Issue 2 16/12/2022
2
Important Information
Please read these instructions carefully and note any safe operational requirements, warnings &
cautions. Use the product correctly and with care for the purpose for which it is intended. Failure
to do so may cause damage and/or personal injury and will invalidate the warranty. Keep these
instructions safe for future use.
• ELECTRICAL SAFETY
• WARNING! It is the user’s responsibility to
check the following:
• Check all electrical equipment and appliances
to ensure that they are safe before using.
Inspect power supply leads, plugs and
all electrical connections for wear and
damage. Baridi recommend that an RCD
(Residual Current Device) is used with all
electrical products.
• if the product is used in the course of business
duties, it must be maintained in a safe
condition and routinely PAT (Portable
Appliance Test) tested.
• Electrical safety information. It is important
that the following information is read and
understood.
• Ensure that the insulation on all cables and on
the appliance is safe before connecting it to
the power supply.
• Regularly inspect power supply cables and
plugs for wear or damage and check all
connections to ensure that they are secure.
• Important: Ensure that the voltage rating on
the appliance suits the power supply to be
used and that the plug is tted with the
correct fuse - see fuse rating in these
instructions.
• DO NOT pull or carry the appliance by the
power cable.
• DO NOT pull the plug from the socket by the
cable. Remove the plug from the socket by
maintaining a rm grip on the plug.
• DO NOT use worn or damaged cables, plugs
or connectors. Ensure that any faulty item is
repaired or replaced immediately by a
qualied electrician.
• This product is tted with a BS1363/A 3 pin
• plug.
• If the cable or plug is damaged during use,
switch off the electricity supply and remove
from use.
• Replace a damaged plug with a BS1363/A
3 pin plug. If in doubt contact a qualied
electrician.
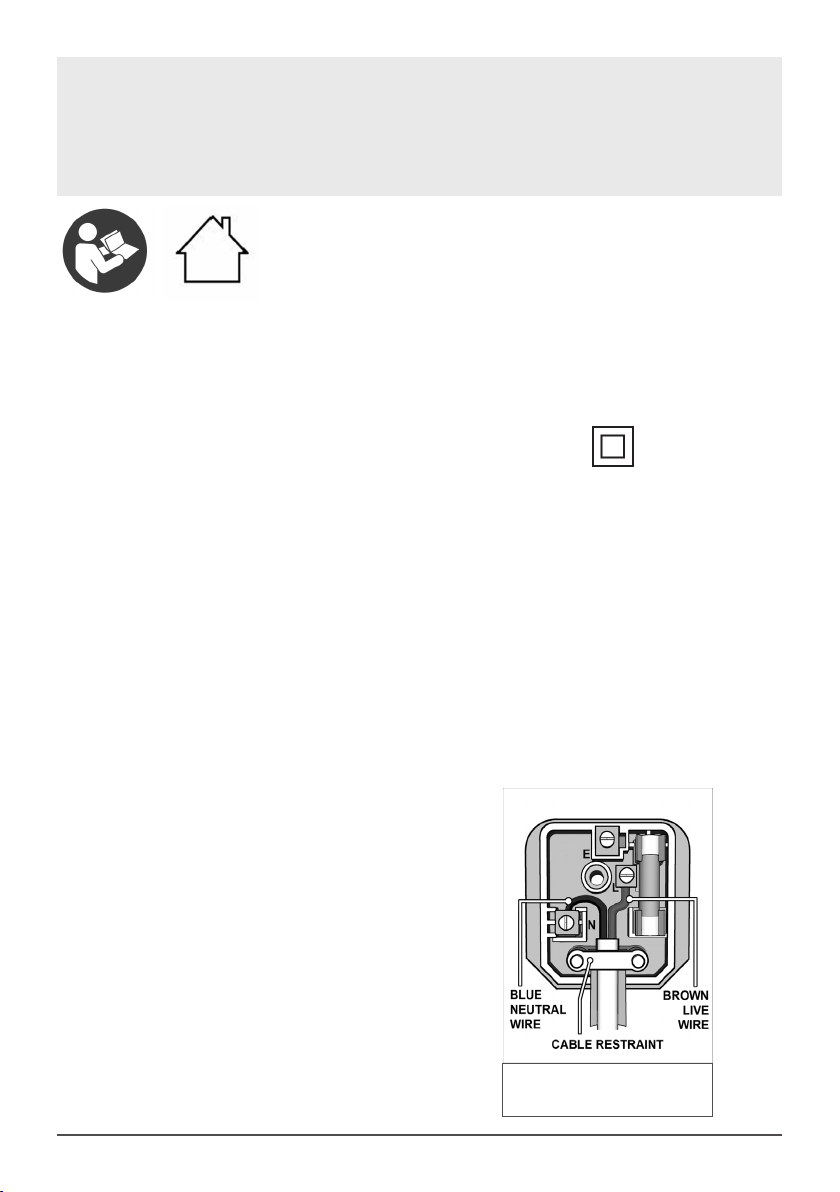
• Class II products are wired with live (brown)
and neutral (blue) only and are marked with
the Class II symbol;
• A) Connect the BROWN live wire to the live
terminal ‘L’.
• B) Connect the BLUE neutral wire to the neutral
terminal ‘N’.
• C) After wiring, check that there are no bare
wires and ensure that all wires have been
correctly connected.
• Ensure that the cable outer sheath extends
inside the cable restraint and that the restraint
is tight.
• DO NOT connect either wire to the earth
terminal.
• Dellonda recommend that repairs are carried
out by a qualied electrician.
Replacement fuse rating:
3A
Refer to
instructions
Indoor use
only

3
• GENERAL SAFETY
• DO NOT remove keg until fully empty.
• DO NOT cover the unit while working.
• DO NOT place in direct sunlight.
• WARNING: Ensure the supply cord is not
trapped or damaged.
• Alcohol should not the consumed by any
person who is not of a legal age to do so.
• Children should be supervised at all times
around this equipment.
• INTRODUCTION
• A 6L keg Beer Dispenser with a stay fresh 30
day digital countdown. It can chill beer to as
low as 3°C and has a handy LED temperature
gauge along with being quiet to use.
Compatible for use with over 40 x 6L mini beer
kegs and operated by air pump, so no need
for gas cylinders. Containing a handy level
indicator on the display showing the amount
of beer left in the keg. With a removable drip
tray to help keep your home bar area clean and
tidy. With a retro black and chrome home bar
design.
• SPECIFICATION
• Model no: DH115
• Lowest temperature: 3°C
• Voltage: 230V
• Frequency: 50Hz
• Foaming Gas: Cyclopentane
• Noise level: ≤48dB(A); Ambient noise ≤25dB(A)
• Dimensions (W x D x H): 495 x 290 x 476mm
• Keg capacity: 6L (Universal Style only)
• LOCATION
• DO NOT locate the unit in a damp or moist
location.
• Operate unit on dry and level surface.
• NOTE: The unit is designed to be free-standing
and to ensure adequate ventilation, leave at
least 12 cm free space around the unit.
• Once in position allow the unit to rest for an
hour before turning it on.
• NOTE: Allow beer to fully settle before
attempting to t dispensing unit.
• NOTE: DO NOT leave keg standing in direct
sunlight or near a heat source.
• NOTE: It is recommended that you allow the
keg to cool for some time before use (ideally
have it pre chilled if possible).
• NOTE: Carefully read any information
provided by the beer manufacturer that
relates to the keg and its operation.
• If tted, remove keg safety clasp according to
keg manufacturers instructions.
1 Handle for top cover
2 Top cover
3 Beer out connector
4 Keg
5 Tap
6 LED Display
7 Digital control button
8Drip tray
9 Power switch
10 Rear cover
11 Connection valve
12 Air in connector
Fig.1

4
• Connect the air delivery hose of the air
connection valve (g.1.11, g.4) to the air-in
connector (g.1.12, g.4).
.
• OPERATION
• Read this document thoroughly and assemble
the unit accordingly.
• Check that the unit is fully assembled and
installed in the appropriate location.
• When the unit is switched on, the LED is
activated.
• NOTE: To cool a beer keg to 3oC may take up
to 20 hours depending on initial beer temp
and ambient temp.
• The unit has a temperature setting range of
between 3oC and 12oC.
• The interface (g.5) will show the current
beer temperature and number of days the
beer keg has been tted.
• To set a required beer temperature use the ‘+’
or ‘-’ key (g.6) to set the value.
• To display the current set value, press the ‘-’
button for one second. The display will return
to the current beer temperature after three
seconds.
• NOTE: The unit has a memory function that
uses the last selected temperature.
• To adjust the number of days use the keg
has had press and hold either the “+” or “-”
symbol .
•
• BEER DISPENSING UNIT (g.2)
• Assemble and t the beer dispensing unit
(g.2) as follows:
• Screw the handle to tap unit.
• Thread the clear hose of the beer-out
connector through the removable cover of the
tap unit (g.3).
• Pull the handle forward to the open position
(g.3) and slide the clear hose of the beer-out
connector rmly onto the inlet spigot in the tap
unit. When the handle is released it will shut
off the ow of beer.
• Locate the assembled dispensing unit (g.2)
into the body of the unit. Fix in place using the
supplied screws and place the rubber covers
over the exposed xings.
•
Temperature
Days Fitted
Fig.2
Fig.3
Fig.4
Fig.5
Fig.6

5
• For more soiled surfaces use a neutral
detergent, wipe down with a clean damp cloth
and dry thoroughly with a clean dry cloth.
• CLEANING AND MAINTENANCE
• Remove the power plug from the supply when
performing cleaning or maintenance.
• It is recommended to empty the drip tray
frequently
• Cleaning the internals of the unit is imperative
to meet hygiene requirements. Clean before
rst use or long periods of non-use.
• Clean all internals ONLY with warm, clean
water.
• Cleaning the unit when changing kegs of
dierent beers is also recommended to
improve your drinking experience.
• DO NOT use abrasive or chemical cleaning
materials on any surface of the unit.
• Wipe interior and exterior surfaces with a
damp cloth and dry thoroughly with a clean
dry cloth.
• TROUBLESHOOTING
Symptom Possible cause Possible solution
Unit does not
operate
Not plugged in. Check connection and fuse
Keg has low/no content Check keg
Faulty liquid and air connections Check all tubes connected
Beer is frothing Check beer temperature Cool keg
Keg has low/no content Check keg
Tap opened too quickly Slower delivery
Environment Protection, Waste Electrical and Waste
Electronic Equipment Regulations (WEEE)
Recycle unwanted packaging materials. When this product is no longer required, or has
reached the end of its useful life, please dispose of in an environmentally friendly way.
Drain any uids (if applicable) into approved containers, in accordance with local waste
regulations. Please note that this product contains one or more batteries. It is our policy to
continually improve products and we reserve the right to alter data, specications and parts
without prior notice. No liability is accepted for incorrect use of this product. Guarantee is
12 months from purchase date, proof of which is required for any claim.
Dellonda Limited, Sole UK Distributor of Baridi
Kempson Way, Suffolk Business Park, Bury St Edmunds, Suffolk. IP32 7AR


