BARIX Extreamer P5 User manual

PRODUCT MANUAL
Universal, Multiformat IP Audio Decoder with
Amplifier, PoE powered
Document version 01.01
Release date 28. Apr. 2011
Hardware Rev. HW 1.0
© 2011 Barix AG, all rights reserved. All information is subject to change
without notice. All mentioned trademarks belong to their respective
owners and are used for reference only.
EXSTREAMER P5

Table of Contents
1
Introduction.............................................................................................
5
1.1 About this document.......................................................................................................
5
1.2 Additional documents.....................................................................................................
5
1.3 About the Exstreamer P5................................................................................................
5
1.4 Applications.....................................................................................................................
5
1.5 Hardware features...........................................................................................................
5
1.6 Integrated Barix IP
Audio Module...................................................................................
6
1.7 Available Applications and Firmware packages.............................................................
6
2
Quick Installation Guide........................................................................
7
2.1 Introduction.....................................................................................................................
7
2.2 Package contents...........................................................................................................
7
2.3 Firmware..........................................................................................................................
7
2.4 Support............................................................................................................................
7
2.5 Front view........................................................................................................................
8
A Reset button................................................................................................................
8
B Status LEDs.................................................................................................................
8
C Control interface (RJ45)...............................................................................................
8
2.6 Rear view.........................................................................................................................
8
D Speaker output (Plug b)...............................................................................................
8
E Ethernet port 10/100 PoE (RJ-45)...............................................................................
8
2.7 Installation.......................................................................................................................
9
2.8 Network configuration by web browser..........................................................................
9
2.9 Setting temporary IP address using the MAC address................................................10
2.10 Troubleshooting.............................................................................................................10
3
Hardware...............................................................................................11
3.1 Introduction...................................................................................................................11
3.2 Functional block diagram..............................................................................................11
3.3 Wiring Diagram..............................................................................................................12
3.4 Control / RS-485 Serial Interface..................................................................................12
3.5 Speaker Interface..........................................................................................................13
Table of Contents ii

3.6 Network Interfaces........................................................................................................13
Status LEDs...................................................................................................................13
MAC Address................................................................................................................14
3.7 Device Status LEDs.......................................................................................................14
3.8 Reset button..................................................................................................................14
4
Rebooting the device...........................................................................15
4.1 Pushing the reset button...............................................................................................15
4.2 Using a web browser....................................................................................................15
4.3 Sending a Reboot Command.......................................................................................15
CGI Interface.................................................................................................................15
TCP Interface................................................................................................................15
UDP Interface................................................................................................................15
4.4 Power-cycling the device..............................................................................................15
5
Updating the device.............................................................................17
5.1 Introduction...................................................................................................................17
5.2 Checking the Current Version.......................................................................................17
Version information.......................................................................................................17
5.3 Downloading the latest firmware..................................................................................18
Introduction...................................................................................................................18
Standard Firmware........................................................................................................18
ABCL Firmware Applications........................................................................................18
5.4 Web Update Procedure.................................................................................................18
Note on Factory Defaults..............................................................................................20
6
Mechanical Informations.....................................................................21
6.1 Dimensions and Weight................................................................................................21
6.2 Space requirements......................................................................................................21
6.3 Mounting.......................................................................................................................21
6.4 Thermal considerations.................................................................................................21
7
Tec h nica l d ata.......................................................................................23
7.1 Power supply input.......................................................................................................23
7.2 CPUs / Memory.............................................................................................................23
Table of Contents iii

7.3 Network Interfaces........................................................................................................23
7.4 Serial Interfaces.............................................................................................................23
7.5 Audio & I/O Interfaces...................................................................................................24
Speaker Interface..........................................................................................................24
Audio Processor (Codec)..............................................................................................24
Speaker output and D/A Conversion............................................................................24
Built-in Parts..................................................................................................................24
7.6 Mechanical....................................................................................................................25
Housing.........................................................................................................................25
Weight...........................................................................................................................25
Dimensions....................................................................................................................25
7.7 MTBF Calculations........................................................................................................25
7.8 Environmental................................................................................................................25
7.9 Certifications / Compliances.........................................................................................25
8
Ordering Information............................................................................26
8.1 Exstreamer P5 NoPSU Package...................................................................................26
9
Legal Information..................................................................................27
Table of Contents iv

1Introduction
1.1 About this document
This PRODUCT MANUAL aims at giving insight to detailed technical aspects of the device and
complements the information given in the product sheet.
The „Quick Install Guide“ (a printed version is included in the devices package) is contained in
this document and followed by chapters to complete the installation.
1.2 Additional documents
As several different applications and different standard firmware packages can be used with
the Barix Exstreamer P5, the process of loading or updating a software is also covered in this
document.
For information about the configuration of the loaded application or firmware please refer to
the corresponding software user manual.
1.3 About the Exstreamer P5
The Exstreamer P5 is a member of the Barix Exstreamer product family, versatile Audio
over IP codecs (encoder/decoder) for use in a wide field of applications, from broadcast to
in-store, from distribution of music in hotelsto SIP telephone paging applications.
1.4 Applications
•Overhead Speaker Interface with Amplifier
•Commercial audio streaming applications
•Playback point in an IP PA system
•In-room IP Device for Hotels, Venues
•In-store audio distribution
•SIP based paging interface
•Zone output device for IP distributed audio
•Ethersound (ES-100/Spkr) channel receiver
1.5 Hardware features
The Barix Exstreamer P5 features:
•
High quality, multi standard audio decoding in formats:
PCM 16bit linear, PCM 8bit logarithmic (µLaw / aLaw) ,
MP3, AAC+, Ogg Vorbis
•
2 KB EEprom for configuration storage
•
2 MB Flash memory for application and web server content
•
Speaker out (5W @ 8Ohm)
•
10/100Mbit Ethernet port supporting PoE (802.3af)
•
RS-485 interface, 300..230'400 Baud, IR interface, 10VDC output (100mA self-resetting
fuse) supporting Barix Volume Source Controller VSC
•
2 LED device status indicators
•
2 LED network status indicators
•
Width 108 mm / 4.25“, Height 38 mm / 1.5“, Depth 78.7 mm / 3.1“
•
Low weight: 300 g / 10.58 oz.
•
Low Power consumption: 15 Watt max.
•
Power supply via 802.3af (PoE) Ethernet (48 VDC)
BARIX AG |
5
/
26

1.6 Integrated Barix IP Audio Module
The Barix Exstreamer P5 houses the Barix IP audio module “IPAM 300”. For technical details
on the audio module please refer to the corresponding product sheet and the development
specification.
1.7 Available Applications and Firmware packages
The Barix Exstreamer P5 comes preloaded with the Firmware “Streaming Client” but can also
be loaded with different firmware packages featuring:
•
Embedded and robust operating system with fully routable IP stack
•
IP standard based protocols (TCP/IP, UDP, HTTP, ICMP, SNMP)
•
Supports BootP, DHCP, Auto IP and IPzator
•
Integrated web server for configuration, control, update and streaming functions
•
Fully documented Application Programming Interface (API)
•
Highly customizable User Interface (HTML) with development kit
•
Special software features in OEM versions on request
Other standard firmware packages as well as ABCL applications can be downloaded from the
Barix website.
BARIX AG |
6
/
26

2Quick Installation Guide
2.1 Introduction
This chapter is a copy of the printed „Quick Install Guide“ which is included in the devices
package. It explains the initial installation steps assuming the presence of the Exstreamer P5
Accessory Kit.
To co m p l e te th e i n s t a ll a t i o n p le a s e re a d a l s o t h e fo l l o w i ng c h a p t e rs .
2.2 Package contents
a
Exstreamer P5
b
Screw block terminal connector (2 pin) for speaker
c
Quick install guide
2.3 Firmware
This device comes preloaded with the Streaming Client firmware. Alternative firmware, such as
the iClient ABCL application, can be downloaded from www.barix.com.
2.4 Support
For support please contact your local dealer or visit www.barix.com.
BARIX AG |
7
/
26

2.5 Front view
A Reset button
A brief press of the button will reset the device.
Holding the reset button pressed in for
approximately 10 seconds will reset the device and
restore the factory default settings when the button
is released.
B Status LEDs
Green and red LEDs for status display
C Control interface (RJ45)
Compatible with VSC Volume Source Control unit.
Pin Description
1
Not connected
2
Not connected
3
Ground [GND]
4
RS-485 B
5
RS-485 A
6
IR signal input
7
Ground [GND]
8
V+ 10V, 100mA max
2.6 Rear view
D Speaker output (Plug b)
Pin Description
1
Speaker -
2
Speaker +
E Ethernet port 10/100 PoE (RJ-45)
Standard RJ45 Ethernet socket with PoE power
(802.3af) input
Pin Description
1
Tx + / PoE a+
2
Tx + / PoE a+
3
Rx + / PoE a-
4
PoE b+
5
PoE b+
6
Rx - / PoE a-
7
PoE b-
8
PoE b-
F Ethernet Status LEDs
Green LED for Link status.
Yellow LED for Activity status.
BARIX AG |
8
/
26

2.7 Installation
STEP 1
Plug a standard (straight) network cable (not included)
into the network port (E) of the Exstreamer and the
other end into your PoE switch. You can also use a
crossover network cable (not included) and a PoE
injector for a direct connection to your PC.
STEP 2
i) Wire your speaker to the speaker plug (b),
plug it into the speaker output (D) and listen.
ii) If you are not yet ready to connect the
speaker, you can still configure the
Exstreamer. Either download the “Barix
DiscoveryTool” from www.barix.com for use
in Step 4ii) or continue from section 2.9 on
the next page.
STEP 3
Connect the Power supply (b) to the device (socket D)
and then to an appropriate electrical outlet.
STEP 4
i) The Exstreamer will now acquire an IP
address and announce it over the audio
outputs (if no DHCP server is available this
can take up to 5 minutes).
ii) If you did not connect a speaker, launch the
“Barix Discovery Tool” and click the “Get”
button to find out which IP address the
device has obtained (see picture at the
bottom of the page). Make sure that the
Ethernet/MAC address matches your device
(see label on the bottom of the device).
STEP 5
If you intend to use a VSC Volume Source Control
unit plug a standard (straight) network cable (not
included) into the control port (C) of the Exstreamer
and the other end into your VSC unit.
Now that you know the IP address proceed to section
2.8
Network configuration by web browser
.
If you were not able to obtain the device’s current IP
address with the previous steps see section
2.10
Troubleshooting
.
2.8 Network configuration by web
browser
If you need to use static (fixed) network settings
follow the steps 1 to 3 otherwise continue at step 4.
STEP 1
Open your web browser.
STEP 2
Enter the IP address that was announced by the
Exstreamer and press Enter. Example: 192.168.0.12
In the top menu click on the “Configuration” button.
In the left menu click on “Advanced Settings” to see
the following page:
STEP 3
Enter the static IP address into the IP address field.
The default is “0.0.0.0” for automatic discovery
(DHCP).
If you know the values for the other fields enter them,
otherwise leave them at default (“0.0.0.0”).
Hit the “Apply” button to save all changes. The device
will reboot with the configured IP address.
STEP 4
Skip the next page and read the following chapters to
complete the installation.
BARIX AG |
9
/
26

2.9 Setting temporary IP address using
the MAC address
This procedure will work only in a local network.After
this procedure the temporary IP will be active only
until restart/reboot.After a restart the procedure has
to be repeated.
STEP 1
Either use a network cable to link the Exstreamer and
the PC directly, or connect the Exstreamer to the PC
via your network switch and power the device. Make
sure that you have a valid static IP address
configured on your PC (e.g. 192.168.0.2)
STEP 2
Windows : For a command window. click on “Start”,
click on “Run..”, in the “Open” field type cmd , click
on “OK”. OSX / Linux : Open a terminal window.
STEP 3
Please proceed to step 4 if you linked the PC directly
to the device in step 1. To ensure that you use a free
IP address (not already used by another device in the
network) please use the Ping command.To verify
availability in this example we assume the PC to have
the IP address “192.168.0.2” and want to check if
“192.168.0.6” is free.
Type ping 192.168.0.6 and hit the “Enter” key. You
should get no reply which gives you reasonable
assertion that the “pinged” IP is available.
STEP 4
Look for the Exstreamer's MAC address printed on a
label on the bottom of the device (12 hex digits,
separated by a hyphen every 2 digits). Type into the
windows command window
arp -s 192.168.0.6 00-08-E1-00-B1-77
or on a OSX or Linux system type into the terminal
arp -s 192.168.0.6 00:08:E1:00:B1:77
and hit the “Enter” key (replace the digits according
to your devices MAC address). You must have
administrative rights to be able to do so (sudo on
OSX / Linux).
STEP 5
Now we have to make the Exstreamer listen to the IP
address “192.168.0.6” using the Telnet command. To
do so type into the command window
telnet 192.168.0.6 1 and hit the “Enter” key (the
number “one” must be there for this command to
work correctly !!!). The Exstreamer will immediately
refuse the connection on port 1, but will be available
for browser access as long as the device stays
powered.
STEP 6
To check if the Exstreamer is responding you can use
the ping command again.To do so type ping
192.168.0.6 and hit the “Enter” key. If you do get a
reply the IP address 192.168.0.6 can be used to
access the Exstreamer using a web browser. Please
go back to section 2.8
Network configuration by web
browser to configure a static IP address.
If you do get “request timed out” then please repeat
step 5 carefully (you most likely mistyped the telnet
command) or repeat the entire procedure.
If the ARP method does not work for you, refer to the
user manual for further methods.
2.10 Troubleshooting
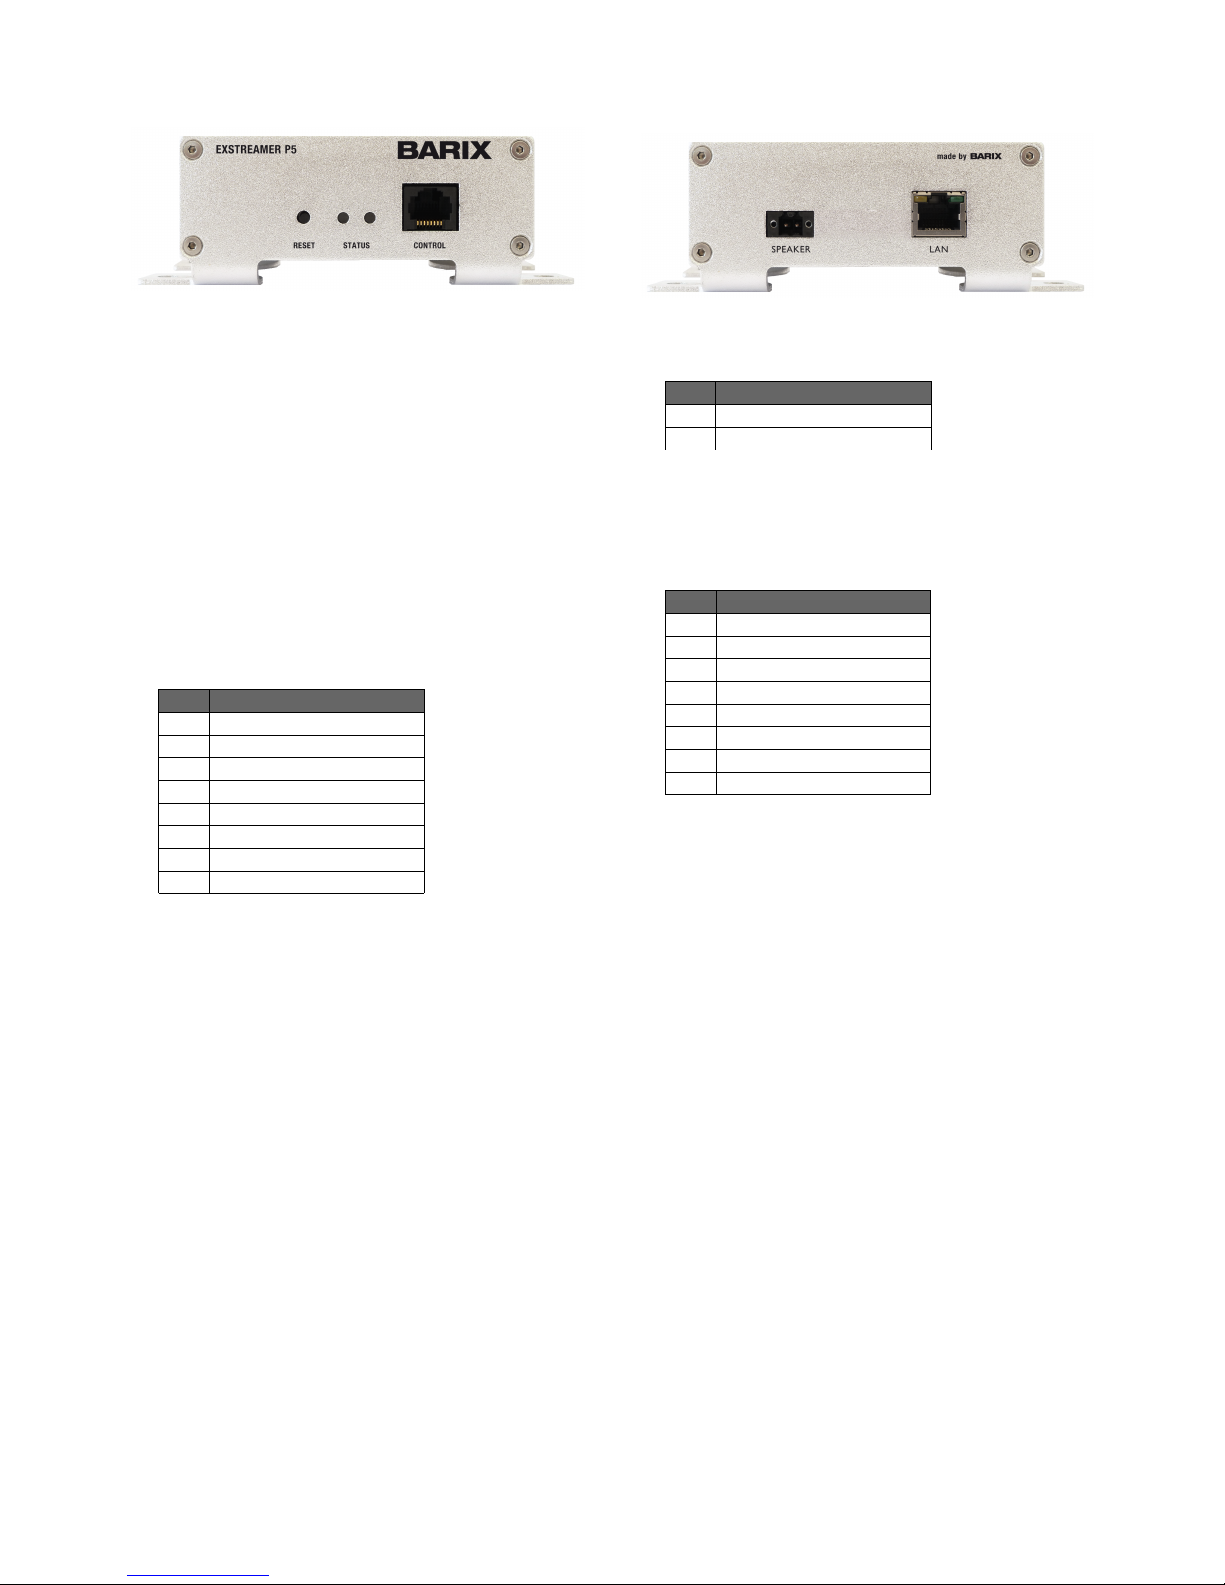
If the status LEDs (B) stay dark check the PoE power
cabling (installation step 1).
Check if the green LINK LED (F) is lit, if it is not then
check your network cabling (network port E).
Note: Acquiring an IP address can take up to 5
minutes.
BARIX AG | 10
/
26

3Hardware
3.1 Introduction
The Barix Exstreamer P5 consists of a motherboard with connectors and peripheral circuits
supporting the embedded IP audio module “IPAM 300” which is used for decoding audio.
Besides the audio processor the IPAM 300 contains the CPU, RAM, Flash, EEProm, network,
serial and discrete I/O circuits. For further details please refer to the IPAM 300's product sheet
and development specification.
In this chapter we will explain the functional blocks using the below block diagram starting on
the top left and working down each interface to the point where it is connected to the IP audio
module. We then do the same from the top right corner.
At the same time you will find for each connector informations on how to wire the Barix
Exstreamer P5 to external components. We will explain the wiring using the wiring diagram on
the next page.
The labeling of connectors
A
to
E
refer to the previous chapter
2
Quick Installation Guide
.
Same goes for the parts included in the Exstreamer P5 package which are mentioned
including indexing letters in parenthesis.
3.2 Functional block diagram
BARIX AG | 11
/
26

3.3 Wiring Diagram
3.4 Control / RS-485 Serial Interface
The female RJ-45 socket C is connected trough a standard RS-485 serial interface
transceiver with the IP Audio module carrying 10 VDC supply (self resetting fuse 100mA) and
Ground intended for powering an external device consuming less than 1 Watt.
To connect to an external RS-485 device or bus a male RJ-45 connector is needed.
To connect a Barix VSC Volume Source Controller a standard Cat.5 cable can be used.
BARIX AG | 12
/
26
3
C
4
5
5
VSC
Volume
Source
Control
GND
B
A
IR Out
7
GND
8
10V
6
3
C
4
5
8
RS-485
Device
GND
B
A
10V

3.5 Speaker Interface
The male 2 pin connector D carries two pins, intended for a 8 Ohm speaker, are connected
directly to the D-class amplifier which is fed by a mono mixer, summing up the left and right
audio outputs of the IP Audio module. To achieve the highest sound power possible (5 Watt
RMS) use an 8 Ohm speaker. A reasonable performance can be achieved with an impedance
ranging from 4 to 32 Ohms.
To connect to a speaker use the supplied (b) orange, female 2 pin screw terminal block
(Weidmuller P/N 1690880000) and fix it to the device using the two built-in locking screws.
3.6 Network Interfaces
The female RJ-45 socket E is connected trough Ethernet magnetics circuits to the IP Audio
module. The switch attached must supply 48VDC “Power over Ethernet” (802.3af) or a PoE
injector must be used. The overall consumption is rated 15 Watts max. Power will be accepted
on pins 1,2 (Pa+) against pins 3,6 (Pa-) or alternatively on pins 4,5 (Pb+) against pins 7,8 (Pb-).
A standard network cable (Cat.5 or higher, not included) must be used to ensure proper
network and power functionality.
Status LEDs
The port features status LEDs ( F
).
The green LED shows the ports link status. On when the link is up, off when the link is down.
The yellow LED shows the ports network activity. On when any traffic* is seen on that port,
being it incoming or outgoing traffic. The yellow LED is off when there is no traffic on that port.
* Note: This traffic could be generated by this device (outgoing), traffic not addressed to this
device but to any other device in the network (especially when daisy-chaining) or broadcasted
traffic (both incoming traffic but passed on) as well as traffic addressed to this device!
BARIX AG | 13
/
26
1
D
2
Speaker
-
+
1
C
2
3
4
Network Switch
Or
PoE injector
TX+ / PoE a+
TX- / PoE a+
RX+ / PoE a-
PoE b+
5
6
7
8
PoE b+
RX- / PoE a-
PoE b-
PoE b-

MAC Address
The MAC address of the device is printed on the label placed below the data plate sticker on
the bottom of the device.
Two additional MAC address stickers come with the device, one intended for placing on the
top of the device before mounting and cabling and one for documentation purposes.
3.7 Device Status LEDs
The green and red LEDs B are used to signal the current status of the device. For a detailed
description of the different LED states please refer to the corresponding software manual.
The green and red device status LEDs are directly connected to the IP Audio Module.
3.8 Reset button
An reset push button A is directly connected to “software reset“ input of the IP Audio Module.
Intended use : reset (reboot) / factory defaults (see software manual for details).
BARIX AG | 14
/
26
Both LEDs:
On, Off, Blinking depending on loaded software

4Rebooting the device
4.1 Pushing the reset button
To reboot the device push the reset button for a brief moment.
4.2 Using a web browser
To reboot the Exstreamer P5 click the “REBOOT” button in the top menu line of the device's
main web page.
Click on the underlined link “Reboot the device”.
After approx. 5 seconds the following will be displayed.
4.3 Sending a Reboot Command
The firmware supports the rebooting of the device by sending a “REBOOT” API command.
The command itself is “c=99” and can be transmitted using one of three API interfaces:
CGI , TCP and UDP as explained below.
CGI Interface
Type in the browsers URL filed the IP of the device followed by “/rc.cgi?c=99” and hit the enter
key to submit the command. The device will reboot immediately.
This command uses the HTTP web server port (default: 80) . Supply the correct port number if
you change this setting.
TCP Interface
Send the command “c=99
”
followed by a „CR“ (Carriage Return) character in a TCP packet to
the device. The device will reboot immediately.
This command uses the TCP command port which is disabled by default (default: 0).
Enable the command port first and send the packet to the port number you have set.
UDP Interface
Send the command “c=99
”
followed by a „CR“ (Carriage Return) character in a UDP packet to
the device. The device will reboot immediately.
This command uses the UDP command port which is disabled by default (default: 0).
Enable the command port first and send the packet to the port number you have set.
4.4 Power-cycling the device
To reboot the Exstreamer P5 the voltage on the power supply connector E has to drop for
approximately one second before coming up again.
BARIX AG | 15
/
26

5Updating the device
5.1 Introduction
Barix preloads all devices with firmware which is current at the day of production. Barix
constantly enhances the capabilities and functions and recommends to keep the firmware on
the devices up-to-date.
The Exstreamer P5 features the “Update over network” method to update the firmware using a
web browser.
Warning
If the network update is interrupted during the process (power or network loss) the device
might become dysfunctional or even unreachable.
The only other remedy is to ship the device back for reloading the devices firmware and
reverting settings to factory defaults.
Please keep that in mind when planning a remote “Update over network”.
5.2 Checking the Current Version
To find out which version is currently installed check the informations next to the Barix logo on
the devices main web page using a standard browser.
Version information
“Firmware” shows the version and the release date of the loaded firmware.
“Web UI” shows the version and the release date of the Web User Interface.
“Bootloader” shows the version of the boot loader firmware.
“Setup” shows the version of the setup table in the configuration EEPROM.
“Song” shows the version and the release date of the audio support module.
“Filesystem” shows the version and the release date of the File system module.
BARIX AG | 16
/
26

5.3 Downloading the latest firmware
Introduction
Barix ships the Exstreamer P5 preloaded with the application “Streaming Client”.
Depending on your needs or your usage of the device an ABCL application or the Exstreamer
Standard Firmware might be the right choice. Follow one of the next two sections depending
on your choice.
Standard Firmware
To do w n l o a d a firmware version please visit www.barix.com.
In the menu on the left side click on
“
downloads
”
In the center column click on “Streaming Client Firmware
”
in the section “Standard
Firmware”.
In the section “Firmware Update Kits
”
verify if the version of the “Streaming Client Update
Kit” is higher then the currently loaded (see version information in previous section). If there is a
newer version click on the link to download it. Save the ZIP file and unpack it to a local drive.
In the section “Firmware Documentation
”
click on the release note and the user manual with
the same versions as the “Streaming Client Update Kit” that you downloaded in previous
step and read carefully before continuing with an upload to the device.
ABCL Firmware Applications
To do w n l o a d a firmware version please visit www.barix.com.
In the menu on the left side click on
“
downloads
”
In the the center column under section “Special Applications” click on “ABCL Applications
(overview)
”
to get an overview or click on of the links below the overview to choose an
application directly.
Click the according link to download the ZIP file as well as the accompanying documents like
the release notes and the user manual. Save the ZIP file and unpack it to a local drive. Read
carefully the release notes and the user manual before continuing with an upload to the device
.
5.4 Web Update Procedure
Calculate approximately 2 minutes to complete the “Web Update” procedure.
STEP 1
Open your web browser, type in the IP address of the Barix device and press Enter.
Example: “192.168.0.12”
STEP 2
Click on the UPDATE button to enter the update page. You will see the following screen:
BARIX AG | 17
/
26

STEP 4
Click on “Please click here to continue” to launch the update process. The device will restart in
a special mode called “Boot loader” and the following screen appears showing a number
counting down from 4 to 0.
Upon start up the following screen appears:
STEP 5
Click on "Browse..." to select the file you want to update. The file is named “compound.bin”
located in the folder “update_rescue”
.
Select the file and click on the “Open” button.
STEP 6
Click on “Upload” to start the upload process which will take approximately 2 minutes.
After a successful upload the following window appears:
STEP 7
Click on the update link and then click on the "Reboot" button in the following window.
The following screen appears:
BARIX AG | 18
/
26

STEP 8
After the device has rebooted, which takes a few seconds, click on the “here” link to reload the
main page.
The device is now ready for configuration according to your needs.
Please read the according User Manual for informations on the configuration.
Note on Factory Defaults
The “Web Update” procedure does not change the current configuration.
Barix recommends nevertheless checking for correct parameters in the configuration as well as
to set parameters for newly added features.
If you observe strange behavior after an update Barix recommends resetting the configuration
to factory defaults (see chapter “Reverting to Factory Defaults” in the according User Manual)
and to start over with the configuration of the device.
BARIX AG | 19
/
26

6Mechanical Informations
6.1 Dimensions and Weight
The Barix Exstreamer P5 aluminum enclosure measures 108 x 38 x 78.7 mm (Width
2 x
Height
3 x Depth
1
) / 4.25” x 1.5” x 3.1” .
The Barix Exstreamer P5 weighs 280 grams / 9.88 oz. (without any cables/connectors).
6.2 Space requirements
The 2 mm / 0.08“ thick front and rear plates are bent to serve as mounting feet increasing the
overall Height
4 to 47 mm / 1.85”.
The mounting feet increase the overall spacing Width
5
to 138 mm / 5.43”.
The speaker connector
D
stands out approximately 11 mm / 0.43” and therefore increases the
overall physical depth to 90 mm / 3.54”. Standard Cat.5 cable plugs stick out 32 mm / 1.26”.
Depending on the plugs used and the suggested bending radius of the cables used on each
side, the overall spacing depth is increased twice by approximately 80 mm / 3.15” 6 to a total
of 239 mm / 9.4”.
6.3 Mounting
For mechanical fixation the Barix Exstreamer P5 features mounting feet with a 2 mm /0.08“
thickness and 4 holes with a diameter
7
of 6.4 mm / 0.25” intended for M5 to M6 screws.
The holes are 45 mm / 1.77” apart in one direction 8 and 123 mm / 4.84” apart in the other
direction 9 .
The feet have a width of 20 mm / 0.79” 10 and are apart from each other by 25 mm / 1” 11 .
BARIX AG | 20
/
26
Table of contents
Other BARIX Media Converter manuals

BARIX
BARIX INSTREAMER ICE User manual

BARIX
BARIX Extreamer 100 User manual

BARIX
BARIX Exstreamer 500 User manual

BARIX
BARIX X8 User manual

BARIX
BARIX EXSTREAMER User manual

BARIX
BARIX EXSTREAMER 120 User manual

BARIX
BARIX Extreamer 1 0 0 User manual

BARIX
BARIX Exstreamer 1000 User manual

BARIX
BARIX INSTREAMER ICE User manual

BARIX
BARIX TPA400 User manual

BARIX
BARIX Instreamer User manual

BARIX
BARIX M400 User manual

BARIX
BARIX EXSTREAMER 100 User manual

BARIX
BARIX Retail Player S400 User manual

BARIX
BARIX EXSTREAMER 100 User manual

BARIX
BARIX EXSTREAMER 1 2 0 User manual

BARIX
BARIX Instreamer User manual

BARIX
BARIX EXSTREAMER 200 User manual

BARIX
BARIX EXSTREAMER 205 User manual