Base Varia User manual

BASE Varia
User Guide
For more information please go to
www.base.de

2
Prolonged exposure to music at full volume on the
music player may damage the listener’s hearing. Set your
phone volume safely. Use only headphones recommended
by TCT Mobile Limited and its affiliates.
Table of contents
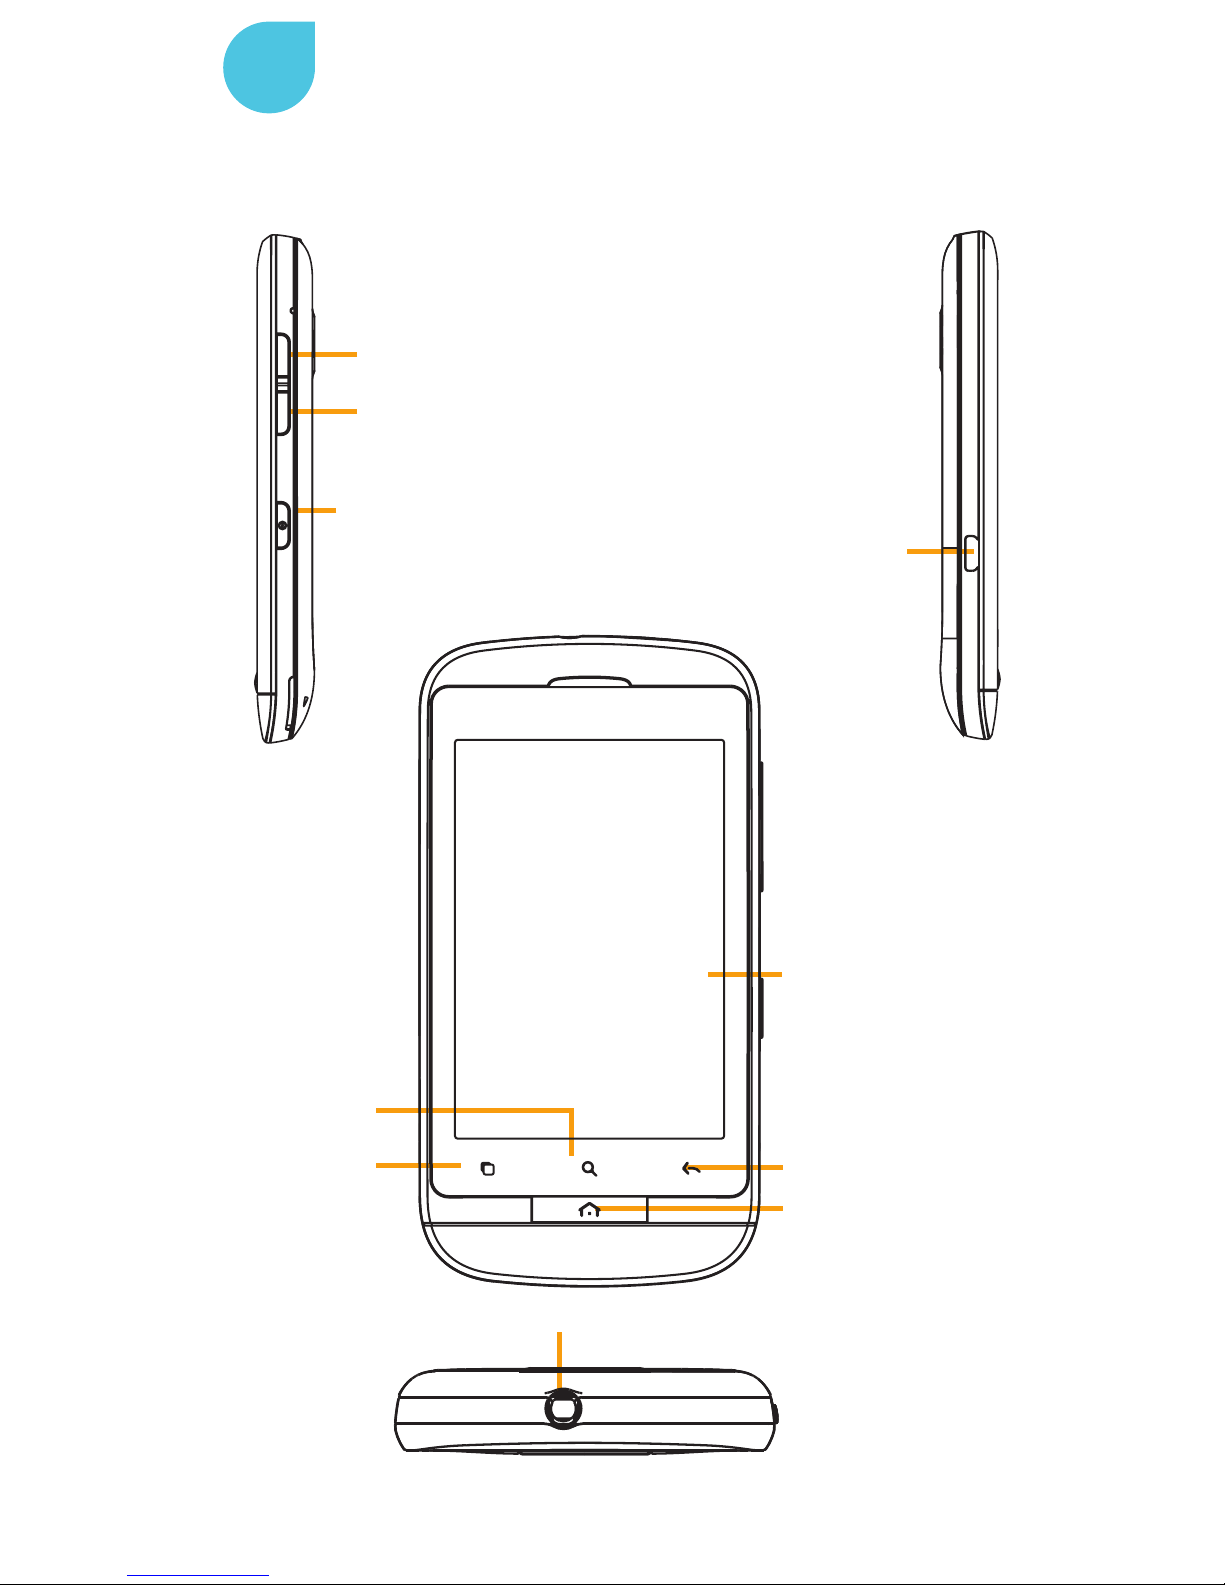
1 Your mobile.............................................................................3
2 Text input ...............................................................................15
3 Phone call..............................................................................16
4 Contacts.................................................................................18
5 Messaging..............................................................................19
6 Email......................................................................................20
7 Getting connected..................................................................21
8 Locate my position using GPS satellites...............................23
9 Data backup...........................................................................24
10 Factory data reset ................................................................25
11 Applications..........................................................................25
This product meets applicable
national SAR limits of 2.0 W/kg. The
specific maximum SAR values can be
found on page 29 of this user guide.
When carrying the product or using
it while worn on your body, either
use an approved accessory such as
a holster or otherwise maintain a
distance of 1.5 cm from the body to
ensure compliance with RF exposure
requirements. Note that the product
may be transmitting even if you are
not making a phone call.
www.sar-tick.com

3
Your mobile
1.1 Keys and connectors
1
Back key
Touchscreen
Home key
Headset connector
Micro USB
connector
Volume up
Volume down
Power key
Menu key
Search key

4
• On Home screen, press to quickly access Settings
menu or Notification panel; to launch quick
search; to manage applications; to customize your
Home screen by adding applications or changing
wallpaper
• On other screens, press to view options list
Short press: Light up the screen; return to the
Home screen or back to the central
Home screen if it is extended
Long press: Enter the recently used applications list
Back to recently used screen
Short press: Lock the screen; light up the screen
Long press: When phone is off, power on the
phone. When phone is on, enter phone
options: Silent mode, Airplane mode,
Power off.
Press to adjust the volume
(in call/media playing mode)
Open search bar for searching within an application,
the phone or web.

5
1.2 Getting started
1.2.1 Set-up
Removing or installing the back cover
Removing or installing front deco
Attention: Front deco is a removable and flexible part, please
take care of it when removing or installing it.
Inserting or removing the SIM card
You must insert your SIM card to make phone calls. Please power
off your phone and remove battery before inserting or removing
the SIM card.
Place the SIM card with SIM1 chip facing downwards and SIM2
chip facing upwards, and then slide it into its housing. Make
sure that it is correctly inserted. To remove the card, press and
slide it out.
For dual SIM model, the SIM1 slot can support both 2G
and 3G network, while the SIM2 slot can only support
a 2G network.

6
Installing or removing the battery
• Insert and click the battery into place, then close the phone
cover.
• Unclip the cover, then remove the battery.
Installing and removing the microSD card
To release the microSD card holder, slide it in the direction of
the arrow and lift it. Then insert the microSD card with the gold-
en contact downward. Finally, turn down the microSD holder
and slide it in the opposite direction to lock it.
Charging the battery
Connect the battery charger to your phone and mains socket
respectively.
To reduce power consumption and energy waste,
when battery is fully charged, disconnect your charger
from the plug; switch off Wi-Fi, GPS, Bluetooth or
background-running applications when not in use;
reduce the backlight time, etc.
Standard charger

7
1.2.2 Power on your phone
Hold down the Power key until the phone powers on. It will take
some seconds before the screen lights up.
Set up your phone for the first time
The first time you power on the phone, you are prompted to set
up your phone in multiple ways: language, input method, mobile
data connection, account setup and synchronization, system
update, etc. You are required to sign into your Google account
to synchronize email, contacts, calendar and other Google
applications.
• Enter your user name and password, then touch Sign in. If
you forget your password, you can go to www.google.com to
retrieve it. If you don’t own a Google account, you can create
one by touching Create.
• Read the setup information on the screen.
• Mark/unmark the check box to choose whether you want to
take advantage of Google’s location service, then touch Next.
• Mark/unmark the check box to choose whether you want to
back up data with your Google account, then touch Next.
• Touch Finish setup.
This initial set up can be skipped and enabled via
Settings/Accounts & sync.
In power on screen without SIM card inserted, you can also
connect to a Wi-Fi network to sign into your Google account and
to use some features.
The first time you insert a new SIM card, you are given the
option to change the default SIM settings.
1.2.3 Power off your phone
Hold down the Power key from the Home screen until the phone
options appear, select Power off.

8
1.3 Home screen
You can bring all the items (applications, shortcuts, folders and
widgets) you love or use most frequently to your Home screen for
quick access. Press Home key to switch to Home screen.
Home screen is provided in an extended format to allow more space for
adding applications, shortcuts etc. Slide the Home screen horizontally
left and right to get a complete view of the Home screen. Small dots
at the lower left and right of the screen indicate which screen you are
viewing.
Status bar
• Status/notification indicators
• Touch and drag down to open
notification panel
Application tab
Touch to open applications list.
Long press to display
thumbnails.
Touch to access Messaging
Touch to access Call log if you have missed call(s)
Search bar
Touch to enter search options:
All, Web, Apps, Contacts, etc.
Touch to enter text search
screen.
Touch to enter voice search
screen.
Touch an icon to open an
application, folder, etc.

9
1.3.1 Using the touchscreen
Touch
To access an application, touch it with your finger.
Touch and hold
To enter the available options for an item, touch and
hold the item. For example, select a contact in Con-
tacts, touch and hold this contact, options list will then
appear on screen.
Drag
Place your finger on the screen to drag an object to
another location.
Slide/Swipe
Slide the screen to scroll up and down the applications,
images, web pages etc. at your convenience.
Flick
Similar to swiping, but flicking makes it move quicker.
Pinch/Spread
Place your fingers of one hand on the screen surface
and draw them apart or together to scale an element
on the screen.
Rotate
Automatically change the screen orientation from
portrait to landscape by turning the phone sideways to
have a better screen view.
1.3.2 Status bar
From status bar, you can view both phone status (to the right
side) and notification information (to the left side). When the
status bar is full, icon will appear, touch to display hidden
icons.

10
Status icons
For dual SIM model, status icons referring to either SIM1 or SIM2
will be identified by a color which you have defined.
GPRS connected Receiving location
data from GPS
GPRS in use Speakerphone is on
EDGE connected Roaming
EDGE in use No signal
3G connected Vibrate mode
3G in use Ringer is silenced
HSPA (3G+) connected Phone microphone
is mute
HSPA (3G+) in use Battery is very low
Connected to a Wi-Fi
network Battery is low
Bluetooth is on Battery is partially
drained
Connected to a
Bluetooth device Battery is full
Airplane mode Battery is charging
Alarm is set Headset connected
GPS is on Signal strength

11
Notification icons
New Google Mail Call in progress
(green)
New text or
multimedia message
Call in progress using
Bluetooth headset
(blue)
Problem with text or
multimedia message
delivery
Missed call
New Google Talk
message Call on hold
New voicemail Call forwarding is on
Upcoming event Uploading data
Data is synchronizing Downloading data
Problem with sign-in or
synchronization
An open Wi-Fi
network is available
microSD card is full Phone is connected
via USB cable
Connected to or
disconnected from
VPN
Radio is on
Song is playing System update
available
USB tethering is on Portable Wi-Fi
hotspot is on
Both USB tethering
and portable hotspot
are on
Application update
available
More notifications are
hidden

12
Notification panel
Touch and drag down the status bar or press Menu key and
touch Notifications to open the Notification panel. Touch and
drag up to close it. From the Notification panel, you can open
some functions by touch (GPS, Bluetooth, etc.), reminders indi-
cated by notification icons, or view wireless service information.
Touch to clear all event-based notifications (other ongoing
notifications will remain).
1.3.3 Search bar
The phone provides a search function which can be used to
locate information within applications, the phone or the web.

13
1.3.4 Lock/unlock your screen
To protect your phone and privacy, you can lock the phone
screen by creating a variety of patterns, PIN or password, etc.
1.3.5 Personalize your Home screen
Add
Touch and hold an empty area or press Menu key and touch Add
on the Home screen. You can add shortcuts, widgets or folders
to the Home screen.
Reposition
Touch and hold the item to be repositioned to activate the move
mode, drag the item to desired position, then release. Hold the
icon on the left or right edge of the screen to drag the item to
another Home screen page.
Remove
Touch and hold the item to be removed to activate the move
mode, drag the item to the bottom trash can, which will then
turn red, and release.
Wallpaper customization
Touch and hold an empty area or press Menu key and touch
Wallpaper on the Home screen to customize wallpaper.

14
1.3.6 Application tab
Touch from Home screen to enter applications list.
To return to the Home screen, press Home key.
Consult recently used applications
To consult recently used applications, you can press and hold
the Home key from Home screen. Touch an icon in the window
to open the related application.
1.3.7 Volume adjustment
You can set alarm, media and phone ringtone volume to your
preference by Volume up/down key, or Settings menu.

15
Text input
2.1 Using onscreen keyboard
Onscreen keyboard will display automatically when a program
requires entering text or numbers.
Onscreen keyboard settings
Press Menu key from Home screen, select Settings/Language
& keyboard/TouchPal keyboard or Android keyboard. A series
of settings are available for your selection.
Adjust the onscreen keyboard orientation
Turn the phone sideways or upright to adjust the onscreen key-
board orientation. You can also adjust it by settings (Press Menu
key on Home screen/Settings/Display).
2.1.1 Android keyboard
2
Touch twice to lock in capital letter
input mode
Touch to switch to symbol and numeric
keyboard
Touch to enter voice input
Hold and slide to select a character,
such as an accented letter, number,
etc.
Touch to enter text or numbers, touch
again to select input method

16
2.1.2 TouchPal keyboard
2.2 Text editing
You can edit the text you have entered.
• Touch the text you have entered twice. Touch and hold a text
field to zoom in on the text with a magnifying glass.
• Touch Select all/Select word in the pop up button.
• The selected text is now highlighted in orange. Drag a
selection tab to adjust the range of selected text.
• Touch Cut/Copy/Paste1in the pop up button.
Touch to hide keyboard
Long press to enter multiple choice
mode
Touch to enter numbers and symbols, etc.
Touch and hold to change input language
Touch to activate Word prediction
: TouchPal settings
: Edit panel
: Voice input
Phone call
3.1 Placing a call
User can easily launch a call by using one of the following two
ways:
• Touch from Home screen.
• Touch
from Home screen and select Phone.
1 Paste option will not appear unless copy or cut operation has
been made.
3

17
Enter the desired number from keyboard directly or select a
contact from Contacts, Call log or Favourites by touching tabs,
then touch to place the call. The number you entered can
be saved to Contacts by touching .
If you make a mistake, you can delete the incorrect digits by
touching .
To hang up a call, touch End.
3.2 Answering or rejecting a call
When you receive an incoming call,
drag down the green phone icon to
answer. Hang up the call by touching
End.
Touch to add to
Contacts
Touch and hold to
access Voicemail
Touch to switch
call connection
method
Scroll up or
down to view
matched results
Indicates the SIM
card you’re using

18
3.3 Consulting your call memory
You can access your call memory by touching Application tab
from the Home screen and touching Call log to view call history in
categories of Missed calls, Outgoing calls, and Incoming calls.
Contacts
You can view and create contacts on your phone or either SIM
and synchronize these with your Google Mail contacts or other
applications on the web or on your phone.
4.1 Adding a contact
Touch Application tab on the Home screen, select Contacts, then
press Menu key from contacts list screen and touch New contact.
4.2 Importing, exporting and sharing
contacts
From Contacts screen, press Menu key to open the contacts list
option menu, touch More/Import/Export. From here you can
exchange contacts between Phone and SD card, Phone and SIM
card or SIM 1 and SIM 2.
You can share a single contact or contacts with others by sending
the contact’s vCard to them via Bluetooth, SMS, email, etc.
Touch a contact you want to share, press Menu key and touch
Share from contact details screen, then select the application to
perform this action.
4.3 Synchronizing contacts in multiple
accounts
Contacts, data or other information can be synchronized from
multiple accounts, depending on the applications installed on
your phone.
4

19
Messaging
You can create, edit and receive SMS and MMS with this mobile
phone.
To access this feature, touch Application tab from Home screen,
then select Messaging.
All messages you receive or send out can be saved
in phone memory or SIM card. To consult messages
stored in SIM card, press Menu key from Messaging
screen, then touch Settings/Manage SIM card mes-
sages.
5.1 Write message
On message list screen, touch Compose new message to write
text/multimedia messages.
5
Touch to create new message
Touch to view the whole
message thread

20
Sending a text message
Enter mobile phone number of the recipient on To bar or touch
to add recipients, touch Type to compose bar to enter the text
of the message. When finished, touch
to send the text mes-
sage. For dual SIM model, touch to select the SIM card for
sending.
An SMS of more than 160 characters will be charged
as several SMS. Specific letters (accent) will also in-
crease the size of the SMS, this may cause multiple
SMS to be sent to your recipient.
Sending a multimedia message
MMS enables you to send video clips, images, photos, anima-
tions, slides and sounds to other compatible mobiles and email
addresses.
An SMS will be converted to MMS automatically when media
files (image, video, audio, slides, etc.) are attached or subject or
email addresses added.
Email
Besides your Google Mail account, you can also set-up external
POP3 or IMAP email accounts in your phone. To access this func
tion, touch Application tab from Home screen, then select Email.
An email wizard will guide you through the steps to set up an
email account.
• Enter the email address and password of the account you want
to set up.
• Touch Next. If the account you entered is not provided by your
service provider in the phone, you will be prompted to go to the
email account settings screen to enter settings manually. Or
you can touch Manual setup to directly enter the incoming and
outgoing settings for the email account you are setting up.
• Enter the account name and display name in outgoing emails.
• Touch Done.
• To add another email account, you can press Menu key and
touch Accounts to access email account screen. Press Menu
key and touch Add account to create.
6
Table of contents
Other Base Cell Phone manuals