Bastl BESTIE User manual

BEST STEREO MIXER FRIEND
BASTL INSTRUMENTS

Bestie Manual
Bestie is a 5-channel stereo mixer with up to 20 dB boost, mute switch
per channel, and flexible connectivity. However, Bestie is not just a mixer
but also a stereo distortion/saturator with a pre-routed feedback channel
that can create juicy, crunchy sounds. Mixing with Bestie can be pure
vanilla if you keep all the levels left of the 12 o’clock position, but once
you start boosting, Bestie can quickly turn into a Beast. Once you start
to overload the mixer, the sounds can start to fight for dominance.
The dedicated headphone output offers a loudness control with a smooth
mixdown overdrive character and a pre/post mute switch for pre-listening
to all your channels before unmuting them to the speakers.
USB-C and AA battery power options make it perfect for portable setups
without compromising sound quality.
Channels 1 and 5 have a flexible connectivity scheme accommodating
2x mono cable for left and right channels or 1x cable mono to split to
both channels or a classic stereo jack.
The Feedback Channel
Channel 3 serves as a feedback channel, which means it routes the
output back to the input. If you plug anything into the Channel 3 input,
it functions as a normal input channel.
When utilizing Channel 3 as a feedback channel, the level before the
12o’clock position functions as an added distortion and gain. If boosted
beyond 0 dB, it will begin to self-oscillate and generate increasingly
deeper tones as the channel is further amplified. At maximum settings,
it produces distinct tremolo-like effects.
A big part of the sonic aesthetics of Bastl Instruments and Casper
Electronics is influenced by the so-called no-input-mixing technique. This
is the technique of routing the output back to the input on mixing consoles
and using gain and EQ to create different tones and noises without
plugging any signals into the mixer. However, fascinating outcomes arise
when these feedback signals are interrupted by elements such as drums.
They interact with the feedback tones and compete for dominance.
Bestie is well suited for such experiments and directly encourages you
to overload its circuitry and make the signals go ape.

Features
● 5 stereo channels
● Mute switch with light indication per channel
● Level control per channel with up to 20 dB boost
● Low noise preamps with sweet overdrive character (same as Dude)
● Inputs via 3.5 mm stereo jacks
● 3.5 mm jack output
● 3.5 mm jack headphone output with loudness control
● Pre/Post mute option for the headphone output (pre-listen)
● Channel 3 is normalized to the output, making it a default
feedback channel.
● Channels 1 and 5 have two 3.5 mm jacks to also accept dual
jack stereo or mono signals.
● USB-C power or 4x AA Battery power
Technical details
● Dimensions: 101 x 69 x 51 mm
● Current consumption: 90 mA (without headphones), up to 200mA
(with headphones)
● Spacing between jacks: 12 mm (center to center)
● Input impedance: 22 kΩ
● Output impedance: 100 Ω
● Headphone impedance: 8–250 Ω

A EF
FG
H
B
C
D
APower up
Connect USB-C to apowered USB connector or insert 4x AA batteries. If
using batteries, we highly encourage you to use rechargeable ones. Flip the
power switch to the ON position, and the light on the front panel under the
name Bestie will light up.
Note: USB-C input will take priority over AA batteries. Batteries will not be
charged when using it.

B Inputs
Inputs 2, 3 and 4 are 3.5 mm stereo jack inputs designed for stereo line-
level devices.
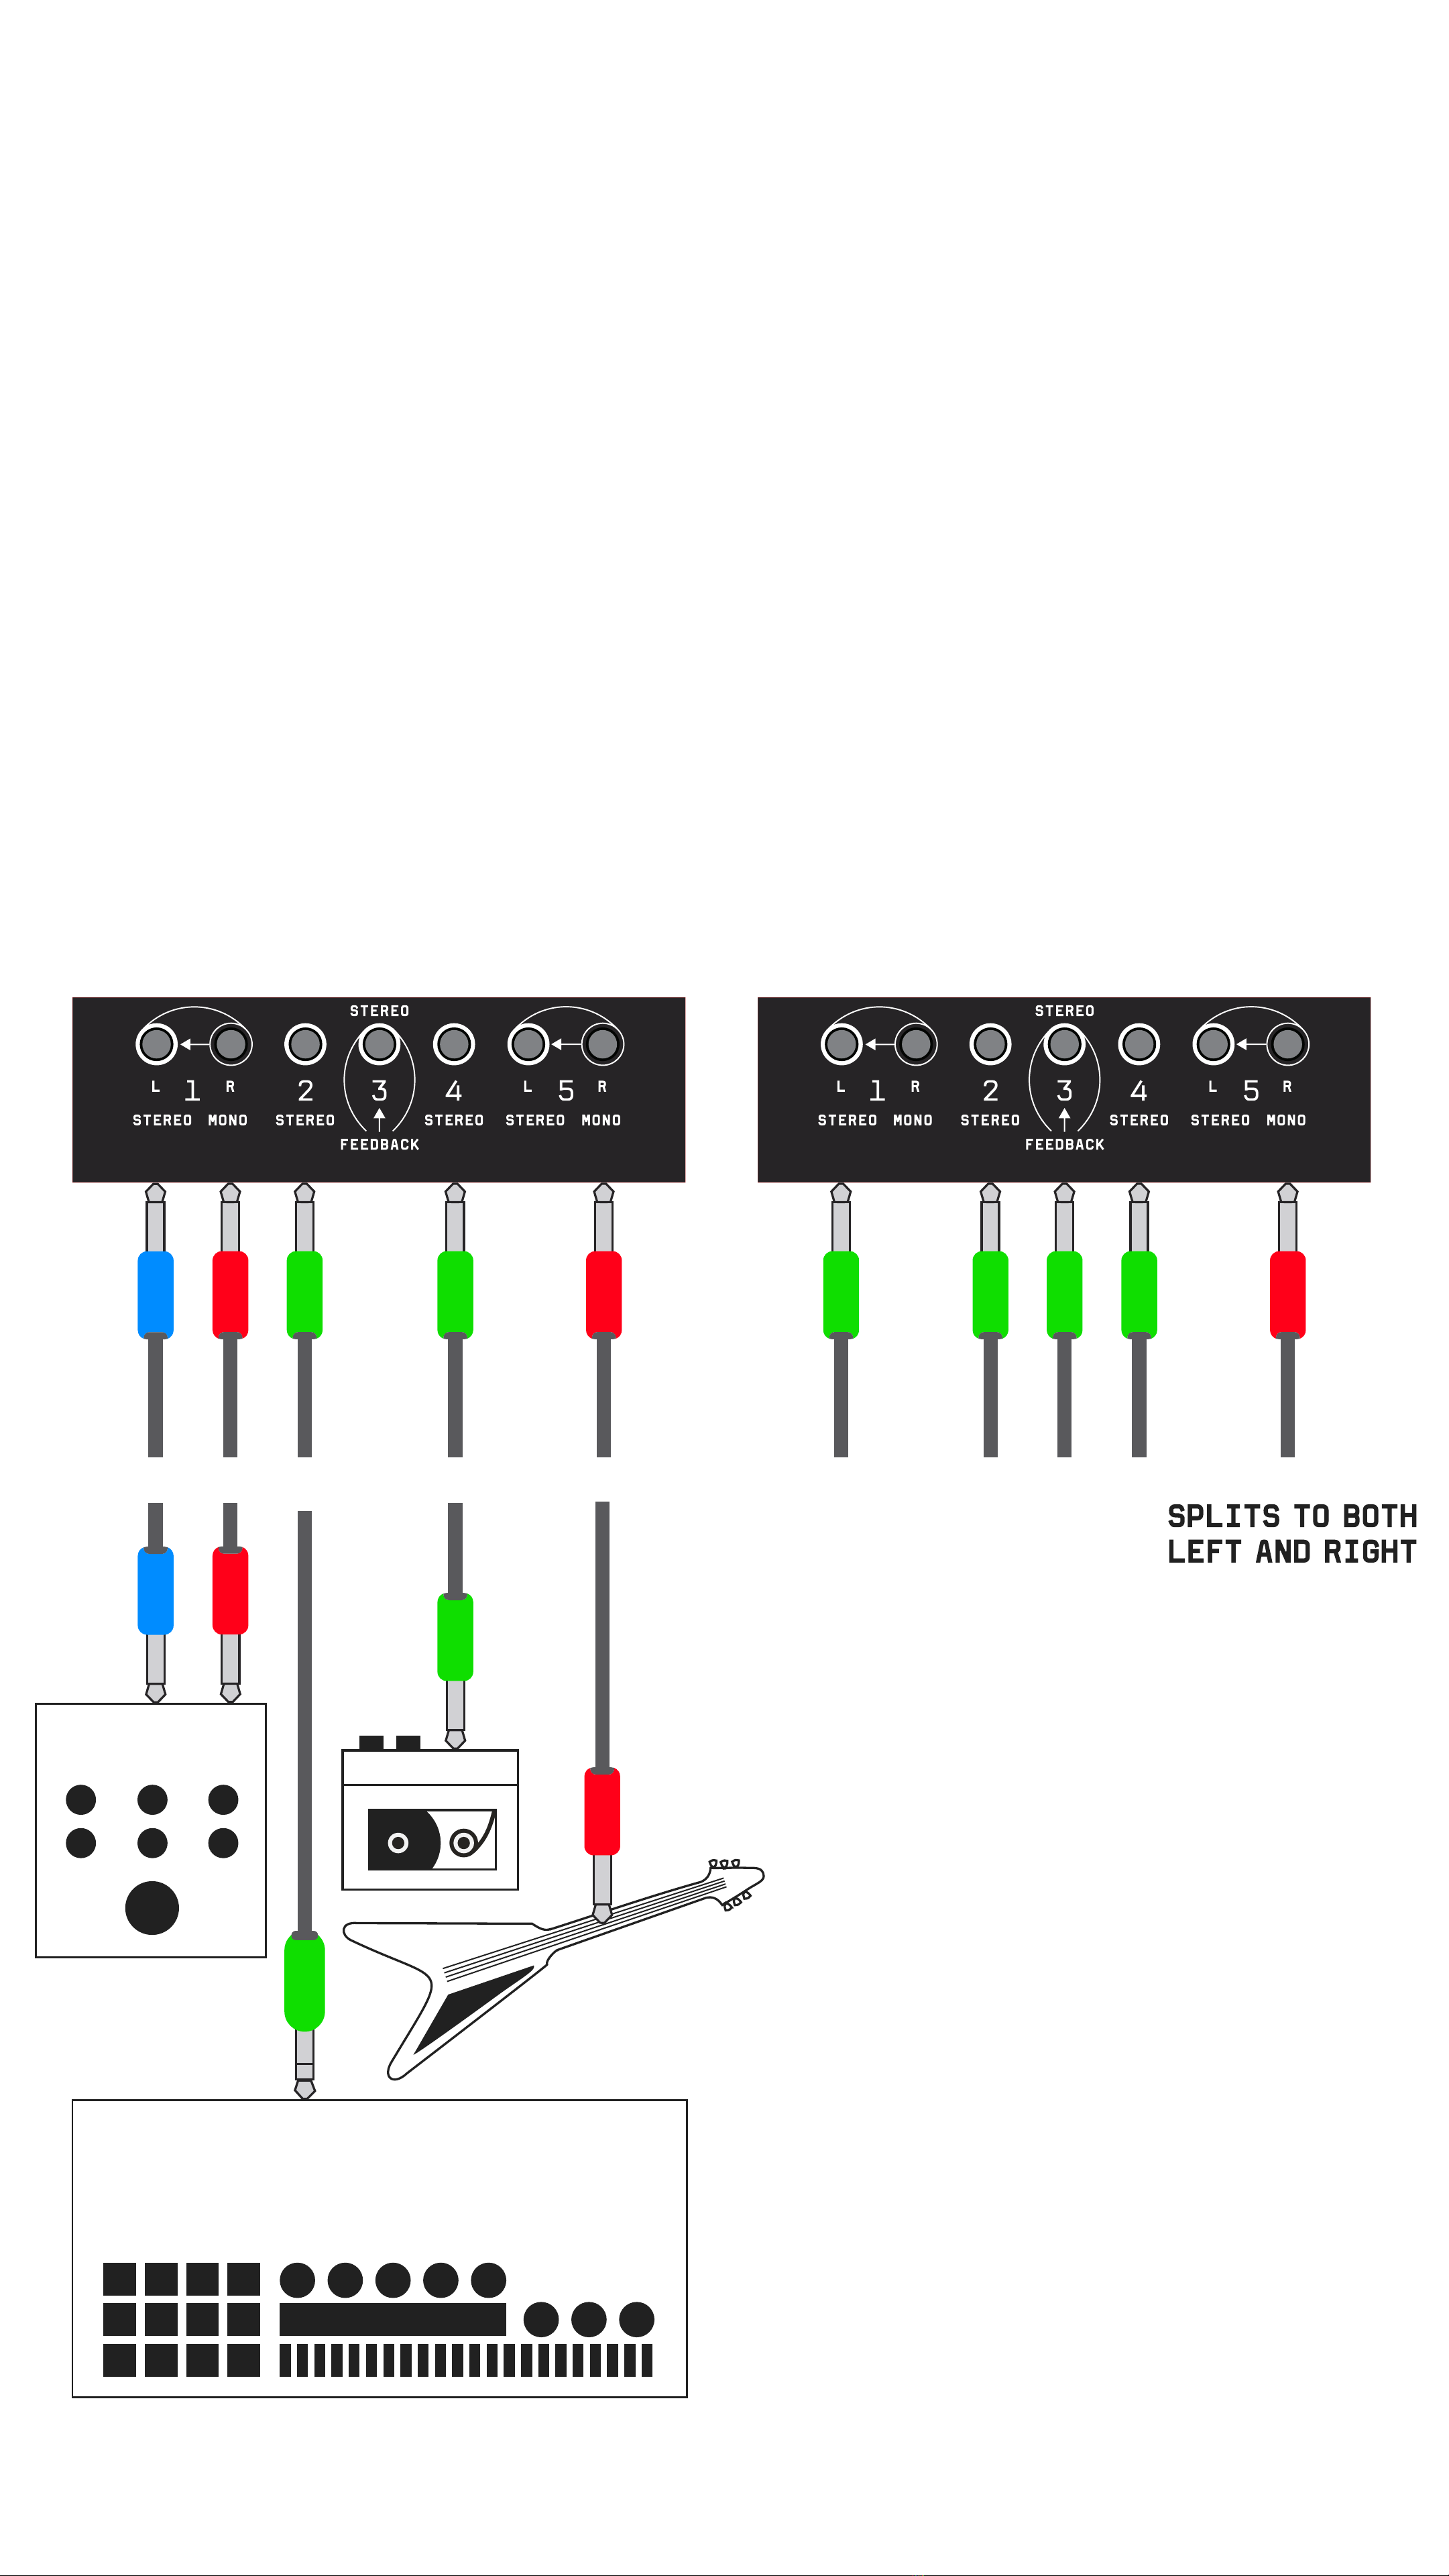
Channels 1 and 5 have flexible routing options:
1 Connect amono jack to the R input. It will be normalized to the L input
and you can hear the same mono signal in both left and right channels.
2 Connect amono left jack to the L input and amono right jack to the
Rinput to have astereo signal via independent connectors.
3 Connect astereo jack to the L input and to get astereo signal. It will
work the same way as Channels 2, 3 and 4.
All inputs are AC coupled.
STEREOSTEREO STEREO STEREOSTEREO MONOMONO
DRUM MACHINE
FX PEDAL
LR
LR
EXAMPLES OF CONNECTING DIFFERENT
STEREO / MONO SOURCES

The Feedback Channel
Channel 3 serves as a feedback channel, which means it routes the output
back to the input. If you plug anything into the Channel 3 input, it functions
as a normal input channel.
When utilizing Channel 3 as a feedback channel, the level before the
12o’clock position functions as an added distortion and gain. If boosted
beyond 0 dB, it will begin to self-oscillate and generate increasingly deeper
tones as the channel is further amplified. At maximum settings, it produces
distinct tremolo-like effects.
A big part of the sonic aesthetics of Bastl Instruments and Casper
Electronics is influenced by the so-called no-input-mixing technique. This
is the technique of routing the output back to the input on mixing consoles
and using gain and EQ to create different tones and noises without plugging
any signals into the mixer. However, fascinating outcomes arise when these
feedback signals are interrupted by elements such as drums. They interact
with the feedback tones and compete for dominance. Bestie is well suited
for such experiments and directly encourages you to overload its circuitry
and make the signals go ape.
CHANNEL 3 BEHAVES AS IF THERE WAS A CABLE GOING FROM
THE OUTPUT TO CHANNEL 3 INPUT. REMOVE THIS FEEDBACK LOOP
BY PLUGGING ANY CABLE INTO THE CHANNEL 3 INPUT

C Mute
Press the Mute switches to change the mute state of a channel. When
the light is on, it means the channel is active, and the light off means it
is disabled. You can also slightly press the button to make it temporarily
unmuted.
D Level/Boost
Use the Level knob to set the gain of each input channel. In the 12 o’clock
position, the gain is 0 dB (same level as the input); when turned fully
clockwise, the gain is +20 dB (10x gain). When the signal is boosted a lot,
it will saturate nicely in the NE5532 op-amp. For clean results, mix with the
level knobs below 12 o’clock. Boost all signals to make them interact with
each other.
E Mix Out
All channels get mixed in the MIX OUT - a line-level output. Use this output
to connect to your destination line input.
F Headphones
The dedicated headphone output is suitable for driving a wide range of
headphones, including high-impedance headphones. Use the Headphones
knob to set the level on the headphones. The headphones knob will also
boost the signal level, and can be used as mixdown overdrive.
G Pre/Post mute headphone switch
This switch selects whether the headphone output listens to the mixdown
before (PRE) or after (POST) the mute switches. This is useful for listening
to all signals on the headphone output while only some (unmuted) are sent
to the main output. This could be used to pre-listen to some channels
before sending them to the main MIX OUT.
NOTE: When using Channel 3 as a feedback channel (with nothing
plugged into the Channel 3 input), and with the headphone switch in the
PRE position, the muted Channel 3 level will boost the headphone output,
as it mixes in the MIX OUT signal. This can provide an additional overdrive
character without feedback. If Channel 3 is unmuted, it will produce normal
feedback.

H
Thetrimmer,accessiblewithasmallflatscrewdriverattherightsideofBestie,
is there to gain-match the left and right channels. While mixing, a mismatch
usually has little effect because the amplitude tolerances are minimal. But
when feedbacking Bestie, it can manifest in audible tonal mismatch and
distortion differences. This effect can either be used to widen the stereo
field (mismatch the gain) or narrow it (tightest possible gain match).
INSIDE HACKING – PLEASE NOTE THAT THE FOLLOWING
ACTIONS VOIDS THE WARRANTY!
1&2 Jumpers JP1, JP2, JP3, and JP4
If you take Bestie apart (by removing the knobs, nuts, and screws) and
look under the large capacitors on both the left and right sides, you will
find a few solder jumpers for both Channel 1 and 5. These can be cut with
a knife to increase the channels’ gain up to +35dB (55x gain), which could
be useful when using pickup microphones or other lower signal devices.
The input impedance remains at 22k. These jumpers can be closed again
by applying a blob of solder.
3 Jumpers JP5 and JP6
Cut both of these jumpers with a knife to disable the feedback routing for
Channel 3.
4 Jumpers JP7 and JP8
Cut both of these jumpers with a knife to increase the maximum gain of
the headphone output from 1.5x gain to 3.6x gain. This can be useful for
high-impedance headphones or if you want to use the headphone output
to distort the mixdown.
4
2 1
3

USB noise, what is causing it and how to avoid it
Some USB devices, such as sound cards or mixers, may have separate
USB ground and audio ground. On the other hand, other devices, including
Bestie, share the ground between USB and audio. When connecting audio
and USB ground, you may create ground loops and introduce noise into
your system, especially if one or more of the devices is not suitable for
this kind of connection (such as the OP-Z, K-Mix, Motu M4, etc.). In this
case, it’s recommended to power Bestie and the problematic device from
separate USB power sources or use the battery power option.

Mixing drums with feedback:
If your drum machine has separate outputs, you may want to consider
mixing them externally and adding saturation to enhance their sound.
The Bestie’s internal feedback channel interacts perfectly with drums.
Activate Channel 3 to get more dirt out of your drum machine.
SETUP EXAMPLES
DRUM MACHINE

Preview different parts on headphones
while muted in the MIX OUT:
When mixing multiple synth or drum parts, you can use the headphone
output with the switch in the PRE mute position to pre-listen to all the
channels before unmuting them to the speaker system.
DRUM MACHINE

Stereo saturation distortion/feedback
after stereo effect:
Stereo saturation is an under-appreciated concept in the hardware
domain, as most distortions and saturators are not stereo. For animated
distortion sound, use the stereo auto-pan effect before Bestie. Chorus
or any other stereo-widening modulated effects will also add subtle yet
very elegant complexity.
STEREO FX
CHORUS/AUTOPAN
LR
FX PEDALL
R
L
R

Stereo feedback loop with an effect:
To expand on the feedback channel idea, consider patching the
headphones output into a stereo effects box and patching it back to the
input. This way, the effect will play a major role in sculpting the feedback
tone and behavior. Experiment with options like chorus, auto-pan, delays
or even pitch-shifters. Anything in the time domain will work great, but
even a simple EQ or filter will go far. Experiment!
DRUM MACHINE
FX PEDAL L
R
L
R
LR

Use Bestie as a performative stereo aux sub-mixer:
Most analog mixers lack stereo aux sends. If you would like to use astereo
effect with a stereo source, you might want to use Bestie as a simple
stereo mixer to mix your effect. It will also be great for performing because
you can use the mute switches to toggle the effects on and off.
DRUM MACHINE
MAIN MIXER
FX PEDAL

Custom in-ear mixdown for live performance:
If you’re preparing for a live performance and require an in-ear monitoring
system,butyourcomputeraudiointerfacecannotprovideanindependent
headphone mixdown, you can use Bestie to achieve this. Simply split all
channels being sent to the front-of-house mixing engineer and mix them
independently using Bestie.
AUDIO INTERFACE
INSTRUMENTAL STEREO VOCAL MONO GUITAR MONO
FOH MIX
ENGINEE
R
MIC GUITAR
SPLIT
THE OUTPUTS
DAW
INSTRUMENTALS
& PROCESING VOCAL
& GUITAR
USB
STEREO FX
CHORUS/AUTOPAN
FX PEDALL
R
L
R

CREDITS
Development Team Václav Mach, Martin Klecl
Supervised by Václav Peloušek
Main Tester Juha Kivekäs
Beta Testers David Žáček, Milan Říha, John Dinger, Peter Edwards,
Oliver Torr, Patrik Veltruský, Niels Aras, David Herzig, Marco Menzle
Management John Dinger
Graphic design Anymade Studio
The idea turned into reality thanks to everyone at Bastl Instruments and
thanks to the immense support of our fans.
Table of contents
Other Bastl Recording Equipment manuals
Popular Recording Equipment manuals by other brands

National Instruments
National Instruments VXI-SB2020 Getting started

Arrakis Systems
Arrakis Systems ARC-10 Service manual

Nady Audio
Nady Audio GEQ 131 owner's manual

Honeywell
Honeywell Gamewell-FCI NGA Operation guide

Yamaha
Yamaha EQ-500U owner's manual

Digital Voice Systems
Digital Voice Systems AMBE-2000 supplementary guide

National Instruments
National Instruments MXI VXI-PCI8026 Getting started

Alesis
Alesis v mini user guide

Patton electronics
Patton electronics 2012 Installation and operation manual

MadLab
MadLab Bleep-o-tron quick start guide

JB Systems
JB Systems DJ KONTROL 1 Operation manual

Alesis
Alesis MMT-8 instruction manual