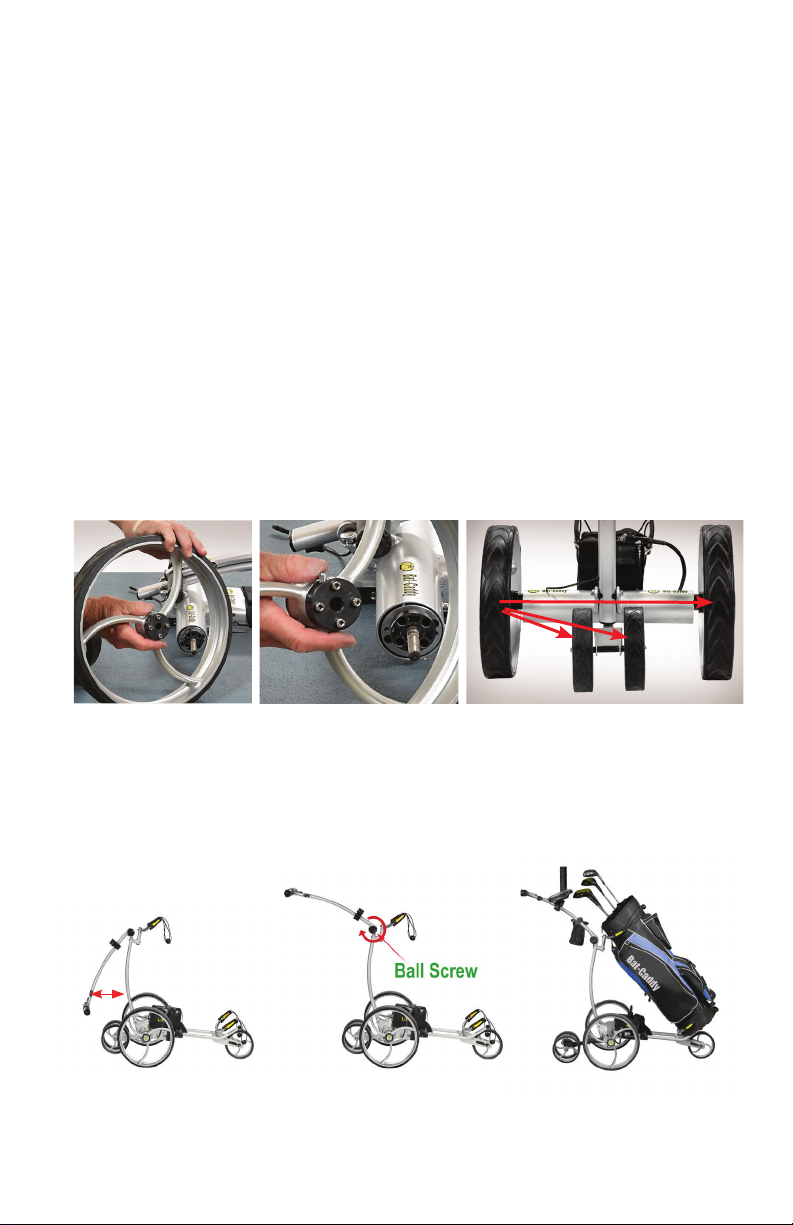
Bat-caddy X8 Series User manual

X8 Pro
X8R
ATTENTION: Please follow all assembly instructions. READ the
instructions carefully to understand the operating procedures BEFORE
you operate your caddy.
User Manual
X8 Series

2
TABLE OF CONTENTS
Packing List.........…………………...............................…............................……3
PartsGlossary........................................................................................………..4
Assembly Instructions.....................………………........................................5,6
Operating Instructions......................................................................…….........7
Remote Control Operation (X8R)..............................................................8
Additional Instructions
Free wheeling, Tracking, USB, Remote synchronization.....................................9
Electronic Systems / Battery ....................................................………….….10
Testing Your Caddy......……………….......................................................……12
General Maintenance........................................................................…...…13
Technical Specications..........................................................................14
TroubleShootingGuide...................................................................................15

3
PACKING LIST
X8 Pro
• 1 Caddy Frame
• 1 Single Wheel Anti-Tip Wheel & Pin
• 2 Rear Wheels (Left & Right)
• 1 Battery Pack (Battery, Bag, Leads)
• 1 Charger
• 1 Tool Kit
• Operational Instructions
• User Manual, Warranty, Terms & Conditions
X8R
• 1 Caddy Frame
• 1 Double Wheel Anti-Tip Wheel & Pin
• 2 Rear Wheels (Left & Right)
• 1 Battery Pack, SLA or LI (Battery, Bag, Leads)
• 1 Charger
• 1 Tool Kit
• 1 Remote Control (2 AAA Batteries included)
• Operational Instructions
• User Manual, Warranty, Terms & Conditions
Standard Accessories (X8Pro & X8R)
• 1 Scorecard Holder
• 1 Cup Holder
• 1 Umbrella Holder
Additional accessories available for purchase at www.batcaddy.com
NOTE:
This device complies with part 15 of the FCC Rules and with Industry Canada license-exempt
RSS standard(s). Operation is subject to the following two conditions:
(1) This device may not cause harmful interference, and
(2) this device must accept any interference received, including interference that may cause
undesired operation.
NOTE: THE MANUFACTURER IS NOT RESPONSIBLE FOR ANY RADIO OR TV
INTERFERENCE CAUSED BY UNAUTHORIZED MODIFICATIONS TO THIS EQUIPMENT
SUCH MODIFICATIONS COULD VOID THE USER’S AUTHORITY TO OPERATE THE
EQUIPMENT
Bat-Caddy X8R
FCC ID: QSQ-REMOTE
IC ID: 10716A-Remote

4
1. Manual Rheostat Speed Control
2. Upper Bag Support
3. Bag Support Strap
4. Battery
5. Rear wheel
6. Rear Wheel Quick Release Catch
7. Dual Motors (within housing tube)
8. Lower Bag Support & Strap
9. Front Wheel
10. Upper Frame Locking
Knob
11. Power Button & Control
12. USB Port
13. Battery Connection Plug
14. Front Wheel
Tracking Adjustment
15. Charger
16. Remote (X8R only)
17. Anti-tip wheel & Pin
(Single or double X8R}
PARTS GLOSSARY
X8Pro & X8R
2
1
3
4
6
9
8
11
7
5
10
13
14
15
5
16
17
12

5
ASSEMBLY INSTRUCTIONS
X8Pro & X8R
1. Unpack all items carefully and check inventory. Place frame structure (one piece)
on soft clean ground to protect the frame from being scratched.
2. Attach rear wheels to axles by pushing the wheel locking button (Pic-1)
on the outside of the wheel and inserting the axle extension in to the wheel.
Make sure to keep the locking button on the outside of the wheel
pushed in during this process, in order to enable the axle extensions,
including the four pins (Pic-2), to be inserted all the way into the
axle sprocket. If not locked in, the wheel will not be connected to the
motor and will not be propelled! Test the lock by trying to pull the wheel out.
Note; the X8 caddy has a right (R) and a left (L) wheel, seen from behind in driving
direction. Please make sure that the wheels are assembled on the correct side,
so the wheel tread will match each other (Pic-3) as well as the front & anti-tip
wheels. To disassemble the wheels, proceed in reverse order.
Pic-3
Pic-6
Pic-2
Pic-5
Pic-1
Pic-4
3. Erect the frame by rst unfolding and connecting the main frame sections
together at the upper frame lock by fastening the upper frame locking knob
(Pic-5). The lower frame connection stays loose and will be in place once the golf
bag is attached (Pic-6). Proceed in reverse for folding the caddy.

6
ASSEMBLY INSTRUCTIONS (Continued)
5. Insert anti-tip wheel into holding bar on motor housing and
secure with pin.
4. Place the battery pack on the battery
tray. Insert the 3-prong battery plug
into the caddy outlet so the notch
aligns properly and attach T-connector onto the battery.
Then attach Velcro strap. Tightly fasten the Velcro strap
underneath the battery tray and around the battery. It is
recommended that you DO NOT fasten the screw on the plug
to the outlet, so in case of tip-over, the cable can unplug from
the socket.
6. Attach optional accessories, such as Scorecard/Beverage/Umbrella holder, below the
handle. Instructions provided separately.
X8R Only
7. Unpack remote control and install batteries with plus and minus
poles as indicated in the diagram in the receiver compartment
of the unit.
Note: BEFORE CONNECTING make sure that caddy power is OFF, Rheostat Speed
Control is in OFF position and the remote control is stored securely!

7
1. The rheostat speed dial on the right side of the handle is your
manual speed control. It allows you to choose your preferred speed
seamlessly. Dial forward (clockwise) to increase speed.
Dial backwards to reduce speed.
2. Press ON/OFF power button for about 3-5 seconds to turn caddy on or off
(LED will light up)
3. Digital Cruise control - Once the cart is powered up, you can use the power button
along with the speed control dial (rheostat) to stop the cart at the current speed and
then resume at the that same speed. Set the desired speed with the speed control
dial (rheostat) and then press the power button for one second when you want to
stop. Press the power button again and the caddy will resume at the same speed.
4. The caddy is equipped with a 10. 20, 30 M/Y Advanced Distance Timer.
Press the Tbutton once, the caddy will advance 10m/y and stop, press twice for 20m/y
and 3 times for 30m/y. You can stop the caddy via the remote by pressing the stop
button.
OPERATING INSTRUCTIONS
X8Pro & X8R
X8 Series
T Handle Control X8 Series Faceplate
Slow Fast
Timer
On/Off &
Start/Stop
Battery Charge
Pic-1

8
FUNCTIONS:
1. STOP: The red button in the middle of the directional arrows should be used for
stopping the caddy abruptly or as an emergency brake.
2. TIMER: 10, 20, 30 yards/meters: press once -10 yds., twice -20 yds.;
three times - 30 yds.
3. BACKWARD ARROW: Pressing the back arrow will set the caddy in backward mo-
tion. Increase backward speed by pushing multiple times. Press also to decrease
forward speed/slowing the caddy.
4. FORWARD ARROW: Pushing the forward arrow will set the caddy in forward
motion. Pushing multiple times will increase the speed. Push arrow to slow down. If
you need to stop press the stop button.
5. LEFT ARROW: Left turns. When the arrows are released the caddy stops turning
and continues straight with the original speed prior turning.
6. RIGHT ARROW: Right turns. Same as left arrow function.
7. ON/OFF Switch: On the right side of the device turns
remote control on or off; recommended to prevent
accidental engagement of caddy.
8. ANTENNA: Internal
9. LED: Lights up when a button is being
pushed indicating a signal is being sent
10. BATTERIES: 2 x 1.5V AAA
Remote Control Operation (X8R Only)
Important Notes
• DO NOT use the remote control in crowded or dangerous spaces, such as parking
lots, public places, roads, narrow bridges, hazards or other potentially dangerous
places
• Change the remote control batteries once the indicator LED light gets weak or does not
light at all.
• The remote control uses two 1.5V AAA batteries available in any supermarket, drugstore,
or electronics store
• It is recommended to keep a set of extra batteries ready as replacement
• To change the batteries, open the battery compartment cover by pulling the lever and place
the batteries according to the diagram in the battery compartment
• The remote-control system is designed to not interfere with other electric caddies
• The maximum range of the remote control varies between 80-100 yards, depending on the
battery charge, obstacles, atmospheric conditions, power lines, cell phone towers or other
electronic/natural interference sources
• It is strongly recommended to operate the caddy at a maximum range of 20-30 yards
in order to prevent loss of control of the unit!
9
7
6
5
4
3
2
1

9
Additional Functions
Freewheeling Mode: The caddy can be easily operated without power. In order to activate
the freewheeling mode, turn main power OFF. Then
disengage rear wheels from motor/gearbox and
sliding the wheel from the inner grove (Pic-1)on the
axle to the outer grove (Pic-2). Make sure wheel is
secure in the outer curve. The caddy now can be pushed manually with
little resistance.
Remote Control Resynchronization
Step 1 - Make sure power is totally off for at least ve (5) seconds.
Step 2 - Hold down the stop button on the remote
Step 3 - Power up caddy. Continue to hold down the stop button.
Step 4 - Continue to hold down the stop button until lights on the LED blink.
Step 5 - Caddy is now in “sync” test each function to assure all are functioning.
Your ready to go!
Tracking Adjustment*: Tracking behavior of all electric caddies is
strongly dependent on equal weight distribution on the caddy and
slope/topography of the golf course. Test your caddy’s tracking
by operating it on a level surface without the bag. If changes are
necessary, you can adjust the tracking of your caddy by loosening
the front wheel axle and the Adjustment bar on the right side of
the from wheel and shifting the axle accordingly. After such
adjustment fasten screws in reverse order but do not overtighten.
*Tracking - there is a video on the website that shows how to adjust tracking
Braking System
The caddy drive train is designed to keep the wheels engaged with the motor, thus acting as
a brake that will control the caddy’s speed while going downhill.
AXLE
ADJUSTMENT BAR
USB port is available for charging GPS and/or cell phones. It is
located in the end cap of the upper frame above the handle control.
The caddy drive train
will control the caddy
speed downhill
Pic-1 Pic-2
Release

10
Electronic Systems
• Remote Control Range: We recommend not to exceed 20-30 yards distance. The greater
the distance between you and the caddy, the greater the chance of losing control of it.
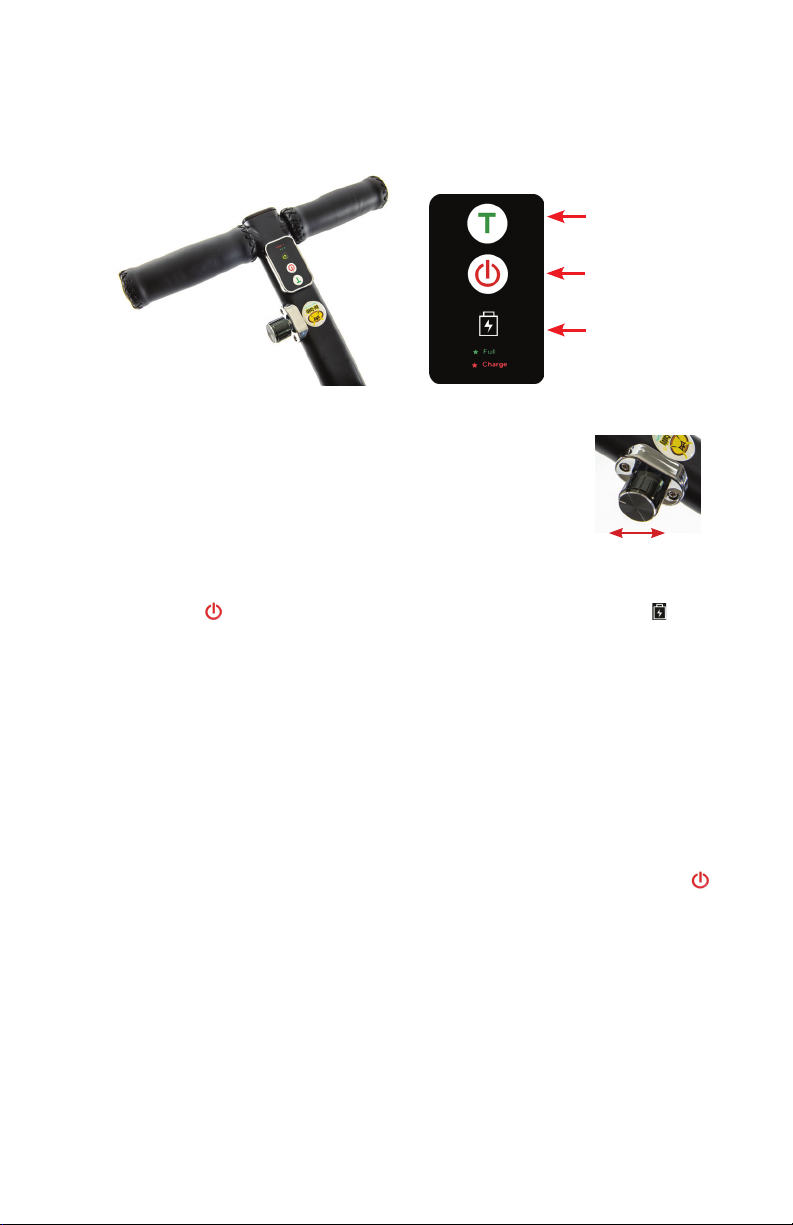
• Microcomputer: The remote caddy has 3 microcomputer controls. The primary
microprocessor is in its own compartment underneath the battery tray. We call it the
controller. The 2nd is in the remote control transmitter handset, and the third is in handle
controls at the top of the handle (handle control board). The battery charge indicator lights
will light up indicating the power is “ON”. Also, it will indicate the charge level of the battery,
green ( OK to run) or red (near discharged, will fail shortly)
• Safety Protection: When the temperature of the controller box reaches its upper limit, the
overload circuit will automatically shut down the unit to cool it down. The remote control
unit will NOT operate at this time, but you may continue to use your caddy with manual
operation.
• Microprocessor Controlled Electronics System: When you connect the battery, the
electronics system will automatically run through a start-up routine; then once completed
you can press the main OFF/ON switch on the handle. The battery charge indicator lights
will show you the charge level of the battery from green (fully charged) to red (discharged).
• Important: The electronics controller box contains no user serviceable parts.
Therefore, it is sealed to reduce the risk of moisture entering and impacting the
electronic system. Breaking this seal increases the risk of damaging the electronics and
decreasing the reliability of your caddy. DO NOT attempt to open the controller case.
DOING SO WILL VOID THE WARRANTY!
• Battery Operation and Care: Follow battery charge and maintenance instructions. The
battery comes with leads and a 3-prong connector.
BATTERY MAINTENANCE & ADDITIONAL INSTRUCTIONS
• Battery Charging and Maintenance (see specic separate instructions for sealed lead
acid (SLA) and lithium batteries)
• PLEASE OBEY THESE PRECAUTIONS FOR BATTERY USE & CHARGING:
• Please do not charge the battery in a sealed container or in an upside down position.
Charge the battery in a well-ventilated area.
• Please do not charge the battery near a heat source, where heat accumulation may occur,
or in direct sunlight.
• In order to prolong the service life of the battery, avoid complete discharge and charge the
battery after every use. Unplug the battery from the charger once the charge is complete.
When the caddy is not in use for an extended period of time, it is recommended to charge
the battery once every 6 weeks.
• The red color on the battery pole stands for positive, and the black stands for negative. In
case of battery replacement, please reconnect the poles of the battery correctly to avoid
severe damage.
• Please do not disassemble the battery or throw it into a re. EXPLOSION HAZARD!
• NEVER TOUCH THE ELECTRIC POLES OF THE BATTERY AT THE SAME TIME! THIS
IS A SEVERE SAFETY HAZARD!

11
Recommendations
• Fully charge the battery for approximately 5-9 hours before the rst use.
• Do not leave the battery on the charger. Remove it from the charger after charge is
complete
• The battery will take approximately 2-3 rounds and charging cycles before it reaches its
full operating potential. During the rst couple of rounds it might still be below its optimal
power.
• Never keep your battery connected to the grid during prolonged power outages. It might
be irreversibly damaged.
DO NOT fully discharge the battery by “overplaying” it. It is recommended to avoid complete
discharge of the battery.
*Life of sealed lead acid and lithium batteries is dependent on a variety of factors, other
than purely the number of charges, including but not limited to, frequency between charges,
duration of charge, level of drainage, idle time, operating temperature, storage conditions
and duration and overall shelf time. Bat-Caddy will cover our batteries according to our
warranty policy and any potential additional coverage is at our discretion”.

12
Testing Your Caddy
Test Environment
First, make sure that you perform your rst test of the caddy in a wide and safe area, free of
obstructions or valuables, such as people, parked automobiles, owing trafc, bodies of water
(rivers, swimming pools, etc.), steep hills, cliffs or similar hazards.
Manual Control Operation
Test the manual function rst: Press the On/Off button for 2-5 seconds. The manual functions
of the caddy are controlled through the speed control dial (rheostat) on the top of the handle.
Turning the wheel clockwise will control the forward movement of the caddy. In order to slow
down or stop the caddy, turn the wheel counterclockwise. Turn the dial SLOWLY in order
to prevent the caddy from “jumping” away!
Remote Control Operation (X8R Only)
Make sure you are close to the caddy at all times while testing it and familiarizing
yourself with the remote control! Turn on the main power switch and make sure that the
speed dial control (rheostat) is in the OFF position. One press of the Forward/Backward arrows
on the remote control starts the caddy in either direction. Further presses increase the speed.
In order to stop the caddy, press the round red STOP button in the middle of the remote.
To turn the caddy in either direction while moving, press the left or right arrows briey. Once
you release the button, the caddy will continue in the current direction at the same speed prior
to the turning command. You will notice that the caddy reacts differently on different surfaces,
and different weight loads so it will take some practice to get just the right touch for turning
maneuvers. Always make sure you stay close enoough to control the caddy manually in an
emergency.
The remote is designed to have a reach of maximal 80-100 yards, but we strongly recommend
to operate the caddy in closer ranges of 10-20 yards (not exceeding 30 yards) to be able
to react quickly to any unforeseen events, such as other golfers crossing your path, or to
avoid hidden obstructions such as creeks, bunkers, or uneven ground, etc. or an unexpected
disconnection in remote operation. An additional safety feature of this caddy is that it will stop
moving if it does not receive a signal from the remote control at least every 45 seconds. This
way should you ever be distracted, your caddy does not completely get away. By pressing the
lower Timer button on the remote, the caddy can be moved forward automatically by 10, 20, or
30 yards. STOP will make the caddy stop in case of overreach. Do not use this function close
to water or other hazards. Never park your caddy facing water or roads!
Recommendations for Efcient and Safe Operation
• Be alert and act responsibly at all times while operating your caddy, just as you would when
operating a riding cart, motor vehicle, or any other type of machinery. We absolutely do
not recommend the consumption of alcohol or any other impairing substances while
operating our caddies.
• DO NOT operate the caddy carelessly or in narrow or dangerous places. Avoid using your
caddy in places where people may gather, such as parking lots, drop-off areas, or practice
areas, to avoid damage to people or valuables. We recommend operating your caddy

13
General Maintenance
All of these recommendations, along with common sense, will help keep your Bat-Caddy in
top condition and ensure that it remains your reliable partner, both on and off the links.
• The Bat-Caddy has been designed so that the user can concentrate on playing golf, while
the caddy does the work of carrying your bag. In order to keep your Bat-Caddy looking its
best, wipe any mud or grass from the frame, wheels and chassis after every round using
a damp cloth or paper towel.
• NEVER use water hoses or high-pressure jet washers to clean your caddy to prevent
moisture from entering the electronic systems, motors, or gear boxes.
• Remove the rear wheels every few weeks and clean out any debris that may cause the
wheels to drag. You may apply some lubricant, such as WD-40, to keep moving parts
smooth and corrosion-free.
• A 4 to 5 hour round of golf played once a week for 12 months is equivalent to approximately
four years’ use of a lawn mower. Thoroughly inspect your cart at least once a year, and if
you notice any symptoms of wear, contact your Bat-Caddy Service Center. Alternatively,
you can have your caddy inspected and tuned at our Service Centers, so it’s always in
great shape for the new season.
• Always disconnect the battery when you store your caddy, and always reassemble your
caddy before reconnecting the battery. If you are not planning to play for at least a month,
store the battery in a cool dry place (not on a concrete oor) and DO NOT LEAVE IT ON
THE CHARGER.
Recommendations for Efcient and Safe Operation
• The caddy (X8R) is equipped with an automatic runaway prevention feature. It
will automatically stop if it does not receive a signal from the remote for about 45 seconds.
A quick press of the forward button will put it in motion again.
• With its optimized balance and straight front wheel, the caddy usually has responsive
turning and maneuvering abilities. However, it sometimes tends to react to uneven weight
distribution of its load or slope variations and will follow the weight and the slope of the
course, which is normal for electric caddies. Please make sure that the weight in your bag
is distributed evenly (move heavy balls and items to both sides equally and to the upper
part of your bag, or shift the bag on the caddy). Also, when operating you caddy, anticipate
the slope of the course in order to avoid frequent corrections in direction. When the need
for complicated correction adjustment maneurvers, such as very uneven terrain, steep
hills, narrow and/or sloped cart paths, muddy areas, gravel paths, close to bunkers and
hazard, around bushes and trees it is strongly recommended to steer the caddy manually
with the handle while adjusting the speed with the remote. When operating the caddy often
in bumpy terrain we recommend to add an additional bungee strap to the lower and/or
upper bag support to give the golf bag additional hold and prevent it from shifting.
• Please avoid or minimize operation on hard and rough surfaces, such as cart paths,
asphalt roads, gravel roads, root etc., as this will cause unnecessary wear and tear on
tires, wheels and other components. Guide the caddy manually when on cart paths
with curbs. Bumping into hard objects might cause damage to wheels and other
components! The caddy is best operated on soft and smooth surfaces such as fairways.

14
TECHNICAL SPECIFICATIONS
Model Name X8 Pro / X8R
Standard Battery 35/36Ah SLA
Dimensions SLA: 8 x 5 x 6 in (20 x 13 x 15 cm)
Weight: 25 lbs
Average charge time: 4-8 hours
Lifetime: ca. 150 charges - 27+ holes p/charge
Lithium Battery 12V 25 Ah Lithium
Dimensions: 7x5x4in
Weight: 6 lbs
Average Charge time 4-6 hours
Lifetime: ca. 600-750 charges - 36+ holes p/charge
Folded Dimensions (w/o wheels) Length: 31” (78.7 cm)
Width: 22” (60 cm)
Height: 10.5” (26.7 cm)
Unfolded Dimensions Length: 42-50 in” (107-127 cm)
Width: 22.5” (60 cm)
Height: 35-45” (89-114cm))
Weight Caddy 23 Lbs (10.5 kg)
Weight Battery 25 lbs (11kg) LI 6 lbs (2.7)
Total Weight (var. battery) 48 (18.2 kg)
Speed 5.4 mi/h (8.6 km/h)
Control Functions Manual Seamless Rheostat
Cruise Control
Functions: Forward, Reverse, Left, Right, Stop
Battery Charge Indicator
Power On/Off
USB Port
Timed Distance Advance function (10,20,30 yards)
Remote Control (range up to 80 -100 yards)
Distance/Range 12 mi (20 km)/27+ holes 36+ holes w/LI
Climbing Ability 30 degrees
Maximum Load 77 lbs (35 kg)
Charger Input: 110-240V AC
Output: 12V/3A-4A DC Trickle Charger
Motor Power: 2 x 200 Watt (400 Watt)
12V DC Electric
Front Wheels Airless, Rubberized tread, Tracking adjustment
Rear Wheels 12 3/8 Diameter, Airless, Rubberized Tread, Quick-release
mechanism,
Anti-tip wheel assembly
Drive Train Rear Wheel Drive, Direct Drive,
Dual independent transmission, Gear ratio (17:1)
Handle Height Adjustment P
Materials Aluminum/SS and ABS
Available Colors Titanium Silver, Phantom Black, Arctic White
Available Accessories
Scorecard Holder, Cup Holder, Umbrella Holder
Optional Accessories Rain Cover, Sand Dispenser, GPS/Cell Phone Holder, Carry Bag,
Seat
Warranty 1 Year on Parts and Labor
1 Year on SLA Battery/2 Years on LI Battery (pro-rated)
Packaging Cardboard box, Styrofoam cushing
Dimensions: 33 x 28 x 14 (84 x 71.1 x 36 cm)
Gross Weight: 36 lbs (16 kg) w. LI Battery

15
TROUBLE SHOOTING GUIDE
Caddy does not have power • Make sure battery is plugged correctly into cart and
battery lead plug is damage free.
• Make sure battery is sufciently charged
• Depress and hold power button for at least 5 seconds
• Make sure battery leads are connected to proper
poles (red on red & black on black)
• Make sure power button is engaging circuit board (you
should hear a click)
Motor is running but wheels don’t turn • Check if wheels are attached correctly. Wheels must be
locked in.
• Check right and left wheel positions. Wheels must be on
the correct side
• Check wheel axle pins.
Caddy pulls to left or right • Check if wheel is tted rmly latched to axle
• Check if both motors running
• Check tracking on level ground without bag
• Check weight distribution in golf bag
• If necessary adjust tracking on front wheel
Problems attaching wheels • Adjust quick release catch
FREQUENTLY ASKED QUESTIONS (FAQs)
Please check our website at http://batcaddy.com/pages/FAQs.html for FAQs
Contact info at
http://batcaddy.com/pages/Contact-Us.html
Check our website www.batcaddy.com
https://batcaddy.com/pages/TechTips.html
For Technical Support please contact one of our Service Centers or visit
Note: Bat-Caddy reserves the right to modify/upgrade any components during a model year,
so illustrations on our website, brochures and manuals may slightly vary from the actual
product shipped. However, Bat-Caddy guarantees that specications and functionality will be
always equal to or better from the advertised product. Promotional accessories may also vary
from illustrations shown on our website and other publications.

BC-81820
www.batcaddy.com
Other manuals for X8 Series
1
This manual suits for next models
1
Table of contents
Other Bat-caddy Golf Trolley manuals