Battenfeld Frankford Arsenal Quick-N-EZ User manual

Vibratory Case Tumbler & Kits
Master Instructions
Assembly & Usage Instructions
Instructions #573331 Rev. E
Section 1 - Quick-N-EZ CASE TUMBLER (ONLY)
#855020, #515667-220v, #645880 & #799534-220v
Section 2 - CASE CLEANING KIT with Tumbler, Separator and Bucket
#645880, #799534-220v and #507565 (Separator only)
Section 3 - Quick-N-EZ CASE Separator (ONLY)
#683551

VIBRATORY CASE TUMBLER ASSEMBLY & USAGE INSTRUCTIONS
A.
C.
B.
D.
Step 1: Mounting the bowl
Turn the bowl upside down and place one square nut into each
of the cavities that has a hole passing through it (1A). Place
tumbler base assembly upside down on bowl (1B). Locate the
three protruding features on the black plate around the nut
cavities of the bowl, press bowl into place (1C).
3 Square Nuts are used here, 1 for
each of the 3 attachment points.
1A
Tools Needed:
1. Phillips screwdriver
2. 7/16” wrench
(or adjustable wrench)
Content:
A. Tumbler Bowl-#193105
B. Tumbler Base-#374598
C. Clear Lid-#208732
D. Hardware Pack-#687542
1 - 5” Threaded Shaft
1 - Flat Washer
1 - Wing Nut
3 - 1/4-20 Phillips Screws
3 - Star Washers
4 - Square Nuts
SECTION 1

Step 2: Securing the bowl
Insert a star washer onto each of the three 1/4-20 Phillips screws.
Thread one washer screw assembly through each nut location, as
shown.
NOTE: Tighten to no more than 10 inch pounds of torque or 1/4
to1/2 turn after screw bottoms out.
2A
Step 3: Prepping the bowl
Turn the entire assembly over. Thread a 1/4-20 square nut
onto the 5” threaded shaft approximately 3/4” on the length of
the shaft. Thread the end of the threaded shaft into the brass
insert inside the bowl. Tighten the threaded shaft down until it
bottoms out in the bushing, and then turn the square nut until
finger tight against the bowl. With an adjustable end wrench or
7/16” wrench turn the nut another 1/8 turn.
NOTE: DO NOT OVER TIGHTEN!
The last Square Nut
is used here
3
Step 4: Securing the lid
Put the lid on top of the threaded shaft assembly. Install the flat
washer and wing nut as shown here.
4
The Frankford Arsenal Vibratory Tumbler
is designed for use with dry media such as
ground corn cob or walnut hulls, either plain
or treated with brass polish; do not attempt
to use the tumbler with any kind of liquid
media or for lapidary applications.
The use of liquid media or attempting
to alter or modify the tumbler will void
your tumbler’s warrant
1B
1C
IMPORTANT SAFETY INSTRUCTIONS
SAVE THESE INSTRUCTIONS
When using this electrical appliance, basic
precautions should always be followed
including the following:
1. Read all instructions before using this appliance.
2. To reduce the risk of injury, close supervision is
necessary when this appliance is used near children.
3. Do not contact moving parts.
4. Only use attachments recommended or sold by
Frankford Arsenal.
5. Do not use outdoors.
6. To disconnect, turn all controls to the off (“O”)
position, then remove the plug.
7. Do not unplug by pulling on the cord. To unplug,
grasp the plug, not the cord.
8. Do not operate this appliance with a damaged cord
or plug, or if the unit malfunctions or is dropped
or damaged in any manner. Return the unit for
examination, repair, or electrical or mechanical
adjustment.
9. To reduce the risk of electrical shock, do not put this
appliance in water or other liquid.
10. Do not place or store this appliance where it can fall
or be pulled into a tub or sink.
11. Remove plug from wall outlet when this appliance is
not in use.
12. Never operate this appliance unattended.
13. Operate this appliance on a non-combustible surface
away from all combustible materials including
curtains, draperies, or walls.
For grounded appliance – Connect to a properly grounded
outlet only. See Grounding Instructions.
This appliance must be grounded. In the event of malfunction
or breakdown, grounding provides a path of least resistance
for electric current to reduce the risk of electric shock. This
appliance is equipped with a cord having an equipment-
grounding conductor and a grounding plug. The plug must be
plugged into an appropriate outlet that is properly installed and
grounded in accordance with all local codes and ordinances.
DANGER - Improper connection of the equipment-
grounding conductor can result in a risk of electric
shock. The conductor with insulation having an outer
surface that is green with or without yellow stripes is
the equipment-grounding conductor. If repair or replacement
of the cord or plug is necessary, do not connect the equipment-
grounding conductor to a live terminal. Check with a qualified
electrician or serviceman if the grounding instructions are not
completely understood, or if in doubt as to whether the appliance
is properly grounded. Do not modify the plug provided with
the appliance - if it will not fit the outlet, have a proper outlet
installed by a qualified electrician.
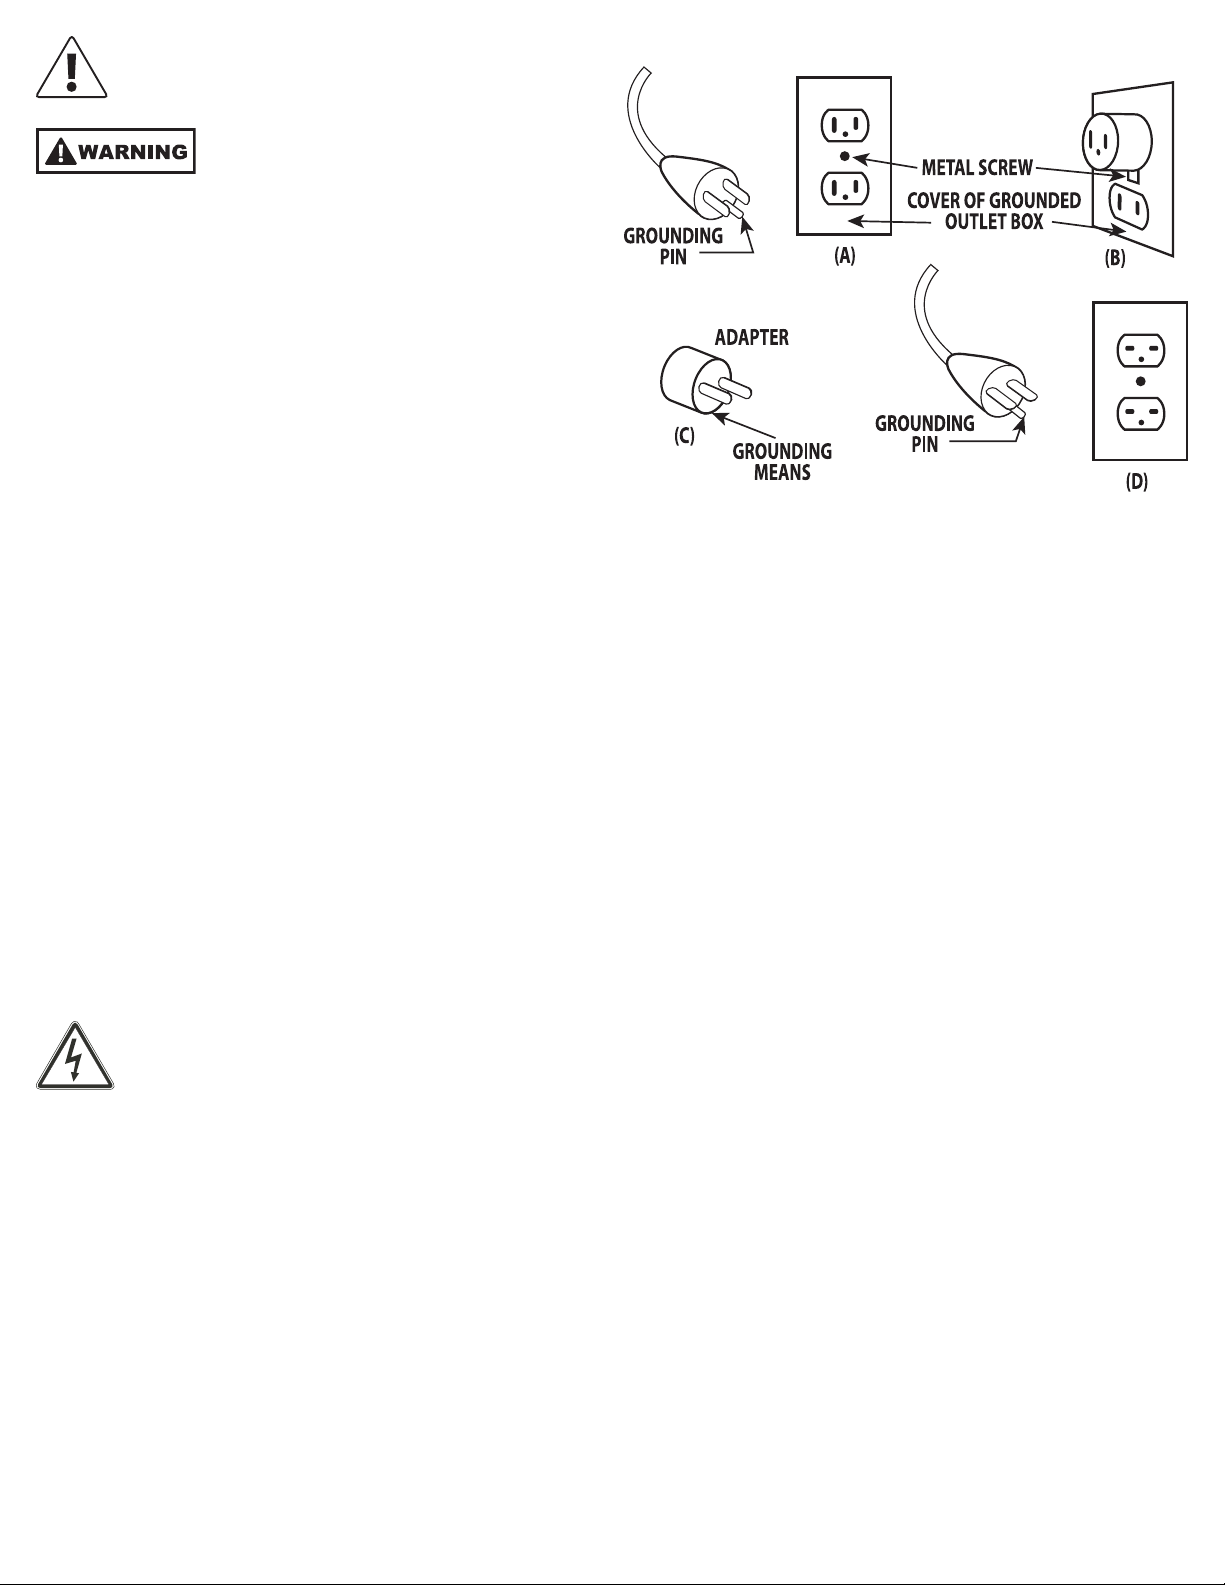
This appliance is for use on a nominal 120 V circuit, and has a
grounding plug that looks like the plug illustrated in sketch “A”.
A temporary adapter, which looks like the adapter in sketches
“B” and “C”, may be used to connect this plug to a 2-pole
receptacle as shown in sketch “B” if a properly grounded outlet
is not available. The temporary adapter should be used only
until a properly grounded outlet can be installed by a qualified
electrician. The green colored rigid ear, lug, and the like,
extending from the adapter must be connected to a permanent
ground such as properly grounded outlet cover box. Whenever
the adapter is used, it must be held in place by the metal screw.
Grounding Sketch
Instructions for Use:
1. Fill the cleaning bowl about 2/3 full of cleaning or polishing
media. Set the tumbler on a flat concrete surface and plug it in.
Add any amount of brass you desire, up to maximum capacity.
Capacity will vary with the size of the cases being cleaned.
In general, once the cleaning media is in the tumbler, you can
continue to add brass to your media until you see the tumbling
action of the brass become sluggish. Obviously, with less tumbling
action, you will get less cleaning action. If you put too much brass
in and the action slows down, simply remove some of the brass.
2. Tumble your brass until it is clean. If you are merely cleaning
your brass, 30 minutes to an hour will normally remove all dirt
and grease. If you want to polish the tarnish or powder stain
from brass, you will need to use treated media or add ammonia-
free brass polish to untreated media and then tumble for several
hours. Just check the brass periodically for progress.
Tumbling Tips:
1. Clean your brass before polishing with “untreated” ground
walnut shells. This simply removes the dirt, grit, or bullet lube
from the cases so they can be inspected. This will insure that any
dirt and grit left on the case won't get into your sizing die and
wear it out prematurely.
2. Resize and deprime your brass before polishing.
3. The media you use to clean and polish your cases will not
wear out, but it will become “loaded up” with bullet lube, polish,
powder residue, and dirt. When it does, you can simply throw it
out, or it can be recharged with brass polish.
4. If you reload for a variety of different guns, you may need to
obtain a few extra buckets in which to keep your different cleaning
and polishing medias while they are not in use. Dirtier loads will
need to be cleaned with fresher media than clean burning loads.
Shooting conditions can also dirty your brass more than normal.
We recommend keeping three buckets on hand to contain media
in different stages of use: #1 for untreated “cleaning media;” #2
for new, barely used treated “polishing” media; and #3 for well-
used, “loaded-up” media.
5. If you use your tumbler to Moly-coat bullets, we recommend
using a separate bowl from the one you use to tumble brass.
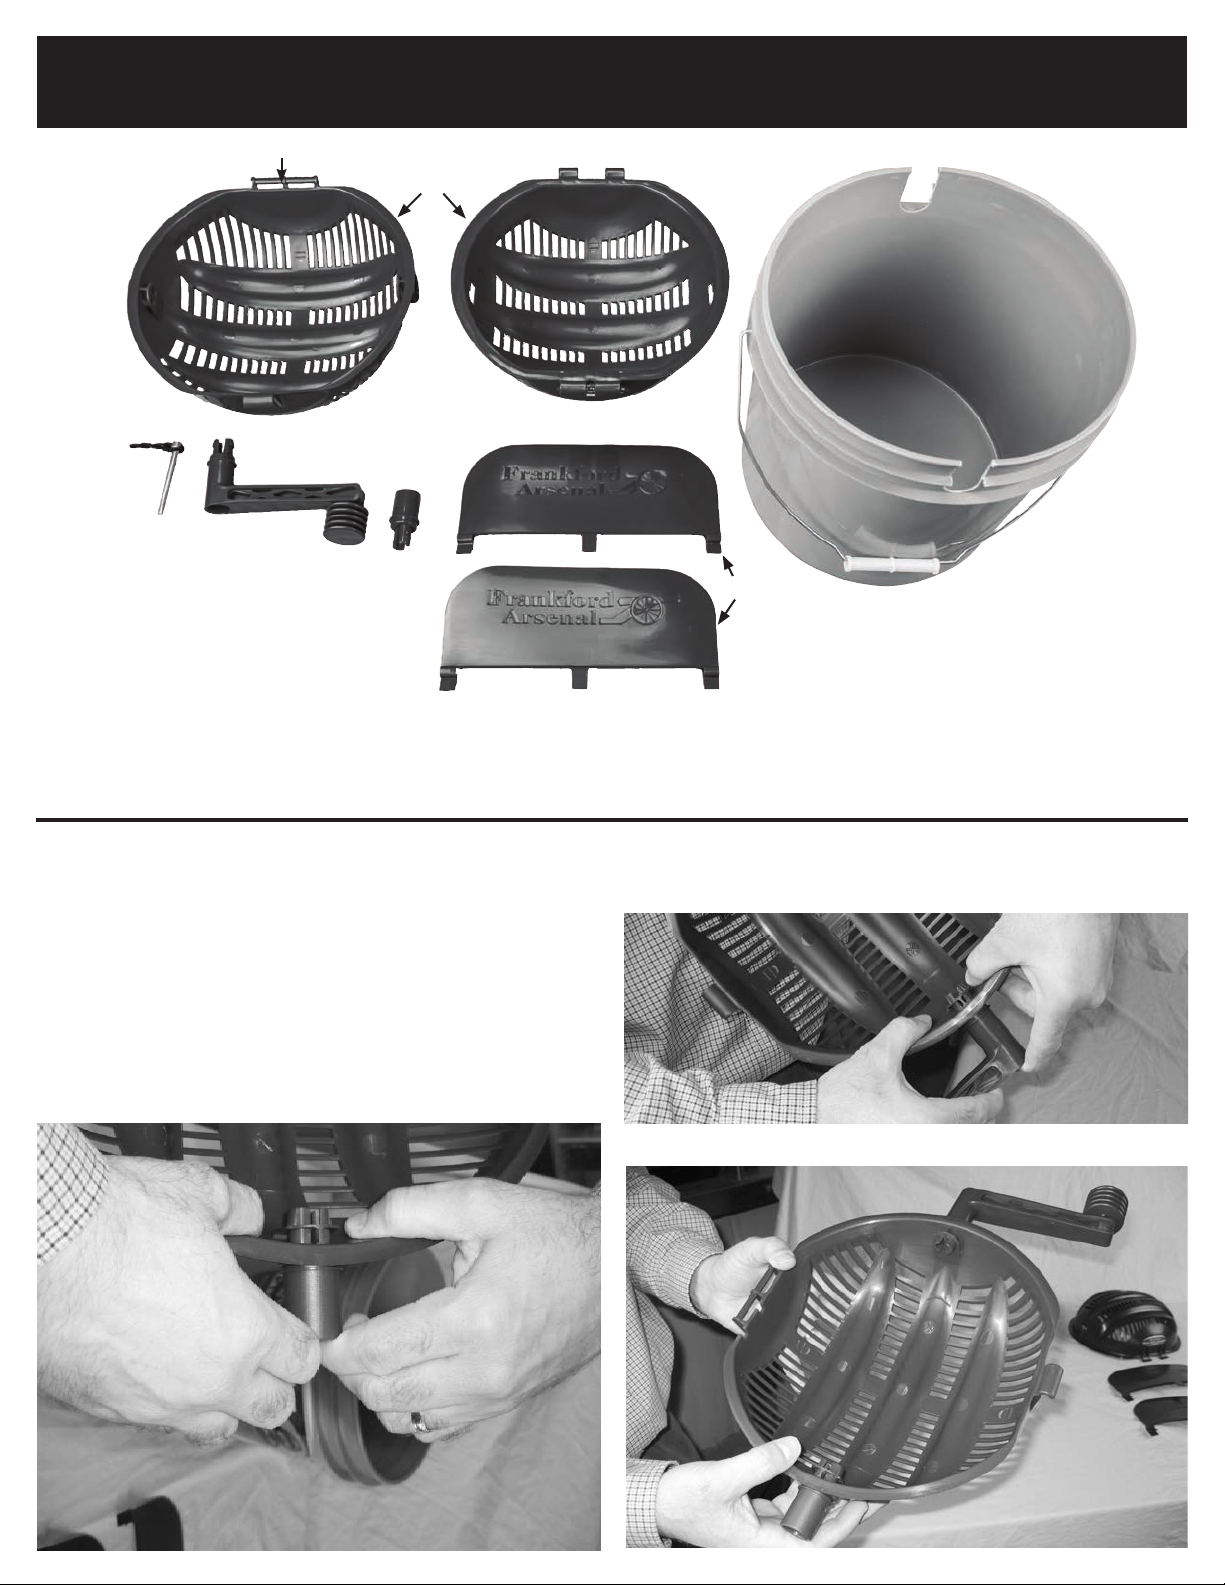
Step 1: Assembling the Bottom Sifter Half
The bottom half of the sifter is the half with the round holes for the
handle and rotational collar.
NOTE: Left-handed users should insert the handle on the
opposite side shown in this photo.
Holding the bottom of the sifter insert the rotating collar insert
and the handle as shown. The parts fit tightly; continue pushing
until collar is firmly seated.
Insert the handle into the bottom half of the sifter as shown below.
The parts are tight snap fits into the sifter half bottom. Some force
will be required. Continue pushing until the handle is fully seated.
SECTION 2
ROTARY SEPARATOR KIT ASSEMBLY & USAGE INSTRUCTIONS
A
BCD
E
F
Content:
A. Two sifter halves
#851426(Top) #861235(Bottom)
B. Pin Closure - #507614
C. Handle - #326544
D. Rotating Collar - #456963
E. Two Media Shields - #526410
F. Bucket - #1046754
1A
1B
1C
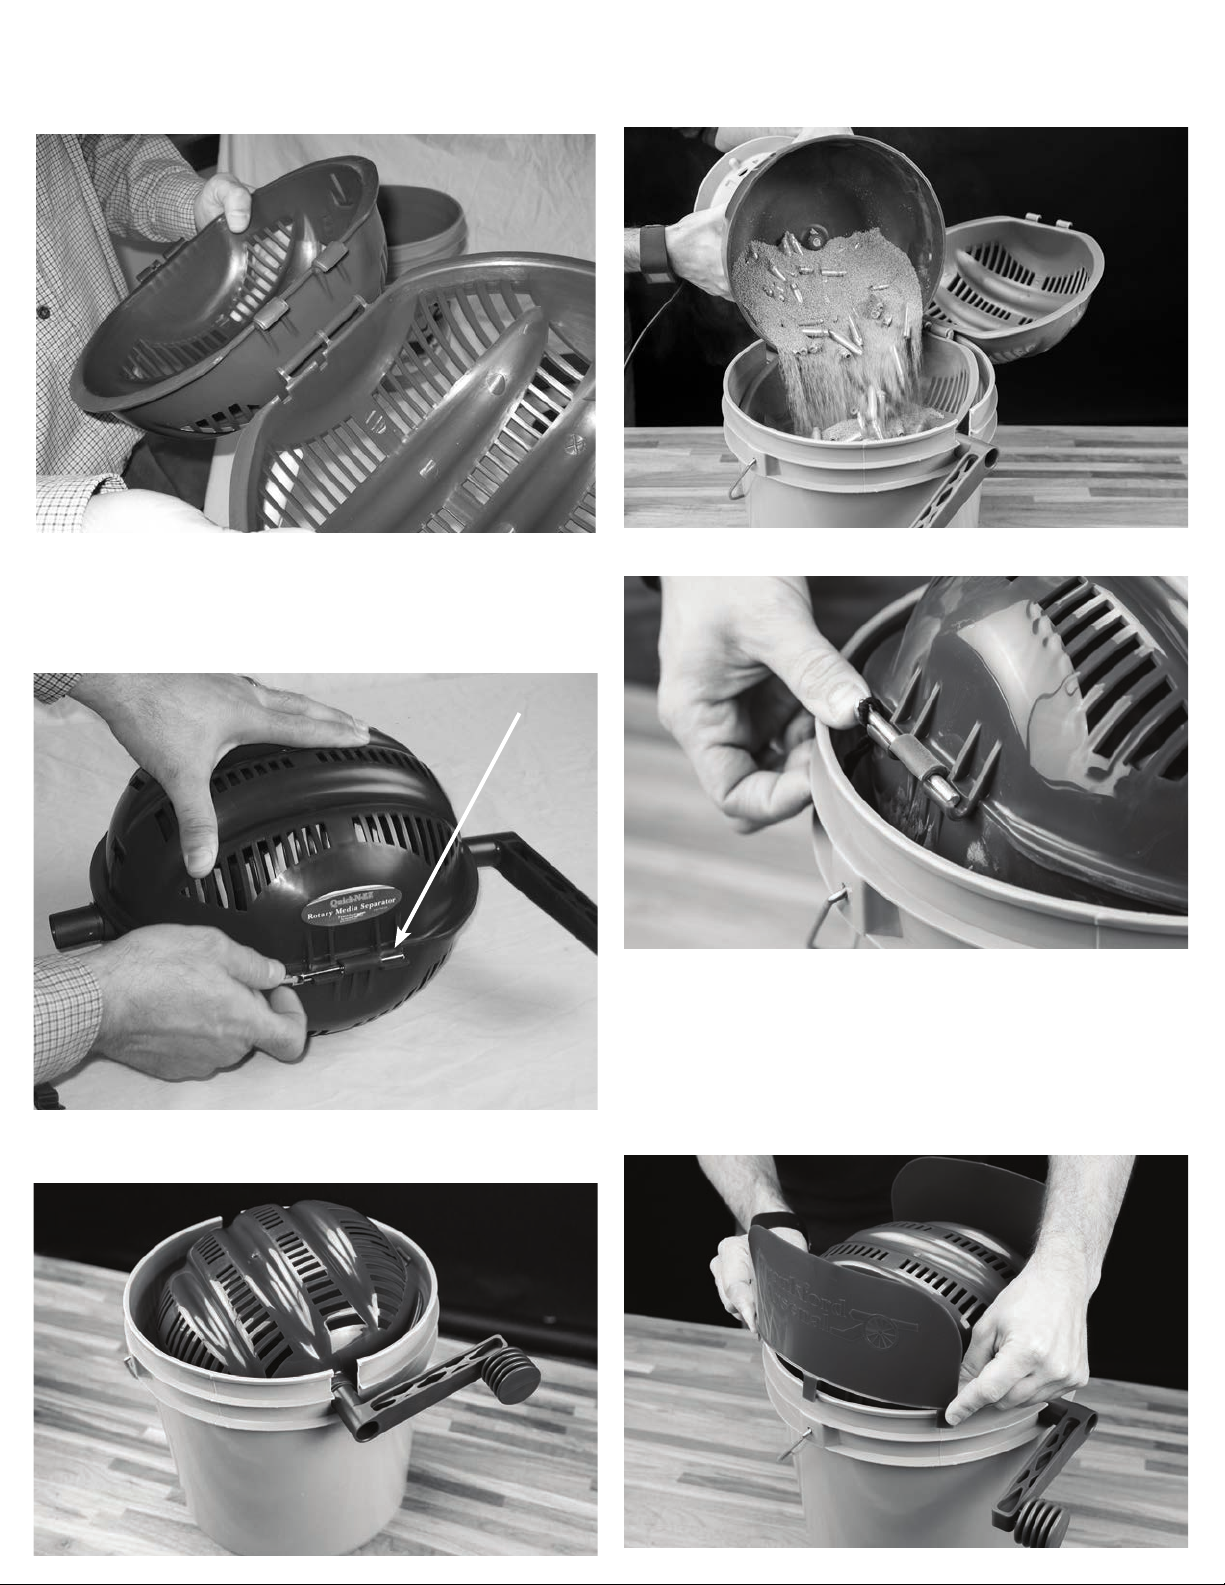
Step 2: Attaching the Top Sifter Half
Snap the top half of the sifter body to the bottom half of the sifter
body as shown here.
Step 3: Install Pin
Next insert the engagement latch pin through the attachment
points as shown. This pin guarantees that the sifter will not
open during operation.
2
Insert Pin Here
3
Step 4: Insert Sifter
insert sifter into notched bucket as shown below.
4
Step 5: Sifting Brass
Open the separator and pour you mixed media and cases into
the sifter. Pour slowly and carefully to avoid spilling media.
5A
Now close the sifter top and reinsert the pin.
Step 6: Installing Media Shields
Install the Media Shields to the bucket as sown below in both
the front and back. This will reduce the chance of media spillage.
NOTE: The Media Shields must be removed before and after
each tumbling.
5B
6

SECTION 3
ROTARY SEPARATOR (ONLY) ASSEMBLY & USAGE INSTRUCTIONS
A
B
C
D
E
Content:
A. Two sifter halves
#851426(Top) #861235(Bottom)
B. Pin Closure- #507614
C. Handle - #326544
D. Rotating Collar - #456963
E. Two Media Shields - #526410
F. Two Bucket Adapters - #941206
F
Step 4: Attach Adapters to Bucket (Bucket Not Included)
The bucket adapters are designed to fit anywhere along the top
perimeter of the bucket, however, if your bucket has handle bosses
as shown here it is a good idea to attached the clamps so that they
bridge the handle attachment boss.
4
Step 5: Start Cleaning Brass
Remove the pin from the rotary media separator.
Set the separator in the bucket collars.
Open the separator and pour your mixed media and cases into
the sifter. Pour slowly and carefully to avoid spilling media.
5A
5B
Now close the sifter top and reinsert the pin through the
retention clips and begin sifting by rotating the handle.
5C
FIRST FOLLOW STEPS 1-3 IN SETION 2
INSTALLING MEDIA SHIELDS: SEE STEP 6 IN SECTION 2

This manual suits for next models
7
Table of contents
Other Battenfeld Cleaning Equipment manuals


