Battery Solutions DDR 400 User manual
800.852.8127 | batterysolutions.com
customerservice@batterysolutions.com
DDR 400 Kit (Damaged Lithium)
Packaging & Shipping Instructions
F-18004 10/12/2021 R7DDR 400 Kit Packaging & Shipping Instructions
The party shipping or transporting batteries (the “Shipper”) to Battery Solutions, LLC. (“BSL”) must properly protect and secure the batteries. Packaging
and labeling must be in compliance with the U.S. Department of Transportation – Code of Federal Regulations (CFR).
Attention Battery Solutions, LLC. Customers - Notice to Comply:
As the shipper of record you must fully comply with all U.S. Department of Transportation regulations.
Whether damaged, defective, recalled, or used, (DDR) we accept all lithium battery types. Defective lithium batteries have
a signicant thermal risk and deteriorated mechanical integrity. The battery may be swollen, bloated with cracks, leaking,
have corrosion, burn marks, or simply subject to a recall. This kit equips you to package any affected battery for storage,
shipping, and material reclamation.
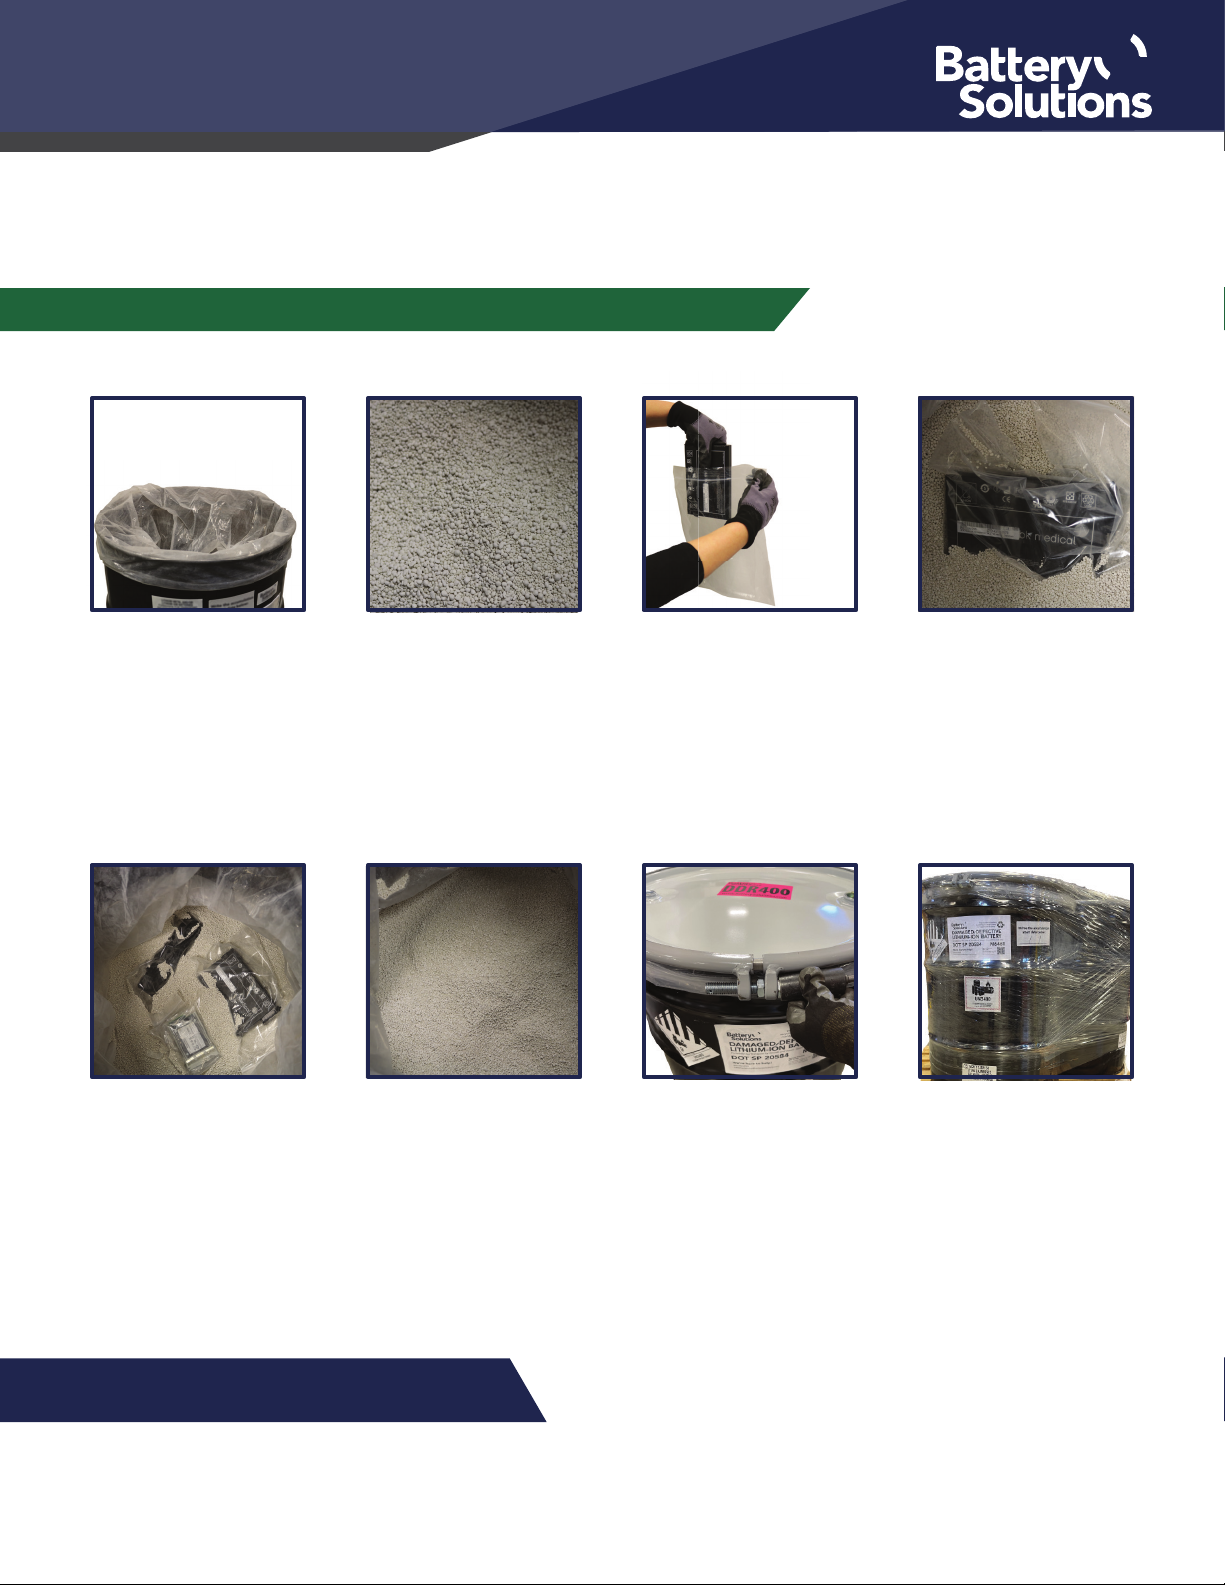
Correctly Packaging DDR Lithium Batteries or Devices
Take off locking ring to
remove lid. Remove the
CellBlock from the drum.
Leave drum liner inside the
drum.
Step 1
Open the CellBlock
and pour into the drum,
minimally 1/2” deep.
Step 2
Place each damaged
battery/device into anit-
static bags and seal.
Step 3
Put the bagged damaged
items into drum with each
item being surrounded by
CellBlock on all sides.
Step 4
Repeat step 4 for any
remaining DDR items. Add
more CellBlock to ensure
items are not touching with
a 1/2” border between
them.
Step 5
Repeat steps 4-5 until drum
is full. When all DDR items
are layered properally,
cover top with 1/2” deep of
CellBlock to ensure safety.
Step 6
Seal locking drum.
IMPORTANT: See
next page for futher
instructions.
Step 7
Band drum(s) to pallet.
Wrap drum(s) in shrink wrap
to further secure to pallet,
creating shipping overpack.
If shipping more than
one kit: Add labels to two
opposing sides of overpack.
Step 8

DDR 400 Kit (Damaged Lithium)
Packaging & Shipping Instructions
800.852.8127 | batterysolutions.com
customerservice@batterysolutions.com
F-18004 10/12/2021 R7DDR 400 Kit Packaging & Shipping Instructions
See manufacturer for closer instructions here: https://batterysolutions.com/closure-instructions-ddr-400-drum
Kit Limitations:
Total combined battery/device weight is limited to gross weight 181.4kg
(400 lbs). Only one battery or device per anti-static bag. Packages
containing damaged or defective lithium batteries are forbidden from air
transport.
Bag & Protect Batteries:
Batteries must be sealed in anti-static bags and insulated with
appropriate packaging material, in a manner to prevent short circuits
during transportation. Non-conductive tape must be use when taping
exposed terminals and wires.
Marks/Labels Required:
The following marks are required for shipments of Li-ion EV batteries:
• Shipping from address
• Ship to address
• The appropriate labels from the listed, as seen below (appropriate
labels are included in kit)
*This information is interpreted directly from the Transportation code, contained in Title 49. Please refer to that code
for more detailed info on the shipping of batteries according to the U.S.D.O.T.
Any UN numbers not included in kit
should be covered or crossed out
before shipping.
• UN3480 - Lithium-ion Batteries
• UN3481 - Lithium-ion Batteries
contained in equipment
• UN3090 - Lithium Metal Batteries
• UN3091 - Lithium Metal Batteries
contained in equipment
Step 7. Close Drum Lid
Important Notes
Included in Kit
• Overpack Box
• Metal Drum
• Metal Lid
• Locking Ring
• CellBlock
• Drum Liner
• Anti-Static Bags
• Special Permit Label
• Lithium UN Label
• Tape Strip
• Zip Tie
• Instruction Sheet
Use proper Class 9 mark with
the appropriate shipping name
The metal lid should be
placed on the drum’s
rim. To ensure proper
alignment, press the
along the lid edges.
A. Place Lid on Drum
Place the locking ring
over the rim of the drum,
with making sure it is
secured around all sides.
B. Adjust Locking Ring
Align the locking ring
with the screw connected
through both holes of
ring.
C. Align Locking Ring
Use drill to ensure that
locking ring is secured
tightly.
D. Place & Lock Ring


