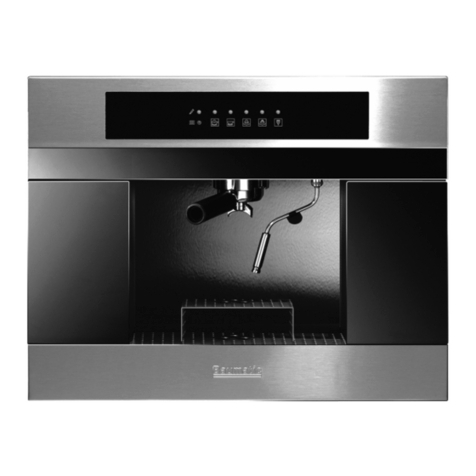
Baumatic PECM1SS User manual

Y 1
PECM1SS
Semi-automatic built in
espresso
coffee machine

User Manual for your Baumatic
PECM1SS
Semi-automatic built-in espresso coffee
machine
NOTE: This User Instruction Manual contains important
information, including safety & installation points, which will
enable you to get the most out of your appliance. Please keep it
in a safe place so that it is easily available for future reference; for
you or any person not familiar with the operation of the appliance.
DD 01/02/08
2

3
Contents
Environmentalnote 4
IMPORTANT SAFETY INFORMATION 5 – 6
Specifications 7 - 10
Product and aperture dimensions 7
Product specifications 7
Standard accessories 7
Technical specifications 8
Description of the coffee machine 8 - 10
Standard accessories 8
Controlpanel 10
Using your coffee machine 11 - 23
Filling the reservoir (manually) 11
Filling the reservoir (automatically) 12 – 13
Beforefirstuse 13
Dispensinghotwater 14
Dispensing steam 15
Dispensing boiling water 16
Refilling the water reservoir manually 17
Refilling the water reservoir automatically 17
Makingdrinks 18 - 23
Connecting a filter holder 18
Using coffee pods 18 – 19
Using ground coffee 19 – 20
Tips on making an espresso 21
Tips on making a cappuccino 21 - 22
Tips on making loose leaf tea 22 - 23
Tips on making tea using boiling water 23
Cleaning and maintenance 24 – 25
Installation 26 - 31
Electricalconnection 26
Installing the coffee machine into the kitchen cabinet 27 – 29
Connecting the coffee machine to the mains water supply 30
Troubleshooting 31
Contactdetails 32

Environmental note
4
oThe packaging materials that Baumatic uses are environmentally
friendly and can be recycled.
oPlease discard all packaging material with due regard for the
environment.

IMPORTANT SAFETY INFORMATION
Your safety is of the utmost importance to Baumatic.
Please make sure that you read this instruction booklet
before attempting to install or use the appliance. If you
are unsure of any of the information contained in this
booklet, please contact the Baumatic Technical
Department.
General Information
oThis appliance is designed for domestic household use. It can
ONLY be built into a standard kitchen cabinet or housing unit, it
should NOT be used as a freestanding appliance.
oThe use of this appliance for any other purpose or in any other
environment without the express agreement of Baumatic Ltd.
will invalidate any warranty or liability claim.
oYour new appliance is guaranteed against electrical or
mechanical defects, subject to certain exclusions that are noted
in Baumatic’s Conditions Of Guarantee. The foregoing does not
affect your statutory rights.
oRepairs may only be carried out by Baumatic Service
Engineers or their authorised service agent.
Warning and safety instructions
oThis appliance complies with all current European safety
legislation. Baumatic do wish to emphasise that this
compliance does not remove the fact that the appliance
surfaces will become extremely hot during use and retain
heat after operation.
oExtreme care MUST be taken when removing any of the
filters or nozzles. They should be allowed to cool before
they are removed from the appliance.
Child Safety
oBaumatic strongly recommend that babies and young children
are prevented from being near to the appliance and not allowed
to touch the appliance at any time.
oIf it is necessary for younger family members to be in the
kitchen, please ensure that they are kept under close supervision
at all times.
5

General Safety
oDo not leave the coffee maker unattended.
oDo not allow electrical fittings or cables to come into contact
with areas on the appliance that get hot.
oDo not install the appliance next to curtains or soft furnishings.
Cleaning
oCleaning of the coffee machine should be carried out on a
regular basis.
oGreat care should be taken whilst using this appliance and when
following the cleaning procedure.
oIMPORTANT: The appliance must be disconnected from the
mains before following the cleaning procedure.
Installation
This appliance must be correctly installed by a
suitably qualified person, strictly in accordance
with the manufacturer’s instructions.
oBaumatic Ltd. declines any responsibility for injury or
damage, to person or property, as a result of improper
use or installation of this appliance.
oThe manufacturer declares that the coffee maker is built using
certified materials and requires the appliance to be installed in
accordance with the standards currently in force. This appliance
must be used by a trained person for domestic purposes only.
6

Specifications
Product Dimensions
Height: 460 mm
Width: 596 mm
Depth: 272 mm
Aperture Dimensions
Height: 450 mm
Width: 600 mm
Depth: (min) 560 mm
Product specifications
oTouch control operation
oMark resistant coating
oChoice of 1 or 2 cup filters
oSuitable for sealed coffee pods or ground coffee
oSteam spout for cappuccino, hot chocolate, tea and instant
coffee
oPull-out drawer with a compartment for cups & saucers and a
dish for coffee waste
oSeparate boiler and single pump for coffee making &
cappuccino/steam
oCan be plumbed in or filled manually
oRemovable water tank (capacity 1.8 litres)
oEmpty water tank warning light
oLED high density illumination light
Standard accessories
oFilter holder
o1 x one espresso cup filter
o1 x two espresso cup filter
o2 x espresso cups with saucers
oWater softener
7

Technical specifications
oCoffee pump pressure 15 bar
oTotal output 1860 W
oCoffee boiler output 1000 W
oSteam boiler output 800 W
oPower supply 230 Vac 50 Hz
oSupply connection 13 A (double pole switched fused
outlet with 3 mm contact gap)
oMains supply lead 3 x 1.5mm²
For future reference please record the following information which can
be found on the Rating Plate and the date of purchase which can be
found on your sales invoice. The rating plate for your coffee machine
can be located by opening the pull out drawer at the bottom of the
coffee maker.
Model Number ……………………………….
Serial Number ……………………………….
Date of Purchase ………………………………
Description of the coffee machine
Standard accessories
1) Filter holder
2) Spout for 1 measure of coffee
3) Spout for 2 measures of coffee
4) Filter for 1 Italian coffee pod
5) Filter for 1 measure of ground coffee or 1 French coffee pod
6) Filter for 2 measures of ground coffee
7) Spout for hot water
8) Froth making spout
9) Ground coffee measuring device
10) Coffee pressing tool
11) Water softener
8

12) Drip tray
13) Drip tray grid
14) Water reservoir door
15) Water reservoir
16) Drawer
17) Hot water and steam
pipe
18) Espresso cup stand
19) Filter holder ring nut
20) ON/OFF switch
21) Operating light
9

Control panel
22) ON/OFF neon
23) Water boiler neon
24) Hot water dispensing neon
25) Steam boiler neon
26) Steam dispensing neon
27) Hot water dispensing neon
28) Water reservoir empty neon
29) Water boiler ON/OFF button
30) Hot water dispensing button
31) Steam boiler ON/OFF button
32) Steam dispensing button
33) Boiling water dispensing button
10

Using your coffee machine
Filling the reservoir (manually)
IMPORTANT: If your coffee machine is not connected to
your mains water supply, then you will need to fill the water
reservoir manually before using your appliance.
oOpen the water reservoir door (14) and remove the water
reservoir (15) from the coffee maker.
oFill the water reservoir with cold water from a tap; you should fill
it with water until it is two thirds full.
oConnect the water softener (11) to the longest tube that hangs
down inside the water reservoir compartment.
oPut the water reservoir back into the cabinet and immerse the
water softener in water, the other tubes must also be placed
inside the reservoir. Make sure that the water reservoir is
pushed back fully into the water reservoir cabinet.
oIMPORTANT: Leave the water filter immersed in water for 5
minutes, before switching on the appliance and attempting to
make a drink. You only need to do this before using the machine
for the first time or if you have changed the water filter.
11

Filling the reservoir (automatically)
IMPORTANT: Make sure that your appliance has been
connected to your mains water supply (see “Connecting the
coffee machine to the mains water supply” section on pages
30 - 31 of this booklet).
oOpen the water reservoir door (14) and remove the water
reservoir (15) from the coffee maker.
oConnect the water softener (11) to the longest tube that hangs
down inside the water reservoir compartment.
oPut the water reservoir back into the cabinet and immerse the
water softener in water, the other tubes must also be placed
inside the reservoir. Make sure that the water reservoir is
pushed back fully into the water reservoir cabinet.
oIMPORTANT: Leave the water softener immersed in water for 5
minutes before attempting to make a drink. You only need to do
this the before using the machine for the first time or if you have
changed the water filter.
oSwitch the appliance on using the ON/OFF switch (20); the
ON/OFF neon (22) will light.
oThe appliance will check to see if the water reservoir has enough
water in it. If there is not enough water, the water reservoir
empty neon (28) will flash.
12

oAfter a few seconds the water reservoir will start to fill with
water.
oThe reservoir will fill for approximately 40 seconds, during this
time the water reservoir empty neon (28) will continue to flash.
oAfter this time period, if the water reservoir is not sufficiently full
of water, the water reservoir empty neon (28) will remain on.
You should switch the machine off using the ON/OFF switch
(20). Then switch the machine back on to commence a further
fill of the water reservoir.
oWhen the water reservoir has filled sufficiently, the water
reservoir empty neon (28) will go out.
oYou should not touch any other button on the coffee machine
until the water reservoir has finished filling.
Before first use
IMPORTANT: YOU MUST FOLLOW THE STEPS BELOW
BEFORE HEATING THE WATER BOILER FOR THE
FIRST TIME.
oInstall the appliance as per the installation instructions contained
within this booklet.
oPlace a jug below the steam pipe (17).
oSwitch on the appliance using the ON/OFF switch (20).
oPush the boiling water dispensing button (33).
oWait until a continual stream of water is flowing from the steam
pipe (17).
oPress the boiling water dispensing button (33) again to stop the
flow of water from the steam pipe.
13

Dispensing hot water
oFill the water reservoir if your appliance is not connected to your
mains water supply.
oSwitch the machine on using the ON/OFF switch (20).
oLet the water reservoir fill with water automatically if it is
connected to your mains water supply.
oOnce the machine has stopped filling and the water reservoir
empty neon (28) has gone out, press the water boiler ON/OFF
button (29). The water boiler neon (23) will flash to indicate
that the water boiler is heating up.
oThe machine is ready to dispense hot water when the water
boiler neon (23) stops flashing and remains lit.
oPlace a cup underneath the filter holder ring nut (19) and then
press the hot water dispensing button (30).
oTo stop hot water from dispensing, press the hot water
dispensing button (30) again.
It is perfectly normal for there to be a noise and a small
amount of water backfilling into the drip tray, after water
has been dispensed.
14

Dispensing steam
oConnect the froth making spout (8) to the steam pipe (17) and
place the end of it into a cup. The froth making spout comes in
two parts, the spout itself and a plastic cover; both parts should
be connected to the steam pipe.
oFill the water reservoir if your appliance is not connected to your
mains water supply.
oSwitch the machine on using the ON/OFF switch (20).
oLet the water reservoir fill with water automatically if it is
connected to your mains water supply.
oOnce the machine has stopped filling and the water reservoir
empty neon (28) has gone out, press the water boiler ON/OFF
button (29). The water boiler neon (23) will flash to indicate
that the water boiler is heating up.
oThe machine is ready to use when the water boiler neon (23)
stops flashing and remains lit.
oPress the steam boiler ON/OFF button (31).
oThe steam boiler neon (25) will start to flash to indicate that the
steam boiler is heating up.
oWhilst the steam boiler is heating up, you may get a small
amount of water dripping from the steam pipe (17).
oThe machine is ready to dispense steam when the steam boiler
neon (25) and the water boiler neon (25) both remain lit.
oTo dispense steam, press the steam dispensing button (32).
oTo stop steam from dispensing, press the steam dispensing
button (32) again.
It is perfectly normal for there to be a noise and a small
amount of water backfilling into the drip tray, after steam
has been dispensed.
15

Dispensing boiling water
oConnect the spout for hot water (7) to the steam pipe (17) and
place the end of it into a cup.
oFill the water reservoir if your appliance is not connected to your
mains water supply.
oSwitch the machine on using the ON/OFF switch (20).
oLet the water reservoir fill with water automatically if it is
connected to your mains water supply.
oOnce the machine has stopped filling and the water reservoir
empty neon (28) has gone out, press the water boiler ON/OFF
button (29). The water boiler neon (23) will flash to indicate
that the water boiler is heating up.
oThe machine is ready to use when the water boiler neon (23)
stops flashing and remains lit.
oPress the steam boiler ON/OFF button (31).
oThe steam boiler neon (25) will start to flash to indicate that the
steam boiler is heating up.
oWhilst the steam boiler is heating up, you may get a small
amount of water dripping from the steam pipe (17).
oThe machine is ready to dispense boiling water when the steam
boiler neon (25) and the water boiler neon (25) both remain lit.
oTo dispense boiling water, press the hot water dispensing button
(33).
oTo stop boiling water from dispensing, press the hot water
dispensing button (33) again.
It is perfectly normal for there to be a noise and a small
amount of water backfilling into the drip tray, after water
has been dispensed.
16

17
Refilling the water reservoir manually
IMPORTANT: You do not need to follow this process if your appliance
is connected to your mains water supply.
oIf whilst making drinks, the water reservoir runs low on water,
the water reservoir empty neon (28) will flash. The coffee
machine will stop any drinks making operation it is currently
undertaking.
oYou should turn the appliance off using the ON/OFF switch (20).
oThen follow the process described on page 11 “Filling the
reservoir (manually)”.
oSwitch the machine back on using the ON/OFF switch (20).
oYou must then follow the drink making process that you were
following when the machine ran out of water from the beginning;
i.e. you will need to heat the water boiler and steam boiler (if
required).
Refilling the water reservoir automatically
oIf whilst making drinks, the water reservoir runs low on water,
the water reservoir empty neon (28) will flash. The coffee
machine will stop making any drinks that are in progress.
oAfter a few seconds the water reservoir will start to fill with
water.
oWhen the water reservoir has filled sufficiently, the water
reservoir empty neon (28) will go out.
oYou should not touch any other button on the coffee machine
until the water reservoir has finished filling.
oYou must then follow the drink making process that you were
following when the machine ran out of water from the beginning;
i.e. you will need to heat the water boiler and steam boiler (if
required).

Making drinks
Connecting a filter holder
oLift the filter holder (1) towards the filter holder ring nut (19);
making sure that it is in the position shown in the drawing
above.
oContinue lifting the holder until it locates inside of the ring nut.
oTurn the handle of the holder to the right, turning it fully so that
the holder is securely fixed into the ring nut.
oWhen you have finished using the holder, turn the handle to the
left and then remove it from the filter holder ring nut (19).
Using coffee pods
oCoffee pods are an easy, practical and hygienic way to make
coffee. The packaging used in coffee pods, means that excess
coffee cannot spill out and they can be easily removed after use.
oIMPORTANT: If you are using Italian coffee pods, then the
filter for 1 Italian coffee pod (4) must be used. If you are
using French coffee pods, then the filter for 1 French
coffee pod (5) must be used.
oEnsure that the coffee pods are used prior to the sell by
date as this will affect the performance of the coffee
machine.
oScrew the spout for 1 measure of coffee (2) onto the filter
holder (1).
oInsert the appropriate coffee pod filter (4) or (5) into the filter
holder (1).
oPlace one coffee pod into the filter holder (1) and place it into
the filter holder ring nut (19).
oPlace a suitably sized cup under the filter holder ring nut (19).
18

19
oSwitch the appliance on using the ON/OFF switch (20), the
ON/OFF neon (22) will light.
oFollow either the manual or automatic reservoir filling process.
oOnce the machine has stopped filling and the water reservoir
empty neon (28) has gone out, press the water boiler ON/OFF
button (29). The water boiler neon (23) will flash to indicate
that the water boiler is heating up.
oThe machine is ready to dispense hot water when the water
boiler neon (23) stops flashing and remains lit.
oTo start coffee dispensing, press the hot water dispensing button
(30).
oTo stop coffee from dispensing, press the hot water dispensing
button (30) again.
oSwitch the appliance off using the ON/OFF switch (20).
oRelease the filter holder (1) from the filter holder ring nut (19).
oWhen the pod has cooled sufficiently, remove it from the filter
holder (1).
oWipe over the filter holder (1), the spout for 1 measure of coffee
(2) and the coffee pod filter that you have used (either (4) or
(5)) with a damp cloth to keep them in pristine condition.
Using ground coffee
oScrew the spout for 1 measure of coffee (2) onto the filter
holder (1).
oInsert the filter for one measure of ground coffee (5) into the
filter holder (1).
oUsing the ground coffee measuring device (9) put one scoop of
ground coffee into the filter holder (1)
oUse the pressing tool (10) to pack down the ground coffee in
the filter holder and then connect it to the filter holder ring nut
(19).
oPlace a suitably sized cup under the filter holder ring nut (1).
oSwitch the appliance on using the ON/OFF switch (20), the
ON/OFF neon (22) will light.

20
oFollow either the manual or automatic reservoir filling process.
oOnce the machine has stopped filling and the water reservoir
empty neon (28) has gone out, press the water boiler ON/OFF
button (29). The water boiler neon (23) will flash to indicate
that the water boiler is heating up.
oThe machine is ready to dispense hot water when the water
boiler neon (23) stops flashing and remains lit.
oTo start coffee dispensing, press the hot water dispensing button
(30).
oTo stop coffee from dispensing, press the hot water dispensing
button (30) again.
oSwitch the appliance off using the ON/OFF switch (20).
oRelease the filter holder (1) from the filter holder ring nut (19).
oWhen sufficiently cooled, wipe over the filter holder (1), the
spout for 1 measure of coffee (2) and the filter for one measure
of ground coffee (5) with a damp cloth to keep them in pristine
condition.
oIf you want to make two cups of ground coffee simultaneously,
then you should use the spout for 2 measures of coffee (3) and
the filter for 2 measures of ground coffee (6). You should also
use the ground coffee measuring device (9) to put two scoops of
ground coffee into the filter holder (1).
Other manuals for PECM1SS
1
Table of contents
Other Baumatic Coffee Maker manuals
Popular Coffee Maker manuals by other brands

Espressione
Espressione Dolche Aroma QUICK USER INSTRUCTIONS AND TROUBLESHOOTING GUIDE

Beem
Beem Fresh Aroma Switch MD-286BT operating instructions

SEVERIN
SEVERIN KA 9231 Dimensions

DeLonghi
DeLonghi Nesspresso Lattissima instructions

Curtis
Curtis TLXG0201S000 Service manual

Bestron
Bestron Breakfast Club ACM900TS instruction manual